1. Connecting GV-Compact DVR V2 (Anti-Vibration Model of
ACC Version)
Article ID: GV17-10-11-10
Release Date: 11/10/2010
This document provides a general instruction on how to install GV-Compact DVR V2
Anti-Vibration model of ACC version on a vehicle and at places other than a vehicle.
Applied to
GV-Compact DVR V2 - Anti-Vibration Model of ACC Version(GV-LX4C2V)
Connecting the ACC Model to a Vehicle
The instructions are based on installation on a Toyota Zace Surf. Since each vehicle differs
in design, refer to the owner’s manual of your vehicle for details and carefully follow the safety
measures. If you are unsure about how to carry out the instructions, have the installation done
by a properly trained technician.
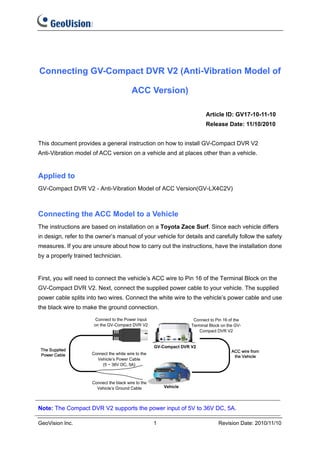
First, you will need to connect the vehicle’s ACC wire to Pin 16 of the Terminal Block on the
GV-Compact DVR V2. Next, connect the supplied power cable to your vehicle. The supplied
power cable splits into two wires. Connect the white wire to the vehicle’s power cable and use
the black wire to make the ground connection.
Note: The Compact DVR V2 supports the power input of 5V to 36V DC, 5A.
GeoVision Inc. 1 Revision Date: 2010/11/10
2. Important: Switch the ignition off before proceeding.
A. Connecting the ACC Wire
1. Locate the fuse box. The fuse box is usually located below the dashboard and to the left of
the steering wheel. You may need to refer to the owner’s manual of your vehicle.
2. Open the cover of the fuse box.
3. Find the fuse specification diagram in the owner’s manual, which tells you what each fuse
controls. Look for the fuse location of the “cigarette lighter.” The fuse diagram is
sometimes located on the back of the fuse box cover.
GeoVision Inc. 2 Revision Date: 2010/11/10
3. 4. Locate the ACC wire connected to the cigarette lighter fuse and connect it to Pin 16 of the
Terminal Block on the GV-Compact DVR V2.
B. Connecting the Power Wire
1. Using the fuse specification diagram, locate the power cable connecting to the fuse box
and connect the white power wire of the GV-Compact DVR V2 to the positive voltage of
the power cable. You may need to use a voltmeter to determine which one is the positive
voltage.
2. Remove the car door scuff plate and wire the power cable along the driver’s door toward
the back seat.
GeoVision Inc. 3 Revision Date: 2010/11/10
4. 3. Use one of the two methods below to connect the black ground wire of the GV-Compact
DVR V2.
• Method 1: Connect the black ground wire to the negative voltage of the power cable
from the fuse box.
• Method 2: Connect the black ground wire to the vehicle’s chassis so that the wire
contacts the bare metal, for example, a metal bolt nearby. The Toyota Zace Surf uses
this method.
Depending on the make and model of your vehicle, sometimes only one method will work.
When the black ground wire is connected correctly, GV-Compact DVR V2 will
automatically shut down 30 seconds after the car’s power is off. If GV-Compact DVR V2
does not shut down 30 seconds after the car ignition is off, try to connect the black ground
wire using the other method.
4. Turn on the car ignition and the GV-Compact DVR V2 should start automatically within 5
seconds. Turn off the car ignition and the GV-Compact DVR V2 should shut down 30
seconds after the car ignition is off.
GeoVision Inc. 4 Revision Date: 2010/11/10
5. Connecting the ACC Model at Other Places
To power on the Anti-Vibration model of ACC version at other places instead of in a vehicle,
you need an additional power adaptor to power on the unit and use the supplied Shorting
Cable to simulate the ACC wiring between the unit and the vehicle. Follow the steps below.
Items required:
• Supplied Shorting Cable
• Power Adaptor of DC 12V, 5.0A (which can be purchased from GeoVision)
1. Connect one end of the Shorting Cable to Pin 14 of the terminal block and the other end to
Pin 16 of the terminal block on the GV-Compact DVR V2.
2. Using a power adaptor of DC 12V, connect the GV-Compact DVR V2 to the power. The
unit automatically starts after powering up for 5 seconds.
3. You can now set up the settings of the GV-Compact DVR V2, such as storage, images,
recording and etc through its OSD or Web interface.
4. To turn off the unit, remove the power adaptor.
GeoVision Inc. 5 Revision Date: 2010/11/10