2. Make it Real Make it Relevant Make an Impact
Find a real problem. Figure our why it matter to
you and your community
Do something about it!
Brainstorm Define
Field Studies
Plan Create
Advocate
Design Thinking
4. Design Thinking
***Teacher Notes
uVery powerful process
uOnce learned can be completed in a half day
uFirst few times through you’ll want to ensure some
skills are in place with your students
uEmpathizing
uNote Taking
uInterview skills, probing questions
uPeer Critiquing
uIdeating
5. Design Thinking
***Teacher Notes
uToday we’ll move quickly through a design challenge.
uWe have added some teacher notes to the slide show — some things to
consider during or before taking your student through a challenge.
uNote Design Thinking frameworks all have in common core, but not all have
to follow this framework. We are following one developed by Susan Crichton.
uFeel free to take this framework and make it your own.
6. Design Thinking
***Teacher Notes
uGroups of 4 are best. As you run through a few challenges you may want to
adjust this.
uStart with partners for steps 1 to 5
uCould do A/B partners or do A/B and C/D then switch to A/C & B/D
7. 1. Interview Notes
***Teacher Notes
u Before doing the Empathy stage you want to do some learning about the
topic.
uIe: Refugee challenge … learn about what a refugee is, what make them a refugee,
what are the challenges they will encounter when trying to leave their country.
u Design thinking could be a good culmination to a unit.
u Note that this process with beginners could take days or even weeks.
8. 1. Interview Notes
(Empathy) – 2 x 4 mins
u 1 person Speak to the problem for 4 minutes
u You listen and take notes in box 1
u Speaker talks to:
uWhat is your problem?
uHow do you know?
uWho is impacted / target group?
uWho do you have to consider?
uWhy should you solve the problem?
10. 2. Detailed Interviews
(Empathy) 2x3 mins
u Opportunity to delve deeper and question
u Ask probing questions to gain more information from first set of notes.
uTell me more about…
uTell a story …
uTell me about a time when …
11. 3. Defining the Issue
***Teacher notes
u Box #3 - Define
u Time to define the issue in the students’ words
u Completed silently
u Younger grades may need to either sketch a picture of the issue or
buddy with an older class?
12. 3. Defining the Issue
(3 mins)
u Box #3 - Define - 3 mins on your own
u Take note and define the issue.
u What are your Goals and Wishes
u Insights
uObjectives of your bigger goal(s).
uIe. I want a covered area big enough for 20 people to
gather with space for cooking should someone bring a bbq
13. 4. Ideate – 5 ideas
– Teacher notes
u Remind students … no limits.
u Could take 10 mins or stretch this out over days or weeks
u Students need to work through this part quietly
u One idea should be a crazy and wild idea
uNo time constraints, money and resources are unlimited.
uHelp them get their creative juices flowing
14. 4. Concevoir des idées
(10 Mins)
u REMEMBER … As you are ideating, no limits.
u 10 mins timed on your own quietly
u Sketch out 5 ideas
u One idea needs to be a crazy and wild idea
15. 5. Feedback
***Teacher Notes
u This is the peer critique part
u “I like, I like, I wonder”
u Could do a lesson on peer critiques first
uAustin’s Butterfly
u You’ll also find that during this process (hearing about your partner’s ideas)
you will further develop your own ideas
u Encourage borrowing of ideas and refining your ideas with elements of your
partners
17. 5. Feedback
(2x5 Mins)
u I like, I like, I wonder
uIdentify some things you like about your partners ideas
uAsk any clarifying questions
uOpportunity to make suggestions (make the wings less pointy – Austin’s Butterfly)
u Peer critique
u Take notes as your partner gives you feedback
18. 6. Redesign
***Teacher Notes
u Students will need to narrow their idea down to one idea.
u Add, remove, change anything you like to create one idea they will soon be
sharing with their group.
19. 6. Redesign
(5 Mins)
u 5 mins on your own quietly, redesign an idea in box 6.
u Incorporate some of the feedback you got from your partner.
u Next stage will be sharing with your group.
20. 7. Group Idea
***Teacher Notes
u In groups of 4, each member of the group takes turns sharing their
idea
u Consider the first time you go through the process skipping this stage
and letting the students build a prototype of their idea
u 2nd Design Challenge maybe 2 people negotiate one idea
u Eventually get to a place where the group of 4 students come up
with one idea
u Everyone needs to fill in Box 7. That’s your ticket to lunch!
u Pushes the students to buy into the group.
21. 7. Group Idea
(set time limit to match needs of group)
u In groups of 4, each member of the group takes turns sharing their idea
u Or in partners negotiate one idea
u Or after sharing build your own idea
u Eventually get to a place where students come up with one idea
u Lots of negotiating
22. Prototyping
***Teacher Notes
u This is the creation part
u Can stop after ideating though
u Doesn’t have to have a time limit. May choose to do this over multiple
classes
u Can be done individually, in partners or in groups
u Can have parameters on what and how much participants are to use.
u Usually a scaled version and/or metaphoric
u Could start as a scaled version and then full scale
23. Prototyping
(30 mins)
u With your group build a prototype of your idea
u Must use items in the bag
u Will be presenting your idea to your peers at the end of the day
24. Sharing with Class
***Teacher Notes
u Lots of flexibility on how the sharing is done.
uGallery tour
uPresent as group
uHave poster board with prototype on display for class and/or school
uEtc.
25. u Each group present their prototype
u Be prepared to speak to the process / evolution of your idea
u Any comments about the design thinking process
u 5 minutes to prepare. 25 for presentations
Sharing with Class
(30 mins)
26. Fabricating
***Teacher Notes
u This is taking your prototype straight to a full size version
u May take multiple days or weeks depending on the complexity
u Can skip the scaled prototyping and skip straight to full scale prototype
27. Test and Refine
***Teacher Notes
u This is where you take your fabricated project and test it
u Make adjustments / Refine
u Re-test
u Like the gravity cars
28. 8. Reflection
***Teacher Notes
u Reflect on the process, team work, collaborating, etc.
u Think pair share
u Report out
u Poster board
29. Conclusion
(Last 8 mins)
u Design Thinking can be applied to any problem.
u This is one variation
u Feel free to adapt it to meet the needs of your class
u Does not require a space. Design thinking can occur anywhere
u Try to hold onto key components
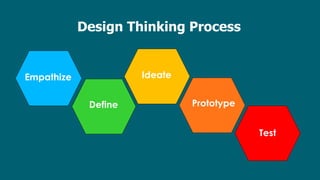
30. Empathize
Define
Ideate
Prototype
Test
Develop a deep
understanding of
the challenge
Clearly articulate
the problem you
want to solve
Brainstorm potential
Solutions; select and
develop your solution
Design a prototype
(or series of prototypes)
to test all or part of
your solution
Engage in a
continuous short-cycle
innovation process to
continually improve
your design
Key Components of Design Thinking