SlideShare a Scribd company logo
1 of 14
Download to read offline
MCW025-030-040E (C819), MSW030-040E (C820), MRW020-030-E (C821)
SERVICE MANUAL CONTENTS
SECTION
PART
NUMBER
YRM
NUMBER
REV
DATE
FRAME............................................................................................................................ 524167547 0100 YRM 1024 04/03
DC MOTOR MAINTENANCE.......................................................................................... 524158039 0620 YRM 0294 03/08
MASTER DRIVE UNIT * (WITH EPAS).......................................................................... 524164715 0630 YRM 0961 10/13
STEERING MECHANISM............................................................................................... 524164716 1600 YRM 0962 01/07
BRAKE SYSTEM............................................................................................................ 524164717 1800 YRM 0963 11/06
WALKIE HIGH LIFT HYDRAULIC SYSTEM.................................................................. 524167548 2000 YRM 1025 05/03
TILT CYLINDERS........................................................................................................... 524153636 2100 YRM 0999 04/03
ELECTRICAL SYSTEM.................................................................................................. 524167549 2200 YRM 1026 02/10
ZAPI CONTROLLERS.................................................................................................... 524185045 2200 YRM 1064 05/14
INDUSTRIAL BATTERY................................................................................................. 524158040 2240 YRM 0001 09/14
MAST-DESCRIPTION..................................................................................................... 524164470 4000 YRM 0480 04/08
LIFT CYLINDERS........................................................................................................... 524164473 4000 YRM 0481 07/13
MAST-REPAIR................................................................................................................ 524164471 4000 YRM 0482 04/08
REACH CARRIAGES..................................................................................................... 524164474 4500 YRM 0971 10/07
METRIC AND INCH (SAE) FASTENERS....................................................................... 524150797 8000 YRM 0231 10/13
PERIODIC MAINTENANCE............................................................................................ 524167551 8000 YRM 1027 07/14
CAPACITIES AND SPECIFICATIONS........................................................................... 524167552 8000 YRM 1028 10/06
DIAGRAMS..................................................................................................................... 524167553 8000 YRM 1029 04/03
Service information for Cummins diesel engines can be ordered through the Hyster Literature Distribution Center.
PART NO. 524167349 (09/14)
100 YRM 1024 General
General
This manual describes the frame for the MSW030/
040-E, MRW020/030-E, and MCW025/030/040-E lift
trucks. These models have a main frame weldment
and a mast weldment. The main frame weldment
for the MCW025/030/040-E differs considerably from
the main frame weldments of the MSW030/040-E
and MRW020/030-E. The MSW030/040-E and
MRW020/030-E have base arm weldments that extend
under the load. The MCW025/030/040-E have an
extended main frame weldment to counterbalance the
load and larger load wheels mounted by trunnion cap
assemblies near the front of the unit. See Figure 1 or
Figure 2.
FEATURES (MSW030/040-E AND
MRW020/030-E)
The MSW030/040-E and MRW020/030-E main frames
have mounts for:
The Mast Weldment
The Electrical System Parts
The Hydraulic Pump and Motor Assembly
The Master Drive Unit
The Load Wheels
Based on model and capacities, MSW030/040-E and
MRW020/030-E frames are available in combinations
of the following:
1. Lifting Capacity
a. 907.2 kg (2000 lb)
b. 1360.8 kg (3000 lb)
c. 1814.4 kg (4000 lb)
2. Battery Compartment Size
a. 229 mm (9.0 in.)
b. 343 mm (13.5 in.)
3. Load Wheels
a. Single
b. Tandem
4. Basearm Width
a. 940 mm (37 in.)
b. 1092 mm (43 in.)
c. 1143 mm (45 in.)
d. 1245 mm (49 in.)
e. 1295 mm (51 in.)
f. 1448 mm (57 in.)
5. Load Center
a. 406 mm (16 in.)
b. 457 mm (18 in.)
c. 533 mm (21 in.)
d. 610 mm (24 in.)
FEATURES (MCW025/030/040-E)
The MCW025/030/040-E main frame has mounts for:
The Mast Weldment
The Electrical System Parts
The Hydraulic Pump and Motor Assembly
The Master Drive Unit
The Load Wheels
The Tilt Cylinders
The MCW025/030/040-E frames share a common 13.5
inch battery compartment and load wheel configuration
and are available in combinations of the following:
1. Lifting Capacity
1134 kg (2500 lb)
1360.8 kg (3000 lb)
1814.4 kg (4000 lb)
2. Wheel Base
a. 1245 mm (49 in.)
b. 1372 mm (54 in.)
c. 1549 mm (61 in.)
3. Load Center
a. 406 mm (16 in.)
b. 457 mm (18 in.)
c. 533 mm (21 in.)
d. 610 mm (24 in.)
1
General 100 YRM 1024
1. TRUNNION CAP
2. BATTERY COMPARTMENT
3. BATTERY CONNECTOR LOCATION
4. DISPLAY AND KEY SWITCH BRACKET
5. MASTER DRIVE UNIT MOUNTING BRACKET
6. BASE ARM WELDMENT
7. SINGLE LOAD WHEEL CONFIGURATION
8. TANDEM LOAD WHEEL CONFIGURATION
(OPTIONAL)
Figure 1. Frame Weldment (MSW030/040-E and MRW020/030-E)
2
100 YRM 1024 General
1. TRUNNION CAP
2. BATTERY COMPARTMENT
3. BATTERY CONNECTOR LOCATION
4. DISPLAY AND KEY SWITCH BRACKET
5. MASTER DRIVE UNIT MOUNTING BRACKET
Figure 2. Frame Weldment (MCW025/030/040-E)
3
Label Replacement 100 YRM 1024
Frame Repair
WARNING
Forklift truck frames and components may have
polyurethane paint. Welding, burning, or other heat
sufficient to cause thermal decomposition of the
paint may release isocyanates. These chemicals
are allergic sensitizers to the skin and respiratory
tract and overexposure may occur without odor
warning. Always utilize good industrial hygiene
practices including removal of all paint (prime and
finish coats) to the metal around the area to be
welded, local ventilation, and/or supplied-air respi-
ratory protection when repairing the frame.
WARNING
Do not make any repairs or adjustments unless you
have proper authorization and training. Repairs and
adjustments that are not correct can cause a dan-
gerous operating condition. Do not operate a lift
truck that needs repairs. Report the need for re-
pairs to your supervisor immediately. If repair is
necessary, put a DO NOT OPERATE tag on the con-
trol handle. Remove the key from the key switch.
Most lift truck repairs are performed on the individual
components that are bolted to the frame and not to the
frame itself.
Painting Instructions
WARNING
Always use solvents and paints in an area with ven-
tilation. Do not use solvents or paints near heat or
fire.
WARNING
Cleaning solvents can be flammable and toxic and
can cause skin irritation. Wear protection for eyes
and skin. Always follow the recommendations of
the manufacturer when using cleaning solvents.
1. Remove all dirt from the surface to be painted.
Clean the area to be painted using a solvent for
painted surfaces. Remove all oil and grease.
2. Remove the top surface of paint and all rust from
the metal using sandpaper. Paint all metal sur-
faces where the paint is completely removed using
primer. Apply the primer before applying the color
paint.
3. Protect all surfaces that will not be painted. Do
not paint cylinder rods, cables, labels, plates, or
controls.
4. Paint the surfaces using Yale paint. Follow the di-
rections on the container. Paint all surfaces the
original color.
Label Replacement
WARNING
Replace damaged Warning or Caution labels imme-
diately.
If labels or information plates are missing or damaged,
they must be replaced.
NOTE: The nameplate cover is installed using rivets.
Remove old rivets before installing a new name-
plate. See your Yale lift truck dealer to make sure the
nameplate information is correct and complete before
installing a new nameplate. Fasten the nameplate
cover with the rivet heads outside.
1. Make sure the surface is dry and has no oil or
grease. Do not use solvent on new paint. Clean
the surface of old paint using a cleaning solvent.
2. Remove the paper from the back of the label. Do
not touch the adhesive surface.
3. Carefully hold the label in the correct position above
the surface. The label cannot be moved after it
touches the surface. Put the label in the correct po-
sition on the surface. Make sure all air is removed
from under the label and the corners and edges are
tight. See Figure 3 and Figure 4.
4
100 YRM 1024 Label Replacement
1. LABEL - FORK WARNING
2. LABEL - MOVING MAST WARNING
3. LABEL - WARNING AND INSTRUCTION
4. LABEL - YALE
5. LABEL - DASH
6. OPERATOR’S MANUAL
7. LABEL - PATENTS AND TRADEMARKS
8. LABEL - BATTERY DISCHARGE NOTICE
9. UL PLATE - E CONSTRUCTION
10. COVER - NAMEPLATE
11. NAMEPLATE
12. RIVET
13. LABEL - YALE
14. LABEL - MANUAL LOWERING
15. LABEL - SNOWFLAKE
16. LABEL - SIDESHIFT
17. LABEL - TILT
Figure 3. Labels and Decals (MSW030/040-E and MRW020/030-E )
5
Label Replacement 100 YRM 1024
1. LABEL - FORK WARNING
2. LABEL - MOVING MAST WARNING
3. LABEL - WARNING AND INSTRUCTION
4. LABEL - YALE
5. LABEL - DASH
6. OPERATOR’S MANUAL
7. LABEL - PATENTS AND TRADEMARKS
8. LABEL - BATTERY DISCHARGE NOTICE
9. UL PLATE - E CONSTRUCTION
10. COVER - NAMEPLATE
11. NAMEPLATE
12. RIVET
13. LABEL - YALE
14. LABEL - MANUAL LOWERING
15. LABEL - SNOWFLAKE
16. LABEL - SIDESHIFT
17. LABEL - TILT
Figure 4. Labels and Decals (MCW025/030/040-E)
6
100 YRM 1024 Battery Compartment
Battery Compartment
WARNING
Batteries are heavy. Use care to avoid injury. Al-
ways use a battery roller stand or tray when trucks
are equipped with optional battery rollers or slide.
The battery compartment is available in two sizes:
229 mm (9.0 in.) or 343 mm (13.5 in.). Any fluids on
or around the battery is an indication that electrolyte
is spilling, leaching, or leaking out. Leaking batteries
must be repaired or replaced.
For instructions for changing the battery and adjust-
ing the battery spacers, refer to Periodic Maintenance
8000 YRM 1027.
BATTERY ROLLER OPTION
Remove
1. Remove battery.
2. Remove side gates to gain access to capscrews.
3. Remove capscrews, washers, lockwashers, and
nuts.
4. Remove battery tray.
5. Clean battery compartment and battery tray thor-
oughly using a cloth or brush and a solution of bak-
ing soda and water.
6. Rinse area with water and dry with a clean cloth.
Install
1. Align battery tray with slots in floor of battery com-
partment. Refer to Figure 5.
2. Install capscrews (3), washers (4), lockwashers (5),
and nuts (6).
3. Torque nuts (6) to 101 N•m (75 lbf ft).
4. Install spacers to side gates using capscrews (9),
lockwashers (10), and nuts (11).
5. Torque nuts (11) to 11 N•m (8 lbf ft).
6. Install side gates.
7. Install battery.
7
Battery Compartment 100 YRM 1024
1. BATTERY ROLLER TRAY
2. ROLLER
3. CAPSCREW
4. WASHER
5. LOCKWASHER
6. NUT
7. SIDE GATE
8. SPACER
9. CAPSCREW
10. LOCKWASHER
11. NUT
Figure 5. Battery Roller Installation
8
620 YRM 294 Brush and Commutator Inspection
General
This section describes disassembly and assembly,
brush installation, inspection, and checks for mal-
functions of DC motors. Inspect the commutator and
brushes every 350 hours of operation. The commu-
tator is the rotating electric connection between the
armature and the electric power supplied by the bat-
tery. Brushes made of carbon compounds slide on
the rotating commutator and are the path for electricity
from the battery to the commutator and the armature.
The maintenance of the commutator and the brushes
is important to the good operation of a DC motor.
Traction motors and hydraulic pump motors are similar
in design. The hydraulic pump motors are smaller
than the traction motors, but the disassembly and
maintenance of these motors are similar. The cooling
fan in the traction motors is fastened to the armature
and can be removed from the armature. The cooling
fan can be removed during disassembly of the traction
motor.
The cooling fan in the hydraulic pump motors can be a
press fit on the armature shaft and is not easily removed
during disassembly of the motor. The armature and
cooling fan must be removed from the drive end of the
motor during disassembly.
The assembly and disassembly of the motor used for
the power steering pump is described in the Steering
System section. This motor is a permanent magnet
motor.
Brush and Commutator Inspection
HYDRAULIC PUMP MOTOR AND
TRACTION MOTOR
NOTE: When inspecting brush conditions and motor
commutator conditions for head damage or abnormal
wear, the battery maintenance and condition should be
eliminated as a cause first. See Industrial Battery
2240 YRM 1.
NOTE: The brushes and commutator can be inspected,
the brushes can be replaced, and Stoning the Commu-
tator can be done with the motor installed in the truck.
NOTE: Inspect the brushes and commutator every 350
hours for best operation and to prevent motor damage.
The hydraulic pump motor normally has more start cy-
cles than other motors, so it can have more wear and
possible damage.
NOTE: The following procedure is for inspecting the
brushes and commutator with the motor installed in the
lift truck. The same inspections can be done with the
motor removed. If the motor is removed, start at Step 3.
1. To rotate the commutator of the traction motor with-
out moving the truck, the drive wheels must be
raised. See Figure 1. Raise drive wheels so com-
mutator of the traction motor can be rotated without
moving lift truck. See How To Raise Drive Wheels
in the Operating Manual or the Periodic Mainte-
nance YRM section for your lift truck.
NOTE: For some models of lift trucks, the battery does
not need to be removed to access the electric motors.
Other models will require the removal of the battery be-
fore gaining access to the electric motors. To remove
the battery, either raise the hood panels or unfasten the
floor plate, depending on which motor needs to be ac-
cessed.
1. ARMATURE
(DRIVE) SHAFT
2. COOLING FAN
3. BRUSH COVER
Figure 1. Traction Motor
1
Thank you very much for
your reading. Please Click
Here. Then Get COMPLETE
MANUAL. NO WAITING
NOTE:
If there is no response to
click on the link above,
please download the PDF
document first and then
click on it.
Brush and Commutator Inspection 620 YRM 294
2. Remove battery. See How to Remove Battery
in the Operating Manual or the Periodic Mainte-
nance YRM section for your lift truck. Remove ac-
cess plate to motors. If the battery in your lift truck
does not need removal for access to the motors, go
to Step 3.
WARNING
Compressed air can move particles so that they
cause injury to the user or to other personnel.
Make sure that the path of the compressed air is
away from all personnel. Wear protective goggles
or a face shield to prevent injury to the eyes.
NOTE: Vacuum cleaning, when possible, is the recom-
mendation of manufacturers of electric motors. The use
of compressed air can send dirt particles into the bear-
ings and other areas of the motor that can cause pos-
sible damage.
3. Remove brush covers at rear of motor. See Fig-
ure 2. Wear eye protection. Use a vacuum cleaner
or compressed air to remove dirt and brush dust
from commutator area.
Figure 2. Brush Cover Removal From Motor
4. Remove and inspect brushes for damage or uneven
wear. Replace all brushes if any brush is worn or
damaged. The brushes must be at least half their
original length. Move brush springs away from top
of each brush and pull brushes from their holders to
inspect surface that rides on commutator. See Fig-
ure 3. That surface must have the same shape as
the commutator and must not have cracks or de-
fects. Some brushes have wear sensor wires at-
tached, even if they are not connected to an indi-
cator. Replace these brushes if brushes are worn
enough to see sensor at commutator end of brush.
5. Inspect commutator surface. See Table 1 and Ta-
ble 2. Carefully rotate armature. DO NOT damage
commutator if you use a tool to rotate armature.
The commutator wears slowly in normal service.
The mica must be cut below the surface of the com-
mutator bars after a long service period or after a
commutator has been turned in a lathe.
A commutator that has been in service will have a
smooth and polished surface with a darker brown
color where it rotates under the brushes. A variation
of color on the commutator surface between light
brown and darker brown is normal. The surface
condition is the lubrication between the commutator
and the brushes. The brushes will wear rapidly if
this surface condition does not develop during the
first 6 to 10 hours of operation after a commutator
with a new surface is installed. If the commutator
has deep grooves, rough edges of the bars, or a
few bars that are black or raised above the others,
the motor must be removed for service.
6. Inspect white or gray insulation (mica) between
commutator bars. The mica must not touch the
brushes or the brushes will wear very rapidly.
7. To replace a brush set, remove screw that holds
brush wires to bus. Pull brush end of springs from
brushes, and pull brushes from holders. Lift brush
springs away from holders, and install new brushes
so brush commutator surface fully touches commu-
tator. Make sure the springs are pushing on each
brush. Install and tighten screws for brush wires
and bus connectors.
8. Carefully install brush covers so sparks are kept
inside motor housing. Install battery as described
in Operating Manual or the Periodic Maintenance
YRM section for your lift truck.
2
620 YRM 294 Brush and Commutator Inspection
Figure 3. Brush Removal and Inspection
Legend for Figure 3
1. BRUSH
2. BRUSH SPRING
3. MICA
Table 1. Normal Commutator Surfaces
A light brown surface of the commutator where it
rotates on the brushes is a normal condition. The
surface of the commutator must be smooth.
Variations between light brown and dark brown colors
are also normal. The surface of the commutator must
be smooth.
3
Brush and Commutator Inspection 620 YRM 294
Table 1. Normal Commutator Surfaces (Continued)
A condition called slot bar marking is also normal
if the commutator surface is smooth. The variable
color occurs in a pattern according to the number of
conductors per slot.
A very dark surface is also a normal and an acceptable
condition if the commutator surface is smooth.
STEERING PUMP MOTOR
NOTE: Some electrical trucks use a steering pump mo-
tor. Refer to your truck model’s service manual for in-
structions on removal and installation of steering pump
motors.
1. Disconnect battery connector. Remove floor plate
from lift truck for access to steering pump motor.
Open hood for access to motor. Remove screws
that hold two brush cover plates to motor housing.
2. Inspect brushes and commutator as described
in previous paragraphs for traction and hydraulic
pump motors. The brush replacement procedure is
also the same, although there are only two brushes
for the steering pump motor. See Table 3.
3. Install brush covers and screws. Install floor plate
or close hood and connect battery connector.
NORMAL COMMUTATOR SURFACE
A commutator that has been in service will have a
smooth and polished surface with a darker brown color
where it rotates under the brushes. See Table 1. A
variation of color on the commutator surface between
light brown and darker brown is normal. This surface
condition is the lubrication between the commutator
and the brushes. The brushes will wear rapidly if this
surface condition does not develop during the first 6 to
10 hours of operation after a commutator with a new
surface is installed.
4

More Related Content

What's hot

1998 YAMAHA FZS600 Service Repair Manual
1998 YAMAHA FZS600 Service Repair Manual1998 YAMAHA FZS600 Service Repair Manual
1998 YAMAHA FZS600 Service Repair Manual
jjjn9eoksl
 
Yale a908 erc32 agf (erc040gh, erc050gh, erc060gh, erc065gh) lift truck servi...
Yale a908 erc32 agf (erc040gh, erc050gh, erc060gh, erc065gh) lift truck servi...Yale a908 erc32 agf (erc040gh, erc050gh, erc060gh, erc065gh) lift truck servi...
Yale a908 erc32 agf (erc040gh, erc050gh, erc060gh, erc065gh) lift truck servi...
fujsekfksmemer
 
Yale a908 erc30 agf (erc040gh, erc050gh, erc060gh, erc065gh) lift truck servi...
Yale a908 erc30 agf (erc040gh, erc050gh, erc060gh, erc065gh) lift truck servi...Yale a908 erc30 agf (erc040gh, erc050gh, erc060gh, erc065gh) lift truck servi...
Yale a908 erc30 agf (erc040gh, erc050gh, erc060gh, erc065gh) lift truck servi...
fhjsjkdmemm
 
Yale a908 erc20 agf (erc040gh, erc050gh, erc060gh, erc065gh) lift truck servi...
Yale a908 erc20 agf (erc040gh, erc050gh, erc060gh, erc065gh) lift truck servi...Yale a908 erc20 agf (erc040gh, erc050gh, erc060gh, erc065gh) lift truck servi...
Yale a908 erc20 agf (erc040gh, erc050gh, erc060gh, erc065gh) lift truck servi...
fjsjjdkemmde
 
YALE A908 ERC32AGF (ERC040GH, ERC050GH, ERC060GH, ERC065GH) LIFT TRUCK Servic...
YALE A908 ERC32AGF (ERC040GH, ERC050GH, ERC060GH, ERC065GH) LIFT TRUCK Servic...YALE A908 ERC32AGF (ERC040GH, ERC050GH, ERC060GH, ERC065GH) LIFT TRUCK Servic...
YALE A908 ERC32AGF (ERC040GH, ERC050GH, ERC060GH, ERC065GH) LIFT TRUCK Servic...
jfkksefmmsem
 

What's hot (18)

Cruzetas Spicer
Cruzetas SpicerCruzetas Spicer
Cruzetas Spicer
 
Yale e108 erc20 30 agf lift truck service repair manual
Yale e108 erc20 30 agf lift truck service repair manualYale e108 erc20 30 agf lift truck service repair manual
Yale e108 erc20 30 agf lift truck service repair manual
 
1998 YAMAHA FZS600 Service Repair Manual
1998 YAMAHA FZS600 Service Repair Manual1998 YAMAHA FZS600 Service Repair Manual
1998 YAMAHA FZS600 Service Repair Manual
 
Jcb vm115 hpd smooth drum roller service repair manual
Jcb vm115 hpd smooth drum roller service repair manualJcb vm115 hpd smooth drum roller service repair manual
Jcb vm115 hpd smooth drum roller service repair manual
 
Jcb vm46 pd smooth drum roller service repair manual
Jcb vm46 pd smooth drum roller service repair manualJcb vm46 pd smooth drum roller service repair manual
Jcb vm46 pd smooth drum roller service repair manual
 
Jcb vm146 pd smooth drum roller service repair manual
Jcb vm146 pd smooth drum roller service repair manualJcb vm146 pd smooth drum roller service repair manual
Jcb vm146 pd smooth drum roller service repair manual
 
Jcb vm132 pd smooth drum roller service repair manual
Jcb vm132 pd smooth drum roller service repair manualJcb vm132 pd smooth drum roller service repair manual
Jcb vm132 pd smooth drum roller service repair manual
 
Jcb vm75 pd smooth drum roller service repair manual
Jcb vm75 pd smooth drum roller service repair manualJcb vm75 pd smooth drum roller service repair manual
Jcb vm75 pd smooth drum roller service repair manual
 
Jcb vm115 hd smooth drum roller service repair manual
Jcb vm115 hd smooth drum roller service repair manualJcb vm115 hd smooth drum roller service repair manual
Jcb vm115 hd smooth drum roller service repair manual
 
Jcb vm115 pd smooth drum roller service repair manual
Jcb vm115 pd smooth drum roller service repair manualJcb vm115 pd smooth drum roller service repair manual
Jcb vm115 pd smooth drum roller service repair manual
 
Jcb vm115 d smooth drum roller service repair manual
Jcb vm115 d smooth drum roller service repair manualJcb vm115 d smooth drum roller service repair manual
Jcb vm115 d smooth drum roller service repair manual
 
Jcb vm75 d smooth drum roller service repair manual
Jcb vm75 d smooth drum roller service repair manualJcb vm75 d smooth drum roller service repair manual
Jcb vm75 d smooth drum roller service repair manual
 
Jcb vm46 d smooth drum roller service repair manual
Jcb vm46 d smooth drum roller service repair manualJcb vm46 d smooth drum roller service repair manual
Jcb vm46 d smooth drum roller service repair manual
 
Jcb vm200 d smooth drum roller service repair manual
Jcb vm200 d smooth drum roller service repair manualJcb vm200 d smooth drum roller service repair manual
Jcb vm200 d smooth drum roller service repair manual
 
Yale a908 erc32 agf (erc040gh, erc050gh, erc060gh, erc065gh) lift truck servi...
Yale a908 erc32 agf (erc040gh, erc050gh, erc060gh, erc065gh) lift truck servi...Yale a908 erc32 agf (erc040gh, erc050gh, erc060gh, erc065gh) lift truck servi...
Yale a908 erc32 agf (erc040gh, erc050gh, erc060gh, erc065gh) lift truck servi...
 
Yale a908 erc30 agf (erc040gh, erc050gh, erc060gh, erc065gh) lift truck servi...
Yale a908 erc30 agf (erc040gh, erc050gh, erc060gh, erc065gh) lift truck servi...Yale a908 erc30 agf (erc040gh, erc050gh, erc060gh, erc065gh) lift truck servi...
Yale a908 erc30 agf (erc040gh, erc050gh, erc060gh, erc065gh) lift truck servi...
 
Yale a908 erc20 agf (erc040gh, erc050gh, erc060gh, erc065gh) lift truck servi...
Yale a908 erc20 agf (erc040gh, erc050gh, erc060gh, erc065gh) lift truck servi...Yale a908 erc20 agf (erc040gh, erc050gh, erc060gh, erc065gh) lift truck servi...
Yale a908 erc20 agf (erc040gh, erc050gh, erc060gh, erc065gh) lift truck servi...
 
YALE A908 ERC32AGF (ERC040GH, ERC050GH, ERC060GH, ERC065GH) LIFT TRUCK Servic...
YALE A908 ERC32AGF (ERC040GH, ERC050GH, ERC060GH, ERC065GH) LIFT TRUCK Servic...YALE A908 ERC32AGF (ERC040GH, ERC050GH, ERC060GH, ERC065GH) LIFT TRUCK Servic...
YALE A908 ERC32AGF (ERC040GH, ERC050GH, ERC060GH, ERC065GH) LIFT TRUCK Servic...
 

More from fjskkdmmmse

Massey ferguson mf 374 vq cab tractor, 0295 parts catalogue manual
Massey ferguson mf 374 vq cab tractor,   0295 parts catalogue manualMassey ferguson mf 374 vq cab tractor,   0295 parts catalogue manual
Massey ferguson mf 374 vq cab tractor, 0295 parts catalogue manual
fjskkdmmmse
 
Massey ferguson mf 374 aq cab tractor parts catalogue manual
Massey ferguson mf 374 aq cab tractor parts catalogue manualMassey ferguson mf 374 aq cab tractor parts catalogue manual
Massey ferguson mf 374 aq cab tractor parts catalogue manual
fjskkdmmmse
 
Massey ferguson mf 364 vq tractor, cab, 010794 parts catalogue manual
Massey ferguson mf 364 vq tractor, cab,   010794 parts catalogue manualMassey ferguson mf 364 vq tractor, cab,   010794 parts catalogue manual
Massey ferguson mf 364 vq tractor, cab, 010794 parts catalogue manual
fjskkdmmmse
 
Massey ferguson mf 364 fq cab tractor parts catalogue manual
Massey ferguson mf 364 fq cab tractor parts catalogue manualMassey ferguson mf 364 fq cab tractor parts catalogue manual
Massey ferguson mf 364 fq cab tractor parts catalogue manual
fjskkdmmmse
 
Massey ferguson mf 364 aq cab tractor parts catalogue manual
Massey ferguson mf 364 aq cab tractor parts catalogue manualMassey ferguson mf 364 aq cab tractor parts catalogue manual
Massey ferguson mf 364 aq cab tractor parts catalogue manual
fjskkdmmmse
 
Massey ferguson mf 354 sq cab tractor parts catalogue manual
Massey ferguson mf 354 sq cab tractor parts catalogue manualMassey ferguson mf 354 sq cab tractor parts catalogue manual
Massey ferguson mf 354 sq cab tractor parts catalogue manual
fjskkdmmmse
 
Kobelco lk700.a wheel loader service repair manual snrf 1558 and up
Kobelco lk700.a wheel loader service repair manual snrf 1558 and upKobelco lk700.a wheel loader service repair manual snrf 1558 and up
Kobelco lk700.a wheel loader service repair manual snrf 1558 and up
fjskkdmmmse
 
Claas jaguar 850 speedstar (type 492) forage harvesters service repair manual
Claas jaguar 850 speedstar (type 492) forage harvesters service repair manualClaas jaguar 850 speedstar (type 492) forage harvesters service repair manual
Claas jaguar 850 speedstar (type 492) forage harvesters service repair manual
fjskkdmmmse
 
Claas jaguar 850 profistar (type 492) forage harvesters service repair manual
Claas jaguar 850 profistar (type 492) forage harvesters service repair manualClaas jaguar 850 profistar (type 492) forage harvesters service repair manual
Claas jaguar 850 profistar (type 492) forage harvesters service repair manual
fjskkdmmmse
 

More from fjskkdmmmse (20)

Massey ferguson mf 374 vq cab tractor, 0295 parts catalogue manual
Massey ferguson mf 374 vq cab tractor,   0295 parts catalogue manualMassey ferguson mf 374 vq cab tractor,   0295 parts catalogue manual
Massey ferguson mf 374 vq cab tractor, 0295 parts catalogue manual
 
Massey ferguson mf 374 aq cab tractor parts catalogue manual
Massey ferguson mf 374 aq cab tractor parts catalogue manualMassey ferguson mf 374 aq cab tractor parts catalogue manual
Massey ferguson mf 374 aq cab tractor parts catalogue manual
 
Massey ferguson mf 364 vq tractor, cab, 010794 parts catalogue manual
Massey ferguson mf 364 vq tractor, cab,   010794 parts catalogue manualMassey ferguson mf 364 vq tractor, cab,   010794 parts catalogue manual
Massey ferguson mf 364 vq tractor, cab, 010794 parts catalogue manual
 
Massey ferguson mf 364 fq cab tractor parts catalogue manual
Massey ferguson mf 364 fq cab tractor parts catalogue manualMassey ferguson mf 364 fq cab tractor parts catalogue manual
Massey ferguson mf 364 fq cab tractor parts catalogue manual
 
Massey ferguson mf 364 aq cab tractor parts catalogue manual
Massey ferguson mf 364 aq cab tractor parts catalogue manualMassey ferguson mf 364 aq cab tractor parts catalogue manual
Massey ferguson mf 364 aq cab tractor parts catalogue manual
 
Massey ferguson mf 354 sq cab tractor parts catalogue manual
Massey ferguson mf 354 sq cab tractor parts catalogue manualMassey ferguson mf 354 sq cab tractor parts catalogue manual
Massey ferguson mf 354 sq cab tractor parts catalogue manual
 
Kubota kx161 3 excavator parts catalogue manual
Kubota kx161 3 excavator parts catalogue manualKubota kx161 3 excavator parts catalogue manual
Kubota kx161 3 excavator parts catalogue manual
 
Kubota kx151 excavator parts catalogue manual
Kubota kx151 excavator parts catalogue manualKubota kx151 excavator parts catalogue manual
Kubota kx151 excavator parts catalogue manual
 
Kubota kx121 2 excavator parts catalogue manual
Kubota kx121 2 excavator parts catalogue manualKubota kx121 2 excavator parts catalogue manual
Kubota kx121 2 excavator parts catalogue manual
 
Kubota kx101 excavator parts catalogue manual
Kubota kx101 excavator parts catalogue manualKubota kx101 excavator parts catalogue manual
Kubota kx101 excavator parts catalogue manual
 
Kubota kx91 3 excavator parts catalogue manual
Kubota kx91 3 excavator parts catalogue manualKubota kx91 3 excavator parts catalogue manual
Kubota kx91 3 excavator parts catalogue manual
 
Kobelco tlk 900 loader backhoe service repair manual
Kobelco tlk 900 loader backhoe service repair manualKobelco tlk 900 loader backhoe service repair manual
Kobelco tlk 900 loader backhoe service repair manual
 
Kobelco tlk 800 loader backhoe service repair manual
Kobelco tlk 800 loader backhoe service repair manualKobelco tlk 800 loader backhoe service repair manual
Kobelco tlk 800 loader backhoe service repair manual
 
Kobelco tlk 700 loader backhoe service repair manual
Kobelco tlk 700 loader backhoe service repair manualKobelco tlk 700 loader backhoe service repair manual
Kobelco tlk 700 loader backhoe service repair manual
 
Kobelco lk700.a wheel loader service repair manual snrf 1558 and up
Kobelco lk700.a wheel loader service repair manual snrf 1558 and upKobelco lk700.a wheel loader service repair manual snrf 1558 and up
Kobelco lk700.a wheel loader service repair manual snrf 1558 and up
 
Claas jaguar 850 speedstar (type 492) forage harvesters service repair manual
Claas jaguar 850 speedstar (type 492) forage harvesters service repair manualClaas jaguar 850 speedstar (type 492) forage harvesters service repair manual
Claas jaguar 850 speedstar (type 492) forage harvesters service repair manual
 
Claas jaguar 850 profistar (type 492) forage harvesters service repair manual
Claas jaguar 850 profistar (type 492) forage harvesters service repair manualClaas jaguar 850 profistar (type 492) forage harvesters service repair manual
Claas jaguar 850 profistar (type 492) forage harvesters service repair manual
 
Yale e187 glc040 065 rg-tg-zg lift truck service repair manual
Yale e187 glc040 065 rg-tg-zg lift truck service repair manualYale e187 glc040 065 rg-tg-zg lift truck service repair manual
Yale e187 glc040 065 rg-tg-zg lift truck service repair manual
 
Yale d878 glp60 vx lift truck (europe) service repair manual
Yale d878 glp60 vx lift truck (europe) service repair manualYale d878 glp60 vx lift truck (europe) service repair manual
Yale d878 glp60 vx lift truck (europe) service repair manual
 
Yale d810 glp18 vx lift truck (europe) service repair manual
Yale d810 glp18 vx lift truck (europe) service repair manualYale d810 glp18 vx lift truck (europe) service repair manual
Yale d810 glp18 vx lift truck (europe) service repair manual
 

Recently uploaded

原版制作麦考瑞大学毕业证成绩单原件一模一样
原版制作麦考瑞大学毕业证成绩单原件一模一样原版制作麦考瑞大学毕业证成绩单原件一模一样
原版制作麦考瑞大学毕业证成绩单原件一模一样
hbgfewda
 
原版制作(NUA毕业证书)英国诺里奇艺术大学毕业证成绩单原件一模一样
原版制作(NUA毕业证书)英国诺里奇艺术大学毕业证成绩单原件一模一样原版制作(NUA毕业证书)英国诺里奇艺术大学毕业证成绩单原件一模一样
原版制作(NUA毕业证书)英国诺里奇艺术大学毕业证成绩单原件一模一样
trthhgf
 
原版制作加州理工学院毕业证成绩单原件一模一样
原版制作加州理工学院毕业证成绩单原件一模一样原版制作加州理工学院毕业证成绩单原件一模一样
原版制作加州理工学院毕业证成绩单原件一模一样
hbgfewda
 
一比一原版(CCA毕业证书)加利福尼亚艺术学院毕业证成绩单原件一模一样
一比一原版(CCA毕业证书)加利福尼亚艺术学院毕业证成绩单原件一模一样一比一原版(CCA毕业证书)加利福尼亚艺术学院毕业证成绩单原件一模一样
一比一原版(CCA毕业证书)加利福尼亚艺术学院毕业证成绩单原件一模一样
zovambe
 
一比一原版北雷克斯学院毕业证成绩单原件一模一样
一比一原版北雷克斯学院毕业证成绩单原件一模一样一比一原版北雷克斯学院毕业证成绩单原件一模一样
一比一原版北雷克斯学院毕业证成绩单原件一模一样
CC
 
一比一原版(Temple毕业证书)美国天普大学毕业证成绩单原件一模一样
一比一原版(Temple毕业证书)美国天普大学毕业证成绩单原件一模一样一比一原版(Temple毕业证书)美国天普大学毕业证成绩单原件一模一样
一比一原版(Temple毕业证书)美国天普大学毕业证成绩单原件一模一样
fsdfdsgf
 
一比一原版(McMaste毕业证书)加拿大麦克马斯特大学毕业证成绩单原件一模一样
一比一原版(McMaste毕业证书)加拿大麦克马斯特大学毕业证成绩单原件一模一样一比一原版(McMaste毕业证书)加拿大麦克马斯特大学毕业证成绩单原件一模一样
一比一原版(McMaste毕业证书)加拿大麦克马斯特大学毕业证成绩单原件一模一样
AD
 
一比一原版(Cumbria毕业证书)英国坎布里亚大学毕业证成绩单学位证书
一比一原版(Cumbria毕业证书)英国坎布里亚大学毕业证成绩单学位证书一比一原版(Cumbria毕业证书)英国坎布里亚大学毕业证成绩单学位证书
一比一原版(Cumbria毕业证书)英国坎布里亚大学毕业证成绩单学位证书
AD
 
Battery Management System Functions (Flowchart of BMS Operations)
Battery Management System Functions (Flowchart of BMS Operations)Battery Management System Functions (Flowchart of BMS Operations)
Battery Management System Functions (Flowchart of BMS Operations)
Electric Vehicle Geek
 
一比一原版(UC毕业证书)加拿大卡尔加里大学毕业证成绩单原件一模一样
一比一原版(UC毕业证书)加拿大卡尔加里大学毕业证成绩单原件一模一样一比一原版(UC毕业证书)加拿大卡尔加里大学毕业证成绩单原件一模一样
一比一原版(UC毕业证书)加拿大卡尔加里大学毕业证成绩单原件一模一样
rgthdgf
 
原版定制(UCSC毕业证书)美国格林威尔大学毕业证原件一模一样
原版定制(UCSC毕业证书)美国格林威尔大学毕业证原件一模一样原版定制(UCSC毕业证书)美国格林威尔大学毕业证原件一模一样
原版定制(UCSC毕业证书)美国格林威尔大学毕业证原件一模一样
rgdasda
 

Recently uploaded (20)

EV Charging Resources and Technical Assistance for Rural Communities and Trib...
EV Charging Resources and Technical Assistance for Rural Communities and Trib...EV Charging Resources and Technical Assistance for Rural Communities and Trib...
EV Charging Resources and Technical Assistance for Rural Communities and Trib...
 
Preparing for Transportation Electrification: The Electric Coop Perspective
Preparing for Transportation Electrification: The Electric Coop PerspectivePreparing for Transportation Electrification: The Electric Coop Perspective
Preparing for Transportation Electrification: The Electric Coop Perspective
 
5 Signs Your VW Key Fob Battery Needs Replacement
5 Signs Your VW Key Fob Battery Needs Replacement5 Signs Your VW Key Fob Battery Needs Replacement
5 Signs Your VW Key Fob Battery Needs Replacement
 
原版制作麦考瑞大学毕业证成绩单原件一模一样
原版制作麦考瑞大学毕业证成绩单原件一模一样原版制作麦考瑞大学毕业证成绩单原件一模一样
原版制作麦考瑞大学毕业证成绩单原件一模一样
 
原版制作(NUA毕业证书)英国诺里奇艺术大学毕业证成绩单原件一模一样
原版制作(NUA毕业证书)英国诺里奇艺术大学毕业证成绩单原件一模一样原版制作(NUA毕业证书)英国诺里奇艺术大学毕业证成绩单原件一模一样
原版制作(NUA毕业证书)英国诺里奇艺术大学毕业证成绩单原件一模一样
 
原版制作加州理工学院毕业证成绩单原件一模一样
原版制作加州理工学院毕业证成绩单原件一模一样原版制作加州理工学院毕业证成绩单原件一模一样
原版制作加州理工学院毕业证成绩单原件一模一样
 
What Could Cause Your Audi To Keep Cutting Out
What Could Cause Your Audi To Keep Cutting OutWhat Could Cause Your Audi To Keep Cutting Out
What Could Cause Your Audi To Keep Cutting Out
 
How to Reset BMW Brake Pad Warning Light A Step-by-Step Guide
How to Reset BMW Brake Pad Warning Light A Step-by-Step GuideHow to Reset BMW Brake Pad Warning Light A Step-by-Step Guide
How to Reset BMW Brake Pad Warning Light A Step-by-Step Guide
 
What Could Cause The Airbag Light To Stay On In Your Volvo XC90
What Could Cause The Airbag Light To Stay On In Your Volvo XC90What Could Cause The Airbag Light To Stay On In Your Volvo XC90
What Could Cause The Airbag Light To Stay On In Your Volvo XC90
 
一比一原版(CCA毕业证书)加利福尼亚艺术学院毕业证成绩单原件一模一样
一比一原版(CCA毕业证书)加利福尼亚艺术学院毕业证成绩单原件一模一样一比一原版(CCA毕业证书)加利福尼亚艺术学院毕业证成绩单原件一模一样
一比一原版(CCA毕业证书)加利福尼亚艺术学院毕业证成绩单原件一模一样
 
Is Your Porsche Cayenne Radio On The Fritz Here's What It Could Mean
Is Your Porsche Cayenne Radio On The Fritz Here's What It Could MeanIs Your Porsche Cayenne Radio On The Fritz Here's What It Could Mean
Is Your Porsche Cayenne Radio On The Fritz Here's What It Could Mean
 
一比一原版北雷克斯学院毕业证成绩单原件一模一样
一比一原版北雷克斯学院毕业证成绩单原件一模一样一比一原版北雷克斯学院毕业证成绩单原件一模一样
一比一原版北雷克斯学院毕业证成绩单原件一模一样
 
一比一原版(Temple毕业证书)美国天普大学毕业证成绩单原件一模一样
一比一原版(Temple毕业证书)美国天普大学毕业证成绩单原件一模一样一比一原版(Temple毕业证书)美国天普大学毕业证成绩单原件一模一样
一比一原版(Temple毕业证书)美国天普大学毕业证成绩单原件一模一样
 
How Do I Know If My Volvo Has Throttle Position Sensor Problems
How Do I Know If My Volvo Has Throttle Position Sensor ProblemsHow Do I Know If My Volvo Has Throttle Position Sensor Problems
How Do I Know If My Volvo Has Throttle Position Sensor Problems
 
一比一原版(McMaste毕业证书)加拿大麦克马斯特大学毕业证成绩单原件一模一样
一比一原版(McMaste毕业证书)加拿大麦克马斯特大学毕业证成绩单原件一模一样一比一原版(McMaste毕业证书)加拿大麦克马斯特大学毕业证成绩单原件一模一样
一比一原版(McMaste毕业证书)加拿大麦克马斯特大学毕业证成绩单原件一模一样
 
一比一原版(Cumbria毕业证书)英国坎布里亚大学毕业证成绩单学位证书
一比一原版(Cumbria毕业证书)英国坎布里亚大学毕业证成绩单学位证书一比一原版(Cumbria毕业证书)英国坎布里亚大学毕业证成绩单学位证书
一比一原版(Cumbria毕业证书)英国坎布里亚大学毕业证成绩单学位证书
 
Battery Management System Functions (Flowchart of BMS Operations)
Battery Management System Functions (Flowchart of BMS Operations)Battery Management System Functions (Flowchart of BMS Operations)
Battery Management System Functions (Flowchart of BMS Operations)
 
一比一原版(UC毕业证书)加拿大卡尔加里大学毕业证成绩单原件一模一样
一比一原版(UC毕业证书)加拿大卡尔加里大学毕业证成绩单原件一模一样一比一原版(UC毕业证书)加拿大卡尔加里大学毕业证成绩单原件一模一样
一比一原版(UC毕业证书)加拿大卡尔加里大学毕业证成绩单原件一模一样
 
原版定制(UCSC毕业证书)美国格林威尔大学毕业证原件一模一样
原版定制(UCSC毕业证书)美国格林威尔大学毕业证原件一模一样原版定制(UCSC毕业证书)美国格林威尔大学毕业证原件一模一样
原版定制(UCSC毕业证书)美国格林威尔大学毕业证原件一模一样
 
Why Won't Your Audi A3 Shift Into Reverse Gear Let's Investigate
Why Won't Your Audi A3 Shift Into Reverse Gear Let's InvestigateWhy Won't Your Audi A3 Shift Into Reverse Gear Let's Investigate
Why Won't Your Audi A3 Shift Into Reverse Gear Let's Investigate
 

Yale c819 (mcw025 e, mcw030e, mcw040e) lift truck service repair manual

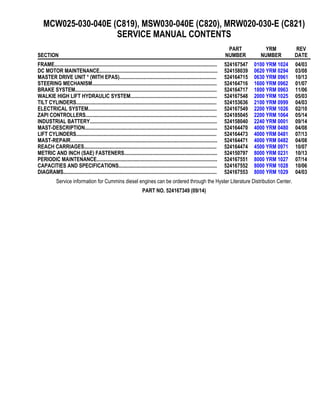
  • 1. MCW025-030-040E (C819), MSW030-040E (C820), MRW020-030-E (C821) SERVICE MANUAL CONTENTS SECTION PART NUMBER YRM NUMBER REV DATE FRAME............................................................................................................................ 524167547 0100 YRM 1024 04/03 DC MOTOR MAINTENANCE.......................................................................................... 524158039 0620 YRM 0294 03/08 MASTER DRIVE UNIT * (WITH EPAS).......................................................................... 524164715 0630 YRM 0961 10/13 STEERING MECHANISM............................................................................................... 524164716 1600 YRM 0962 01/07 BRAKE SYSTEM............................................................................................................ 524164717 1800 YRM 0963 11/06 WALKIE HIGH LIFT HYDRAULIC SYSTEM.................................................................. 524167548 2000 YRM 1025 05/03 TILT CYLINDERS........................................................................................................... 524153636 2100 YRM 0999 04/03 ELECTRICAL SYSTEM.................................................................................................. 524167549 2200 YRM 1026 02/10 ZAPI CONTROLLERS.................................................................................................... 524185045 2200 YRM 1064 05/14 INDUSTRIAL BATTERY................................................................................................. 524158040 2240 YRM 0001 09/14 MAST-DESCRIPTION..................................................................................................... 524164470 4000 YRM 0480 04/08 LIFT CYLINDERS........................................................................................................... 524164473 4000 YRM 0481 07/13 MAST-REPAIR................................................................................................................ 524164471 4000 YRM 0482 04/08 REACH CARRIAGES..................................................................................................... 524164474 4500 YRM 0971 10/07 METRIC AND INCH (SAE) FASTENERS....................................................................... 524150797 8000 YRM 0231 10/13 PERIODIC MAINTENANCE............................................................................................ 524167551 8000 YRM 1027 07/14 CAPACITIES AND SPECIFICATIONS........................................................................... 524167552 8000 YRM 1028 10/06 DIAGRAMS..................................................................................................................... 524167553 8000 YRM 1029 04/03 Service information for Cummins diesel engines can be ordered through the Hyster Literature Distribution Center. PART NO. 524167349 (09/14)
  • 2. 100 YRM 1024 General General This manual describes the frame for the MSW030/ 040-E, MRW020/030-E, and MCW025/030/040-E lift trucks. These models have a main frame weldment and a mast weldment. The main frame weldment for the MCW025/030/040-E differs considerably from the main frame weldments of the MSW030/040-E and MRW020/030-E. The MSW030/040-E and MRW020/030-E have base arm weldments that extend under the load. The MCW025/030/040-E have an extended main frame weldment to counterbalance the load and larger load wheels mounted by trunnion cap assemblies near the front of the unit. See Figure 1 or Figure 2. FEATURES (MSW030/040-E AND MRW020/030-E) The MSW030/040-E and MRW020/030-E main frames have mounts for: The Mast Weldment The Electrical System Parts The Hydraulic Pump and Motor Assembly The Master Drive Unit The Load Wheels Based on model and capacities, MSW030/040-E and MRW020/030-E frames are available in combinations of the following: 1. Lifting Capacity a. 907.2 kg (2000 lb) b. 1360.8 kg (3000 lb) c. 1814.4 kg (4000 lb) 2. Battery Compartment Size a. 229 mm (9.0 in.) b. 343 mm (13.5 in.) 3. Load Wheels a. Single b. Tandem 4. Basearm Width a. 940 mm (37 in.) b. 1092 mm (43 in.) c. 1143 mm (45 in.) d. 1245 mm (49 in.) e. 1295 mm (51 in.) f. 1448 mm (57 in.) 5. Load Center a. 406 mm (16 in.) b. 457 mm (18 in.) c. 533 mm (21 in.) d. 610 mm (24 in.) FEATURES (MCW025/030/040-E) The MCW025/030/040-E main frame has mounts for: The Mast Weldment The Electrical System Parts The Hydraulic Pump and Motor Assembly The Master Drive Unit The Load Wheels The Tilt Cylinders The MCW025/030/040-E frames share a common 13.5 inch battery compartment and load wheel configuration and are available in combinations of the following: 1. Lifting Capacity 1134 kg (2500 lb) 1360.8 kg (3000 lb) 1814.4 kg (4000 lb) 2. Wheel Base a. 1245 mm (49 in.) b. 1372 mm (54 in.) c. 1549 mm (61 in.) 3. Load Center a. 406 mm (16 in.) b. 457 mm (18 in.) c. 533 mm (21 in.) d. 610 mm (24 in.) 1
  • 3. General 100 YRM 1024 1. TRUNNION CAP 2. BATTERY COMPARTMENT 3. BATTERY CONNECTOR LOCATION 4. DISPLAY AND KEY SWITCH BRACKET 5. MASTER DRIVE UNIT MOUNTING BRACKET 6. BASE ARM WELDMENT 7. SINGLE LOAD WHEEL CONFIGURATION 8. TANDEM LOAD WHEEL CONFIGURATION (OPTIONAL) Figure 1. Frame Weldment (MSW030/040-E and MRW020/030-E) 2
  • 4. 100 YRM 1024 General 1. TRUNNION CAP 2. BATTERY COMPARTMENT 3. BATTERY CONNECTOR LOCATION 4. DISPLAY AND KEY SWITCH BRACKET 5. MASTER DRIVE UNIT MOUNTING BRACKET Figure 2. Frame Weldment (MCW025/030/040-E) 3
  • 5. Label Replacement 100 YRM 1024 Frame Repair WARNING Forklift truck frames and components may have polyurethane paint. Welding, burning, or other heat sufficient to cause thermal decomposition of the paint may release isocyanates. These chemicals are allergic sensitizers to the skin and respiratory tract and overexposure may occur without odor warning. Always utilize good industrial hygiene practices including removal of all paint (prime and finish coats) to the metal around the area to be welded, local ventilation, and/or supplied-air respi- ratory protection when repairing the frame. WARNING Do not make any repairs or adjustments unless you have proper authorization and training. Repairs and adjustments that are not correct can cause a dan- gerous operating condition. Do not operate a lift truck that needs repairs. Report the need for re- pairs to your supervisor immediately. If repair is necessary, put a DO NOT OPERATE tag on the con- trol handle. Remove the key from the key switch. Most lift truck repairs are performed on the individual components that are bolted to the frame and not to the frame itself. Painting Instructions WARNING Always use solvents and paints in an area with ven- tilation. Do not use solvents or paints near heat or fire. WARNING Cleaning solvents can be flammable and toxic and can cause skin irritation. Wear protection for eyes and skin. Always follow the recommendations of the manufacturer when using cleaning solvents. 1. Remove all dirt from the surface to be painted. Clean the area to be painted using a solvent for painted surfaces. Remove all oil and grease. 2. Remove the top surface of paint and all rust from the metal using sandpaper. Paint all metal sur- faces where the paint is completely removed using primer. Apply the primer before applying the color paint. 3. Protect all surfaces that will not be painted. Do not paint cylinder rods, cables, labels, plates, or controls. 4. Paint the surfaces using Yale paint. Follow the di- rections on the container. Paint all surfaces the original color. Label Replacement WARNING Replace damaged Warning or Caution labels imme- diately. If labels or information plates are missing or damaged, they must be replaced. NOTE: The nameplate cover is installed using rivets. Remove old rivets before installing a new name- plate. See your Yale lift truck dealer to make sure the nameplate information is correct and complete before installing a new nameplate. Fasten the nameplate cover with the rivet heads outside. 1. Make sure the surface is dry and has no oil or grease. Do not use solvent on new paint. Clean the surface of old paint using a cleaning solvent. 2. Remove the paper from the back of the label. Do not touch the adhesive surface. 3. Carefully hold the label in the correct position above the surface. The label cannot be moved after it touches the surface. Put the label in the correct po- sition on the surface. Make sure all air is removed from under the label and the corners and edges are tight. See Figure 3 and Figure 4. 4
  • 6. 100 YRM 1024 Label Replacement 1. LABEL - FORK WARNING 2. LABEL - MOVING MAST WARNING 3. LABEL - WARNING AND INSTRUCTION 4. LABEL - YALE 5. LABEL - DASH 6. OPERATOR’S MANUAL 7. LABEL - PATENTS AND TRADEMARKS 8. LABEL - BATTERY DISCHARGE NOTICE 9. UL PLATE - E CONSTRUCTION 10. COVER - NAMEPLATE 11. NAMEPLATE 12. RIVET 13. LABEL - YALE 14. LABEL - MANUAL LOWERING 15. LABEL - SNOWFLAKE 16. LABEL - SIDESHIFT 17. LABEL - TILT Figure 3. Labels and Decals (MSW030/040-E and MRW020/030-E ) 5
  • 7. Label Replacement 100 YRM 1024 1. LABEL - FORK WARNING 2. LABEL - MOVING MAST WARNING 3. LABEL - WARNING AND INSTRUCTION 4. LABEL - YALE 5. LABEL - DASH 6. OPERATOR’S MANUAL 7. LABEL - PATENTS AND TRADEMARKS 8. LABEL - BATTERY DISCHARGE NOTICE 9. UL PLATE - E CONSTRUCTION 10. COVER - NAMEPLATE 11. NAMEPLATE 12. RIVET 13. LABEL - YALE 14. LABEL - MANUAL LOWERING 15. LABEL - SNOWFLAKE 16. LABEL - SIDESHIFT 17. LABEL - TILT Figure 4. Labels and Decals (MCW025/030/040-E) 6
  • 8. 100 YRM 1024 Battery Compartment Battery Compartment WARNING Batteries are heavy. Use care to avoid injury. Al- ways use a battery roller stand or tray when trucks are equipped with optional battery rollers or slide. The battery compartment is available in two sizes: 229 mm (9.0 in.) or 343 mm (13.5 in.). Any fluids on or around the battery is an indication that electrolyte is spilling, leaching, or leaking out. Leaking batteries must be repaired or replaced. For instructions for changing the battery and adjust- ing the battery spacers, refer to Periodic Maintenance 8000 YRM 1027. BATTERY ROLLER OPTION Remove 1. Remove battery. 2. Remove side gates to gain access to capscrews. 3. Remove capscrews, washers, lockwashers, and nuts. 4. Remove battery tray. 5. Clean battery compartment and battery tray thor- oughly using a cloth or brush and a solution of bak- ing soda and water. 6. Rinse area with water and dry with a clean cloth. Install 1. Align battery tray with slots in floor of battery com- partment. Refer to Figure 5. 2. Install capscrews (3), washers (4), lockwashers (5), and nuts (6). 3. Torque nuts (6) to 101 N•m (75 lbf ft). 4. Install spacers to side gates using capscrews (9), lockwashers (10), and nuts (11). 5. Torque nuts (11) to 11 N•m (8 lbf ft). 6. Install side gates. 7. Install battery. 7
  • 9. Battery Compartment 100 YRM 1024 1. BATTERY ROLLER TRAY 2. ROLLER 3. CAPSCREW 4. WASHER 5. LOCKWASHER 6. NUT 7. SIDE GATE 8. SPACER 9. CAPSCREW 10. LOCKWASHER 11. NUT Figure 5. Battery Roller Installation 8
  • 10. 620 YRM 294 Brush and Commutator Inspection General This section describes disassembly and assembly, brush installation, inspection, and checks for mal- functions of DC motors. Inspect the commutator and brushes every 350 hours of operation. The commu- tator is the rotating electric connection between the armature and the electric power supplied by the bat- tery. Brushes made of carbon compounds slide on the rotating commutator and are the path for electricity from the battery to the commutator and the armature. The maintenance of the commutator and the brushes is important to the good operation of a DC motor. Traction motors and hydraulic pump motors are similar in design. The hydraulic pump motors are smaller than the traction motors, but the disassembly and maintenance of these motors are similar. The cooling fan in the traction motors is fastened to the armature and can be removed from the armature. The cooling fan can be removed during disassembly of the traction motor. The cooling fan in the hydraulic pump motors can be a press fit on the armature shaft and is not easily removed during disassembly of the motor. The armature and cooling fan must be removed from the drive end of the motor during disassembly. The assembly and disassembly of the motor used for the power steering pump is described in the Steering System section. This motor is a permanent magnet motor. Brush and Commutator Inspection HYDRAULIC PUMP MOTOR AND TRACTION MOTOR NOTE: When inspecting brush conditions and motor commutator conditions for head damage or abnormal wear, the battery maintenance and condition should be eliminated as a cause first. See Industrial Battery 2240 YRM 1. NOTE: The brushes and commutator can be inspected, the brushes can be replaced, and Stoning the Commu- tator can be done with the motor installed in the truck. NOTE: Inspect the brushes and commutator every 350 hours for best operation and to prevent motor damage. The hydraulic pump motor normally has more start cy- cles than other motors, so it can have more wear and possible damage. NOTE: The following procedure is for inspecting the brushes and commutator with the motor installed in the lift truck. The same inspections can be done with the motor removed. If the motor is removed, start at Step 3. 1. To rotate the commutator of the traction motor with- out moving the truck, the drive wheels must be raised. See Figure 1. Raise drive wheels so com- mutator of the traction motor can be rotated without moving lift truck. See How To Raise Drive Wheels in the Operating Manual or the Periodic Mainte- nance YRM section for your lift truck. NOTE: For some models of lift trucks, the battery does not need to be removed to access the electric motors. Other models will require the removal of the battery be- fore gaining access to the electric motors. To remove the battery, either raise the hood panels or unfasten the floor plate, depending on which motor needs to be ac- cessed. 1. ARMATURE (DRIVE) SHAFT 2. COOLING FAN 3. BRUSH COVER Figure 1. Traction Motor 1
  • 11. Thank you very much for your reading. Please Click Here. Then Get COMPLETE MANUAL. NO WAITING NOTE: If there is no response to click on the link above, please download the PDF document first and then click on it.
  • 12. Brush and Commutator Inspection 620 YRM 294 2. Remove battery. See How to Remove Battery in the Operating Manual or the Periodic Mainte- nance YRM section for your lift truck. Remove ac- cess plate to motors. If the battery in your lift truck does not need removal for access to the motors, go to Step 3. WARNING Compressed air can move particles so that they cause injury to the user or to other personnel. Make sure that the path of the compressed air is away from all personnel. Wear protective goggles or a face shield to prevent injury to the eyes. NOTE: Vacuum cleaning, when possible, is the recom- mendation of manufacturers of electric motors. The use of compressed air can send dirt particles into the bear- ings and other areas of the motor that can cause pos- sible damage. 3. Remove brush covers at rear of motor. See Fig- ure 2. Wear eye protection. Use a vacuum cleaner or compressed air to remove dirt and brush dust from commutator area. Figure 2. Brush Cover Removal From Motor 4. Remove and inspect brushes for damage or uneven wear. Replace all brushes if any brush is worn or damaged. The brushes must be at least half their original length. Move brush springs away from top of each brush and pull brushes from their holders to inspect surface that rides on commutator. See Fig- ure 3. That surface must have the same shape as the commutator and must not have cracks or de- fects. Some brushes have wear sensor wires at- tached, even if they are not connected to an indi- cator. Replace these brushes if brushes are worn enough to see sensor at commutator end of brush. 5. Inspect commutator surface. See Table 1 and Ta- ble 2. Carefully rotate armature. DO NOT damage commutator if you use a tool to rotate armature. The commutator wears slowly in normal service. The mica must be cut below the surface of the com- mutator bars after a long service period or after a commutator has been turned in a lathe. A commutator that has been in service will have a smooth and polished surface with a darker brown color where it rotates under the brushes. A variation of color on the commutator surface between light brown and darker brown is normal. The surface condition is the lubrication between the commutator and the brushes. The brushes will wear rapidly if this surface condition does not develop during the first 6 to 10 hours of operation after a commutator with a new surface is installed. If the commutator has deep grooves, rough edges of the bars, or a few bars that are black or raised above the others, the motor must be removed for service. 6. Inspect white or gray insulation (mica) between commutator bars. The mica must not touch the brushes or the brushes will wear very rapidly. 7. To replace a brush set, remove screw that holds brush wires to bus. Pull brush end of springs from brushes, and pull brushes from holders. Lift brush springs away from holders, and install new brushes so brush commutator surface fully touches commu- tator. Make sure the springs are pushing on each brush. Install and tighten screws for brush wires and bus connectors. 8. Carefully install brush covers so sparks are kept inside motor housing. Install battery as described in Operating Manual or the Periodic Maintenance YRM section for your lift truck. 2
  • 13. 620 YRM 294 Brush and Commutator Inspection Figure 3. Brush Removal and Inspection Legend for Figure 3 1. BRUSH 2. BRUSH SPRING 3. MICA Table 1. Normal Commutator Surfaces A light brown surface of the commutator where it rotates on the brushes is a normal condition. The surface of the commutator must be smooth. Variations between light brown and dark brown colors are also normal. The surface of the commutator must be smooth. 3
  • 14. Brush and Commutator Inspection 620 YRM 294 Table 1. Normal Commutator Surfaces (Continued) A condition called slot bar marking is also normal if the commutator surface is smooth. The variable color occurs in a pattern according to the number of conductors per slot. A very dark surface is also a normal and an acceptable condition if the commutator surface is smooth. STEERING PUMP MOTOR NOTE: Some electrical trucks use a steering pump mo- tor. Refer to your truck model’s service manual for in- structions on removal and installation of steering pump motors. 1. Disconnect battery connector. Remove floor plate from lift truck for access to steering pump motor. Open hood for access to motor. Remove screws that hold two brush cover plates to motor housing. 2. Inspect brushes and commutator as described in previous paragraphs for traction and hydraulic pump motors. The brush replacement procedure is also the same, although there are only two brushes for the steering pump motor. See Table 3. 3. Install brush covers and screws. Install floor plate or close hood and connect battery connector. NORMAL COMMUTATOR SURFACE A commutator that has been in service will have a smooth and polished surface with a darker brown color where it rotates under the brushes. See Table 1. A variation of color on the commutator surface between light brown and darker brown is normal. This surface condition is the lubrication between the commutator and the brushes. The brushes will wear rapidly if this surface condition does not develop during the first 6 to 10 hours of operation after a commutator with a new surface is installed. 4