SlideShare a Scribd company logo
1 of 15
Download to read offline
2004 DRIVELINE/AXLE
Rear Drive Axle - Vue
SPECIFICATIONS
FASTENER TIGHTENING SPECIFICATIONS
Fastener Tightening Specifications
REAR AXLE SPECIFICATIONS
Rear Axle Specifications
SEALERS, ADHESIVES, AND LUBRICANTS
Sealers, Adhesives, and Lubricants
Application
Specification
Metric English
Clutch Cover M8 Bolts 26 N.m 19 lb ft
Drain Plug 30 N.m 22 lb in
Fill Plug 35 N.m 26 lb ft
Input Flange 3/4 x 20 Nut 203 N.m 150 lb ft
Prop Guard 24 N.m 18 lb ft
Propeller Shaft-to-Drive Shaft Flange M10 Bolts 70 N.m 52 lb ft
Rear Bracket Bushing-to-Body M12 Bolts 105 N.m 77 lb ft
Rear Bracket M12 Bolts/Nuts 105 N.m 77 lb ft
Rear Cover M10 Bolts 46 N.m 34 lb ft
Rear Cover M8 Bolts 26 N.m 19 lb ft
Ring Gear M8 Bolts 54 N.m 40 lb ft
Side Bracket Bushing-to-Body M12 Bolts 105 N.m 77 lb ft
Vent Fitting 24 N.m 18 lb ft
Application
Specification
Metric English
Assembly Rolling Torque - without Clutch Lubed Bearings 1.9-3.5 17-31 lb in
Gear Ratio, L61 2.2L and L81 3.0L 2.53 2.53
Gear Ratio L66 3.5L 3.39 3.39
Pinion Shaft Preload 1.69 N.m 15 lb in
Pinion to Ring Gear Backlash 0.125-0.225 mm 0.005-0.009 in
Rear Differential Fill Quantity 750 ml 25.4 oz
Application Type of Material
Saturn P/N
United States
2004 Saturn Vue
2004 DRIVELINE/AXLE Rear Drive Axle - Vue
2004 Saturn Vue
2004 DRIVELINE/AXLE Rear Drive Axle - Vue
Helpmelearn
April-08-08 8:43:02 AM Page 1 © 2005 Mitchell Repair Information Company, LLC.
Helpmelearn
April-08-08 8:43:40 AM Page 1 © 2005 Mitchell Repair Information Company, LLC.
COMPONENT LOCATOR
REAR AXLE DISASSEMBLED VIEWS
Fig. 1: Rear Axle Disassembled View
Courtesy of GENERAL MOTORS CORP.
Callouts For Fig. 1 Disassembled View
Clutch Housing to Differential Housing Sealing Surfaces Sealant 21019581
Drain Plug Threads Sealant 21485278
Fill Plug Threads Sealant 21485278
GM Versatrak Fluid Synthetic Gear Oil 12378514
Propeller Shaft Mounting Bolts Threadlocker 21005994
Rear Cover to Differential Housing Sealing Surfaces Sealant 21019581
Ring Gear Pattern Inspection Gear Marking Compound 1052351
2004 Saturn Vue
2004 DRIVELINE/AXLE Rear Drive Axle - Vue
Helpmelearn
April-08-08 8:43:03 AM Page 2 © 2005 Mitchell Repair Information Company, LLC.
Callout Component Name
1 Nut
2 Input Flange
3 Dust Shield
4 Oil Seal
5 Drain Plug
6 Plug
7 Bolt
8 Shield
9 Bolt
10 Clutch Cover
11 Bearing
12 Snap Ring
13 Seal
14 Clutch Drum
15 Pinion Nut
16 Bearing
17 Cup
18 Seal
19 Filter
20 Mount
21 Axle Seals
22 Hollow Dowel
23 Differential Carrier
24 Cup
25 Collapsible Spacer
26 Bearing
27 Shim
28 Pinion Gear
29 Shim
30 Cup
31 Differential Carrier Assembly
32 Cover
33 Bolt
34 Fill Plug
35 Vent
36 Nut
37 Bracket
38 Bolt
2004 Saturn Vue
2004 DRIVELINE/AXLE Rear Drive Axle - Vue
Helpmelearn
April-08-08 8:43:03 AM Page 3 © 2005 Mitchell Repair Information Company, LLC.
Fig. 2: Differential Carrier Components
Courtesy of GENERAL MOTORS CORP.
Callouts For Fig. 2 Disassembled View
Callout Component Name
1 Bearing
1 Bearing
2 Bolt
3 Pinion Shaft Pin
4 Differential Case
5 Pinion Shaft Lock Pin
6 Ring Gear
7 Washer
7 Washer
8 Axle Side Gear
8 Axle Side Gear
9 Washer
9 Washer
10 Pinion Gears
10 Pinion Gears
2004 Saturn Vue
2004 DRIVELINE/AXLE Rear Drive Axle - Vue
Helpmelearn
April-08-08 8:43:03 AM Page 4 © 2005 Mitchell Repair Information Company, LLC.
DIAGNOSTIC INFORMATION AND PROCEDURES
DIAGNOSTIC STARTING POINT - REAR DRIVE AXLE
Begin the system diagnosis by reviewing the Rear Axle Disassembled Views or Rear Drive Axle Description
and Operation , and Transfer Case Description and Operation in Transfer Case NVG900. Reviewing the
description and operation information will help you determine the correct symptom diagnostic procedure when
a malfunction exists. Reviewing the description and operation information will also help you determine if the
condition described by the customer is normal operation. Refer to Symptoms - Rear Drive Axle procedure for
diagnosing the system.
SYMPTOMS - REAR DRIVE AXLE
Strategy Based Diagnostics
Review the system in order to familiarize yourself with the system functions. Refer to Rear Axle Disassembled
Views or Rear Drive Axle Description and Operation , and Transfer Case Description and Operation in
Transfer Case NVG900. All diagnosis on a vehicle should follow a logical process. Strategy based diagnostics
is a uniform approach for repairing all systems. The diagnostics flow may always be used in order to resolve a
system problem. The diagnostic flow is the place to start when repairs are necessary. For a detailed explanation,
refer to Strategy Based Diagnosis .
Visual/Physical Inspection
z Inspect for aftermarket devices, which could affect the operation of the vehicle. Refer to Checking
Aftermarket Accessories in Wiring Systems.
z Inspect the easily accessible or visible system components for obvious damage or a condition which
could cause the symptom.
z Check for correct lubricant level and proper viscosity.
z Verify the exact operating conditions under which the concerns exist. Note factors such as speed, road
conditions, ambient temperature, and other specifics.
z Compare the driving characteristics or sounds, if applicable, to a known good vehicle and make sure you
are not trying to correct a normal condition.
z Rear Axle activation and operation may be checked by position the four wheels off the ground, starting
the vehicle, and selecting the drive position. A properly operating rear axle and transfer case will rotate
all four wheels at equal RPM. Fully apply the parking brake, the rear will stop turning. Apply the throttle
while watching the rear wheels. They will rotate slightly as the driveline winds-up. This indicates the
AWD is functioning.
z Factors that may contribute to an inoperative rear axle include:
{ A low gear oil level
{ A mini spare or different size tires
NOTE: Do not exceed more than 5 seconds of parking brake application. RDM
damage may result.
2004 Saturn Vue
2004 DRIVELINE/AXLE Rear Drive Axle - Vue
Helpmelearn
April-08-08 8:43:03 AM Page 5 © 2005 Mitchell Repair Information Company, LLC.
{ A fluid over-temperature condition
{ A defective rear axle assembly
{ An inoperative transfer case assembly
{ The wrong fluid type
Intermittent
Test the vehicle under the same conditions that the customer reported in order to verify the system is operating
properly.
Noise Acceptability
A gear driven unit will produce a certain amount of noise. Some noise is acceptable and audible at certain
speeds, or under various driving conditions, such as a newly-paved blacktop road. Slight noise is not
detrimental to the operation of the axle and is considered normal.
Symptom List
Refer to a symptom diagnostic procedure from the following list in order to diagnose the symptom:
z Noisy in Drive
z Noisy When Coasting
z Intermittent Noise
z Constant Noise
z Noisy on Turns
z Rear Axle Lubricant Leak Diagnosis
NOISY IN DRIVE
Noisy in Drive
Cause Correction
Inspect for proper gear oil levels prior to performing system diagnosis.
Loose propeller shaft
mounting bolts
Tighten the bolts as required. Refer to Fastener Tightening Specifications
in Propeller Shaft.
Worn propeller shaft
constant velocity joint
Replace the propeller shaft assembly. Refer to Propeller Shaft Replacement
in Propeller Shaft.
A worn propeller shaft constant velocity joint may create a clicking, grinding,
or snapping type noise.
Worn or loose center
bearing assembly
Replace the center bearing assembly as required. A worn center bearing may
cause vehicle vibration or a grinding, squealing type of noise.
Refer to Center Bearing Removal in Propeller Shaft.
Worn universal joints Replace the universal joints as required. A worn universal joint may create a
clicking or snapping type of noise.
Refer to Universal Joint Replacement - External Snap Ring
2004 Saturn Vue
2004 DRIVELINE/AXLE Rear Drive Axle - Vue
Helpmelearn
April-08-08 8:43:03 AM Page 6 © 2005 Mitchell Repair Information Company, LLC.
NOISY WHEN COASTING
Noisy When Coasting
in Propeller Shaft.
Worn axle shaft constant
velocity joints
Replace/repair the constant velocity joints as required. A worn axle shaft
constant velocity joint may create a clicking, grinding, or snapping type of
noise.
Refer to Symptoms - Rear Drive Axle .
Transfer case noise Refer to Diagnostic Starting Point-Transfer Case procedure in Power Take-
Off Unit.
Worn or damaged axle
mounting bushings (side)
Replace bushings as required.
A worn bushing may create a clunk type of noise during acceleration or
deceleration.
Refer to Differential Housing Support Bushing Replacement .
Worn or damaged axle
mounting bushing (rear)
Replace bushings as required.
A worn bushing may create a clunk type of noise during acceleration or
deceleration.
Check bushing orientation; the tuning slots must be in proper position.
Loose rear mounting
bracket
Tighten the bracket bolts as required.
Refer to Fastener Tightening Specifications .
Loose or damaged prop
guard
Repair or replace as required.
A loose dust shield may contact the propeller shaft assembly and create a
scraping or grinding type of noise.
Bearing noise within axle
assembly
A grinding roar type of noise will increase or decrease relative to the vehicle
speed.
1. Check for proper fluid level. Refer to Lubricant Replacement - Rear
Drive Axle .
2. If the noise continues, repair or replace the unit as required.
Gear set whine noise
within axle assembly
A whine type of noise will increase or decrease relative to the vehicle speed
(approximately 80-90 km/h (50-56 mph)).
1. Check for the proper fluid level. Refer to Lubricant Replacement -
Rear Drive Axle .
2. Repair or replace the unit as required.
Shutter or moan at slow
speeds or slow turns
A shutter or moan type of noise in slow sharp turns.
1. RDM could be contaminated with the wrong fluid type/water.
2. Replace the fluid; fill as required and retest under conditions. Refer to
Lubricant Replacement - Rear Drive Axle .
3. Replace the drum.
Cause Correction
Inspect for proper gear oil levels prior to performing system diagnosis.
2004 Saturn Vue
2004 DRIVELINE/AXLE Rear Drive Axle - Vue
Helpmelearn
April-08-08 8:43:03 AM Page 7 © 2005 Mitchell Repair Information Company, LLC.
Loose propeller shaft mounting
bolts
Tighten the bolts as required. Refer to Fastener Tightening
Specifications in Propeller Shaft.
Worn propeller shaft constant
velocity joint.
Replace the propeller shaft assembly. Refer to Propeller Shaft
Replacement in Propeller Shaft.
A worn propeller shaft constant velocity joint may create a clicking,
grinding, or snapping type of noise.
Worn or loose center bearing
assembly
Replace the center bearing assembly as required.
A worn center bearing assembly may cause vehicle vibration or a
grinding or squealing type of noise.
Worn universal joints Replace the universal joints as required.
A worn universal joint may create a clicking or a snapping type of
noise.
Refer to Universal Joint Replacement - External Snap Ring in
Propeller Shaft.
Worn axle shaft constant
velocity joints.
Replace or repair the constant velocity joints as required.
A worn axle shaft constant velocity joint may create a clicking,
grinding, or snapping type of noise.
Refer to Symptoms - Rear Drive Axle .
Transfer case noise Refer to Symptoms - Transfer Case .
Worn or damaged axle
mounting bushings (Side)
Check the bushing position and replace the bushings as required. A
worn bushing may create a clunk type of noise during acceleration or
deceleration or wrong orientation.
Refer to Differential Housing Support Bushing Replacement .
Worn or damaged axle
mounting bushings (Rear)
Replace the bushings as required.
A worn bushing may create a clunk type of noise during acceleration or
deceleration.
Refer to Differential Housing Support Bushing Replacement .
Loose rear mounting bracket Tighten the bracket bolts as required.
Refer to Fastener Tightening Specifications .
Loose or damaged prop guard Repair or replace as required.
A loose dust shield may contact the propeller shaft assembly and create
a scraping or grinding type of noise.
Bearing noise within axle
assembly
A grinding or roar type of noise will increase or decrease relative to
vehicle speed.
1. Check for the proper fluid level. Refer to Lubricant
Replacement - Rear Drive Axle .
2. If the noise continues, repair or replace the unit as required.
Gear set whine noise within axle
assembly created by incorrect
gear backlash
A whine type of noise will increase of decrease relative to vehicle
speed.
1. Check for the proper fluid level. Refer to Lubricant
Replacement - Rear Drive Axle .
2. Repair or replace the unit as required.
2004 Saturn Vue
2004 DRIVELINE/AXLE Rear Drive Axle - Vue
Helpmelearn
April-08-08 8:43:03 AM Page 8 © 2005 Mitchell Repair Information Company, LLC.
INTERMITTENT NOISE
Intermittent Noise
CONSTANT NOISE
Constant Noise
Cause Correction
Inspect for proper gear oil levels prior to performing system diagnosis.
Low gear oil levels Fill axle to the recommended level.
Refer to Lubricant Replacement - Rear Drive Axle .
A low level may create intermittent or incomplete clutch park engagement.
Incorrect gear oil Replace with gear oil Saturn P/N 12378514.
Refer to Lubricant Replacement - Rear Drive Axle .
Incorrect gear oil may create improper clutch pack engagement or a
slippage condition.
Worn clutch pack oil pump Replace the clutch pack assembly.
Worn clutch pack friction
discs
Replace the clutch pack assembly.
Cause Correction
Inspect for proper gear oil levels prior to performing system diagnosis.
Low gear oil levels Faulty oil seal or other types of leaks may contribute to lower
than required fluid levels.
Refer to Rear Axle Lubricant Leak Diagnosis .
Fill to the proper level with gear oil Saturn P/N 12378514.
Refer to Lubricant Replacement - Rear Drive Axle .
Worn or loose axle mounts Repair or replace axle mounts as required.
Refer to Differential Housing Support Bushing Replacement .
Worn propeller shaft constant velocity
or universal joints
Replace the universal joints as required. Refer to Universal
Joint Replacement - External Snap Ring in Propeller Shaft.
If constant velocity joint is damaged, replace the propeller shaft.
Refer to Propeller Shaft Replacement in Propeller Shaft.
Worn propeller shaft center bearing
assembly
Replace the center bearing assembly.
Refer to Center Bearing Removal in Propeller Shaft.
Bearing noise within axle assembly This type of noise will decrease or increase relative to the
vehicle speed.
1. Check for the proper fluid level. Refer to Lubricant
Replacement - Rear Drive Axle .
2. Repair or replace the unit as required.
Gear set whine noise within the carrier
assembly caused by incorrect backlash
A whine type of noise will increase or decrease relative to the
vehicle speed.
1. Check for the proper fluid level. Refer to Lubricant
2004 Saturn Vue
2004 DRIVELINE/AXLE Rear Drive Axle - Vue
Helpmelearn
April-08-08 8:43:03 AM Page 9 © 2005 Mitchell Repair Information Company, LLC.
NOISY ON TURNS
Noisy on Turns
REAR AXLE LUBRICANT LEAK DIAGNOSIS
Rear Axle Lubricant Leak Diagnosis
REPAIR INSTRUCTIONS
Replacement - Rear Drive Axle .
2. Repair or replace the unit as required.
Cause Correction
Inspect for proper gear oil levels prior to performing system diagnosis.
Operate the vehicle turning in tight circles, in both left and right directions.
Moan, groan, chatter, or a pulsing type concern may indicate a pump or clutch park problem within the
axle assembly.
Worn or loose rear axle mounts Repair or replace as required.
Worn axle shaft constant velocity joints Replace the constant velocity joints as required.
Worn wheel bearings Replace the wheel bearings as required.
Incorrect gear oil Replace with gear oil Saturn P/N 12378514.
Refer to Lubricant Replacement - Rear Drive
Axle .
Worn differential side and/or idler gears and worn
cross-pin
Replace gears and pin as required.
Worn clutch plates Replace clutch drum.
Cause Correction
Restricted or damaged
ventilation tube assembly
Replace the ventilation tube as required.
Leaking fill or drain plug Install sealant Saturn P/N 21485278 or equivalent onto threads of plugs
and tighten.
Refer to Fastener Tightening Specifications .
Leaking input flange seal 1. Inspect the input flange surface for excessive wear or damage.
2. Inspect the front bearing for wear or damage. A worn bearing may
allow excessive movement of the clutch pack input shaft.
3. Replace the components as required.
Leaks at the housing sealing
surfaces
Dissemble the axle and reseal the sealing surfaces as required.
Refer to Differential Housing Assembly Disassemble .
Worn or damages axle shaft
oil seals
Replace the axle shaft oil seals as required.
Axle housing porosity Replace the housing(s) as required.
Refer to Rear Axle Shaft Seal Replacement - Left and Rear Axle Shaft
Seal Replacement - Right .
2004 Saturn Vue
2004 DRIVELINE/AXLE Rear Drive Axle - Vue
Helpmelearn
April-08-08 8:43:03 AM Page 10 © 2005 Mitchell Repair Information Company, LLC.
Thank you very much for
your reading. Please Click
Here. Then Get COMPLETE
MANUAL. NO WAITING
NOTE:
If there is no response to
click on the link above,
please download the PDF
document first and then
click on it.
LUBRICANT LEVEL INSPECTION - REAR DRIVE AXLE
Inspection Procedure
1. Prime the rear drive module in the service stall:
1. Raise and support the vehicle so that all wheels are off of the ground. Refer to Lifting and Jacking
the Vehicle in General Information.
2. Start the engine and place transmission in a forward gear.
3. Slowly apply the park brake until the rear wheels stop rotating.
4. Carefully accelerate the engine until the rear wheels begin to rotate.
5. Continue allowing the rear wheels to rotate for 5 seconds.
6. Release the accelerator and apply the brakes.
7. Place transmission in park or neutral and turn off the engine.
8. Release the park brake.
9. Raise the vehicle fully.
2. Alternatively, prime the rear drive module by driving the vehicle on a flat, paved surface in a tight, 360
degree circle for 3 consecutive revolutions at 8 km/h (5 mph).
3. Raise and support the vehicle. Refer to Lifting and Jacking the Vehicle in General Information.
IMPORTANT: In order to obtain an accurate indication of the fluid level, the rear drive
module priming procedure must be performed prior to fluid level
inspection.
IMPORTANT: Do not exceed 5 seconds of park brake apply while vehicle is in gear
and the engine is running to avoid overheating of the rear drive
module.
2004 Saturn Vue
2004 DRIVELINE/AXLE Rear Drive Axle - Vue
Helpmelearn
April-08-08 8:43:03 AM Page 11 © 2005 Mitchell Repair Information Company, LLC.
Fig. 3: Removing/Installing Fluid Fill Plug
Courtesy of GENERAL MOTORS CORP.
4. Clean the area around the fluid fill plug.
5. Remove the fluid fill plug.
2004 Saturn Vue
2004 DRIVELINE/AXLE Rear Drive Axle - Vue
Helpmelearn
April-08-08 8:43:03 AM Page 12 © 2005 Mitchell Repair Information Company, LLC.
Fig. 4: Removing Wire & Measure The Distance Between The Bend & The Fluid Level
Courtesy of GENERAL MOTORS CORP.
6. Using a length of heavy mechanics wire or equivalent, position a 90 degree bend approximately 25 mm (1
in) from the end of the wire.
7. Place the angled end of the wire into the fluid fill plug hole.
8. Rest the wire squarely on the threads of the fill plug hole.
9. Remove the wire and measure the distance between the bend and the fluid level as indicated by the
witness mark.
Specification: The distance from the bend to the witness mark should be 8-17 mm (0.32-0.68 in).
2004 Saturn Vue
2004 DRIVELINE/AXLE Rear Drive Axle - Vue
Helpmelearn
April-08-08 8:43:03 AM Page 13 © 2005 Mitchell Repair Information Company, LLC.
10. Adjust the fluid level as required by adding or removing fluid Saturn P/N 12378514.
11. Thoroughly clean the fill plug threads and apply sealer Saturn P/N 21485278 to the threads.
12. Install the rear drive module fill plug.
Tighten: Tighten the fill plug to 35 N.m (26 lb ft).
13. Lower the vehicle.
LUBRICANT REPLACEMENT - REAR DRIVE AXLE
Draining Procedure
2004 Saturn Vue
2004 DRIVELINE/AXLE Rear Drive Axle - Vue
Helpmelearn
April-08-08 8:43:03 AM Page 14 © 2005 Mitchell Repair Information Company, LLC.

More Related Content

What's hot

1999 TOYOTA COROLLA Service Repair Manual
1999 TOYOTA COROLLA Service Repair Manual1999 TOYOTA COROLLA Service Repair Manual
1999 TOYOTA COROLLA Service Repair Manualjksmemd eudkmmd
 
Still r70 60 diesel fork truck service repair manual
Still r70 60 diesel fork truck service repair manualStill r70 60 diesel fork truck service repair manual
Still r70 60 diesel fork truck service repair manualfjskemdme
 
Hyundai hl730 tm 3 wheel loader service repair manual
Hyundai hl730 tm 3 wheel loader service repair manualHyundai hl730 tm 3 wheel loader service repair manual
Hyundai hl730 tm 3 wheel loader service repair manualujjjjfkksekmmdm
 
Hyundai h70 crawler dozer service repair manual
Hyundai h70 crawler dozer service repair manualHyundai h70 crawler dozer service repair manual
Hyundai h70 crawler dozer service repair manualfjjskekmdmme
 
Hyundai r110 7 crawler excavator service repair manual
Hyundai r110 7 crawler excavator service repair manualHyundai r110 7 crawler excavator service repair manual
Hyundai r110 7 crawler excavator service repair manualfhsjekkdkem
 
Kubota b20 tractor parts catalogue manual
Kubota b20 tractor parts catalogue manualKubota b20 tractor parts catalogue manual
Kubota b20 tractor parts catalogue manualsoeldksejdksem
 
02 Clutches
02 Clutches02 Clutches
02 ClutchesRob Holt
 
Hyundai hl760 (#1001 #1301) wheel loader service repair manual
Hyundai hl760 (#1001 #1301) wheel loader service repair manualHyundai hl760 (#1001 #1301) wheel loader service repair manual
Hyundai hl760 (#1001 #1301) wheel loader service repair manualdfujdjkskekmmd
 
Hyundai hl740(tm) 7 wheel loader service repair manual
Hyundai hl740(tm) 7 wheel loader service repair manualHyundai hl740(tm) 7 wheel loader service repair manual
Hyundai hl740(tm) 7 wheel loader service repair manualdfujdjkskekmmd
 
1998 lexus lx 450 (lx450) service repair manual
1998 lexus lx 450 (lx450) service repair manual1998 lexus lx 450 (lx450) service repair manual
1998 lexus lx 450 (lx450) service repair manualfjjskekdmem
 
1997 lexus lx 450 (lx450) service repair manual
1997 lexus lx 450 (lx450) service repair manual1997 lexus lx 450 (lx450) service repair manual
1997 lexus lx 450 (lx450) service repair manualfjkskekdmmenm
 
Hyundai hl750 tm 3 wheel loader service repair manual
Hyundai hl750 tm 3 wheel loader service repair manualHyundai hl750 tm 3 wheel loader service repair manual
Hyundai hl750 tm 3 wheel loader service repair manualdfujdjkskekmmd
 

What's hot (13)

Amarillo gear repair manual
Amarillo gear repair manualAmarillo gear repair manual
Amarillo gear repair manual
 
1999 TOYOTA COROLLA Service Repair Manual
1999 TOYOTA COROLLA Service Repair Manual1999 TOYOTA COROLLA Service Repair Manual
1999 TOYOTA COROLLA Service Repair Manual
 
Still r70 60 diesel fork truck service repair manual
Still r70 60 diesel fork truck service repair manualStill r70 60 diesel fork truck service repair manual
Still r70 60 diesel fork truck service repair manual
 
Hyundai hl730 tm 3 wheel loader service repair manual
Hyundai hl730 tm 3 wheel loader service repair manualHyundai hl730 tm 3 wheel loader service repair manual
Hyundai hl730 tm 3 wheel loader service repair manual
 
Hyundai h70 crawler dozer service repair manual
Hyundai h70 crawler dozer service repair manualHyundai h70 crawler dozer service repair manual
Hyundai h70 crawler dozer service repair manual
 
Hyundai r110 7 crawler excavator service repair manual
Hyundai r110 7 crawler excavator service repair manualHyundai r110 7 crawler excavator service repair manual
Hyundai r110 7 crawler excavator service repair manual
 
Kubota b20 tractor parts catalogue manual
Kubota b20 tractor parts catalogue manualKubota b20 tractor parts catalogue manual
Kubota b20 tractor parts catalogue manual
 
02 Clutches
02 Clutches02 Clutches
02 Clutches
 
Hyundai hl760 (#1001 #1301) wheel loader service repair manual
Hyundai hl760 (#1001 #1301) wheel loader service repair manualHyundai hl760 (#1001 #1301) wheel loader service repair manual
Hyundai hl760 (#1001 #1301) wheel loader service repair manual
 
Hyundai hl740(tm) 7 wheel loader service repair manual
Hyundai hl740(tm) 7 wheel loader service repair manualHyundai hl740(tm) 7 wheel loader service repair manual
Hyundai hl740(tm) 7 wheel loader service repair manual
 
1998 lexus lx 450 (lx450) service repair manual
1998 lexus lx 450 (lx450) service repair manual1998 lexus lx 450 (lx450) service repair manual
1998 lexus lx 450 (lx450) service repair manual
 
1997 lexus lx 450 (lx450) service repair manual
1997 lexus lx 450 (lx450) service repair manual1997 lexus lx 450 (lx450) service repair manual
1997 lexus lx 450 (lx450) service repair manual
 
Hyundai hl750 tm 3 wheel loader service repair manual
Hyundai hl750 tm 3 wheel loader service repair manualHyundai hl750 tm 3 wheel loader service repair manual
Hyundai hl750 tm 3 wheel loader service repair manual
 

Similar to 2005 saturn vue service repair manual

2006 saturn vue service repair manual
2006 saturn vue service repair manual2006 saturn vue service repair manual
2006 saturn vue service repair manualfujjsekfkksekm
 
2009 SATURN OUTLOOK Service Repair Manual
2009 SATURN OUTLOOK Service Repair Manual2009 SATURN OUTLOOK Service Repair Manual
2009 SATURN OUTLOOK Service Repair Manualjksemd jksemm
 
Vnx.su master propulsion_2003
Vnx.su master propulsion_2003Vnx.su master propulsion_2003
Vnx.su master propulsion_2003vnx21
 
Differentials
DifferentialsDifferentials
DifferentialsRob Holt
 
Piaggio FLY 125 150 4T Service Repair Manual.pdf
Piaggio FLY 125 150 4T Service Repair Manual.pdfPiaggio FLY 125 150 4T Service Repair Manual.pdf
Piaggio FLY 125 150 4T Service Repair Manual.pdfnan98056babai
 
Piaggio FLY 125 150 4T Service Repair Manual.pdf
Piaggio FLY 125 150 4T Service Repair Manual.pdfPiaggio FLY 125 150 4T Service Repair Manual.pdf
Piaggio FLY 125 150 4T Service Repair Manual.pdfqfrq5052065
 
suspensionretardersystem-220726153321-060937ae.pptx
suspensionretardersystem-220726153321-060937ae.pptxsuspensionretardersystem-220726153321-060937ae.pptx
suspensionretardersystem-220726153321-060937ae.pptxbasant11731
 
1995 ford explorer service repair manual
1995 ford explorer service repair manual1995 ford explorer service repair manual
1995 ford explorer service repair manualufsiekdolskek
 
1998 ford explorer service repair manual
1998 ford explorer service repair manual1998 ford explorer service repair manual
1998 ford explorer service repair manualeudskkejedmm
 
1995 FORD EXPLORER Service Repair Manual
1995 FORD EXPLORER Service Repair Manual1995 FORD EXPLORER Service Repair Manual
1995 FORD EXPLORER Service Repair Manualkjdmjys
 
1997 ford explorer service repair manual
1997 ford explorer service repair manual1997 ford explorer service repair manual
1997 ford explorer service repair manualfisdkjekemms
 
1996 FORD EXPLORER Service Repair Manual
1996 FORD EXPLORER Service Repair Manual1996 FORD EXPLORER Service Repair Manual
1996 FORD EXPLORER Service Repair Manualukjsekmdwe
 
2000 ford explorer service repair manual
2000 ford explorer service repair manual2000 ford explorer service repair manual
2000 ford explorer service repair manualfjskekazxdmmme
 
2009 GEM Global Electric Motorcars Service Repair Manual.pdf
2009 GEM Global Electric Motorcars Service Repair Manual.pdf2009 GEM Global Electric Motorcars Service Repair Manual.pdf
2009 GEM Global Electric Motorcars Service Repair Manual.pdf8fuusejkdkdmm3e
 
2009 GEM Global Electric Motorcars Service Repair Manual.pdf
2009 GEM Global Electric Motorcars Service Repair Manual.pdf2009 GEM Global Electric Motorcars Service Repair Manual.pdf
2009 GEM Global Electric Motorcars Service Repair Manual.pdffujsekddmdmdm
 
2009 GEM Global Electric Motorcars Service Repair Manual.pdf
2009 GEM Global Electric Motorcars Service Repair Manual.pdf2009 GEM Global Electric Motorcars Service Repair Manual.pdf
2009 GEM Global Electric Motorcars Service Repair Manual.pdffuusejkdkdmdm
 
2008 GEM Global Electric Motorcars Service Repair Manual.pdf
2008 GEM Global Electric Motorcars Service Repair Manual.pdf2008 GEM Global Electric Motorcars Service Repair Manual.pdf
2008 GEM Global Electric Motorcars Service Repair Manual.pdf8fuusejkdkdmm3e
 
2009 GEM Global Electric Motorcars Service Repair Manual.pdf
2009 GEM Global Electric Motorcars Service Repair Manual.pdf2009 GEM Global Electric Motorcars Service Repair Manual.pdf
2009 GEM Global Electric Motorcars Service Repair Manual.pdffujsekdkdidjj4e
 

Similar to 2005 saturn vue service repair manual (18)

2006 saturn vue service repair manual
2006 saturn vue service repair manual2006 saturn vue service repair manual
2006 saturn vue service repair manual
 
2009 SATURN OUTLOOK Service Repair Manual
2009 SATURN OUTLOOK Service Repair Manual2009 SATURN OUTLOOK Service Repair Manual
2009 SATURN OUTLOOK Service Repair Manual
 
Vnx.su master propulsion_2003
Vnx.su master propulsion_2003Vnx.su master propulsion_2003
Vnx.su master propulsion_2003
 
Differentials
DifferentialsDifferentials
Differentials
 
Piaggio FLY 125 150 4T Service Repair Manual.pdf
Piaggio FLY 125 150 4T Service Repair Manual.pdfPiaggio FLY 125 150 4T Service Repair Manual.pdf
Piaggio FLY 125 150 4T Service Repair Manual.pdf
 
Piaggio FLY 125 150 4T Service Repair Manual.pdf
Piaggio FLY 125 150 4T Service Repair Manual.pdfPiaggio FLY 125 150 4T Service Repair Manual.pdf
Piaggio FLY 125 150 4T Service Repair Manual.pdf
 
suspensionretardersystem-220726153321-060937ae.pptx
suspensionretardersystem-220726153321-060937ae.pptxsuspensionretardersystem-220726153321-060937ae.pptx
suspensionretardersystem-220726153321-060937ae.pptx
 
1995 ford explorer service repair manual
1995 ford explorer service repair manual1995 ford explorer service repair manual
1995 ford explorer service repair manual
 
1998 ford explorer service repair manual
1998 ford explorer service repair manual1998 ford explorer service repair manual
1998 ford explorer service repair manual
 
1995 FORD EXPLORER Service Repair Manual
1995 FORD EXPLORER Service Repair Manual1995 FORD EXPLORER Service Repair Manual
1995 FORD EXPLORER Service Repair Manual
 
1997 ford explorer service repair manual
1997 ford explorer service repair manual1997 ford explorer service repair manual
1997 ford explorer service repair manual
 
1996 FORD EXPLORER Service Repair Manual
1996 FORD EXPLORER Service Repair Manual1996 FORD EXPLORER Service Repair Manual
1996 FORD EXPLORER Service Repair Manual
 
2000 ford explorer service repair manual
2000 ford explorer service repair manual2000 ford explorer service repair manual
2000 ford explorer service repair manual
 
2009 GEM Global Electric Motorcars Service Repair Manual.pdf
2009 GEM Global Electric Motorcars Service Repair Manual.pdf2009 GEM Global Electric Motorcars Service Repair Manual.pdf
2009 GEM Global Electric Motorcars Service Repair Manual.pdf
 
2009 GEM Global Electric Motorcars Service Repair Manual.pdf
2009 GEM Global Electric Motorcars Service Repair Manual.pdf2009 GEM Global Electric Motorcars Service Repair Manual.pdf
2009 GEM Global Electric Motorcars Service Repair Manual.pdf
 
2009 GEM Global Electric Motorcars Service Repair Manual.pdf
2009 GEM Global Electric Motorcars Service Repair Manual.pdf2009 GEM Global Electric Motorcars Service Repair Manual.pdf
2009 GEM Global Electric Motorcars Service Repair Manual.pdf
 
2008 GEM Global Electric Motorcars Service Repair Manual.pdf
2008 GEM Global Electric Motorcars Service Repair Manual.pdf2008 GEM Global Electric Motorcars Service Repair Manual.pdf
2008 GEM Global Electric Motorcars Service Repair Manual.pdf
 
2009 GEM Global Electric Motorcars Service Repair Manual.pdf
2009 GEM Global Electric Motorcars Service Repair Manual.pdf2009 GEM Global Electric Motorcars Service Repair Manual.pdf
2009 GEM Global Electric Motorcars Service Repair Manual.pdf
 

More from fhsjejkdm

John deere 280 skid steer loader service repair manual
John deere 280 skid steer loader service repair manualJohn deere 280 skid steer loader service repair manual
John deere 280 skid steer loader service repair manualfhsjejkdm
 
John deere 270 skid steer loader service repair manual
John deere 270 skid steer loader service repair manualJohn deere 270 skid steer loader service repair manual
John deere 270 skid steer loader service repair manualfhsjejkdm
 
John deere 260 skid steer loader service repair manual
John deere 260 skid steer loader service repair manualJohn deere 260 skid steer loader service repair manual
John deere 260 skid steer loader service repair manualfhsjejkdm
 
John deere 230 cs chainsaws service repair manual
John deere 230 cs chainsaws service repair manualJohn deere 230 cs chainsaws service repair manual
John deere 230 cs chainsaws service repair manualfhsjejkdm
 
John deere 200 cs chainsaws service repair manual
John deere 200 cs chainsaws service repair manualJohn deere 200 cs chainsaws service repair manual
John deere 200 cs chainsaws service repair manualfhsjejkdm
 
John deere 200 sprayer attachment service repair manual
John deere 200 sprayer attachment service repair manualJohn deere 200 sprayer attachment service repair manual
John deere 200 sprayer attachment service repair manualfhsjejkdm
 
John deere 113 172 clipper service repair manual
John deere 113  172 clipper service repair manualJohn deere 113  172 clipper service repair manual
John deere 113 172 clipper service repair manualfhsjejkdm
 
John deere 110 g, 210g, 240g 260g trimmer clutters service repair manual
John deere 110 g, 210g, 240g  260g trimmer  clutters service repair manualJohn deere 110 g, 210g, 240g  260g trimmer  clutters service repair manual
John deere 110 g, 210g, 240g 260g trimmer clutters service repair manualfhsjejkdm
 
John deere 54 inch commercial walk behind mower service repair manual
John deere 54 inch commercial walk behind mower service repair manualJohn deere 54 inch commercial walk behind mower service repair manual
John deere 54 inch commercial walk behind mower service repair manualfhsjejkdm
 
John deere 51 & 246 rotary brooms service repair manual
John deere 51 & 246 rotary brooms service repair manualJohn deere 51 & 246 rotary brooms service repair manual
John deere 51 & 246 rotary brooms service repair manualfhsjejkdm
 
John deere 48, 450, 550 & 660 rotary tillers service repair manual
John deere 48, 450, 550 & 660 rotary tillers service repair manualJohn deere 48, 450, 550 & 660 rotary tillers service repair manual
John deere 48, 450, 550 & 660 rotary tillers service repair manualfhsjejkdm
 
John deere 48, 50, 54, 60, 72, 76, 160, 172, 261 & 272 rotary mowers serv...
John deere 48, 50, 54, 60, 72, 76, 160, 172, 261 & 272 rotary mowers serv...John deere 48, 50, 54, 60, 72, 76, 160, 172, 261 & 272 rotary mowers serv...
John deere 48, 50, 54, 60, 72, 76, 160, 172, 261 & 272 rotary mowers serv...fhsjejkdm
 
John deere 48 inch commercial walk behind mower service repair manual
John deere 48 inch commercial walk behind mower service repair manualJohn deere 48 inch commercial walk behind mower service repair manual
John deere 48 inch commercial walk behind mower service repair manualfhsjejkdm
 
John deere 47, 59 & 359 snowblowers service repair manual
John deere 47, 59 & 359 snowblowers service repair manualJohn deere 47, 59 & 359 snowblowers service repair manual
John deere 47, 59 & 359 snowblowers service repair manualfhsjejkdm
 
John deere 46, 49 & 50 snowthrowers service repair manual
John deere 46, 49 & 50 snowthrowers service repair manualJohn deere 46, 49 & 50 snowthrowers service repair manual
John deere 46, 49 & 50 snowthrowers service repair manualfhsjejkdm
 
Clark gph 50 forklift service repair manual
Clark gph 50 forklift service repair manualClark gph 50 forklift service repair manual
Clark gph 50 forklift service repair manualfhsjejkdm
 
Clark gp127 e forklift service repair manual
Clark gp127 e forklift service repair manualClark gp127 e forklift service repair manual
Clark gp127 e forklift service repair manualfhsjejkdm
 
Clark gp127 forklift service repair manual
Clark gp127 forklift service repair manualClark gp127 forklift service repair manual
Clark gp127 forklift service repair manualfhsjejkdm
 
Clark gex20 30 forklift service repair manual
Clark gex20 30 forklift service repair manualClark gex20 30 forklift service repair manual
Clark gex20 30 forklift service repair manualfhsjejkdm
 
Clark gcs standard forklift service repair manual
Clark gcs standard forklift service repair manualClark gcs standard forklift service repair manual
Clark gcs standard forklift service repair manualfhsjejkdm
 

More from fhsjejkdm (20)

John deere 280 skid steer loader service repair manual
John deere 280 skid steer loader service repair manualJohn deere 280 skid steer loader service repair manual
John deere 280 skid steer loader service repair manual
 
John deere 270 skid steer loader service repair manual
John deere 270 skid steer loader service repair manualJohn deere 270 skid steer loader service repair manual
John deere 270 skid steer loader service repair manual
 
John deere 260 skid steer loader service repair manual
John deere 260 skid steer loader service repair manualJohn deere 260 skid steer loader service repair manual
John deere 260 skid steer loader service repair manual
 
John deere 230 cs chainsaws service repair manual
John deere 230 cs chainsaws service repair manualJohn deere 230 cs chainsaws service repair manual
John deere 230 cs chainsaws service repair manual
 
John deere 200 cs chainsaws service repair manual
John deere 200 cs chainsaws service repair manualJohn deere 200 cs chainsaws service repair manual
John deere 200 cs chainsaws service repair manual
 
John deere 200 sprayer attachment service repair manual
John deere 200 sprayer attachment service repair manualJohn deere 200 sprayer attachment service repair manual
John deere 200 sprayer attachment service repair manual
 
John deere 113 172 clipper service repair manual
John deere 113  172 clipper service repair manualJohn deere 113  172 clipper service repair manual
John deere 113 172 clipper service repair manual
 
John deere 110 g, 210g, 240g 260g trimmer clutters service repair manual
John deere 110 g, 210g, 240g  260g trimmer  clutters service repair manualJohn deere 110 g, 210g, 240g  260g trimmer  clutters service repair manual
John deere 110 g, 210g, 240g 260g trimmer clutters service repair manual
 
John deere 54 inch commercial walk behind mower service repair manual
John deere 54 inch commercial walk behind mower service repair manualJohn deere 54 inch commercial walk behind mower service repair manual
John deere 54 inch commercial walk behind mower service repair manual
 
John deere 51 & 246 rotary brooms service repair manual
John deere 51 & 246 rotary brooms service repair manualJohn deere 51 & 246 rotary brooms service repair manual
John deere 51 & 246 rotary brooms service repair manual
 
John deere 48, 450, 550 & 660 rotary tillers service repair manual
John deere 48, 450, 550 & 660 rotary tillers service repair manualJohn deere 48, 450, 550 & 660 rotary tillers service repair manual
John deere 48, 450, 550 & 660 rotary tillers service repair manual
 
John deere 48, 50, 54, 60, 72, 76, 160, 172, 261 & 272 rotary mowers serv...
John deere 48, 50, 54, 60, 72, 76, 160, 172, 261 & 272 rotary mowers serv...John deere 48, 50, 54, 60, 72, 76, 160, 172, 261 & 272 rotary mowers serv...
John deere 48, 50, 54, 60, 72, 76, 160, 172, 261 & 272 rotary mowers serv...
 
John deere 48 inch commercial walk behind mower service repair manual
John deere 48 inch commercial walk behind mower service repair manualJohn deere 48 inch commercial walk behind mower service repair manual
John deere 48 inch commercial walk behind mower service repair manual
 
John deere 47, 59 & 359 snowblowers service repair manual
John deere 47, 59 & 359 snowblowers service repair manualJohn deere 47, 59 & 359 snowblowers service repair manual
John deere 47, 59 & 359 snowblowers service repair manual
 
John deere 46, 49 & 50 snowthrowers service repair manual
John deere 46, 49 & 50 snowthrowers service repair manualJohn deere 46, 49 & 50 snowthrowers service repair manual
John deere 46, 49 & 50 snowthrowers service repair manual
 
Clark gph 50 forklift service repair manual
Clark gph 50 forklift service repair manualClark gph 50 forklift service repair manual
Clark gph 50 forklift service repair manual
 
Clark gp127 e forklift service repair manual
Clark gp127 e forklift service repair manualClark gp127 e forklift service repair manual
Clark gp127 e forklift service repair manual
 
Clark gp127 forklift service repair manual
Clark gp127 forklift service repair manualClark gp127 forklift service repair manual
Clark gp127 forklift service repair manual
 
Clark gex20 30 forklift service repair manual
Clark gex20 30 forklift service repair manualClark gex20 30 forklift service repair manual
Clark gex20 30 forklift service repair manual
 
Clark gcs standard forklift service repair manual
Clark gcs standard forklift service repair manualClark gcs standard forklift service repair manual
Clark gcs standard forklift service repair manual
 

Recently uploaded

(办理学位证)(Rice毕业证)莱斯大学毕业证成绩单修改留信学历认证原版一模一样
(办理学位证)(Rice毕业证)莱斯大学毕业证成绩单修改留信学历认证原版一模一样(办理学位证)(Rice毕业证)莱斯大学毕业证成绩单修改留信学历认证原版一模一样
(办理学位证)(Rice毕业证)莱斯大学毕业证成绩单修改留信学历认证原版一模一样gfghbihg
 
What Could Cause A VW Tiguan's Radiator Fan To Stop Working
What Could Cause A VW Tiguan's Radiator Fan To Stop WorkingWhat Could Cause A VW Tiguan's Radiator Fan To Stop Working
What Could Cause A VW Tiguan's Radiator Fan To Stop WorkingEscondido German Auto
 
Dubai Call Girls Size E6 (O525547819) Call Girls In Dubai
Dubai Call Girls  Size E6 (O525547819) Call Girls In DubaiDubai Call Girls  Size E6 (O525547819) Call Girls In Dubai
Dubai Call Girls Size E6 (O525547819) Call Girls In Dubaikojalkojal131
 
UNIT-III-TRANSMISSION SYSTEMS REAR AXLES
UNIT-III-TRANSMISSION SYSTEMS REAR AXLESUNIT-III-TRANSMISSION SYSTEMS REAR AXLES
UNIT-III-TRANSMISSION SYSTEMS REAR AXLESDineshKumar4165
 
如何办理(UQ毕业证书)昆士兰大学毕业证毕业证成绩单原版一比一
如何办理(UQ毕业证书)昆士兰大学毕业证毕业证成绩单原版一比一如何办理(UQ毕业证书)昆士兰大学毕业证毕业证成绩单原版一比一
如何办理(UQ毕业证书)昆士兰大学毕业证毕业证成绩单原版一比一hnfusn
 
VIP Kolkata Call Girl Kasba 👉 8250192130 Available With Room
VIP Kolkata Call Girl Kasba 👉 8250192130  Available With RoomVIP Kolkata Call Girl Kasba 👉 8250192130  Available With Room
VIP Kolkata Call Girl Kasba 👉 8250192130 Available With Roomdivyansh0kumar0
 
FULL ENJOY - 9953040155 Call Girls in Sector 61 | Noida
FULL ENJOY - 9953040155 Call Girls in Sector 61 | NoidaFULL ENJOY - 9953040155 Call Girls in Sector 61 | Noida
FULL ENJOY - 9953040155 Call Girls in Sector 61 | NoidaMalviyaNagarCallGirl
 
UNIT-V-ELECTRIC AND HYBRID VEHICLES.pptx
UNIT-V-ELECTRIC AND HYBRID VEHICLES.pptxUNIT-V-ELECTRIC AND HYBRID VEHICLES.pptx
UNIT-V-ELECTRIC AND HYBRID VEHICLES.pptxDineshKumar4165
 
2024 TOP 10 most fuel-efficient vehicles according to the US agency
2024 TOP 10 most fuel-efficient vehicles according to the US agency2024 TOP 10 most fuel-efficient vehicles according to the US agency
2024 TOP 10 most fuel-efficient vehicles according to the US agencyHyundai Motor Group
 
BLUE VEHICLES the kids picture show 2024
BLUE VEHICLES the kids picture show 2024BLUE VEHICLES the kids picture show 2024
BLUE VEHICLES the kids picture show 2024AHOhOops1
 
Russian Call Girls Delhi Indirapuram {9711199171} Aarvi Gupta ✌️Independent ...
Russian  Call Girls Delhi Indirapuram {9711199171} Aarvi Gupta ✌️Independent ...Russian  Call Girls Delhi Indirapuram {9711199171} Aarvi Gupta ✌️Independent ...
Russian Call Girls Delhi Indirapuram {9711199171} Aarvi Gupta ✌️Independent ...shivangimorya083
 
( Best ) Genuine Call Girls In Mandi House =DELHI-| 8377087607
( Best ) Genuine Call Girls In Mandi House =DELHI-| 8377087607( Best ) Genuine Call Girls In Mandi House =DELHI-| 8377087607
( Best ) Genuine Call Girls In Mandi House =DELHI-| 8377087607dollysharma2066
 
UNIT-1-VEHICLE STRUCTURE AND ENGINES.ppt
UNIT-1-VEHICLE STRUCTURE AND ENGINES.pptUNIT-1-VEHICLE STRUCTURE AND ENGINES.ppt
UNIT-1-VEHICLE STRUCTURE AND ENGINES.pptDineshKumar4165
 
(办理学位证)(Toledo毕业证)托莱多大学毕业证成绩单修改留信学历认证原版一模一样
(办理学位证)(Toledo毕业证)托莱多大学毕业证成绩单修改留信学历认证原版一模一样(办理学位证)(Toledo毕业证)托莱多大学毕业证成绩单修改留信学历认证原版一模一样
(办理学位证)(Toledo毕业证)托莱多大学毕业证成绩单修改留信学历认证原版一模一样gfghbihg
 
GREEN VEHICLES the kids picture show 2024
GREEN VEHICLES the kids picture show 2024GREEN VEHICLES the kids picture show 2024
GREEN VEHICLES the kids picture show 2024AHOhOops1
 
定制昆士兰大学毕业证(本硕)UQ学位证书原版一比一
定制昆士兰大学毕业证(本硕)UQ学位证书原版一比一定制昆士兰大学毕业证(本硕)UQ学位证书原版一比一
定制昆士兰大学毕业证(本硕)UQ学位证书原版一比一fjjhfuubb
 
UNIT-IV-STEERING, BRAKES AND SUSPENSION SYSTEMS.pptx
UNIT-IV-STEERING, BRAKES AND SUSPENSION SYSTEMS.pptxUNIT-IV-STEERING, BRAKES AND SUSPENSION SYSTEMS.pptx
UNIT-IV-STEERING, BRAKES AND SUSPENSION SYSTEMS.pptxDineshKumar4165
 
(8264348440) 🔝 Call Girls In Shaheen Bagh 🔝 Delhi NCR
(8264348440) 🔝 Call Girls In Shaheen Bagh 🔝 Delhi NCR(8264348440) 🔝 Call Girls In Shaheen Bagh 🔝 Delhi NCR
(8264348440) 🔝 Call Girls In Shaheen Bagh 🔝 Delhi NCRsoniya singh
 
call girls in G.T.B. Nagar (DELHI) 🔝 >༒9953330565🔝 genuine Escort Service 🔝✔️✔️
call girls in  G.T.B. Nagar (DELHI) 🔝 >༒9953330565🔝 genuine Escort Service 🔝✔️✔️call girls in  G.T.B. Nagar (DELHI) 🔝 >༒9953330565🔝 genuine Escort Service 🔝✔️✔️
call girls in G.T.B. Nagar (DELHI) 🔝 >༒9953330565🔝 genuine Escort Service 🔝✔️✔️9953056974 Low Rate Call Girls In Saket, Delhi NCR
 

Recently uploaded (20)

(办理学位证)(Rice毕业证)莱斯大学毕业证成绩单修改留信学历认证原版一模一样
(办理学位证)(Rice毕业证)莱斯大学毕业证成绩单修改留信学历认证原版一模一样(办理学位证)(Rice毕业证)莱斯大学毕业证成绩单修改留信学历认证原版一模一样
(办理学位证)(Rice毕业证)莱斯大学毕业证成绩单修改留信学历认证原版一模一样
 
What Could Cause A VW Tiguan's Radiator Fan To Stop Working
What Could Cause A VW Tiguan's Radiator Fan To Stop WorkingWhat Could Cause A VW Tiguan's Radiator Fan To Stop Working
What Could Cause A VW Tiguan's Radiator Fan To Stop Working
 
Dubai Call Girls Size E6 (O525547819) Call Girls In Dubai
Dubai Call Girls  Size E6 (O525547819) Call Girls In DubaiDubai Call Girls  Size E6 (O525547819) Call Girls In Dubai
Dubai Call Girls Size E6 (O525547819) Call Girls In Dubai
 
UNIT-III-TRANSMISSION SYSTEMS REAR AXLES
UNIT-III-TRANSMISSION SYSTEMS REAR AXLESUNIT-III-TRANSMISSION SYSTEMS REAR AXLES
UNIT-III-TRANSMISSION SYSTEMS REAR AXLES
 
如何办理(UQ毕业证书)昆士兰大学毕业证毕业证成绩单原版一比一
如何办理(UQ毕业证书)昆士兰大学毕业证毕业证成绩单原版一比一如何办理(UQ毕业证书)昆士兰大学毕业证毕业证成绩单原版一比一
如何办理(UQ毕业证书)昆士兰大学毕业证毕业证成绩单原版一比一
 
VIP Kolkata Call Girl Kasba 👉 8250192130 Available With Room
VIP Kolkata Call Girl Kasba 👉 8250192130  Available With RoomVIP Kolkata Call Girl Kasba 👉 8250192130  Available With Room
VIP Kolkata Call Girl Kasba 👉 8250192130 Available With Room
 
FULL ENJOY - 9953040155 Call Girls in Sector 61 | Noida
FULL ENJOY - 9953040155 Call Girls in Sector 61 | NoidaFULL ENJOY - 9953040155 Call Girls in Sector 61 | Noida
FULL ENJOY - 9953040155 Call Girls in Sector 61 | Noida
 
UNIT-V-ELECTRIC AND HYBRID VEHICLES.pptx
UNIT-V-ELECTRIC AND HYBRID VEHICLES.pptxUNIT-V-ELECTRIC AND HYBRID VEHICLES.pptx
UNIT-V-ELECTRIC AND HYBRID VEHICLES.pptx
 
2024 TOP 10 most fuel-efficient vehicles according to the US agency
2024 TOP 10 most fuel-efficient vehicles according to the US agency2024 TOP 10 most fuel-efficient vehicles according to the US agency
2024 TOP 10 most fuel-efficient vehicles according to the US agency
 
BLUE VEHICLES the kids picture show 2024
BLUE VEHICLES the kids picture show 2024BLUE VEHICLES the kids picture show 2024
BLUE VEHICLES the kids picture show 2024
 
Russian Call Girls Delhi Indirapuram {9711199171} Aarvi Gupta ✌️Independent ...
Russian  Call Girls Delhi Indirapuram {9711199171} Aarvi Gupta ✌️Independent ...Russian  Call Girls Delhi Indirapuram {9711199171} Aarvi Gupta ✌️Independent ...
Russian Call Girls Delhi Indirapuram {9711199171} Aarvi Gupta ✌️Independent ...
 
( Best ) Genuine Call Girls In Mandi House =DELHI-| 8377087607
( Best ) Genuine Call Girls In Mandi House =DELHI-| 8377087607( Best ) Genuine Call Girls In Mandi House =DELHI-| 8377087607
( Best ) Genuine Call Girls In Mandi House =DELHI-| 8377087607
 
UNIT-1-VEHICLE STRUCTURE AND ENGINES.ppt
UNIT-1-VEHICLE STRUCTURE AND ENGINES.pptUNIT-1-VEHICLE STRUCTURE AND ENGINES.ppt
UNIT-1-VEHICLE STRUCTURE AND ENGINES.ppt
 
(办理学位证)(Toledo毕业证)托莱多大学毕业证成绩单修改留信学历认证原版一模一样
(办理学位证)(Toledo毕业证)托莱多大学毕业证成绩单修改留信学历认证原版一模一样(办理学位证)(Toledo毕业证)托莱多大学毕业证成绩单修改留信学历认证原版一模一样
(办理学位证)(Toledo毕业证)托莱多大学毕业证成绩单修改留信学历认证原版一模一样
 
Hot Sexy call girls in Pira Garhi🔝 9953056974 🔝 escort Service
Hot Sexy call girls in Pira Garhi🔝 9953056974 🔝 escort ServiceHot Sexy call girls in Pira Garhi🔝 9953056974 🔝 escort Service
Hot Sexy call girls in Pira Garhi🔝 9953056974 🔝 escort Service
 
GREEN VEHICLES the kids picture show 2024
GREEN VEHICLES the kids picture show 2024GREEN VEHICLES the kids picture show 2024
GREEN VEHICLES the kids picture show 2024
 
定制昆士兰大学毕业证(本硕)UQ学位证书原版一比一
定制昆士兰大学毕业证(本硕)UQ学位证书原版一比一定制昆士兰大学毕业证(本硕)UQ学位证书原版一比一
定制昆士兰大学毕业证(本硕)UQ学位证书原版一比一
 
UNIT-IV-STEERING, BRAKES AND SUSPENSION SYSTEMS.pptx
UNIT-IV-STEERING, BRAKES AND SUSPENSION SYSTEMS.pptxUNIT-IV-STEERING, BRAKES AND SUSPENSION SYSTEMS.pptx
UNIT-IV-STEERING, BRAKES AND SUSPENSION SYSTEMS.pptx
 
(8264348440) 🔝 Call Girls In Shaheen Bagh 🔝 Delhi NCR
(8264348440) 🔝 Call Girls In Shaheen Bagh 🔝 Delhi NCR(8264348440) 🔝 Call Girls In Shaheen Bagh 🔝 Delhi NCR
(8264348440) 🔝 Call Girls In Shaheen Bagh 🔝 Delhi NCR
 
call girls in G.T.B. Nagar (DELHI) 🔝 >༒9953330565🔝 genuine Escort Service 🔝✔️✔️
call girls in  G.T.B. Nagar (DELHI) 🔝 >༒9953330565🔝 genuine Escort Service 🔝✔️✔️call girls in  G.T.B. Nagar (DELHI) 🔝 >༒9953330565🔝 genuine Escort Service 🔝✔️✔️
call girls in G.T.B. Nagar (DELHI) 🔝 >༒9953330565🔝 genuine Escort Service 🔝✔️✔️
 

2005 saturn vue service repair manual

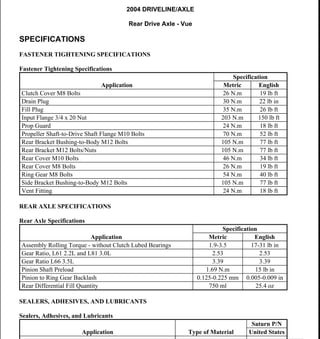
  • 1. 2004 DRIVELINE/AXLE Rear Drive Axle - Vue SPECIFICATIONS FASTENER TIGHTENING SPECIFICATIONS Fastener Tightening Specifications REAR AXLE SPECIFICATIONS Rear Axle Specifications SEALERS, ADHESIVES, AND LUBRICANTS Sealers, Adhesives, and Lubricants Application Specification Metric English Clutch Cover M8 Bolts 26 N.m 19 lb ft Drain Plug 30 N.m 22 lb in Fill Plug 35 N.m 26 lb ft Input Flange 3/4 x 20 Nut 203 N.m 150 lb ft Prop Guard 24 N.m 18 lb ft Propeller Shaft-to-Drive Shaft Flange M10 Bolts 70 N.m 52 lb ft Rear Bracket Bushing-to-Body M12 Bolts 105 N.m 77 lb ft Rear Bracket M12 Bolts/Nuts 105 N.m 77 lb ft Rear Cover M10 Bolts 46 N.m 34 lb ft Rear Cover M8 Bolts 26 N.m 19 lb ft Ring Gear M8 Bolts 54 N.m 40 lb ft Side Bracket Bushing-to-Body M12 Bolts 105 N.m 77 lb ft Vent Fitting 24 N.m 18 lb ft Application Specification Metric English Assembly Rolling Torque - without Clutch Lubed Bearings 1.9-3.5 17-31 lb in Gear Ratio, L61 2.2L and L81 3.0L 2.53 2.53 Gear Ratio L66 3.5L 3.39 3.39 Pinion Shaft Preload 1.69 N.m 15 lb in Pinion to Ring Gear Backlash 0.125-0.225 mm 0.005-0.009 in Rear Differential Fill Quantity 750 ml 25.4 oz Application Type of Material Saturn P/N United States 2004 Saturn Vue 2004 DRIVELINE/AXLE Rear Drive Axle - Vue 2004 Saturn Vue 2004 DRIVELINE/AXLE Rear Drive Axle - Vue Helpmelearn April-08-08 8:43:02 AM Page 1 © 2005 Mitchell Repair Information Company, LLC. Helpmelearn April-08-08 8:43:40 AM Page 1 © 2005 Mitchell Repair Information Company, LLC.
  • 2. COMPONENT LOCATOR REAR AXLE DISASSEMBLED VIEWS Fig. 1: Rear Axle Disassembled View Courtesy of GENERAL MOTORS CORP. Callouts For Fig. 1 Disassembled View Clutch Housing to Differential Housing Sealing Surfaces Sealant 21019581 Drain Plug Threads Sealant 21485278 Fill Plug Threads Sealant 21485278 GM Versatrak Fluid Synthetic Gear Oil 12378514 Propeller Shaft Mounting Bolts Threadlocker 21005994 Rear Cover to Differential Housing Sealing Surfaces Sealant 21019581 Ring Gear Pattern Inspection Gear Marking Compound 1052351 2004 Saturn Vue 2004 DRIVELINE/AXLE Rear Drive Axle - Vue Helpmelearn April-08-08 8:43:03 AM Page 2 © 2005 Mitchell Repair Information Company, LLC.
  • 3. Callout Component Name 1 Nut 2 Input Flange 3 Dust Shield 4 Oil Seal 5 Drain Plug 6 Plug 7 Bolt 8 Shield 9 Bolt 10 Clutch Cover 11 Bearing 12 Snap Ring 13 Seal 14 Clutch Drum 15 Pinion Nut 16 Bearing 17 Cup 18 Seal 19 Filter 20 Mount 21 Axle Seals 22 Hollow Dowel 23 Differential Carrier 24 Cup 25 Collapsible Spacer 26 Bearing 27 Shim 28 Pinion Gear 29 Shim 30 Cup 31 Differential Carrier Assembly 32 Cover 33 Bolt 34 Fill Plug 35 Vent 36 Nut 37 Bracket 38 Bolt 2004 Saturn Vue 2004 DRIVELINE/AXLE Rear Drive Axle - Vue Helpmelearn April-08-08 8:43:03 AM Page 3 © 2005 Mitchell Repair Information Company, LLC.
  • 4. Fig. 2: Differential Carrier Components Courtesy of GENERAL MOTORS CORP. Callouts For Fig. 2 Disassembled View Callout Component Name 1 Bearing 1 Bearing 2 Bolt 3 Pinion Shaft Pin 4 Differential Case 5 Pinion Shaft Lock Pin 6 Ring Gear 7 Washer 7 Washer 8 Axle Side Gear 8 Axle Side Gear 9 Washer 9 Washer 10 Pinion Gears 10 Pinion Gears 2004 Saturn Vue 2004 DRIVELINE/AXLE Rear Drive Axle - Vue Helpmelearn April-08-08 8:43:03 AM Page 4 © 2005 Mitchell Repair Information Company, LLC.
  • 5. DIAGNOSTIC INFORMATION AND PROCEDURES DIAGNOSTIC STARTING POINT - REAR DRIVE AXLE Begin the system diagnosis by reviewing the Rear Axle Disassembled Views or Rear Drive Axle Description and Operation , and Transfer Case Description and Operation in Transfer Case NVG900. Reviewing the description and operation information will help you determine the correct symptom diagnostic procedure when a malfunction exists. Reviewing the description and operation information will also help you determine if the condition described by the customer is normal operation. Refer to Symptoms - Rear Drive Axle procedure for diagnosing the system. SYMPTOMS - REAR DRIVE AXLE Strategy Based Diagnostics Review the system in order to familiarize yourself with the system functions. Refer to Rear Axle Disassembled Views or Rear Drive Axle Description and Operation , and Transfer Case Description and Operation in Transfer Case NVG900. All diagnosis on a vehicle should follow a logical process. Strategy based diagnostics is a uniform approach for repairing all systems. The diagnostics flow may always be used in order to resolve a system problem. The diagnostic flow is the place to start when repairs are necessary. For a detailed explanation, refer to Strategy Based Diagnosis . Visual/Physical Inspection z Inspect for aftermarket devices, which could affect the operation of the vehicle. Refer to Checking Aftermarket Accessories in Wiring Systems. z Inspect the easily accessible or visible system components for obvious damage or a condition which could cause the symptom. z Check for correct lubricant level and proper viscosity. z Verify the exact operating conditions under which the concerns exist. Note factors such as speed, road conditions, ambient temperature, and other specifics. z Compare the driving characteristics or sounds, if applicable, to a known good vehicle and make sure you are not trying to correct a normal condition. z Rear Axle activation and operation may be checked by position the four wheels off the ground, starting the vehicle, and selecting the drive position. A properly operating rear axle and transfer case will rotate all four wheels at equal RPM. Fully apply the parking brake, the rear will stop turning. Apply the throttle while watching the rear wheels. They will rotate slightly as the driveline winds-up. This indicates the AWD is functioning. z Factors that may contribute to an inoperative rear axle include: { A low gear oil level { A mini spare or different size tires NOTE: Do not exceed more than 5 seconds of parking brake application. RDM damage may result. 2004 Saturn Vue 2004 DRIVELINE/AXLE Rear Drive Axle - Vue Helpmelearn April-08-08 8:43:03 AM Page 5 © 2005 Mitchell Repair Information Company, LLC.
  • 6. { A fluid over-temperature condition { A defective rear axle assembly { An inoperative transfer case assembly { The wrong fluid type Intermittent Test the vehicle under the same conditions that the customer reported in order to verify the system is operating properly. Noise Acceptability A gear driven unit will produce a certain amount of noise. Some noise is acceptable and audible at certain speeds, or under various driving conditions, such as a newly-paved blacktop road. Slight noise is not detrimental to the operation of the axle and is considered normal. Symptom List Refer to a symptom diagnostic procedure from the following list in order to diagnose the symptom: z Noisy in Drive z Noisy When Coasting z Intermittent Noise z Constant Noise z Noisy on Turns z Rear Axle Lubricant Leak Diagnosis NOISY IN DRIVE Noisy in Drive Cause Correction Inspect for proper gear oil levels prior to performing system diagnosis. Loose propeller shaft mounting bolts Tighten the bolts as required. Refer to Fastener Tightening Specifications in Propeller Shaft. Worn propeller shaft constant velocity joint Replace the propeller shaft assembly. Refer to Propeller Shaft Replacement in Propeller Shaft. A worn propeller shaft constant velocity joint may create a clicking, grinding, or snapping type noise. Worn or loose center bearing assembly Replace the center bearing assembly as required. A worn center bearing may cause vehicle vibration or a grinding, squealing type of noise. Refer to Center Bearing Removal in Propeller Shaft. Worn universal joints Replace the universal joints as required. A worn universal joint may create a clicking or snapping type of noise. Refer to Universal Joint Replacement - External Snap Ring 2004 Saturn Vue 2004 DRIVELINE/AXLE Rear Drive Axle - Vue Helpmelearn April-08-08 8:43:03 AM Page 6 © 2005 Mitchell Repair Information Company, LLC.
  • 7. NOISY WHEN COASTING Noisy When Coasting in Propeller Shaft. Worn axle shaft constant velocity joints Replace/repair the constant velocity joints as required. A worn axle shaft constant velocity joint may create a clicking, grinding, or snapping type of noise. Refer to Symptoms - Rear Drive Axle . Transfer case noise Refer to Diagnostic Starting Point-Transfer Case procedure in Power Take- Off Unit. Worn or damaged axle mounting bushings (side) Replace bushings as required. A worn bushing may create a clunk type of noise during acceleration or deceleration. Refer to Differential Housing Support Bushing Replacement . Worn or damaged axle mounting bushing (rear) Replace bushings as required. A worn bushing may create a clunk type of noise during acceleration or deceleration. Check bushing orientation; the tuning slots must be in proper position. Loose rear mounting bracket Tighten the bracket bolts as required. Refer to Fastener Tightening Specifications . Loose or damaged prop guard Repair or replace as required. A loose dust shield may contact the propeller shaft assembly and create a scraping or grinding type of noise. Bearing noise within axle assembly A grinding roar type of noise will increase or decrease relative to the vehicle speed. 1. Check for proper fluid level. Refer to Lubricant Replacement - Rear Drive Axle . 2. If the noise continues, repair or replace the unit as required. Gear set whine noise within axle assembly A whine type of noise will increase or decrease relative to the vehicle speed (approximately 80-90 km/h (50-56 mph)). 1. Check for the proper fluid level. Refer to Lubricant Replacement - Rear Drive Axle . 2. Repair or replace the unit as required. Shutter or moan at slow speeds or slow turns A shutter or moan type of noise in slow sharp turns. 1. RDM could be contaminated with the wrong fluid type/water. 2. Replace the fluid; fill as required and retest under conditions. Refer to Lubricant Replacement - Rear Drive Axle . 3. Replace the drum. Cause Correction Inspect for proper gear oil levels prior to performing system diagnosis. 2004 Saturn Vue 2004 DRIVELINE/AXLE Rear Drive Axle - Vue Helpmelearn April-08-08 8:43:03 AM Page 7 © 2005 Mitchell Repair Information Company, LLC.
  • 8. Loose propeller shaft mounting bolts Tighten the bolts as required. Refer to Fastener Tightening Specifications in Propeller Shaft. Worn propeller shaft constant velocity joint. Replace the propeller shaft assembly. Refer to Propeller Shaft Replacement in Propeller Shaft. A worn propeller shaft constant velocity joint may create a clicking, grinding, or snapping type of noise. Worn or loose center bearing assembly Replace the center bearing assembly as required. A worn center bearing assembly may cause vehicle vibration or a grinding or squealing type of noise. Worn universal joints Replace the universal joints as required. A worn universal joint may create a clicking or a snapping type of noise. Refer to Universal Joint Replacement - External Snap Ring in Propeller Shaft. Worn axle shaft constant velocity joints. Replace or repair the constant velocity joints as required. A worn axle shaft constant velocity joint may create a clicking, grinding, or snapping type of noise. Refer to Symptoms - Rear Drive Axle . Transfer case noise Refer to Symptoms - Transfer Case . Worn or damaged axle mounting bushings (Side) Check the bushing position and replace the bushings as required. A worn bushing may create a clunk type of noise during acceleration or deceleration or wrong orientation. Refer to Differential Housing Support Bushing Replacement . Worn or damaged axle mounting bushings (Rear) Replace the bushings as required. A worn bushing may create a clunk type of noise during acceleration or deceleration. Refer to Differential Housing Support Bushing Replacement . Loose rear mounting bracket Tighten the bracket bolts as required. Refer to Fastener Tightening Specifications . Loose or damaged prop guard Repair or replace as required. A loose dust shield may contact the propeller shaft assembly and create a scraping or grinding type of noise. Bearing noise within axle assembly A grinding or roar type of noise will increase or decrease relative to vehicle speed. 1. Check for the proper fluid level. Refer to Lubricant Replacement - Rear Drive Axle . 2. If the noise continues, repair or replace the unit as required. Gear set whine noise within axle assembly created by incorrect gear backlash A whine type of noise will increase of decrease relative to vehicle speed. 1. Check for the proper fluid level. Refer to Lubricant Replacement - Rear Drive Axle . 2. Repair or replace the unit as required. 2004 Saturn Vue 2004 DRIVELINE/AXLE Rear Drive Axle - Vue Helpmelearn April-08-08 8:43:03 AM Page 8 © 2005 Mitchell Repair Information Company, LLC.
  • 9. INTERMITTENT NOISE Intermittent Noise CONSTANT NOISE Constant Noise Cause Correction Inspect for proper gear oil levels prior to performing system diagnosis. Low gear oil levels Fill axle to the recommended level. Refer to Lubricant Replacement - Rear Drive Axle . A low level may create intermittent or incomplete clutch park engagement. Incorrect gear oil Replace with gear oil Saturn P/N 12378514. Refer to Lubricant Replacement - Rear Drive Axle . Incorrect gear oil may create improper clutch pack engagement or a slippage condition. Worn clutch pack oil pump Replace the clutch pack assembly. Worn clutch pack friction discs Replace the clutch pack assembly. Cause Correction Inspect for proper gear oil levels prior to performing system diagnosis. Low gear oil levels Faulty oil seal or other types of leaks may contribute to lower than required fluid levels. Refer to Rear Axle Lubricant Leak Diagnosis . Fill to the proper level with gear oil Saturn P/N 12378514. Refer to Lubricant Replacement - Rear Drive Axle . Worn or loose axle mounts Repair or replace axle mounts as required. Refer to Differential Housing Support Bushing Replacement . Worn propeller shaft constant velocity or universal joints Replace the universal joints as required. Refer to Universal Joint Replacement - External Snap Ring in Propeller Shaft. If constant velocity joint is damaged, replace the propeller shaft. Refer to Propeller Shaft Replacement in Propeller Shaft. Worn propeller shaft center bearing assembly Replace the center bearing assembly. Refer to Center Bearing Removal in Propeller Shaft. Bearing noise within axle assembly This type of noise will decrease or increase relative to the vehicle speed. 1. Check for the proper fluid level. Refer to Lubricant Replacement - Rear Drive Axle . 2. Repair or replace the unit as required. Gear set whine noise within the carrier assembly caused by incorrect backlash A whine type of noise will increase or decrease relative to the vehicle speed. 1. Check for the proper fluid level. Refer to Lubricant 2004 Saturn Vue 2004 DRIVELINE/AXLE Rear Drive Axle - Vue Helpmelearn April-08-08 8:43:03 AM Page 9 © 2005 Mitchell Repair Information Company, LLC.
  • 10. NOISY ON TURNS Noisy on Turns REAR AXLE LUBRICANT LEAK DIAGNOSIS Rear Axle Lubricant Leak Diagnosis REPAIR INSTRUCTIONS Replacement - Rear Drive Axle . 2. Repair or replace the unit as required. Cause Correction Inspect for proper gear oil levels prior to performing system diagnosis. Operate the vehicle turning in tight circles, in both left and right directions. Moan, groan, chatter, or a pulsing type concern may indicate a pump or clutch park problem within the axle assembly. Worn or loose rear axle mounts Repair or replace as required. Worn axle shaft constant velocity joints Replace the constant velocity joints as required. Worn wheel bearings Replace the wheel bearings as required. Incorrect gear oil Replace with gear oil Saturn P/N 12378514. Refer to Lubricant Replacement - Rear Drive Axle . Worn differential side and/or idler gears and worn cross-pin Replace gears and pin as required. Worn clutch plates Replace clutch drum. Cause Correction Restricted or damaged ventilation tube assembly Replace the ventilation tube as required. Leaking fill or drain plug Install sealant Saturn P/N 21485278 or equivalent onto threads of plugs and tighten. Refer to Fastener Tightening Specifications . Leaking input flange seal 1. Inspect the input flange surface for excessive wear or damage. 2. Inspect the front bearing for wear or damage. A worn bearing may allow excessive movement of the clutch pack input shaft. 3. Replace the components as required. Leaks at the housing sealing surfaces Dissemble the axle and reseal the sealing surfaces as required. Refer to Differential Housing Assembly Disassemble . Worn or damages axle shaft oil seals Replace the axle shaft oil seals as required. Axle housing porosity Replace the housing(s) as required. Refer to Rear Axle Shaft Seal Replacement - Left and Rear Axle Shaft Seal Replacement - Right . 2004 Saturn Vue 2004 DRIVELINE/AXLE Rear Drive Axle - Vue Helpmelearn April-08-08 8:43:03 AM Page 10 © 2005 Mitchell Repair Information Company, LLC.
  • 11. Thank you very much for your reading. Please Click Here. Then Get COMPLETE MANUAL. NO WAITING NOTE: If there is no response to click on the link above, please download the PDF document first and then click on it.
  • 12. LUBRICANT LEVEL INSPECTION - REAR DRIVE AXLE Inspection Procedure 1. Prime the rear drive module in the service stall: 1. Raise and support the vehicle so that all wheels are off of the ground. Refer to Lifting and Jacking the Vehicle in General Information. 2. Start the engine and place transmission in a forward gear. 3. Slowly apply the park brake until the rear wheels stop rotating. 4. Carefully accelerate the engine until the rear wheels begin to rotate. 5. Continue allowing the rear wheels to rotate for 5 seconds. 6. Release the accelerator and apply the brakes. 7. Place transmission in park or neutral and turn off the engine. 8. Release the park brake. 9. Raise the vehicle fully. 2. Alternatively, prime the rear drive module by driving the vehicle on a flat, paved surface in a tight, 360 degree circle for 3 consecutive revolutions at 8 km/h (5 mph). 3. Raise and support the vehicle. Refer to Lifting and Jacking the Vehicle in General Information. IMPORTANT: In order to obtain an accurate indication of the fluid level, the rear drive module priming procedure must be performed prior to fluid level inspection. IMPORTANT: Do not exceed 5 seconds of park brake apply while vehicle is in gear and the engine is running to avoid overheating of the rear drive module. 2004 Saturn Vue 2004 DRIVELINE/AXLE Rear Drive Axle - Vue Helpmelearn April-08-08 8:43:03 AM Page 11 © 2005 Mitchell Repair Information Company, LLC.
  • 13. Fig. 3: Removing/Installing Fluid Fill Plug Courtesy of GENERAL MOTORS CORP. 4. Clean the area around the fluid fill plug. 5. Remove the fluid fill plug. 2004 Saturn Vue 2004 DRIVELINE/AXLE Rear Drive Axle - Vue Helpmelearn April-08-08 8:43:03 AM Page 12 © 2005 Mitchell Repair Information Company, LLC.
  • 14. Fig. 4: Removing Wire & Measure The Distance Between The Bend & The Fluid Level Courtesy of GENERAL MOTORS CORP. 6. Using a length of heavy mechanics wire or equivalent, position a 90 degree bend approximately 25 mm (1 in) from the end of the wire. 7. Place the angled end of the wire into the fluid fill plug hole. 8. Rest the wire squarely on the threads of the fill plug hole. 9. Remove the wire and measure the distance between the bend and the fluid level as indicated by the witness mark. Specification: The distance from the bend to the witness mark should be 8-17 mm (0.32-0.68 in). 2004 Saturn Vue 2004 DRIVELINE/AXLE Rear Drive Axle - Vue Helpmelearn April-08-08 8:43:03 AM Page 13 © 2005 Mitchell Repair Information Company, LLC.
  • 15. 10. Adjust the fluid level as required by adding or removing fluid Saturn P/N 12378514. 11. Thoroughly clean the fill plug threads and apply sealer Saturn P/N 21485278 to the threads. 12. Install the rear drive module fill plug. Tighten: Tighten the fill plug to 35 N.m (26 lb ft). 13. Lower the vehicle. LUBRICANT REPLACEMENT - REAR DRIVE AXLE Draining Procedure 2004 Saturn Vue 2004 DRIVELINE/AXLE Rear Drive Axle - Vue Helpmelearn April-08-08 8:43:03 AM Page 14 © 2005 Mitchell Repair Information Company, LLC.