More Related Content Similar to 1998 ford explorer service repair manual (15) More from eudskkejedmm (20) 1. 1998-99 DRIVE AXLES
Differentials - Front - Dana 35 - Explorer, Mountaineer & Ranger
DESCRIPTION
Dana model 35 front axle is an integral carrier housing. See Fig. 2 . Axle housing is made of aluminum and is
mounted to subframe assembly. Drive pinion depth and differential side bearing preload are set by use of shims.
Pinion bearing preload is set by use of collapsible pinion spacer.
AXLE RATIO & IDENTIFICATION
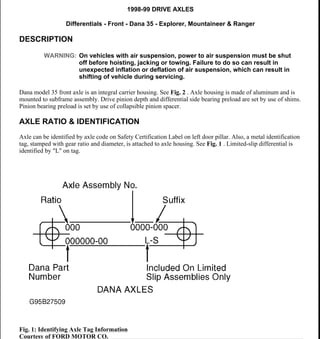
Axle can be identified by axle code on Safety Certification Label on left door pillar. Also, a metal identification
tag, stamped with gear ratio and diameter, is attached to axle housing. See Fig. 1 . Limited-slip differential is
identified by "L" on tag.
Fig. 1: Identifying Axle Tag Information
Courtesy of FORD MOTOR CO.
WARNING: On vehicles with air suspension, power to air suspension must be shut
off before hoisting, jacking or towing. Failure to do so can result in
unexpected inflation or deflation of air suspension, which can result in
shifting of vehicle during servicing.
1999 Ford Explorer
1998-99 DRIVE AXLES Differentials - Front - Dana 35 - Explorer, Mountaineer & Ranger
1999 Ford Explorer
1998-99 DRIVE AXLES Differentials - Front - Dana 35 - Explorer, Mountaineer & Ranger
Helpmelearn
November-17-07 10:45:31 AM Page 1 © 2005 Mitchell Repair Information Company, LLC.
Helpmelearn
November-17-07 10:45:34 AM Page 1 © 2005 Mitchell Repair Information Company, LLC.
2. Fig. 2: Exploded View Of Front Axle Housing Assembly (Typical)
Courtesy of FORD MOTOR CO.
LUBRICATION
Capacity is 3.25 Pts. (1.54L) of Motorcraft SAE 80W90 Thermally Stable 4X4 Axle Lubricant (XL-80W90-
QL). Capacities listed are approximate. Fill differential until fluid level is about 1/4" below bottom of filler plug
hole.
TROUBLE SHOOTING
REMOVAL & INSTALLATION
NOTE: See appropriate table in TROUBLE SHOOTING article in GENERAL
INFORMATION.
WARNING: On vehicles with air suspension, power to air suspension must be shut
off before hoisting, jacking or towing. Failure to do so can result in
unexpected inflation or deflation of air suspension, which can result in
shifting of vehicle during servicing.
1999 Ford Explorer
1998-99 DRIVE AXLES Differentials - Front - Dana 35 - Explorer, Mountaineer & Ranger
Helpmelearn
November-17-07 10:45:31 AM Page 2 © 2005 Mitchell Repair Information Company, LLC.
3. AXLE SHAFT, BEARING & OIL SEAL
Removal
Remove right axle shaft. See 4WD AXLE SHAFTS - FRONT - EXPLORER, MOUNTAINEER & RANGER
article. Remove axle from axle housing. Using Converter Seal Remover (T94P-77001-BH) and slide hammer,
remove axle tube seal. Using Bearing Remover (T94P-77001-KH) and slide hammer, remove axle tube bearing.
Installation
1. Ensure bearing bore is clean and undamaged. Using Bearing Installer (T95T-1175-D) and Driver Handle
(T80T-4000-W), install bearing in axle tube, .88" (44.5 mm) below outer lip of axle tube. Coat lip of seal
with multipurpose grease. Using Seal Installer (T95T-3010-A) and Driver Handle (T80T-4000-W), install
axle tube seal.
2. To complete installation, reverse removal procedure. Tighten all nuts and bolts or specification. See
TORQUE SPECIFICATIONS . Fill differential with proper lubricant until fluid level is about 1/4"
below bottom of filler plug hole. See LUBRICATION .
AXLE HOUSING ASSEMBLY
Removal & Installation
1. Raise and support vehicle. Remove both front axle shafts. See 4WD AXLE SHAFTS - FRONT -
EXPLORER, MOUNTAINEER & RANGER article. Scribe alignment marks on drive shaft and pinion
flange for installation reference. Remove driveshaft-to-pinion flange bolts, and wire drive shaft aside.
2. Disconnect axle housing vent hose. Using a suitable jack, support axle housing, and secure axle housing
to jack. Remove 3 front axle housing-to-frame nuts and bolts. Lower floor jack, and remove axle housing
assembly.
3. To install, reverse removal procedure. Tighten all nuts and bolts to specification. See TORQUE
SPECIFICATIONS . Fill differential with proper lubricant until fluid level is about 1/4" below bottom
of filler plug hole. See LUBRICATION .
PINION FLANGE & OIL SEAL
Removal
1. Raise and support vehicle. Scribe alignment marks on drive shaft and pinion flange for installation
reference. Remove driveshaft-to-pinion flange bolts, and wire drive shaft aside. Using an INCH-lb. torque
wrench, measure and record torque required to rotate pinion through several revolutions.
2. Hold pinion flange and remove pinion nut. Scribe index marks on pinion flange and pinion stem for
installation reference. Remove pinion flange. Using Converter Seal Remover (T94P-77001-BH) and slide
hammer, remove pinion seal.
NOTE: Pinion flange and oil seal replacement affects bearing preload. Preload must be
carefully reset during reassembly.
1999 Ford Explorer
1998-99 DRIVE AXLES Differentials - Front - Dana 35 - Explorer, Mountaineer & Ranger
Helpmelearn
November-17-07 10:45:31 AM Page 3 © 2005 Mitchell Repair Information Company, LLC.
4. Installation
1. Ensure pinion shaft splines are free of burrs. Remove burrs with fine crocus cloth if necessary. Lubricate
area between oil seal lip. Using Pinion Oil Seal Replacer (T79P-4676-A), install oil seal into axle
housing.
2. Align marks on pinion flange and pinion stem. Apply a small amount of lubricant to pinion flange
splines. Install pinion flange and NEW pinion nut. Hold pinion flange, and gradually tighten nut while
rotating pinion.
3. Check pinion bearing preload often, until correct preload is obtained. DO NOT back off pinion nut to
reduce preload. See DIFFERENTIAL SPECIFICATIONS . Connect rear end of drive shaft to pinion
flange, aligning scribed marks.
4. Apply locking compound to drive shaft bolt threads and tighten bolts to specification. See TORQUE
SPECIFICATIONS . Fill differential with proper lubricant until fluid level is about 1/4" below bottom
of filler plug hole. See LUBRICATION .
OVERHAUL
DISASSEMBLY
1. Remove axle housing. See AXLE HOUSING ASSEMBLY under REMOVAL & INSTALLATION.
Mount axle housing in Holding Fixture (T57L-500-B) using Adapters (T90T-4000-A) and Spacer (T80T-
4000-B2). Remove housing cover, and drain differential fluid.
2. Remove axle shaft from axle housing. Using Converter Seal Remover (T94P-77001-BH) and slide
hammer, remove right and left axle tube seal. Using Bearing Remover (T94P-77001-KH) and slide
hammer, remove right and left axle tube bearings (if necessary).
3. Note matched numbers or letters on differential bearing caps and carrier for reassembly reference.
Remove bearing caps. Install Housing Spreader Adapter Set (T90T-4000-A) and Differential Housing
Spreader (TOOL-4000-E). See Fig. 3 . Mount dial indicator onto axle housing to measure amount of
spread.
4. Spread axle housing to .020" (.51 mm). Remove dial indicator. Carefully pry differential assembly out of
housing. Remove spreader immediately so housing does not permanently distort. Remove and tag side
bearing races to indicate from which side of carrier they were removed.
5. Turn nose of axle housing up. Using an INCH lbs. torque wrench, measure and record pinion bearing
NOTE: If oil seal becomes cocked during installation, remove seal and install NEW oil
seal.
NOTE: If desired preload is exceeded, a NEW collapsible spacer must be
installed. Tighten nut to obtain proper preload.
CAUTION: DO NOT spread carrier housing more than .030" (.76 mm), since
permanent damage to housing could result.
1999 Ford Explorer
1998-99 DRIVE AXLES Differentials - Front - Dana 35 - Explorer, Mountaineer & Ranger
Helpmelearn
November-17-07 10:45:31 AM Page 4 © 2005 Mitchell Repair Information Company, LLC.
5. preload. Hold pinion flange and remove pinion nut. Scribe index marks on pinion flange and pinion stem
for installation reference. Remove pinion flange. Using Converter Seal Remover (T94P-77001-BH) and
slide hammer, remove pinion seal.
6. Remove drive pinion by tapping with soft-face mallet. Remove outer pinion bearing and oil slinger. Drive
out inner and outer drive pinion bearing race using Pinion Bearing Race Remover (T86T-4628-BH) and
Driver Handle (T80T-4000-W). Press pinion bearing off pinion. Measure and record inner pinion bearing
shim thickness.
7. Place differential case into vise, with rags underneath to protect ring gear. Remove and discard ring gear
bolts. Tap ring gear with soft-face mallet to remove ring gear from case. Using drift and hammer, drive
out pinion shaft lock pin. Remove pinion shaft.
8. Rotate side gears until pinion gears are aligned with case opening. Remove pinion gears and thrust
washers. Remove side gears with thrust washers. Using universal bearing remover, remove inner pinion
bearing and oil slinger from drive pinion.
Fig. 3: Spreading Axle Housing
Courtesy of FORD MOTOR CO.
CLEANING & INSPECTION
1999 Ford Explorer
1998-99 DRIVE AXLES Differentials - Front - Dana 35 - Explorer, Mountaineer & Ranger
Helpmelearn
November-17-07 10:45:31 AM Page 5 © 2005 Mitchell Repair Information Company, LLC.
6. 1. Clean all components in solvent. Allow bearings to air dry. Inspect all machined surfaces for smoothness
or raised edges. Inspect all gear teeth for wear or chipping, and replace as necessary.
2. Check all bearings and races for nicks, roller end wear, grooves or damage. Replace as needed. Check
pinion flange for wear in sealing area and replace as necessary.
3. Check differential pinion shaft, pinion gears, side gears and thrust washers for wear or damage. Replace
all defective parts. Replace pinion gear and ring gear as a set.
REASSEMBLY
1. Install thurst washers onto differential side gears. Install differential side greas into differential housing.
Install trurst washer and pinion gear into differential case. Install pinion shaft. Install pinion shaft roll pin.
2. Using Pinion Bearing Cup Replacer (T67P-4616-A), install pinion bearing cups. If using old ring and
pinion gear set, go to next step. If using new ring and pinion gear set, go to step 8 .
3. Apply a light film of oil to pinion bearing. Assemble Pinion Depth Gauge (T79P-4020-A). Install
aligning adapter, gauge disc and screw. Place rear pinion bearing over aligning adapter and into bearing
cup of carrier housing. See Fig. 4 .
4. Install front pinion bearing into front bearing cup. Place handle onto screw and tighten to 20 INCH lbs.
(2.25 N.m). See Fig. 5 . Ensure pinion depth measuring tool is properly installed and tightened.
5. Rotate gauge block several times to seat bearings. Rotational torque on gauge block assembly should be
20 INCH lbs. (2.25 N.m) with new bearings. Final position of gauge block should be 45 degrees above
axle shaft center line. See Fig. 6 .
6. Clean differential bearing bores thoroughly, and install gauge tube. Tighten differential bearing cap bolts
to specification. See TORQUE SPECIFICATIONS . Use flat pinion shims as a gauge for shim
selection. Hold gauge block in proper position, and measure clearance between gauge block and tube.
7. Correct shim selection is accomplished when a slight drag is felt as shim is drawn between gauge block
and tube. Shims are available in various thicknesses. Install correct shim on pinion for reassembly. Pinion
bearings must be installed in the same location as during pinion depth measurement. Remove measuring
equipment and go to step 9 .
8. Notice the plus (+), minus (-) or zero (0) etching on both old and new pinion and adjust thickness of new
shim according to charts in illustration. See Fig. 7 . Go to next step.
9. Place pinion shim previously determine on pinion shaft and press on inner pinion bearing. Place NEW
collapsible spacer on pinion shaft. Install outer pinion bearing and oil slinger in axle housing. Using
Pinion Oil Seal Replacer (T79P-4676-A), install oil seal into axle housing.
10. Position pinion gear in axle housing. Align marks on pinion flange and pinion stem. Apply a small
amount of lubricant to pinion flange splines. Install pinion flange and NEW pinion nut. Hold pinion
flange, and gradually tighten nut while rotating pinion.
NOTE: If oil seal becomes cocked during installation, remove seal and install
NEW oil seal.
NOTE: If desired preload is exceeded, a NEW collapsible spacer must be
installed. Tighten nut to obtain proper preload.
1999 Ford Explorer
1998-99 DRIVE AXLES Differentials - Front - Dana 35 - Explorer, Mountaineer & Ranger
Helpmelearn
November-17-07 10:45:31 AM Page 6 © 2005 Mitchell Repair Information Company, LLC.
7. 11. Check pinion bearing preload often, until correct preload is obtained. DO NOT back off pinion nut to
reduce preload. See DIFFERENTIAL SPECIFICATIONS . Remove differential bearing and install
Right Master Bearing (T93P-4222-B) and Left Master Bearing (T93P-4222-A) on differential housing.
12. Insert differential and master bearings into axle housing. Position dial indicator to outside mounting hole.
Position indicator tip on machined surface of differential case flange. Adjust dial indicator to measure full
travel. Push differential case left and right as far as possible. Measure total end play and record on Line-A
of differential bearing shim selection procedure work sheet. See Fig. 9 .
13. Remove differential case from carrier to install ring gear. Ensure ring is free of any nicks or burrs. Press
ring gear onto case, and tighten bolts to correct torque. See TORQUE SPECIFICATIONS . Install
differential case with master bearings into axle housing.
14. With dial indicator in place, push ring gear to mesh with pinion gear. Rock ring gear to allow full mesh
with pinion gear. Zero dial indicator. Move ring gear away from pinion gear as much as possible. Record
measurement on Line-B of differential bearing shim selection procedure work sheet. Remove differential
from housing, and remove master bearing from carrier assembly.
15. Identify and mark right and left bearing for installation reference. Clamp Bearing Preload Tool (T93P-
4220-AR) base in a soft-jaw vise. Keep bearing mounting surface above vise jaws. Position bearing
assembly on bearing preload tool base, and tighten tool bolt to 20 INCH lbs. (2.3 N.m). See Fig. 8 .
16. Invert preload tool and clamp bolt head in vise. Position depth micrometer over top of bearing. With
depth micrometer positioned on bearing cone, measure height of each individual bearing assembly.
Measure distance from bearing cone to bearing preload tool disc. Record both bearing measurements on
Line-D on differential bearing shim selection procedure work sheet.
17. Select appropriate bearing shims using differential bearing shim selection procedure work sheet. See Fig.
9 . For correct shim, see DIFFERENTIAL SHIM SIZE table.
18. Remove master bearing from carrier, and press appropriate differential bearing on appropriate side of
differential case. Tighten housing spreader so dial indicator reads .030" (.762 mm). Install selected shims.
19. Install differential assembly in axle housing. Install and tighten bearing caps to specification with housing
spreader still installed. See TORQUE SPECIFICATIONS . Loosen and remove spreader. Move dial
indicator base and mount in line with ring gear.
20. Mount dial indicator, and zero indicator on any ring gear drive tooth. See Fig. 10 . Turn ring gear without
turning pinion gear to measure backlash. Preferred backlash is .005-008" (.127-.203 mm).
21. If backlash is not to specification, adjust backlash by increasing thickness of one shim and decreasing
thickness of other shim by same amount. See RING GEAR BACKLASH-TO-SHIM THICKNESS
CONVERSION table. See Fig. 11 .
22. To complete assembly, reverse disassembly procedure. Tighten all nuts and bolts to specification. See
TORQUE SPECIFICATIONS . Fill differential with proper lubricant until fluid level is about 1/4"
below bottom of filler plug hole. See LUBRICATION .
DIFFERENTIAL SHIM SIZE
Color No. Of Stripes Shim Thickness - In. (mm)
Red 1 .2410-.2415 (6.121-6.134)
Red 2 .2430-.2435 (6.172-6.185)
Orange 1 .2450-.2455 (6.223-6.236)
Orange 2 .2470-.2475 (6.274-6.287)
1999 Ford Explorer
1998-99 DRIVE AXLES Differentials - Front - Dana 35 - Explorer, Mountaineer & Ranger
Helpmelearn
November-17-07 10:45:31 AM Page 7 © 2005 Mitchell Repair Information Company, LLC.
8. RING GEAR BACKLASH-TO-SHIM THICKNESS CONVERSION
Orange 3 .2490-.2495 (6.325-6.337)
Orange 4 .2510-.2515 (6.375-6.388)
Orange 5 .2530-.2535 (6.426-6.439)
Yellow 1 .2550-.2555 (6.477-6.490)
Yellow 2 .2570-.2575 (6.528-6.541)
Yellow 3 .2590-.2595 (6.579-6.591)
Yellow 4 .2610-.2615 (6.629-6.642)
Yellow 5 .2630-.2635 (6.680-6.693)
White 1 .2650-.2655 (6.731-6.744)
White 2 .2670-.2675 (6.782-6.795)
White 3 .2690-.2695 (6.833-6.845)
White 4 .2710-.2715 (6.883-6.896)
White 5 .2730-.2735 (6.934-6.947)
Green 1 .2750-.2755 (6.985-6.998)
Green 2 .2770-.2775 (7.036-7.049)
Green 3 .2790-.2795 (7.087-7.099)
Green 4 .2810-.2815 (7.137-7.150)
Green 5 .2830-.2835 (7.188-7.201)
Pink 1 .2850-.2855 (7.239-7.252)
Pink 2 .2870-.2875 (7.290-7.303)
Pink 3 .2890-.2895 (7.341-7.353)
Pink 4 .2910-.2915 (7.391-7.404)
Pink 5 .2930-.2935 (7.442-7.455)
Blue 2 .2970-.2975 (7.544-7.557)
Blue 3 .2990-.2995 (7.595-7.607)
Blue 4 .3010-.3015 (7.645-7.658)
Blue 5 .3030-.3035 (7.696-7.709)
Gray 1 .3050-.3055 (7.747-7.760)
Gray 2 .3070-.3075 (7.798-7.811)
Required Change In Backlash - In. (mm) Required Change In Shim Thickness - In. (mm)
.001 (.03) .002 (.05)
.002 (.05) .002 (.05)
.003 (.08) .004 (.10)
.004 (.10) .006 (.15)
.005 (.13) .006 (.15)
.006 (.15) .008 (.20)
.007 (.18) .010 (.25)
.008 (.20) .010 (.25)
.009 (.23) .012 (.30)
1999 Ford Explorer
1998-99 DRIVE AXLES Differentials - Front - Dana 35 - Explorer, Mountaineer & Ranger
Helpmelearn
November-17-07 10:45:31 AM Page 8 © 2005 Mitchell Repair Information Company, LLC.
9. Fig. 4: Assembling Pinion Depth Gauge
Courtesy of FORD MOTOR CO.
.010 (.25) .014 (.36)
.011 (.28) .014 (.36)
.012 (.30) .016 (.41)
.013 (.33) .018 (.46)
.014 (.36) .018 (.46)
.015 (.38) .020 (.51)
1999 Ford Explorer
1998-99 DRIVE AXLES Differentials - Front - Dana 35 - Explorer, Mountaineer & Ranger
Helpmelearn
November-17-07 10:45:31 AM Page 9 © 2005 Mitchell Repair Information Company, LLC.
10. Fig. 5: Installing Pinion Depth Gauge
Courtesy of FORD MOTOR CO.
1999 Ford Explorer
1998-99 DRIVE AXLES Differentials - Front - Dana 35 - Explorer, Mountaineer & Ranger
Helpmelearn
November-17-07 10:45:31 AM Page 10 © 2005 Mitchell Repair Information Company, LLC.
11. Fig. 6: Final Position Of Pinion Depth Gauge
Courtesy of FORD MOTOR CO.
1999 Ford Explorer
1998-99 DRIVE AXLES Differentials - Front - Dana 35 - Explorer, Mountaineer & Ranger
Helpmelearn
November-17-07 10:45:31 AM Page 11 © 2005 Mitchell Repair Information Company, LLC.
12. Thank you very much for
your reading. Please Click
Here. Then Get COMPLETE
MANUAL. NO WAITING
NOTE:
If there is no response to
click on the link above,
please download the PDF
document first and then
click on it.
13. Fig. 7: Pinion Depth Shim Adjustment Charts
Courtesy of FORD MOTOR CO.
1999 Ford Explorer
1998-99 DRIVE AXLES Differentials - Front - Dana 35 - Explorer, Mountaineer & Ranger
Helpmelearn
November-17-07 10:45:31 AM Page 12 © 2005 Mitchell Repair Information Company, LLC.
14. Fig. 8: Positioning Bearing Preload Tool
Courtesy of FORD MOTOR CO.
1999 Ford Explorer
1998-99 DRIVE AXLES Differentials - Front - Dana 35 - Explorer, Mountaineer & Ranger
Helpmelearn
November-17-07 10:45:31 AM Page 13 © 2005 Mitchell Repair Information Company, LLC.
15. Fig. 9: Differential Bearing Shim Selection Procedure Work Sheet
Courtesy of FORD MOTOR CO.
1999 Ford Explorer
1998-99 DRIVE AXLES Differentials - Front - Dana 35 - Explorer, Mountaineer & Ranger
Helpmelearn
November-17-07 10:45:31 AM Page 14 © 2005 Mitchell Repair Information Company, LLC.