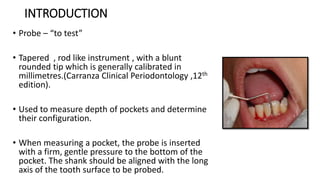
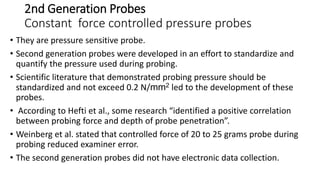
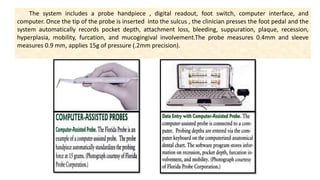
The document discusses the history and development of periodontal probes over several generations. It describes the key characteristics of 1st generation manual probes and 2nd generation pressure-sensitive probes. It then focuses on 3rd generation computer-assisted probes which standardize pressure and digitally record readings to reduce errors. Some examples provided are the Foster Miller Probe, Florida Probe, and True Pressure Sensitive probe. Overall the document traces the evolution of probes to become more precise, standardized, and integrated with digital systems.
3. INTRODUCTION
⢠Probe â âto testâ
⢠Tapered , rod like instrument , with a blunt
rounded tip which is generally calibrated in
millimetres.(Carranza Clinical Periodontology ,12th
edition).
⢠Used to measure depth of pockets and determine
their configuration.
⢠When measuring a pocket, the probe is inserted
with a firm, gentle pressure to the bottom of the
pocket. The shank should be aligned with the long
axis of the tooth surface to be probed.
4. HISTORY
⢠Periodontal probe and its use was first described by F.V. Simoton of
the University Of California, San Francisco in 1925.He proposed flat
probes 1 mm wide, 10 mm long, and notched every 2 mm.
⢠Miller suggested probing of all pockets and recording their depth and
putting this information on diagnostic chart.
⢠Orban (1958) described the periodontal probe as âthe eye of the
operator "beneath the gingival margin.
5. ⢠Goldman et al. stated that "Clinical probing with suitable periodontal
instruments such as the Williams calibrated probe is a prime necessity
in delineating the depth, topography and character of the periodontal
Pocket â.
⢠Glickman stated that "The probe is an instrument with a tapered rod-
like blade which has a blunt and rounded tip.â
⢠The probes most commonly used today were developed by Ramfjord
in 1959. He stated that the probes in use at that time were too thick
to probe narrow clinical pockets and designed a round probe with a
tip diameter of 0.4mm.
6. ⢠In 1967, Clavind and Loe reported the results of a research protocol in
which they used a periodontal probe tip that was 0.8 mm in diameter with
a 10 gm force.
⢠In 1992, B. L. Pihlstrom created a classification of periodontal probes.
⢠In 2000, Watts extended the classification system to include a fourth
and fifth generation of probes.
7. ⢠Rationale behind periodontal probing
Detect and measure loss or gain of attachment level
TO
Determine the extent of previous or ongoing disease activity
AND
Assess the effect of ongoing treatment.
8. CHARACTERISTICS OF A PROBE
ďś It should be tissue friendly and not traumatize the periodontal tissues
during probing.
ďśIt should be suitable as a measuring instrument.
ďśIt should be standardized to ensure reproducibility, particularly with respect
to recommended pressure(20 gms).
ďśIt should be suitable both for use in clinical setting where precise data
documentation is required and on individual patient basis, and for screening
purposes, as in epidemiology.
ďśIt should be easy and simple to use and read.
9. PROBE DIAMETER
ďThere are numerous reports using various tip diameters (0.4, 0.5,
0.6, 0.8 and 1.0 mm).
ď Van der Velden and Jansen (1981) indicated that the pressure applied to the
probe moved the probe along the tooth until an opposing pressure prevents
further movement. Inflammation reduces the ability of the tissues to exert
pressure opposing that exerted by the probe.
ď Keagle and Garnick (1989) - Probe diameter of 0.6 mm discriminated best,
the different levels of gingival inflammation and health.
ďIt is recommended that, to measure the new sulcus depth, but not to
penetrate the long junctional epithelium, forces of 20 grams should be used
with a probe tip diameter 0.6 mm.
10. USES
⢠To measure sulcus and pocket depth
⢠To measure clinical attachment level
⢠To determine width of attached
gingiva
⢠To assess the presence of bleeding or
purulent exudate
⢠To detect and quantify furcation in
molar tooth specially by Nabers
probe.
⢠To determine the biotype of gingiva
Determination of sulcus /pocket
depth
Width of attached gingival is measured
Bleeding appears after few seconds
Nabers probe is used to detect furcation in maxillaty
molar region
11. ⢠To measure the size of oral lesions
⢠To detect gingival recession
⢠To detect edema .
Side of the probe is used to apply
pressure on the swelling
Measuring recession
12. Classification of probes
⢠Periodontal probes are classified as
ďś1st generation probe
ďś2nd generation probe
ďś3rd generation probe
ďś4th generation probe
ďś5th generation probe
Ref: Pihlstrom et al ,1992 and Watts et al ,2000
Philstrom
Watts
13. 1st Generation Probes
Advantages
⢠Tactile sensitivity
⢠Easily available and inexpensive.
⢠Even in presence of sub gingival calculus
probe can be inserted with little navigation
by the operator.
⢠Tip is rounded to avoid tissue trauma.
⢠Color coded for faster and easier
identification of readings.
Conventional Manual Probe
Disadvantages
â˘Probes are heavy
⢠Probing force is not control
⢠Errors during visualization
Composed of either stainless steel or plastic. The design of the working ends of manual probes are either
tapered, round, flat, or rectangular with smooth rounded ends and are calibrated in millimetres at various
intervals. Probes have either straight or curved working ends.
14. TYPES OF PERIODONTAL PROBES.
⢠A. Marquis color-coded probe. Calibrations are in
3,6,9,12mm sections.
⢠B. UNC-15 probe, a 15-mm long probe with millimeter
markings and color coding at the fifth, tenth, and fifteenth
millimeters.
⢠C. University of Michigan âOâ probe, with Williams
markings (at 1, 2, 3, 5, 7, 8, 9, and 10 mm).
⢠D. Michigan âOâ probe with markings at 3, 6, and 8 mm.
⢠E. World Health Organization(WHO) probe, which has a
0.5-mm ball at the tip and millimeter markings at 3.5, 8.5,
and 11.5 mm and color coding from 3.5 to 5.5 mm
15. William probe
⢠Charles H.M. Williams in 1936 introduced graduated
periodontal probe.
⢠It is stainless steel probe with diameter 1mm ,length 13mm
and blunt tip end.
⢠The probe tip and handles are enclosed at 130.80
⢠4 and 6 mm markings are missing which minimize
confusion during reading due to small size of markings.
4 mm is the upper limit of moderate Periodontitis and 6 mm
is considered advanced (⼠5 mm) Periodontitis.
16. UNC 15-Probe
⢠15mm marking
⢠Marking at 5,10,and 15 mm
⢠Probe tip diameter 0.6mm
⢠Thin shank allows access into tight
fibrotic sulci. Suitable for use in deep
periodontal pockets.
⢠It is preferred for clinical trials where
conventional probe is required.
17. Marquis colour coded probe
⢠Calibrations are in 3mm sections to facilitate easy
read out of pocket depth.
⢠Markings are 3,6,9,12mm.
⢠It is available in both straight and curved designs
and has the slimmest tip.
18. Michigan O probe
⢠In an effort to increase the accuracy and
reproducibility of readings and to improve efficiency,
Michigan âOâ probe was introduced by Ramfjord.
⢠It was attempted to make this probe as thin as
possible and to give it the most versatile angulation
for universal probing of periodontal pockets
⢠Markings are at 3 ,6, and 8 mm
19. Goldman Fox Probe
⢠There will be markings at 1,2,3,5,7,8,9,10 mm.
There will be no colour coding(black bands) . Flat
working end for easier insertion in facial and
lingual surfaces.
⢠It is used to assess periodontal pocket depths,
attachment levels, anatomy configurations and
gingival bleeding.
⢠Flat shank does not allow easy access into
tight fibrotic pockets.
20. CPITN probe
First described by WHO and FDI in 1978 and introduced by Jukka Ainamo, David
Barmes, George Beagrie in 1982. It is recommended for screening and monitoring
patients using CPITN index.
ď Purposes- 1.measurement of pocket depth 2.detection of subgingival calculus
The FDI /WHO Joint Working Group has advised the manufacturers of CPITN
probes to identify the instruments as CPITNâE (epidemiologic) , which have 3.5-mm
and 5.5-mm markings, and CPITNâC (clinical), which have 3.5-mm, 5.5-mm, 8.5-
mm, and 11.5-mm markings. CPITN probes have thin handles and are lightweight
(5gm). The probes have a ball tip of 0.5 mm, with a black band between 3.5 mm
and 5.5 mm, as well as black rings at 8.5 mm and 11.5 mm.
ďAdvantages:- a. Ball tip for patient comfort.
b. Colour coded from 3.5-5.5; easy to read markings.
c. Thin shank allows access into tight fibrotic sulci.
21. FURCATION PROBE
⢠The Nabers probe has curved workings ends and a
blunt tip to facilitate detection and classification of
furcations ie, degree of penetration into the furca.
Although the conventional straight probes can still be
used, most clinicians find the Nabers probe to be
superior for furcation areas. These probes can be
color-coded or without demarcation. There are
markings at 3,6,9,12 mm.There are presence of
colour coding between 3-6 and 9-12mm.
⢠Advantages:- Ideal for detection of mesial and distal
furcations in maxillary molars; markings are helpful.
⢠THREE TYPES:1N,2N(COLOUR CODED),3N PROBE
22. LL 20 Probe(Hu-Friedy USA)
⢠A conventional manual probe marked in
increments of 1 mm upto 20mm
⢠Tip diameter 0.5mm
⢠Thick black markings at 4 , 9 ,14 and 19
mm.
Ref : Mayfield et al ,1996
23. PLASTIC PROBE
The newer plastic Color Vue version of probe has become
very popular now-a-days. These probes allow clinicians to
obtain more efficient and accurate readings, resulting in
more time for themselves and patient education by
providing better visibility and comfort.
Advantages: - a. Vivid yellow tip and black markings provide
increased intraoral visibility for faster and more accurate
assessments.
b. Flexible, rounded tip ensures greater patient comfort
and acceptability.
c. Convenient twist-on design allows for easy
replacement of worn tips and use of larger diameter,
ergonomic handle.
d. Safe for use with implants
Plastic probe: Colorvue (Hu-
Friedy, Chicago).
24. Biotype probe(Hu-Friedyâs,COLORVUE)
BIOTYPE PROBE TIPS ARE DESIGNED TO BE USED UPTO 30 TIMES.THE HIGH QUALITY RESIN TIPS ARE SAFE AND
GENTLE ENOUGH TO USE ON ALL PATIENTS,INCLUDING PATIENTS WITH IMPLANTS.
27. 2nd Generation Probes
Constant force controlled pressure probes
⢠They are pressure sensitive probe.
⢠Second generation probes were developed in an effort to standardize and
quantify the pressure used during probing.
⢠Scientific literature that demonstrated probing pressure should be
standardized and not exceed 0.2 N/mm2 led to the development of these
probes.
⢠According to Hefti et al., some research âidentified a positive correlation
between probing force and depth of probe penetrationâ.
⢠Weinberg et al. stated that controlled force of 20 to 25 grams probe during
probing reduced examiner error.
⢠The second generation probes did not have electronic data collection.
28. Advantages of second generation probes:-
â˘Standardization of probing forces.
â˘Comfortable to the patient.
â˘Constant pressure.
Disadvantages of second generation probes:-
â˘Probe tip may pass beyond the junctional epithelium in inflamed
sites.
â˘Reading has to be performed manually.
â˘No computer storage of the data.
29. 1st pressure sensitive probe
⢠By Gabathuler and Hassell in 1971
Hand-piece component
⢠Tip diameter :0.65 mm
⢠Markings 3,6 and 9mm
⢠Probing force: 0.25¹0.09N
Electric component:
Small piezoelectric pressure sensor attached to non-probing end of
probe tip
Probing forces were transferred from the tip to sensor via a piston and
the electric potential generated in the piezo element was amplified
stored or converted into a printer signal.
30. ⢠Armitage et al(1977) developed 16 gauge transparent catheter
around a needle shaft with a spring around it.
⢠Needle shaft could be inserted into the catheter determine by force
of spring .
⢠Any type of probe could be inserted into the shaft.
⢠Force calibration : 0.15 -0.35 N in 0.05 increments
31. Pressure probe
⢠By vander Velden and de Vries in 1978
⢠Metal cylinder with a diameter of 1mm and movable piston of
diameter 0.63 mm
⢠Probing force: 0.1 -0.5 N
⢠Probing pressure : 0.32 N/square mm
32. Electronic pressure sensitive probe
⢠By Polson et al in 1980
⢠Hand piece of pressure-sensitive periodontal
probe, A. Periodontal probe tip inserted into a
chuck at front of hand piece. B. Protective
plastic sheath. C, Pivot. D. Air gap. E. Coil of
electromagnet. Prior to insertion of probe tip
into sulcus, the air gap is closed: when the
preset probing force is reached, the air gap
opens and an audible signal sounds
⢠Yeaple probe used in the studies of dentinal
hypersensitivity.(Kleinberg et al.,1994)
33. Vine Valley probe
⢠Same as electronic pressure
sensitive probe by Polson et al
(1980) except that in it probe
with which readings were made
was LL 20 probe.
⢠Ref : Mayfield et al ,1996
34. ⢠True Pressure Sensitive (TPS)
probe:-It is the prototype for second-
generation probes . Introduced by
Hunter in 1994, these probes have a
disposable probing head and a
hemispheric probe tip with a diameter
of 0.5 mm. A controlled probing
pressure of 20 gm is usually applied.
These probes have a visual guide and a
sliding scale.
35.
36. 3rd Generation Probe
Constant force plus computer assisted probe
⢠It minimizes the errors of second generation by using not only
standardized pressure, but also digital readouts of the probesâ readings
and computer storage of data. This generation includes computer-
assisted direct data capture to reduce examiner bias and allows for
greater probe precision. These probes require computerization of the
dental operatory and can be used by clinicians and academic institutions
for research .These probes reduce the errors in reading the probe,
recording data, and calculating attachment level.
37. Advantages of third generation probes:-
⢠Standardization of probing forces
⢠Errors in reading the probe and transferring the data are eliminated.
⢠Print out of the data from the computer can be used for patient
education.
Disadvantages of third generation probes:-
⢠Tactile sensitivity is decreased.
⢠Probe may pass beyond the junctional epithelium in inflamed sites ,
overestimating the pocket depth.
⢠After the inflammation has resolved, probe may not penetrate beyond
the junctional epithelium , leading to underestimating the pocket depth.
38. Foster Miller Probe
⢠By Jeffcoat et al in 1986
⢠Automated detection of CEJ,better landmark than gingival margin.
⢠Components:
Pneumatic cylinder
Linear Variable Differential Transducer
Force Transducer
accelerometer
probe tip
⢠The main disadvantage is that it can deem root roughness or root
surface irregularities as the CEJ.
39. Florida probe
⢠The Florida ProbeŽ (Florida Probe Corp,
Gainesville, FL) was devised by Gibbs et al. in
1988. The Florida Probe was developed following
the criteria defined by the National Institute of
Dental and Craniofacial Research for overcoming
limitations of conventional probing.
40. ⢠Advantages:
a. Constant probing force with precise electronic measurements.
b. Computer storage of data.
⢠Disadvantages:
a. Lack of tactile sensitivity.
b. Underestimation of deep probing depths by the automated probe.
41. The system includes a probe handpiece , digital readout, foot switch, computer interface, and
computer. Once the tip of the probe is inserted into the sulcus , the clinician presses the foot pedal and the
system automatically records pocket depth, attachment loss, bleeding, suppuration, plaque, recession,
hyperplasia, mobility, furcation, and mucogingival involvement.The probe measures 0.4mm and sleeve
measures 0.9 mm, applies 15g of pressure (.2mm precision).
44. Toronto automated probe
⢠By Birek et al and Mc Culloh et al ,1991
⢠Used occlusoincisal surface as reference and measure CAL
⢠Probed with :0.5 mm Ni-Ti wire that is extended under air pressure.
⢠Angulation maintained by ¹10 ° of a vertical position by the examiner.
⢠This probe has the advantage of an incorporated electronic guidance system
to improve precision in probe angulation.
⢠The disadvantages are associated with positioning: it is difficult to measure
second and third molars, and patients have to position their heads in the
same place to reproduce reading.
45. Inter probe
⢠An electronic probe using an optical encoder
transduction element.
⢠flexible probe tip
⢠No pain
⢠Probing pressure: 15 gm
⢠0.55 mm probe plastic filament
⢠The probes optical encoder handpieces uses
constant probing pressure, which provides
repeatable measurement of pocket depth and
attachment loss.
46. 4th Generation Probe
⢠These are three dimensional probes in which sequential probe positions are
measured.
⢠ADVANTAGES
⢠1)Allow three âdimensional measurement
⢠2)Sequential probe positions can be measured
⢠3)Computerized storage
⢠4)Printout can be obtained
⢠DISADVANTAGES
⢠1)Under developed
47. Fifth generation probe
⢠Probes are being designed to be 3D and non-invasive: an ultrasound or
other device is added to the fourth generation probe. Fifth-generation
probes aim to identify the attachment level without penetrating it.
⢠The only fifth-generation probe available, the Ultra Sonographic (US) probe
( Glen Allen, VA), uses ultrasound waves to detect image and map the
upper boundary of the periodontal ligament and its variation over time as
an indicator of the presence of periodontal disease. The US probe was
devised by Hinders and Companion at the NASA Langley Research Centre.
To probe these structures ultrasonically, a narrow beam of ultrasonic
energy is projected down between the tooth and bone from a transducer,
which is scanned manually along the gingival margin.
48. ⢠Ultrasound gives more information because secondary echoes are
recorded from tissue features at various depths. It appears likely that
the technique also will be able to provide information on the
condition of the gingival tissue and the quality and extent of the
epithelial attachment to the tooth surface. This may supply valuable
data to aid the clinician in the diagnosis and treatment charting of
these diseases.
49. Ultrasound waves in coupling water are
focused inside of tip to a very thin beam.
Crest of the periodontal ligament reflects
ultrasound beam. Echoes are recorded by
ultrasonic transducer and then analyzed by
Computer expert system.
50. Disadvantages of fifth generation probes:-
Expensive
Operator needs to understand the images
provided by computer.
Advantages of fifth generation probes:-
ď A non invasive probe that
provides painless probing to the
patient.
ď There is no question of probe
passing beyond the junctional
epithelium, as the ultrasound waves
detect image and map the upper
boundary of periodontal ligament.
ď Computer storage of data.
ď Guidance path is predetermined.
ď Provides information regarding
condition of gingival tissue.
US probe
51. Other non- periodontal probes
Name Mode of action
Calculus detection probe Detect subgingival calculus with
light emitting diode by means of
audible signals.
Diamond Probe/Perio 2000 System Measures relative sulfide
concentrations in GCF by
microsensor as an indicator of
gram-negative bacterial activity.
Periotemp Probe Detects early inflammatory
changes in the gingival tissues
by measuring temperature
variations in GCF, with a
sensitivity of 0.1 ÂşC.
52. PROBING TECHNIQUE
⢠Probing is the act of walking the tip of a probe along the junctional
epithelium within the sulcus or pocket for the purpose of assessing
the health status of the periodontal tissues .
⢠The Walking method:- the probe is walked around the sulcus or
periodontal pocket using walking stroke. The walking stroke is the
movement of a probe around the perimeter of the base of a sulcus or
pocket. Walking strokes are used to cover the entire circumference of
the sulcus or pocket base.
53. ⢠1.Walking strokes are a series of bobbing strokes
that are made within the sulcus or pocket. The
stroke begins when the probe is inserted into the
sulcus while keeping the probe tip against the
tooth surface.
⢠2.The probe is inserted until the tip encounters the
resistance of the junctional epithelium that forms
the base of the sulcus. The junctional epithelium
feels soft and resilient when touched by the probe.
⢠3.Create the walking stroke by moving the probe
up and down in short bobbing strokes and forward
in 1-mm increments. With each down stroke, the
probe returns to touch the junctional epithelium.
⢠4.The pressure exerted with the probe tip against
the junctional epithelium should be between 10
and 20 grams.
54. ⢠Adaptation and parallelism:- The side of the probe tip(defined as 1 to
2mm of the side of the probe) should be kept in contact with the
tooth surface .The probe is positioned as parallel as possible to the
tooth surface. The probe must be parallel in the mesiodistal
dimension and faciolingual dimension.
55. INTERPROXIMAL TECHNIQUE
⢠When two adjacent teeth are in contact,a special technique is used to
probe the area directly beneath the contact area.
56.
57. PERI IMPLANT PROBING
⢠The results obtained with peri implant probing cannot be interpreted
same as the natural teeth because:
- Differences in the surrounding tissues that support implanted teeth.
- Probe inserts and penetrates differently.
- Around natural teeth, the periodontal probe is resisted by the
insertion of supra-crestal connective tissue fibers into the cementum of
root surface. There is no equivalent fiber attachment around implants.
58. ⢠When selecting a probe for measuring pocket depth around a dental
implant, select a plastic probe. Dental implant surfaces are typically
titanium and can be easily scratched or nicked, producing surface
irregularities that may provide a foundation for bacterial attachment.
59. ⢠Advantages:
- Can measure the level of mucosal margin relative to a fixed position
on the implant.
- Measure the depth of tissue around the implant.
-Peri implant probing depth is often a measure of the thickness of
surrounding connective tissue and correlates most consistently with
the level of surrounding bone.
⢠The probing depth around implants presumed to be âhealthyâ has
been about 3mm around all surfaces.
60. CONCLUSION
⢠The âGold Standardâ for recording changes in periodontal status is
longitudinal measurement of clinical attachment levels from the
cemento-enamel junction or relative attachment level from a fixed
reference point.
⢠Thus, periodontal probe still remains as a standard and a
conventional diagnostic tool in spite of newer diagnostic modalities
available currently.
⢠Newer developments in the field of periodontal probes provide the
potential for error free determination of pocket depth.
61. REFERENCES
1.Glossary Of Periodontal Terms. 2001 4 th Edition.
2.Carranzaâs Clinical Periodontology,11th edition
3.Periobasics.com
4.Principles & Fundamental of periodontal instrumentation-6th edition-Jill S Nield-
Gehrig
5. Pihlstrom BL. Measurement of attachment level in clinical
trials: Probing methods. J Periodontol. 1992;63(12 Suppl):1072-10773
6. Birek P, McCulloch CAG, Hardy V. Gingival attachment level measurements with
an automated periodontal probe. J Clin Periodontol. 1987;14(8):472-477.
7. Gibbs CH, Hirschfeld IW, Lee JG, et al. Description and clinical evaluation of a new
computerized periodontal probe-the Florida Probe. J Clin Periodontol.
1988;15(2):137-144.
8. L. Mayfield*, G. Bratthall, R. AttStrĂśm Periodontal probe precision using 4
different periodontal probes Journal of Clinical Periodontology23;(20)76â82,
February 1996.