Bush Survival
•Download as ODP, PDF•
1 like•315 views

Here is a presentation I made for my TAFE work. It is tips of how to survive in the wild if you get lost.

Recommended
More Related Content
Similar to Bush Survival
Similar to Bush Survival (20)
Recently uploaded
Recently uploaded (19)
Bush Survival
- 2. DISCLAMER The bush is a dangerous place. The writer will not take any responsibility if someone gets hurt taking the advice from this presentation. Always take advise from a expert before entering a dangerous environment.
- 3. Going out in the wild Going for hiking, bike rides, four wheel driving etc. is a great way to get out in to the wild. You can spend time with friends and family and even make new friends. But you need to make sure you are prepared. Some times things happen like getting lost, hurting yourself and many more things. This presentation is about how to survive if some thing does happen .
- 4. The First Thing To Do A big mistake people make is panicking. The most important thing to do is relax, sit down (as long as it safe to do so!) and think about your next step. How far out am I, is any body hurt, am I hurt, is it best to wait for help or do I go get help? Most people when they break down in the bush, will rush off and try to get help and will be found dead or hurt 5km from the car. Just use common sense.
- 5. Priorities Of Survival There’s a saying you can say to yourself to remember the four priorities, Please Remember What's First. The P in Please stands for Protection, The R in Remember stands for Rescue, the W in What's stands for Water and the F in First stands for Food. These are the basic needs for survival. Lets go through the priorities of survival.
- 6. Protection The first priority is protection. Think about it, there’s no point putting rescue first and then you die because you didn't build or find shelter. The first thing that protects you from the elements is your clothing. Clothing is your first line of defence. Wear layers in a cold climate to trap air. Wearing layers is better than just wearing one big garment. Also keep your clothes dry. Wet clothing looses 90% of there insulating properties. Water conducts heat (away from your body) approximately 25 time faster then air of the same temperature. So in other words, stay dry!
- 7. Protection In a hot climate, clothing and head wear could be your only protection against the sun. A improvised hat or head scarf can provide shade and keep your body cool if made wet. Keep your skin covered is a good idea if you don't want to get burnt.
- 8. Protection The next form of protection is shelter. A tip, most of the time nature has provided one for you. So before you waste energy making a shelter, have a quick look around first and see if there is any trees fallen over or maybe some caves. Then if there is nothing then you are going to have to build one. Ideally it would be great to have a tent but most of the time you don’t carry one in you pocket!
- 9. Protection FIRE. This is a thing that kills a lot of people. But in this case it saves a lot. Fire, if used right can save your life. It will provide you with heat, light, comfort and protection. Lighting one can be a pain. But if you know what your doing, it can make it a whole lot easier. There is three things a fire needs: Oxygen, Fuel and Heat.
- 10. Protection Choose the location for your fire wisely; relative proximity to your shelter and wind direction being the most important consideration. ( You don't want a bush fire!) Build a base of green branches if the ground is wet or dig a pit to protect if it is windy. Look for wood off the ground to ensure that you get dry wood. (Look for dead branches and twigs that crack when you break them). You will then need tinder to get you spark going.
- 11. Protection Your probably thinking “What another slide about fire”? Trust me if you are out in the elements and it is freezing cold and you are wet, you will want to know how to light a fire! There are lots of types of tinder. Fluffy fibrous materials like dry moss and dry grasses all make good tinder, as do cotton balls, tampons or petrol soaked rags. (Be very careful starting a fire with petrol. Use a very small amount and start the fire well away from the petrol source.) Before you light your fire make sure you have enough wood to last you. If you think you have got enough double it.
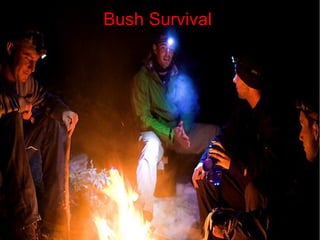
- 12. Protection (Yes one more slide) Finally once you have a flame, start putting the kindling on. One thing you have to learn about fire is you can’t rush it. Look after it when its small, it will look after you when its big. So remember it needs oxygen. Once the kindling catches on start building it up. Make lighting the fire a group thing. (if more than one of you are lost of course!) Once it is going, sit around the fire and talk about home. Its amazing how much a fire can lift your spirits.
- 13. Rescue Rescue is your next priority. Rescue services will start looking as soon as they know you are missing. You might only get one chance to signal your rescuers so make sure you are prepared. Location: You need to think, what way would they be coming from? How will they spot you? Like I said at the start if it is safe to do so, stay were you are. You need to make yourself visible. Signalling: The international sign for help is the letters SOS. Make the SOS sign with rocks or sticks near your location. If you have a torch or light source keep it near by for signalling A shiny surface will reflect the sun for many miles. For example you could use a knife or a mirror off your car. Use this to signal them directly or sweep the horizon if no one is in sight.
- 14. Rescue Signalling (Continued): Smoky signal fires are a great way to alert rescuers. Have them built and ready for quick ignition. Keep the fire dry by putting vegetation over the top. Have damp or living wood or green leaves near by to create smoke. You can also put oil, diesel and tyres on to make smoke. (Please make sure you deflate the tyre before you put it on the fire!) Navigation: If you HAVE to walk to find help, you need to know which direction to go. There is two reasons why you would travel to find help. Number one is your location is unsafe, or two you know that no one is looking for you. There are many ways of finding directions.
- 15. Rescue Navigation (continued): There is a method called the shadow stick. What you do is place a stick in the ground. Mark where the tip of the shadow falls. Wait 15 min's and mark again. The line between those two marks denotes a general east-west axis. (Not recommended in polar regions above/below 60° latitude.) In the southern hemisphere, the south line in the picture will become north. The next one is my favourite. Using your watch all you do is point the 12 at the sun and half way between 12 and the short hand is a rough north-south line.
- 16. Water Water is very important. They say some people can last 3 weeks without food but barely 3 days without water. (In good conditions) Don't eat food if you don't have water because your body uses water to digest food. Sources: One way to find water is if you find some game trails (Animal tracks) and follow them and see if they lead to water. Also look for lush vegetation which can be a sign the there is underground water present. If you are desperate, now I mean like really desperate you can drink your own pee. Yes that sound really gross but you can drink it. I don't recommend it, but if your just about to die then go for it.
- 17. Water Collection: You should always start looking for water before you run out. Don't wait until you have nothing before you start looking. You could make a rain/dew trap or a solar still. Purification: Water from Arctic ice (caution may be sea ice), a rain/dew or still probably won't need purifying. You should always purify when possible. Drinking water that makes you sick can be worse than having no water. To purify water you need boil the water for about 15mins. To get dirt out of the water just use your shirt or sock. Try to get water from a running source.
- 18. Food Good old bush tucker. The bush can provide some food that half the time you don't know it is there. The first step, don't eat food that is unknown to you. Probably the most safe food to eat in the bush is meat. Setting snares and traps is better than wasting energy hunting. Generally if it walks, crawls, swims or flies it is edible. When you start getting to plants then you have to be careful. Berries, and fruit are a bit more hard to tell if its edible.
- 19. Food Traps: Most animals can be snared with a wire noose in the right position. Funnel the animal toward your trap. The more traps you set the better your chance of you catching some thing. Practice knots at home. Scavenging: The good survivor is a scavenger. Let nature do all the hard work for you. Don't be choosy if you get your hands on something edible, eat it.
- 20. Food There is a testing process that you can do to test plants if they are edible. The first step is to smell. Crush a small amount and smell. If it smells like bitter almonds or peaches – DISCARD. Next Rub slightly or squeeze some of the juice on to a tender part of the body (under the arm between armpit and elbow). If any discomfort, rash or swelling is experienced- DISCARD. If there is no irritation to the skin proceed in the following stages, going on to the next only waiting 10sec to check that there is no unpleasant reaction: ● Place a small portion on the lips ● Place a small portion in the corner of the mouth ● Place a small portion on the tip of the tongue ● Place a small portion under the tongue ● Chew a small portion In any cases: if any discomfort is felt, such as soreness to the throat, irritation or stinging or burning sensation- DISCARD Swallow a small amount and WAIT FIVE HOURS. During this period eat or drink NOTHING else. If there is no reactions, you may consider the plant safe.
- 21. CHOOSE TO SURVIVE This is the most important thing. You might think it doesn’t help much but it does. There have been people that have been in situations that you would of thought was impossible to get out of. Just because they kept their hope up, they survived. Be prepared, plan your trip carefully, contact professionals for advise, and most of all respect the wild. Jayden Glassby ☺ Above: Climbing mountains with my grand dad and brother.