

Recommended
More Related Content
What's hot
What's hot (20)
Similar to TNC connector catalog
Similar to TNC connector catalog (20)
More from Echo Dong
More from Echo Dong (15)
Recently uploaded
Recently uploaded (20)
TNC connector catalog
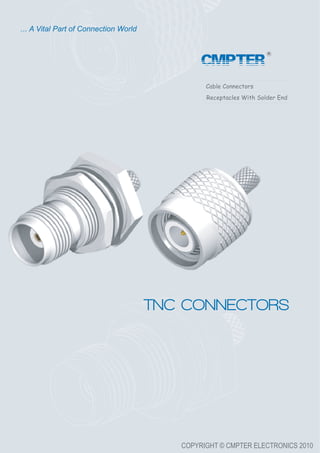
- 1. COPYRIGHT © CMPTER ELECTRONICS 2010 Cable Connectors Receptacles With Solder End TNC CONNECTORS ... A Vital Part of Connection World CMPTER
- 2. TNC 50 Ohm Coaxial Connectors #45 ZhongShan East Road, ZhenJiang 212003, JiangSu, China Tel : +86-511-8443 6131 Fax : +86-511-8502 5485 Website: www.cmpter.comEmail : sales@cmpter.com CMPTER 1 DESCRIPTION CONTENTS Description .............................................................................. Technical data ........................................................................... Interface dimensions .................................................................... Cable connectors ....................................................................... Receptacles with solder end ............................................................ Assembly instruction .................................................................... Mounting hole ........................................................................... 15 1 2 3 4 10 9 The Threaded Neil Concelman connector emerged in 1956 as an alternative to the bayonet coupling mechanism of the BNC.Utilizing the same basic structural parameters as the BNC connector, only minia- ture. They are two versions of TNC connectors:Standard and Reverse Polarity. The standard type of TNC operates in frequency ranges between DC-11 GHz, and is often used in applications which have perfor- mance requirements such as networks, antennas, telecom, cable assembly and celluar system.
- 3. TNC INTERFACE #45 ZhongShan East Road, ZhenJiang 212003, JiangSu, China Tel : +86-511-8443 6131 Fax : +86-511-8502 5485 Website: www.cmpter.comEmail : sales@cmpter.com CMPTER 2 Interface dimensions conformable to the standards: International: IEC60169-17 Europe: CECC 22 200 USA: MIL-C-39012, TNC Interface MIL-STD-348A/313 IP rating (interface, mated) IP68 LETTER mm inch LETTER mm inch min. max. min. max. min. max. min. max. A 1.32 1.37 0.052 0.054 A - 4.72 - 0.186 B 4.83 - 0.190 - B 8.1 8.1 0.319 0.321 D 11.40 - 0.449 - C 8.31 8.46 0.327 0.333 E - 2.2 - 0.087 D 8.79 9.04 0.346 0.356 F 0.35 0.65 0.014 0.025 E 9.6 9.68 0.378 0.381 G 7 7.05 0.275 0.277 F - 2.2 - 0.087 1 4.9 5.7 0.193 0.224 H - 5.9 - 0.232 2 5.28 5.79 0.208 0.228 1 8.3 8.5 0.327 0.335 3 0.15 - 0.006 - 2 1.73 2.24 0.068 0.088 4 1.8 - 0.071 - 3 4.75 - 0.187 - 5 0.15 - 0.006 - 4 - 0.15 - 0.006 6 0.08 1.02 0.003 0.040 5 4.72 5.23 0.186 0.206 7 5.33 5.84 0.210 0.230 6 4.78 5.28 0.188 0.208 8 0.7 1.98 0.027 0.078 7 10.7 - 0.421 - 8 0.38 0.76 0.015 0.030 9 4.95 - 0.195 - PLUG JACK
- 4. TECHNICAL DATA #45 ZhongShan East Road, ZhenJiang 212003, JiangSu, China Tel : +86-511-8443 6131 Fax : +86-511-8502 5485 Website: www.cmpter.comEmail : sales@cmpter.com CMPTER 3 ELECTRICAL DATA Impedance Frequency range Dielectric withsanding voltage Working voltage 50 Ohm DC — 11 GHz 1.5 kV rms, 50 Hz(depending on cable) 500 V rms, 50 Hz(depending on cable) Insulation resistance Contact resistance RF leakage ≥ 5*1000 MΩ inter contact ≤ 1.5 mΩ out contact ≤ 1mΩ ≥ 55 dB MECHANICAL DATA Coupling nut retention force Contact captivation Durability(matings) 46 Ncm...69 Ncm/4.1 in.lbs...6.1 in.lbs (recommended) ≥ 450 N / 101.2 lbs ≥ 27N / 6.1lbs ≥ 500 Coupling nut torque ENVIRONMENTAL Thermal shock Moisture resistance Corrosion -40 °C to + 155 °C MIL-STD-202, Method 107,Condition B MIL-STD-202, Method 106 Saltspray test acc.to MIL-STD-202, Method 101, Condition B Temperature Range MIL-STD-202, Method 204, Condition BVibration 170 Ncm/15.0 in.lbs (proof torque)
- 5. CABLE CONNECTORS Straight cable plugs (male) #45 ZhongShan East Road, ZhenJiang 212003, JiangSu, China Tel : +86-511-8443 6131 Fax : +86-511-8502 5485 Website: www.cmpter.comEmail : sales@cmpter.com CMPTER 80-03-1M18-001 P/N Cable Type Finish BodyCenter Gold Nickel Assembly Instruction Notes LMR195/RG58 A01 RoHS 80-03-1M04-002 P/N Cable Type Finish BodyCenter Gold Nickel Assembly Instruction Notes RG316/LMR100/RG174 A02 80-03-1M10-004 P/N Cable Type Finish BodyCenter Silver Nickel Assembly Instruction Notes LMR240 A01 Cable entry crimp Centre contact soldered Cable entry crimp Centre contact soldered Cable entry crimp Centre contact soldered 4 3.20[.126DIA] 4.60[.181DIA] 6.25[.246DIA] 12.70 [.500] 5.40[.213DIA.] 23.50 [.925] 15.00[.591DIA.] 1.65[.065DIA.] 3.20[.126DIA.] 4.00[.157] 10.00 [.394] 20.80 [.819] 15.00[.591DIA.] 2.60[.102DIA.]4.2[.165DIA.] 6.80[.268DIA.] 8.00[.315DIA.] 13.00 [.512] 23.50 [.925] 15.00[.591DIA.]
- 6. CABLE CONNECTORS Straight cable plugs (male) #45 ZhongShan East Road, ZhenJiang 212003, JiangSu, China Tel : +86-511-8443 6131 Fax : +86-511-8502 5485 Website: www.cmpter.comEmail : sales@cmpter.com CMPTER 80-03-1M01-005 P/N Cable Type Finish BodyCenter Gold Nickel Assembly Instruction Notes LMR400 A01 RoHS 80-03-4M18-006 P/N Cable Type Finish BodyCenter Gold Nickel Assembly Instruction Notes RG58/LMR195 A03 80-03-4M01-008 P/N Cable Type Finish BodyCenter Gold Nickel Assembly Instruction Notes LMR400 A03 Cable entry crimp Cable entry clamp Centre contact soldered Cable entry clamp Centre contact soldered 5 Centre contact soldered 26.45 [1.041] 15.00[.591DIA.] SW 11.00 [.433 AF.] SW 11.00 [.433 HEX.] 37.45 [1.474] 19.00[.748DIA.] SW 16.00 [.630 AF.] SW 16.00 [.630 AF.] 15.00[.591DIA.] 15.00 [.591] 10.90[.429DIA.] 12.20[.480DIA.] 7.5[.295DIA.] 26.00 [1.024] 15.00[.591DIA.]
- 7. CABLE CONNECTORS Right angle cable plugs (male) #45 ZhongShan East Road, ZhenJiang 212003, JiangSu, China Tel : +86-511-8443 6131 Fax : +86-511-8502 5485 Website: www.cmpter.comEmail : sales@cmpter.com CMPTER 80-13-1M18-009 P/N Cable Type Finish BodyCenter Gold Nickel Assembly Instruction Notes LMR195/RG58 A04 RoHS 80-13-1M04-010 P/N Cable Type Finish BodyCenter Gold Nickel Assembly Instruction Notes LMR100/RG174/RG316 A04 Cable entry crimp Centre contact soldered Cable entry crimp Centre contact soldered 6 25.10 [.988] 19.70[.776] 3.20 [.126 DIA] 12.70 [.500] 5.40[.213DIA.] 6.25[.246DIA.] 15.00[.591DIA.] 25.10 [.988] 3.20[.126DIA.] 4.00[.157DIA.] 22.00[.866] 1.65 [.065 DIA.] 10.00 [.394] 15.00[.591DIA.]
- 8. CABLE CONNECTORS Straight cable jacks (female) #45 ZhongShan East Road, ZhenJiang 212003, JiangSu, China Tel : +86-511-8443 6131 Fax : +86-511-8502 5485 Website: www.cmpter.comEmail : sales@cmpter.com CMPTER 80-02-1M18-012 P/N Cable Type Finish BodyCenter Gold Nickel Assembly Instruction Notes RG58/LMR195 A01 RoHS 80-02-1M21-013 P/N Cable Type Finish BodyCenter Gold Nickel Assembly Instruction Notes LMR195/RG58 A03 Cable entry crimp Cable entry clamp Centre contact soldered 7 7/16-28UNEF-2A 30.00 [1.181] 11.5[.453DIA.] 6.80[.268DIA.] 8.00[.315DIA.] 13.00 [.512] 4.2[.165DIA.] 33.35 [1.313] SW 10.0 [.394 HEX.] 7/16-28UNEF-2A 11.5[.453DIA.] SW 10.0 [.394 AF.]
- 9. CABLE CONNECTORS Straight bulkhead cable jacks (female) #45 ZhongShan East Road, ZhenJiang 212003, JiangSu, China Tel : +86-511-8443 6131 Fax : +86-511-8502 5485 Website: www.cmpter.comEmail : sales@cmpter.com CMPTER 80-02-1A04-015 P/N Cable Type Finish BodyCenter Gold Nickel Assembly Instruction Mount Hole LMR100/RG174/RG316 A01 RoHS 80-02-2A14-016 P/N Cable Type Finish BodyCenter Gold Nickel Assembly Instruction Mount Hole Semi-rigid.141/RG402 A04 Cable entry solder Centre contact crimp Cable entry solder 8 M01 M01 7/16-28UNEF-2A 1/2-28UNEF-2A 29.30 [1.154] 10.00 [.394] MAX. 5 [MAX. .197] 1.65[.065DIA.] 3.20[.126DIA.] 4.00[.157] 10.00 [.394] 2.60[.102DIA.] SW 16.00 [.630 HEX.] SW 17.00 [.669 HEX.] Centre contact solder 7/16-28UNEF-2A 1/2-28UNEF-2A 27.00 [1.063] 10.00 [.394] MAX. 5 [MAX. .197] SW 16.00 [.630 HEX.] SW 17.00 [.669 HEX.] 3.70[.146DIA.]
- 10. RECEPTACLES WITH SOLDER END Receptacles, jacks (female) #45 ZhongShan East Road, ZhenJiang 212003, JiangSu, China Tel : +86-511-8443 6131 Fax : +86-511-8502 5485 Website: www.cmpter.comEmail : sales@cmpter.com CMPTER 80-02-5B2-018 P/N Mount Hole Finish BodyCenter Gold Nickel Notes M02 RoHS 80-02-5F1-019 P/N Mount Hole Finish BodyCenter Gold Nickel Notes M03 80-02-5F7-020 P/N Mount Hole Finish BodyCenter Gold Nickel Notes M03 Panel mounted Panel mounted Panel mounted 9 7/16-28UNEF-2A 26.00 [1.024] 11.5[.453DIA.] 14.00[.551DIA.] 12.00 [.472] 2.00 [.079] 2.03[.080DIA.] 3/8-32UNEF-2A 26.50 [1.043] 17.50 [.689 SQ.] 12.70 [.500] 12.70[.500] 4- 3.10 [.122 DIA.] 2.30 [.091] 18.20 [.717] 1.40[.055DIA.] 2.03[.080DIA.] 11.00[.433] 25.30 [.996] 17.50 [.689 SQ.] 12.70 [.500] 12.70[.500] 4- 3.10 [.122 DIA.] 2.30 [.091] 18.20 [.717] 2.03[.080DIA.] 11.00[.433] 5.30[.209DIA.]
- 11. ASSEMBLY INSTRUCTIONS A01 #45 ZhongShan East Road, ZhenJiang 212003, JiangSu, China Tel : +86-511-8443 6131 Fax : +86-511-8502 5485 Website: www.cmpter.comEmail : sales@cmpter.com CMPTER 10 BodyCenter Contact Heatshrink sleeve (option) a Stripping Dimensions b c Ferrule 2. Slide the center contact on until it bottom against the cable dielectric. Solder the center contact onto the cable. 1 2 3. Fan the braid. 4. Slide the cable into the body until stops. 3 1 2 1. Slide the heatshrink sleeve onto the cable (option). Slide the ferrule onto the cable. Strip the cable as Striping Dimensions. 1 5. Slide the ferrule over the braid. Crimp the ferrule with crimping tool (see table). 1 1 2 2 1 6. Cut the excess of braid if necessary. Slide the sleeve over the ferrule and heatshrink it in place (option). P/N HEX. Crimp Tool (mm [in]) Stripping Length (mm [in]) ba c Cable Type LMR240 80-03-1M01-005 LMR400 80-03-1M18-001 LMR195/RG58 5.41 [.213] 6.80 [.268] 10.9 [.429] 4 [.157] 11.5 [.453]2 [.079] 2.5 [.098] 12.5 [.492] 4.5 [.177] 14 [.551] 80-03-1M10-004 80-02-1M18-012
- 12. ASSEMBLY INSTRUCTIONS A02 #45 ZhongShan East Road, ZhenJiang 212003, JiangSu, China Tel : +86-511-8443 6131 Fax : +86-511-8502 5485 Website: www.cmpter.comEmail : sales@cmpter.com CMPTER Body Heatshrink sleeve (option) 1. Slide the heatshrink sleeve onto the cable (option). Slide the ferrule onto the cable. 2. Slide the guide pin on until it bottom against the cable dielectric. Solder the guide pin onto the cable. 1 2 3. Fan the braid. 4. Slide the cable into the body until stops. 5. Slide the ferrule over the braid. a Stripping Dimensions b c 11 Ferrule 3 1 2 Strip the cable as Striping Dimensions. 1 Guide Pin 6. Cut the excess of braid if necessary. Crimp the ferrule with crimping tool (see table). 1 1 2 2 1 Slide the sleeve over the ferrule and heatshrink it in place (option). P/N HEX. Crimp Tool (mm [in]) Stripping Length (mm [in]) ba 3.25 [.128] 2.5 [.098] c Cable Type 80-02-1A04-015 LMR100/RG174/RG316 80-03-1M04-002 3 [.118] 11 [.433]
- 13. 1 2 2 1 ASSEMBLY INSTRUCTIONS A03 #45 ZhongShan East Road, ZhenJiang 212003, JiangSu, China Tel : +86-511-8443 6131 Fax : +86-511-8502 5485 Website: www.cmpter.comEmail : sales@cmpter.com CMPTER 12 Body Nut Washer 2. Fold the braid back. Insert the insert sleeve into the cable (under the braid) until the back surface flush with the cable dielectric. 4. Slide the nut over the cable assembly. 2 1 1. Slide the nut, the washer, the rubber and another washer onto the cable. Strip the cable as Striping Dimensions. 5. Screw sub-assembly into the body with wrench, recommended coupling torque see table. 1 a Stripping Dimensions c b Center Contact Rubber Insert Sleeve 3. Slide the center contact on until it bottom against the cable dielectric. Solder the center contact. 1 80-03-4M18-006 LMR195/RG58 P/N Stripping Length (mm [in]) ba c Cable Type 3 [.118] 5 [.197] 80-03-4M01-008 LMR400 80-02-1M21-013 Recommended Coupling Torque 450N·cm 5 [.197] 3.5 [.138] 7 [.276] 9 [.354]
- 14. ASSEMBLY INSTRUCTIONS A04 #45 ZhongShan East Road, ZhenJiang 212003, JiangSu, China Tel : +86-511-8443 6131 Fax : +86-511-8502 5485 Website: www.cmpter.comEmail : sales@cmpter.com CMPTER Heatshrink sleeve (option) 1. Slide the heatshrink sleeve onto the cable (option). Slide the ferrule onto the cable. 3. Push the body under the braid. Slide the ferrule over the braid. 2. Fan the braid. 4. Crimp the ferrule with crimping tool (see table). 5. Place the cap into the body. a Stripping Dimensions b c 13 Ferrule 3 1 2 Strip the cable as Striping Dimensions. 1 6. Press on the cap until stops. Slide the sleeve over the ferrule and heatshrink it in place (option). Body Cap 1 1 2 1 Solder the inner conductor. 1 2 1 80-13-1M04-010 LMR100/RG174/RG316 80-13-1M18-009 LMR195/RG58 P/N HEX. Crimp Tool (mm [in]) Stripping Length (mm [in]) ba c Cable Type 5.41 [.213] 1.5 [.059] 18.5 [.728]11 [.433]3.25 [.128] 2 [.079] 17.5 [.689]7.5 [.295]
- 15. 1 ASSEMBLY INSTRUCTIONS A05 #45 ZhongShan East Road, ZhenJiang 212003, JiangSu, China Tel : +86-511-8443 6131 Fax : +86-511-8502 5485 Website: www.cmpter.comEmail : sales@cmpter.com CMPTER 14 Body Center Contact Heatshrink sleeve (option) 1. Slide the heatshrink sleeve onto the cable (option). Strip the cable as Striping Dimensions. 2 1 2. Slide the center contact on until it bottom against the cable dielectric. Solder the center contact onto the cable. 1 2 3. Slide the cable into the body until it stops. 4. Solder the body onto the cable. 1 5. Slide the heatshrink sleeve over the body and heatshrink it in place (option). 1 a Stripping Dimensions 80-02-2A14-016 P/N Stripping Length (mm [in]) a Notes 4.0 [.157] Cable Type Semi-rigid .141/RG402
- 16. MOUNTING HOLES #45 ZhongShan East Road, ZhenJiang 212003, JiangSu, China Tel : +86-511-8443 6131 Fax : +86-511-8502 5485 Website: www.cmpter.comEmail : sales@cmpter.com CMPTER 15 12.80 [.504 DIA.] 12.00 [0.472] M01 M03 12.70 [0.500] 12.70[0.500] 4- 3.4 [.134 DIA.] 11.30 [.445 DIA.] 9.00 [0.354] 9.70 [.382 DIA.] M02
- 17. Office Adress: #45 ZhongShan East Road, ZhenJiang, JiangSu China. Tel:+86 511 8443 6131 Fax:+86 511 8502 5485 Email: sales@cmpter.com Website: http://www.cmpter.com Cmpter Electronics, Ltd.