1. PT630 Beginner’s Guide:
The PT630 is a programmable portable terminal capable of scanning a multitude of
barcode symbologies. The most common use for this device is Inventory. Users would
like to scan barcodes in their warehouse, enter quantities, and transfer the data to their
PC’s for interpretation. The PT630 comes ready for this application. This application is
commonly known as “Form Caching”. The following steps instruct the user how to
setup the PT630 for Form Caching:
1. Turn Device ON and wait for BIOS screen
2. Press and hold CMD
3. Enter 2. TER
4. Enter 2. Form Caching
5. Begin Scanning
6. Press ESC once you are finished scanning in inventory to return to Main Menu
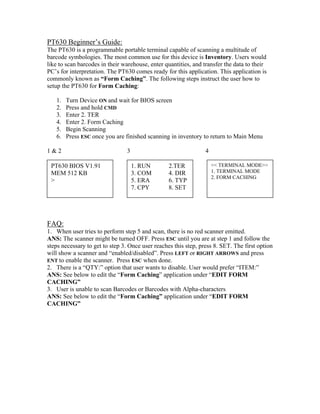
1 & 2 3 4
FAQ:
1. When user tries to perform step 5 and scan, there is no red scanner emitted.
ANS: The scanner might be turned OFF. Press ESC until you are at step 1 and follow the
steps necessary to get to step 3. Once user reaches this step, press 8. SET. The first option
will show a scanner and “enabled/disabled”. Press LEFT or RIGHT ARROWS and press
ENT to enable the scanner. Press ESC when done.
2. There is a “QTY:” option that user wants to disable. User would prefer “ITEM:”
ANS: See below to edit the “Form Caching” application under “EDIT FORM
CACHING”
3. User is unable to scan Barcodes or Barcodes with Alpha-characters
ANS: See below to edit the “Form Caching” application under “EDIT FORM
CACHING”
PT630 BIOS V1.91
MEM 512 KB
>
1. RUN 2.TER
3. COM 4. DIR
5. ERA 6. TYP
7. CPY 8. SET
<< TERMINAL MODE>>
1. TERMINAL MODE
2. FORM CACHING
2. Transfer Scanned Items to PC:
Data may be transferred to and from the PT630 with UTE’s PTComm Manager which
can be found on the CD that accompanies the device or at the following website:
http://www.ute.com/downloads.php?product_id=52
PTComm Manager must be installed on the PC in order to communicate with the PT630.
Once PTComm Manager is installed follow these steps to transfer the data file to the PC:
NOTE: The PT630 can be ON or OFF and these steps should successfully connect the
PT630 to the PC
1. Connect the PT630 to the back of the PC via RS232 or Set the PT630 on the PT063
cradle and ensure the cradle is connected to the PC and that is has power.
2. Open PTComm Manager
3. Click on the icon under “File” or click on “Transfers” -> “Open Portable”
3. 4. Verify the MODEL, ADDRESS, and COM. PORT. Most importantly, to ensure a
successful connection, select BOTH “Auto Detect Baud Rate” and “Auto Detect or
Confirm Portable Model” and press OK
5. The PT630 should BEEP even if it is OFF, PTComm Manager will automatically turn
on the device and connect to it. If there is data in the device, it will be displayed under
the Portable Name. Click and drag the “FORM.dat” file to a folder on the left hand
side of the screen (the PC).
Data Scanned in
with FORM
CACHING is
saved as
“FORM.DAT”
4. Edit Form Caching:
Form Caching can be edited to the user’s preference. Many things can be changed in the
process. The following steps will display how to remove the “QTY:” prompt from the
application so that the user will only be prompted for an ITEM.
1. Turn off the Device
2. Press and hold CMD and LEFT ARROW. While holding these two buttons, press
the ON button. The PT630 should turn on and a new screen with three options
should appear.
3. Select “SUPERVISOR”.
4. Enter the password “630” and press ENT
5. Select 4. FORM
a. If a screen warning that FORM.DAT contains data, make sure user has
saved all scanned data to the PC using PTComm Manager before
proceeding. (See above Transfer Scanned Items to PC)
6. The first screen will display “ITEM:” Press ENT to confirm this prompt.
7. Max Data length will need to be confirmed. A safe length is 48.
8. Min Data length will need to be confirmed next. A safe length is 1.
9. Data Type can be Numeric or Alphanumeric. If user scans barcodes with both
letters and number, option 2 is best; otherwise option 1.
10. Device Type designates how the data will be received. “Both” is a good choice.
11. This step is where “QTY:” will be removed. The screen should display “QTY”,
press ESC NOT ENT!
12. If step 11 is successful, the screen should prompt “Between Field”.
13. Field Delimiter of “comma” is good choice
14. Record Delimiter of 3.CRLF is default and preferred
15. Date stamp and Time stamp are next. This is up to the user, but to disable both
choose option 1 at the prompts.
16. Finally Field Delay of 0 is a good setting.
17. Press ESC and try out the new settings.
2. 4. 5.
5a. 6. 7.
File FORM.DAT
has data !
Overwrite ?
1=YES/0=NO
<<START MENU>>
1. SUPERVISOR
2. WARM START
3. COLD START
<<SUPERVISOR>>
PASSWORD:
XXX
1. DEV 2. TERM
3. MEM 4. FORM
5. PWR 6. PSWD
7. SYS 8. DIAG
DEFINE FIELD 1
PROMPT (16 MAX)
ITEM:
DATA LENGTH
MAX (1 – 48 )
5. 8. 9. 10.
**11. PRESS ESC!!!*** 12. 13.
14. 15. 16.
DATA LENGTH
MIN ( 1 – MAX )
DATA TYPE
1. NUMERIC
2. ALPHANUM
DEVICE TYPE
1. KEY ONLY
2. SCAN ONLY
3. BOTH
DEFINE FIELD 2
PROMPT (16 MAX)
QTY:
BETWEEN FIELD
1. APPEND SCREEN
2. CLEAR SCREEN
FIELD DELIMITER
1. , 2. ;
3. SPACE 4. TAB
RECORD DELIMITER
1. CR
2. LF
3. CRLF
DATE & TIME
1. NONE
.
.
.
.
FIELD DELAY
( 0 – 6 ) ?