3. Introduction of Electrical protective devices (1).pptx
12777 coastal single pages part149
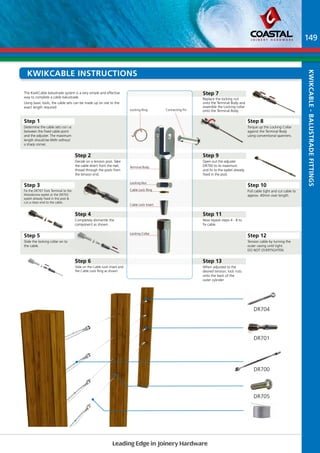
1. The KwikCable balustrade system is a very simple and effective
way to complete a cable balustrade.
Using basic tools, the cable sets can be made up on site to the
exact length required.
Step 4
Completely dismantle the
component as shown.
Step 6
Slide on the Cable Lock Insert and
the Cable Lock Ring as shown.
Step 7
Replace the locking nut
onto the Terminal Body and
assemble the Locking collar
onto the Terminal Body.
Step 10
Pull cable tight and cut cable to
approx. 40mm over length.
Step 11
Now repeat steps 4 - 8 to
fix cable.
Step 12
Tension cable by turning the
outer casing until tight.
DO NOT OVERTIGHTEN.
Step 13
When adjusted to the
desired tension, lock nuts
onto the back of the
outer cylinder.
Step 8
Torque up the Locking Collar
against the Terminal Body
using conventional spanners.
Locking Ring Connecting Pin
Terminal Body
Locking Nut
Cable Lock Ring
Cable Lock Insert
Locking Collar
Step 5
Slide the locking collar on to
the cable.
Step 9
Open out the adjuster
DR700 to its maximum
and fix to the eyelet already
fixed in the post.
Step 1
Determine the cable sets run i.e.
between the fixed cable point
and the adjuster. The maximum
length should be 6Mtr without
a sharp corner.
Step 2
Decide on a tension post. Take
the cable direct from the reel,
thread through the posts from
the tension end.
Step 3
Fix the DR701 Fork Terminal to the
Woodscrew eyelet or the DR702
eyelet already fixed in the post &
cut a clean end to the cable.
Leading Edge in Joinery Hardware
149
KwikCable Instructions
Kwikcable - balustrade FITTINGS
DR704
DR701
DR700
DR705