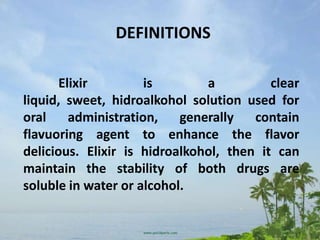
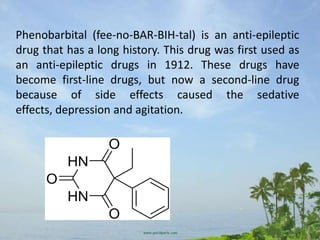
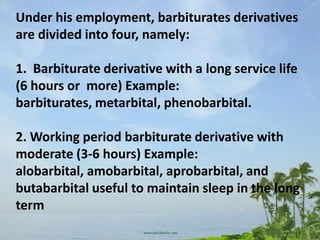
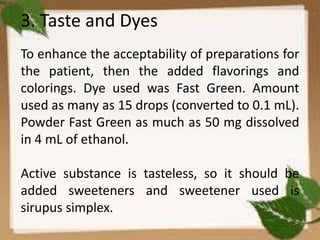
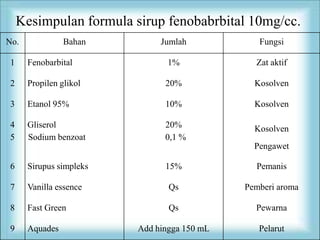
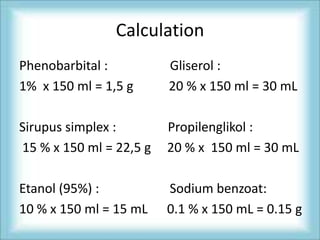
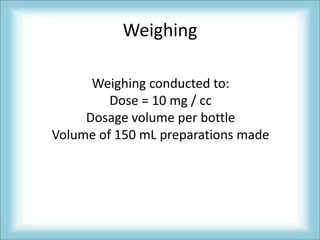
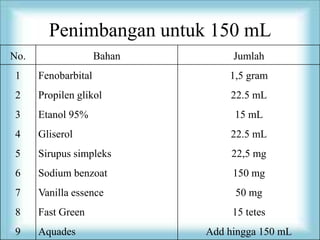
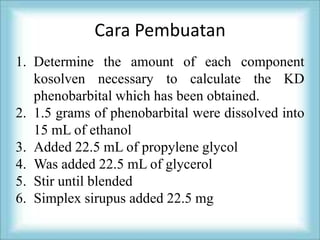
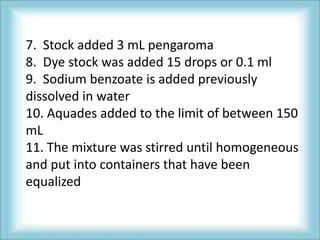
ELIKSIR
PHENOBARBITAL

      By group II
DEFINITIONS

       Elixir         is       a          clear
liquid, sweet, hidroalkohol solution used for
oral     administration,   generally   contain
flavuoring agent to enhance the flavor
delicious. Elixir is hidroalkohol, then it can
maintain the stability of both drugs are
soluble in water or alcohol.
Phenobarbital (fee-no-BAR-BIH-tal) is an anti-epileptic
drug that has a long history. This drug was first used as
an anti-epileptic drugs in 1912. These drugs have
become first-line drugs, but now a second-line drug
because of side effects caused the sedative
effects, depression and agitation.
Under his employment, barbiturates derivatives
are divided into four, namely:

1. Barbiturate derivative with a long service life
(6 hours or more) Example:
barbiturates, metarbital, phenobarbital.

2. Working period barbiturate derivative with
moderate (3-6 hours) Example:
alobarbital, amobarbital, aprobarbital, and
butabarbital useful to maintain sleep in the long
term
3. Barbiturate derivative with a short
working period (from 0.5 to 3 hours)
Example: sekobarbital, and
pentobarbital, which is used to induce sleep
for people who have trouble falling asleep.

4. Barbiturate derivative with a very short
period of employment (<0.5 h) Example:
thiopental is used for general anesthesia.
Eliksir Fenobarbital
Phenobarbital has a low solubility in
water solvent, so as to increase the
solubility made ​mixed solvent (co-
solvent).            In           the
experiment,     phenobarbital   elixir
made ​in the dosage form.
Known there are two ways in making
elixir, namely:
1. Active substance is dissolved in a
    solvent with a solubility of the active
    substance is greater, then add other
    solvents as well.
2. Active substance is dissolved little by
    little into the mixed solvent.
Phenobarbital has a low solubility in
 water solvent, so as to increase of the
  solubility made ​mixed solvent (co-
     solvent). In the experiment,
phenobarbital elixir made ​in the dosage
                 form.
Dose Phenobarbital
   Active substance at this time is fenobabrbital
sefiaan       that         can       act        as
anticonvulsants, sedatives, and hypnotics. Dose of
phenobarbital:
                 For oral sedativum
         The usual dose: 1 time = 15-30 mg
                  1 day = 45-90 mg
          The maximum dose: 1 time = 300
                         mg
                   1 day = 600 mg
For oral anticonvulsant
The usual dose: 1 time = 50-100 mg
        1 day = 150-300 mg
  Maximum dose: 300 mg 1 time =
          1 day = 600 mg
        For oral hipnotikum
The usual dose: 1 time = 100-200 mg
(Indonesia Pharmacopoeia III, p. 980)
Additional substances
1. Kosolven

  Will be made Phenobarbital elixir dosage of
  10 mg / cc. Preparations will be made as
  many as 250 mL. Thus, the mass required
  Phenobarbital 500 mg. Phenobarbital has the
  properties of soluble in water (1:1000) and
  dissolved in ethanol (1:10). By looking at
  these solubility data, the importance of the
  amount of ethanol used as much as 25 mL.
Maximum use of ethanol as a co-solvent as
much as 10%, was within 10% is already the
active substance can dissolve as much as
the desired dosage. However, the
formulation used also other
solvents, namely propylene glycol and
glycerin.

Water used to make this preparation is CO2-
free water.
2. Preservative


 Preservatives used in the formulation is
 sodium benzoate.
3. Taste and Dyes
To enhance the acceptability of preparations for
the patient, then the added flavorings and
colorings. Dye used was Fast Green. Amount
used as many as 15 drops (converted to 0.1 mL).
Powder Fast Green as much as 50 mg dissolved
in 4 mL of ethanol.

Active substance is tasteless, so it should be
added sweeteners and sweetener used is
sirupus simplex.
Kesimpulan formula sirup fenobabrbital 10mg/cc.
No.             Bahan         Jumlah            Fungsi

1     Fenobarbital              1%             Zat aktif

2     Propilen glikol          20%             Kosolven

3     Etanol 95%               10%             Kosolven

4     Gliserol                 20%             Kosolven
5     Sodium benzoat           0,1 %
                                               Pengawet

6     Sirupus simpleks         15%             Pemanis

7     Vanilla essence           Qs           Pemberi aroma

8     Fast Green                Qs             Pewarna

9     Aquades            Add hingga 150 mL      Pelarut
Calculation
Phenobarbital :          Gliserol :
1% x 150 ml = 1,5 g      20 % x 150 ml = 30 mL

Sirupus simplex :        Propilenglikol :
15 % x 150 ml = 22,5 g   20 % x 150 ml = 30 mL

Etanol (95%) :           Sodium benzoat:
10 % x 150 ml = 15 mL    0.1 % x 150 mL = 0.15 g
Weighing

      Weighing conducted to:
         Dose = 10 mg / cc
     Dosage volume per bottle
Volume of 150 mL preparations made
Penimbangan untuk 150 mL
No.                  Bahan        Jumlah
1     Fenobarbital               1,5 gram
2     Propilen glikol            22.5 mL
3     Etanol 95%                  15 mL
4     Gliserol                   22.5 mL
5     Sirupus simpleks            22,5 mg
6     Sodium benzoat              150 mg
7     Vanilla essence             50 mg
8     Fast Green                  15 tetes
9     Aquades                Add hingga 150 mL
Cara Pembuatan
1. Determine the amount of each component
   kosolven necessary to calculate the KD
   phenobarbital which has been obtained.
2. 1.5 grams of phenobarbital were dissolved into
   15 mL of ethanol
3. Added 22.5 mL of propylene glycol
4. Was added 22.5 mL of glycerol
5. Stir until blended
6. Simplex sirupus added 22.5 mg
7. Stock added 3 mL pengaroma
8. Dye stock was added 15 drops or 0.1 ml
9. Sodium benzoate is added previously
dissolved in water
10. Aquades added to the limit of between 150
mL
11. The mixture was stirred until homogeneous
and put into containers that have been
equalized

eliksir fenobarbital

  • 1.
  • 2.
    DEFINITIONS Elixir is a clear liquid, sweet, hidroalkohol solution used for oral administration, generally contain flavuoring agent to enhance the flavor delicious. Elixir is hidroalkohol, then it can maintain the stability of both drugs are soluble in water or alcohol.
  • 3.
    Phenobarbital (fee-no-BAR-BIH-tal) isan anti-epileptic drug that has a long history. This drug was first used as an anti-epileptic drugs in 1912. These drugs have become first-line drugs, but now a second-line drug because of side effects caused the sedative effects, depression and agitation.
  • 4.
    Under his employment,barbiturates derivatives are divided into four, namely: 1. Barbiturate derivative with a long service life (6 hours or more) Example: barbiturates, metarbital, phenobarbital. 2. Working period barbiturate derivative with moderate (3-6 hours) Example: alobarbital, amobarbital, aprobarbital, and butabarbital useful to maintain sleep in the long term
  • 5.
    3. Barbiturate derivativewith a short working period (from 0.5 to 3 hours) Example: sekobarbital, and pentobarbital, which is used to induce sleep for people who have trouble falling asleep. 4. Barbiturate derivative with a very short period of employment (<0.5 h) Example: thiopental is used for general anesthesia.
  • 6.
    Eliksir Fenobarbital Phenobarbital hasa low solubility in water solvent, so as to increase the solubility made ​mixed solvent (co- solvent). In the experiment, phenobarbital elixir made ​in the dosage form.
  • 7.
    Known there aretwo ways in making elixir, namely: 1. Active substance is dissolved in a solvent with a solubility of the active substance is greater, then add other solvents as well. 2. Active substance is dissolved little by little into the mixed solvent.
  • 8.
    Phenobarbital has alow solubility in water solvent, so as to increase of the solubility made ​mixed solvent (co- solvent). In the experiment, phenobarbital elixir made ​in the dosage form.
  • 9.
    Dose Phenobarbital Active substance at this time is fenobabrbital sefiaan that can act as anticonvulsants, sedatives, and hypnotics. Dose of phenobarbital: For oral sedativum The usual dose: 1 time = 15-30 mg 1 day = 45-90 mg The maximum dose: 1 time = 300 mg 1 day = 600 mg
  • 10.
    For oral anticonvulsant Theusual dose: 1 time = 50-100 mg 1 day = 150-300 mg Maximum dose: 300 mg 1 time = 1 day = 600 mg For oral hipnotikum The usual dose: 1 time = 100-200 mg (Indonesia Pharmacopoeia III, p. 980)
  • 11.
    Additional substances 1. Kosolven Will be made Phenobarbital elixir dosage of 10 mg / cc. Preparations will be made as many as 250 mL. Thus, the mass required Phenobarbital 500 mg. Phenobarbital has the properties of soluble in water (1:1000) and dissolved in ethanol (1:10). By looking at these solubility data, the importance of the amount of ethanol used as much as 25 mL.
  • 12.
    Maximum use ofethanol as a co-solvent as much as 10%, was within 10% is already the active substance can dissolve as much as the desired dosage. However, the formulation used also other solvents, namely propylene glycol and glycerin. Water used to make this preparation is CO2- free water.
  • 13.
    2. Preservative Preservativesused in the formulation is sodium benzoate.
  • 14.
    3. Taste andDyes To enhance the acceptability of preparations for the patient, then the added flavorings and colorings. Dye used was Fast Green. Amount used as many as 15 drops (converted to 0.1 mL). Powder Fast Green as much as 50 mg dissolved in 4 mL of ethanol. Active substance is tasteless, so it should be added sweeteners and sweetener used is sirupus simplex.
  • 15.
    Kesimpulan formula sirupfenobabrbital 10mg/cc. No. Bahan Jumlah Fungsi 1 Fenobarbital 1% Zat aktif 2 Propilen glikol 20% Kosolven 3 Etanol 95% 10% Kosolven 4 Gliserol 20% Kosolven 5 Sodium benzoat 0,1 % Pengawet 6 Sirupus simpleks 15% Pemanis 7 Vanilla essence Qs Pemberi aroma 8 Fast Green Qs Pewarna 9 Aquades Add hingga 150 mL Pelarut
  • 16.
    Calculation Phenobarbital : Gliserol : 1% x 150 ml = 1,5 g 20 % x 150 ml = 30 mL Sirupus simplex : Propilenglikol : 15 % x 150 ml = 22,5 g 20 % x 150 ml = 30 mL Etanol (95%) : Sodium benzoat: 10 % x 150 ml = 15 mL 0.1 % x 150 mL = 0.15 g
  • 17.
    Weighing Weighing conducted to: Dose = 10 mg / cc Dosage volume per bottle Volume of 150 mL preparations made
  • 18.
    Penimbangan untuk 150mL No. Bahan Jumlah 1 Fenobarbital 1,5 gram 2 Propilen glikol 22.5 mL 3 Etanol 95% 15 mL 4 Gliserol 22.5 mL 5 Sirupus simpleks 22,5 mg 6 Sodium benzoat 150 mg 7 Vanilla essence 50 mg 8 Fast Green 15 tetes 9 Aquades Add hingga 150 mL
  • 19.
    Cara Pembuatan 1. Determinethe amount of each component kosolven necessary to calculate the KD phenobarbital which has been obtained. 2. 1.5 grams of phenobarbital were dissolved into 15 mL of ethanol 3. Added 22.5 mL of propylene glycol 4. Was added 22.5 mL of glycerol 5. Stir until blended 6. Simplex sirupus added 22.5 mg
  • 20.
    7. Stock added3 mL pengaroma 8. Dye stock was added 15 drops or 0.1 ml 9. Sodium benzoate is added previously dissolved in water 10. Aquades added to the limit of between 150 mL 11. The mixture was stirred until homogeneous and put into containers that have been equalized

Editor's Notes

  • #2 Textured and layered backgroundwith title(Advanced)Tip: Some shape effects on this slide are created with the Combine Shapes commands. To access this command, you must add it to the Quick Access Toolbar, located above the File tab. To customize the Quick Access Toolbar, do the following:Click the arrow next to the Quick Access Toolbar, and then under CustomizeQuickAccessToolbar click MoreCommands.In the PowerPointOptions dialog box, in the Choose commands from list, select All Commands. In the list of commands, click CombineShapes, and then click Add.To reproduce the shape effects on this slide, do the following:On the Home tab, in the Slides group, click Layout, and then click Blank.Also on the Home tab, in the Drawing group, click Shapes, and then under Rectangles click Rectangle.On the slide, drag to draw a rectangle.Select the rectangle. Under Drawing Tools, on the Format tab, in the ShapeStyles group, click Shape Fill, point to Gradient, and then click More Gradients. In the Format Shape dialog box, click Fill in the left pane, in the Fill pane, click Gradient fill, and then do the following:In the Type list, select Linear.In the Angle box, enter 160°.Under Gradient stops, click Add gradient stop or Remove gradient stop until four stops appear in the slider.Also under Gradient stops, customize the gradient stops as follows:Select the first stop in the slider, and then do the following:In the Position box, enter 0%.Click the button next to Color, click More Colors, and then in the Colors dialog box, on the Custom tab, enter values for Red: 200, Green: 149, and Blue: 4.In the Transparency box, enter 79%.Select the next stop in the slider, and then do the following:In the Position box, enter 29%.Click the button next to Color, click More Colors, and then in the Colors dialog box, on the Custom tab, enter values for Red: 124, Green: 93, and Blue: 30.In the Transparency box, enter 84%.Select the next stop in the slider, and then do the following:In the Position box, enter 68%.Click the button next to Color, click More Colors, and then in the Colors dialog box, on the Custom tab, enter values for Red: 131, Green: 104, and Blue: 7.In the Transparency box, enter 74%.Select the last stop in the slider, and then do the following:In the Position box, enter 100%.Click the button next to Color, click More Colors, and then in the Colors dialog box, on the Custom tab, enter values for Red: 98, Green: 61, and Blue: 40.In the Transparency box, enter 51%.Also in the FormatShape dialog box, click LineColor in the left pane, in the LineColor pane, select Noline.Also in the FormatShape dialog box, click Glow and Soft Edges in the left pane, in the Glow and Soft Edges pane, under Soft Edges, in the Size box, enter 5 pt.Also in the Format Shape dialog box, click Size in the left pane, in the Size pane, enter 1.83” in the Height box and 10.33” in the Width box.On the Home tab, in the Drawing group, click Arrange, point to Align, and then do the following:Click Align to Slide.Click Align Center.To reproduce the clip art effects on this slide, do the following:On the Insert tab, in the Images group, click Clip Art. In the Clip Art pane, in the Search for box, enter 00437948, select the Include Office.com content check box, and then click Go. Select the clip art file in the pane to insert it into the slide. (Note: If you choose another clip art file, the clip art must be in the Windows Metafile format [.wmf].)Drag the clip art from the Clip Art pane to the slide.Select the clip art. Under PictureTools, on the Format tab, in the Size group, enter 6.99” in the Height box and 7.5” in the Width box.On the Home tab, in the Drawing group, click Arrange, and then click Ungroup.In the Microsoft Office PowerPoint dialog box, click Yes. On the slide, select the converted clip art. On the Home tab, in the Editing group, click Select, and then click Selection Pane. In the Selection and Visibility pane, select the top-level group. On the Home tab, in the Drawing group, click Arrange, and then click Ungroup. Also in the Selection and Visibility pane, select the Autoshape object, and then press DELETE. Press and hold CTRL, and then select all the clip art shapes. On the Quick Access Toolbar, click Combine Shapes, and then click ShapeUnion.Position the new freeform shape in the bottom left corner of the slide so that it extends beyond the left and bottom edges of the slide.Select the freeform shape. Under Drawing Tools, on the Format tab, in the Shape Styles group, click Shape Fill, point to Gradients, and then click MoreGradients. In the FormatShape dialog box, click Fill in the left pane, in the Fill pane, click Solid fill, and then do the following:Click the button next to Color, click More Colors, and then in the Colors dialog box, on the Custom tab, enter values for Red: 84, Green: 65, and Blue: 54.In the Transparency box, enter 99%Also in the Format Picture dialog box, click Glow and Soft Edges in the left pane, in the Glow and Soft Edges pane, under Glow, do the following:Click the button next to Color, click More Colors, and then in the Colors dialog box, on the Custom tab, enter values for Red: 104, Green: 71, and Blue: 34.In the Size box, enter 7 pt.In the Transparency box, enter 90%.To reproduce the text effects on this slide, do the following:On the Insert tab, in the Text group, click Text Box.On the slide, drag to draw a text box.Enter text in the text box, and then select the text. On the Home tab, in the Font group, select Garamondfrom the Font list, select 54 pt. from the FontSize list, and then click Bold.Under DrawingTools, on the Format tab, in theWordArt Styles group, click the Format Text Effects dialog box launcher. In the Format Text Effects dialog box, click Shadow in the left pane, in the Shadow pane, do the following:In the Transparency box, enter 70%.In the Blur box, enter 5 pt.In the Angle box, enter 315°.In the Distance box, enter 4 pt.Drag the text box inside the rectangle and on the right side of the slide.To reproduce the first background layer on this slide, do the following:On the Home tab, in the Drawing group, click Shapes, and then under Rectangles click Rectangle.On the slide, drag to draw a rectangle.Select the rectangle. Under Drawing Tools, on the Format tab, in the Shape Styles group, click the Format Shape dialog box launcher. In the Format Shape dialog box, click Fill in the left pane, in the Fill pane, click Picture or texture fill, and then do the following:Click the button next to Texture, and then click Stationary (fourth row).Clear the Tile picture as texture check box.Also in the FormatShape dialog box, click Line Color in the left pane, in the Line Color pane, clickNoline.Also in the Format Shape dialog box, click Size in the left pane, in the Size pane, under Size and rotate, enter 7.5” in the Height box and 10” in the Width box.Select the rectangle. On the Home tab, in the Clipboard group, click Copy.Press DELETE to delete the rectangle.Also on the Home tab, in the Clipboard group, click the arrow below Paste, and select Paste Special. In the Paste Special dialog box, select Paste, and then under As, select Picture (PNG).Select the picture. Under Picture Tools, on the Format tab, in the Adjust group, click Artistic Effects, and then click Artistic Effects Options. In the FormatPicture dialog box, click Artistic Effects in the left pane, in the Artistic Effects pane, click the button next to Artistic Effect, and then click Paint Brush (second row).Also in the Artistic Effects pane, do the following:In the Transparency box, enter 15%.In the Brush Size box, enter 2.Also in the Format Picture dialog box, click Picture Color in the left pane, in the Picture Color pane, do the following:Under Color Saturation, in the Saturation box, enter 200%.Under Color Tone, click the button next to Presets and then click Temperature: 5,300 K.Also in the Format Picture dialog box, click Picture Corrections in the left pane, in the Picture Corrections pane, do the following:Under Sharpen and Soften, in the box next to Sharpen, enter -70%.Under Brightness and Contrast, in the Contrast box, enter -10%.Select the rectangle. On the Home tab, in the Drawing group, click Arrange, point to Align, and then do the following:Click Align Middle.Click Align Center.On the Home tab, in the Drawing group, click Arrange, and then click Send to Back.To reproduce the second background layer on this slide, do the following:On the Home tab, in the Drawing group, click the button next to Shapes, and then under Rectangles click Rectangle.On the slide, drag to draw a rectangle.Select the rectangle. Under Drawing Tools, on the Format tab, in the Shape Styles group, click the Format Shape dialog box launcher. In the Format Shape dialog box, click Fill in the left pane, in the Fill pane, click Gradient fill, and then do the following:In the Type list, select Linear.In the Angle box, enter 160°.Under Gradient stops, click Add gradient stop or Remove gradient stop until four stops appear in the slider.Also under Gradient stops, customize the gradient stops as follows:Select the first stop in the slider, and then do the following: In the Position box, enter 0%.Click the button next to Color, and then under Theme Colors click Black, Text 1 (first row).In the Transparency box, enter 100%. Select the next stop in the slider, and then do the following: In the Position box, enter 29%.Click the button next to Color, click More Colors, and then in the Colors dialog box, on the Custom tab, enter values for Red: 36, Green: 25, and Blue: 15.In the Transparency box, enter 100%. Select the next stop in the slider, and then do the following: In the Position box, enter 68%.Click the button next to Color, click More Colors, and then in the Colors dialog box, on the Custom tab, enter values for Red: 104, Green: 71, and Blue: 34.In the Transparency box, enter 68%Select the last stop in the slider, and then do the following: In the Position box, enter 100%.Click the button next to Color, click More Colors, and then in the Colors dialog box, on the Custom tab, enter values for Red: 84, Green: 65, and Blue: 54.In the Transparency box, enter 37%. Also in the Format Shape dialog box, click Line Color in the left pane, in the Line Color pane, select No line.Also in the Format Shape dialog box, click Size in the left pane, in the Size pane, under Size and rotate, enter 7.5” in the Height box and 10” in the Width box.Select the rectangle. On the Home tab, in the Drawing group, click Arrange, point to Align, and then do the following:Click Align Middle.Click Align Center.To reproduce the third background layer on this slide, do the following:On the Home tab, in the Drawing group, click Shapes, and then under Rectangles click Rectangle.On the slide, drag to draw a rectangle.Select the rectangle. Under Drawing Tools, on the Format tab, in the Shape Styles group, click the Format Shape dialog box. In the Format Shape dialog box, click Fill in the left pane, in the Fill pane, select Picture or texture fill, and then do the following:Click the button next to Texture, and then click Cork (fifth row).Clear the Tile picture as texture check box.Under Stretch options, in the Transparency box, enter 84%.Also in the FormatPicture dialog box, click LineColor in the left pane, in the Line Color pane, select No line.Also in the Format Picture dialog box, click Artistic Effects in the left pane, in the Artistic Effects pane, click the button next to Artistic Effect, click Paint Brush (second row), and then in the Brush Size box, enter 1.Also in the Format Picture dialog box, click Picture Corrections in the left pane, in the Picture Corrections pane, under Brightness and Contrast, enter 1% in the Brightness box and 26% in the Contrast box.Also in the Format Picture dialog box, click Size in the left pane, in the Size pane, under Size and rotate, enter 7.5” in the Height box and 10” in the Width box.Select the rectangle. On the Home tab, in the Drawing group, click Arrange, point to Align, and then do the following:Click Align Middle.Click Align Center.To reproduce the fourth background layer on this slide, do the following:On the Home tab, in the Drawing group, click Shapes, and then under Rectangles click Rectangle.On the slide, drag to draw a rectangle.Select the rectangle. Under Drawing Tools, on the Format tab, in the Shape Styles group, click the Format Shape dialog box. In the Format Shape dialog box, click Fill in the left pane, in the Fill pane, select Picture or texture fill, and then do the following:Click the button next to Texture, and then click Granite (third row).Under Tiling options, in the Transparency box, enter 90%.Also in the FormatPicture dialog box, click LineColor in the left pane, in the Line Color pane, select No line.Also in the Format Picture dialog box, click Artistic Effects in the left pane, in the Artistic Effects pane, click the button next to Artistic Effect, click Photocopy (fifth row), and then do the following:In the Transparency box, enter 94%.In the Detail box, enter 9.Also in the Format Picture dialog box, click Picture Corrections in the left pane, in the Picture Corrections pane, under Brightness and Contrast, in the Contrast box, enter 35%.Also in the Format Shape dialog box, click Size in the left pane, in the Size pane, under Size and rotate, enter 7.5” in the Height box and 10” in the Width box.Select the rectangle. On the Home tab, in the Drawing group, click Arrange, point to Align, and then do the following:Click Align Middle.Click Align Center.