7. Write upper-case and lower-case letters exactly as you see
them in the figure. Also write Greek characters exactly as you
see them (use the provided character picker).
11. Set the edge type to inhibits (Choose “--|” from the dropdown)
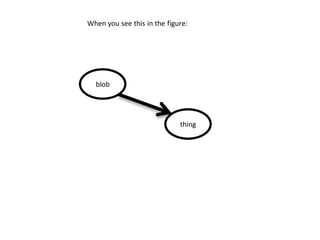
12. The locations of the nodes and edges do not
have to exactly match the figure. Just put them
in approximately the same arrangement as you
see in the figure.
17. Create an intermediate node with name = “_” (underscore). Both the
edges to and from the intermediate node should have the “type”
(activate/inhibit) according to the figure.
23. Please note you can’t add a “container” (“parent”) node to an existing
“child” node. You have to create the “parent” (in this case, “TEXAS”)
first, and then create the children.
24. Also note: this is not the same as just dragging nodes to be visually on
top of another node. You have to add them as child nodes.
26. Just make a parent node with no name. If everything in the figure is
inside one container, you don’t need to create that container – it’s
already assumed that everything goes together. Just create the
containers if they group items inside the figure.
32. Create a parent node and name it “_complex_”. While “blob” and
“Rooster” are together in “_complex_”, the connection is between
“blob” and “thing”.