SlideShare a Scribd company logo
1 of 22
Download to read offline
A R V I F E S A Página1
USODELABIBLIOTECADELINVENTOR 2010PARA
DiseñandoTubos,TuberíasyMangueras
Usted usará ahora Autodesk Inventor para crear una serie de tuberías, tubos y mangueras
flexibles que recorren un ensamblaje de un deslizador. El ensamblaje con el que va a
trabajar semuestradebajo.
AbriendoelArchivodeEnsamblaje
Enlugar dediseñar unensamblajedesdeel principio, abriremos unoexistente:
1. Enel menúArchivo, hagaclicenAbrir .
2. EnelcuadrodediálogoAbrir, naveguehastalacarpetaChapter12_DesigningTubes, Pipes, and
Hoses, seleccione_Chapter12_skid_assembly.iamyluegohagaclicenAbrir.
A R V I F E S A Página2
EmpezandounDiseñodeConductodeTubería
1.-Enlabarradel Panel deEnsamblaje, haga, clicenlaherramientaCrear Conducto de
Tubería, INVENTOR2009 y enINVENTOR2010.
2.-Enel cuadrodediálogoCrear Conducto, deTubos yTuberías, hagaclicenAceptar
Para aceptar los parámetros por defecto. EnINVENTOR2009
EnINVENTOR2010
A R V I F E S A Página3
Nota: El navegador del ModelomuestraahoraunacarpetallamadaConductos
DeTubos yTuberías. Todos losconductoscreados enel ensamblajeprincipal se
Almacenarán enestacarpetaautomáticamente.
DefiniendounEstilodeTubería
1.-EnlabarradePanelTubosyTuberías, hagaclic, enlaherramientaEstilos
deTubosyTuberías,
2.- EnlalistadeEstilos, hagaclicen ISO7598/ISO49-TuberíadeAcero
RoscadaconAccesorios, deHierro.
3.-Hagaclicconelbotónderechosobreelnombredelestiloyseleccionela
opciónActivadelmenúcontextual, luegohagaclicenAceptar.
EnINVENTOR2009
A R V I F E S A Página4
EnINVENTOR2010
A R V I F E S A Página5
CreandounEnrutamientodeTubería
1.-GireyhagaZoomasumodelohastaquequededeformasimilar al delaimagen
A R V I F E S A Página6
2.-En la barra de Panel Tubos y Tuberías, haga clic en, la herramienta Nuevo
Enrutamiento En INVENTOR 2009 o En INVENTOR 2010 y después,
hagaclicenAceptarparaaceptar el nombrepor, defectoparael archivodeenrutamiento.
EnINVENTOR2010
3.- EnlabarradePanel Enrutamiento, hagaclicenlaherramientaEnrutamiento
EnINVENTOR2009 y EnINVENTOR2010
4.-Detengasucursor sobreel diámetrointerior del accesorio.
5.- Cuando aparezca el punto verde y la fecha amarilla apunte hacia el exterior del
accesorio, hagaclicparacolocar el primer nodo.
Unpuntoazulsignificaque el segmentodetuberíacumplelamínima longitudpero es
demasiado cortoparaunaccesorioocodoadicional.
Unpuntoverdeindicauna ubicaciónválidaparasunuevonodo.
UnaX amarillasignificaque su nodo no cumple con la longitud mínima del
segmentoconfigurada.
A R V I F E S A Página7
A R V I F E S A Página8
Y
UsandolaEntradadeValores Exactos
Definael segundonododesuenrutamientousandolaentradanuméricaexacta:
1. En cualquier lugar frente al accesorio, detengael cursor sobre el eje ydespués haga clic
conel botón
DerechoyseleccioneIntroducirDistancia.
2. En el cuadro de diálogo Introducir Distancia, teclee 100 mmy después haga clic en la
marcadevalidaciónverdeparaaceptar.
UsandolaHerramientadeEnrutamiento3D, Ortogonal
Defina el siguiente nodo de su enrutamiento usando la herramienta de orientación gráfica
deEnrutamiento3DOrtogonal. Estaherramientaleasistedurantelacreaciónoreubicación
delos nodos quedefinenel enrutamientodelatubería.
1.-Detengaelcursorsobrelaseccióninferiordel ejevertical, cuandoestadecolorverdehagaclic
conelbotónderechoyseleccioneIntroducirDistancia.
A R V I F E S A Página9
2. En el diálogo Introducir Distancia, teclee 200 mm y luego haga, clic en la marca de
validaciónverdeparaaceptar.
UsandoReferenciadePunto
Acontinuación usará lafuncionalidad Referencia de Punto para definir el enrutamiento de
la tubería en relación a otra geometría del ensamblaje. Puede crear nodos de enrutamiento
tomando comoreferenciacaras, aristas opuntos de trabajoque existan en el ensamblajede
tubos ytuberías.
ReferenciadePuntosobre:
1.- Mientras detieneel cursor sobre el eje azul, hagaclic conel botónderechoy seleccione
Referencia de Punto. Con la Referencia de Puntoactivada, puede ahorahacer referencia
aotros objetos del ensamblaje.
A R V I F E S A Página10
2. Desplace y detenga el cursor sobre objetos para ver como la Referencia de Punto
determinasuubicación.
3. Detengael cursor sobrelacaradelavigadesoportequesemuestra(fecha).
4. Cuando aparezca el indicador de distancia, teclee 10 mmpara hacer aparecer el diálogo
Introducir Distancia y luego haga clic en la marca de validación verde. Este nodo que
acabadecrear sobrepasalavigaen10mm.
EmpezandounDiseñodeMangueraFlexible
1.- Uselas herramientas ZoomyRotaciónparavisualizar el áreamostradaenlaimagen
2.- En la barra de Panel, haga clic en la herramienta Crear Conducto de Tubería y
hagaclicenAceptar paraaceptarlos parámetros por defecto.
A R V I F E S A Página11
DefiniendounEstilodeMangueraFlexible
1.- EnlabarradePanel Tubos yTuberías, hagaclicenEstilos deTubos yTuberías.
2.- En el menú desplegable de Estilo, seleccione Manguera hidráulica - Rosca recta
machoyluegohagaclicenAceptar.
CreandounEnrutamientodeMangueraFlexible
Definalos puntos inicial yfinal parael enrutamiento:
1.- EnlabarradePanel Tubos yTuberías, hagaclicenlaherramienta
NuevoEnrutamiento yhagaclicenAceptarparaaceptarlos
Valores por defecto.
A R V I F E S A Página12
2.- EnlabarradePanel deEnrutamiento, hagaclicenla herramientaEnrutamiento
3.- Seleccione la arista circular del accesorio DBW20:1 como se muestra a la derecha
(fecha1).
4.- Paraelsegundoaccesorio,seleccionelaaristacircular.
5. - Para aceptar el auto-enrutamiento pre visualizado, en la ventana gráfica, Haga clic con
el botónderechoyseleccioneTerminar.
Terminandoel DiseñodelaMangueraFlexible
1.- Enlaventanagráfica, hagaclicconel botónderechoyseleccione Terminar
Edición.
2.-EnlabarradePanel Tubos yTuberías, hagaclicenla herramientaLlenar
Enrutamiento .
A R V I F E S A Página13
HaciendounCambiodeDiseño
Autodesk Inventor le permite hacer cambios de diseño y actualiza automáticamente sus
diseños detubos, tuberías ymangueras.
Hagauncambiodediseño:
1. Haga doble clic en _Chapter 12_skid_assembly.iam para activar el ensamblaje
principal.
2. Hagaclicenel símbolomás (+) juntoaJunctionBox:1.
3. Hagaclicenlarestriccióndeensamblaje Mate:15(100.00mm).
4. Enlaparteinferior del navegador delmodelo,cambieel valor a 500mmy
luegopulseEnter.
A R V I F E S A Página14
ObservequecuandocambialaposicióndelaCajadeConexiones (Junction
Box), el enrutamiento de la manguera se actualiza automáticamente de acuerdo con los
criteriosdediseñoaplicados.
HaciendounCambiodeDiseño
Autodesk Inventor le permite hacer cambios de diseño y actualiza automáticamente sus
diseños detubos, tuberías ymangueras.
Hagauncambiodediseño:
1. Haga doble clic en _Chapter 12_skid_assembly.iam para activar el ensamblaje
principal.
A R V I F E S A Página15
2. Hagaclicenel símbolomás (+) juntoaJunctionBox:1.
3. Hagaclicenlarestriccióndeensamblaje Mate:15(100.00mm).
4. Enlaparteinferior del navegador delmodelo,cambieel valor a 500mmy
luegopulseEnter.
ObservequecuandocambialaposicióndelaCajadeConexiones (Junction
Box), el enrutamiento de la manguera se actualiza automáticamente de acuerdo con
los criterios dediseñoaplicados.
EmpezandounDiseñodeTuboRígidoTubodecobresoldado
Ahoracrearásuprimeraconduccióndetuboenelensamblaje:
1. EnlabarradePanel Ensamblaje, hagaclicenlaherramienta Crear
ConductodeTubería
A R V I F E S A Página16
2. Enel cuadrodediálogo, hagaclicenAceptarparaaceptar los
parámetros por defecto.
3. Use las herramientas Rotación y Zoompara visualizar el áreamostrada en la imagen de
laderecha.
DefiniendounEstilodeTuboRígido Tubodecobresoldado
Definael EstilodeTubos yTuberías:
1. En la barra de Panel Tubos y Tuberías, haga clic en la herramienta Estilos de Tubos y
Tuberías
2. En la lista desplegable de Estilos, seleccione ASTM B 88-ASME B16.22 - Tubo de
cobresoldadoyluego
hagaclicenAceptar.
CreandounEnrutamientodeTuboRígido Tubodecobresoldado
A R V I F E S A Página17
Definael enrutamiento:
1. En la Barra de Panel Tubos y Tuberías, haga clic en la herramienta Nuevo
Enrutamiento y luego haga, clic en Aceptar para aceptar los parámetros por
defecto.
2. Asegúresedequeestátrabajandoenmilímetros:
En el menú Herramientas,haga clic en Parámetros del Documento.
En el diálogo Parámetros del Documento, haga clic en la
pestaña Unidades y, paralaLongitud, seleccionemilímetrodelalista.
Haga clic en Aceptar.
3. EnlaBarradePanel deEnrutamiento, hagaclicenlaherramienta Enrutamiento
4. Seleccionelaaristacircular del accesoriocomoprimer punto,
asegurándosedequelafechaamarillaapuntahaciael exterior del accesorio.
UseIntroducir Distanciaparadefinir el enrutamientodeltubo:
1. Detengasucursor sobreel eje, hagaclicconel botónderecho
yseleccioneIntroducirDistancia.
2. Teclee100mmenel diálogoIntroducir Distanciayluego
pulseEnter.
A R V I F E S A Página18
3. Detengasucursor sobreelejeverdequeseextiendehacialaderecha, haga
clicconelbotónderechoyseleccioneIntroducirDistancia.
4. Teclee200mmeneldiálogoIntroducir Distanciayluegopulse
Enter.
5. Paradefnir elpuntofnaldelenrutamiento, seleccioneeldiámetrode
laaperturadelapartesuperior delabombona.
6. Haga clic en el botón de Selección Verde para aceptar la primera solución
mostrada.
7. PresioneEscparasalir delcomando,
después hagaclicconel botónderechoyseleccione TerminarEdición.
TerminandoelDiseñodeTuboRígido Tubodecobresoldado
A R V I F E S A Página19
En la barra de Panel Tubos y Tuberías, haga clic en la
herramienta LlenarEnrutamiento
TerminandoelDiseñodeTuboRígido Tubodecobresoldado
A R V I F E S A Página20
En la barra de Panel Tubos y Tuberías, haga clic en la
herramienta LlenarEnrutamiento
Nuts Frutos decáscara
USODELABIBLIOTECADELINVENTOR 2010PARA
DiseñandoTubos, Tuberías yMangueras Pág 01
Abriendoel ArchivodeEnsamblaje Pág. 01
EmpezandounDiseñodeConductodeTubería Pág. 02
DefiniendounEstilodeTubería Pág. 03
CreandounEnrutamientodeTubería Pág. 05
UsandolaEntradadeValores Exactos Pág. 08
EmpezandounDiseñodeMangueraFlexible Pág. 10
HaciendounCambiodeDiseño Pág. 13
EmpezandounDiseñodeTuboRígidoTubodecobresoldado Pág. 15
CURSO: USO DE LA BIBLIOTECA DEL INVENTOR 2010 PARA el Diseño de
Tubos, Tuberías yMangueras
TEMAS
DiseñandoTubos, Tuberías yMangueras
Abriendoel ArchivodeEnsamblaje
EmpezandounDiseñodeConductodeTubería
DefiniendounEstilodeTubería
CreandounEnrutamientodeTubería
UsandolaHerramientadeEnrutamiento3D, Ortogonal
A R V I F E S A Página21
EmpezandounDiseñodeMangueraFlexible
LO MAS USADO
populateroute, pueblanlaruta
fittings , accesorios
ben,
done, HECHO
sweep, barrido
Environments, Ambientes
Ribbon, Cinta
Overview, Descripcióngeneral
Pattern, patrónoArreglo
A R V I F E S A Página22

More Related Content

What's hot

Giáo trình mô phỏng phân tích lực trên Autodesk Inventor
Giáo trình mô phỏng phân tích lực trên Autodesk InventorGiáo trình mô phỏng phân tích lực trên Autodesk Inventor
Giáo trình mô phỏng phân tích lực trên Autodesk InventorTrung tâm Advance Cad
 
HƯỚNG DẪN TẠO MẶT CẮT TRONG BẢN VẼ SOLIDWORKS
HƯỚNG DẪN TẠO MẶT CẮT TRONG BẢN VẼ SOLIDWORKSHƯỚNG DẪN TẠO MẶT CẮT TRONG BẢN VẼ SOLIDWORKS
HƯỚNG DẪN TẠO MẶT CẮT TRONG BẢN VẼ SOLIDWORKSdiendanks
 
Mô phỏng chuyển động với Solidworks Motion (demo)
Mô phỏng chuyển động với Solidworks Motion (demo)Mô phỏng chuyển động với Solidworks Motion (demo)
Mô phỏng chuyển động với Solidworks Motion (demo)Trung tâm Advance Cad
 
Giáo trình tự học Autodesk Inventor mới nhất
Giáo trình tự học Autodesk Inventor mới nhấtGiáo trình tự học Autodesk Inventor mới nhất
Giáo trình tự học Autodesk Inventor mới nhấtTrung tâm Advance Cad
 
Thiết kế kim loại tấm -Sheetmetal Solidworks (demo)
Thiết kế kim loại tấm -Sheetmetal Solidworks (demo)Thiết kế kim loại tấm -Sheetmetal Solidworks (demo)
Thiết kế kim loại tấm -Sheetmetal Solidworks (demo)Trung tâm Advance Cad
 
7ed_Dennis G. Zill_Michael R Cullen_ Ecuaciones_Diferenciales_7ed.pdf
7ed_Dennis G. Zill_Michael R Cullen_ Ecuaciones_Diferenciales_7ed.pdf7ed_Dennis G. Zill_Michael R Cullen_ Ecuaciones_Diferenciales_7ed.pdf
7ed_Dennis G. Zill_Michael R Cullen_ Ecuaciones_Diferenciales_7ed.pdfPedroPuchigay2
 
Hướng dẫn phân tích mô phỏng solidworks (demo)
Hướng dẫn phân tích mô phỏng solidworks (demo)Hướng dẫn phân tích mô phỏng solidworks (demo)
Hướng dẫn phân tích mô phỏng solidworks (demo)Trung tâm Advance Cad
 
Tutorial hướng dẫn mô phỏng Solidworks
Tutorial hướng dẫn mô phỏng Solidworks Tutorial hướng dẫn mô phỏng Solidworks
Tutorial hướng dẫn mô phỏng Solidworks Trung Thanh Nguyen
 
Giáo trình thiết kế kim loại tấm Solidworks 2016
Giáo trình thiết kế kim loại tấm Solidworks 2016 Giáo trình thiết kế kim loại tấm Solidworks 2016
Giáo trình thiết kế kim loại tấm Solidworks 2016 Trung tâm Advance Cad
 
Thiết kế kim loại tấm Solidworks 2017
Thiết kế kim loại tấm Solidworks 2017Thiết kế kim loại tấm Solidworks 2017
Thiết kế kim loại tấm Solidworks 2017Technical VN
 
Dung sai lap_ghep
Dung sai lap_ghepDung sai lap_ghep
Dung sai lap_ghepxuanthi_bk
 
Báo cáo thí nghiệm Vật liệu học
Báo cáo thí nghiệm Vật liệu họcBáo cáo thí nghiệm Vật liệu học
Báo cáo thí nghiệm Vật liệu họcThanhvietnguyen Nguyen
 
Chapa Metálica Gran libro SOLIDWORKS.pdf
Chapa Metálica  Gran libro SOLIDWORKS.pdfChapa Metálica  Gran libro SOLIDWORKS.pdf
Chapa Metálica Gran libro SOLIDWORKS.pdfJovanny Duque
 
Khóa học phân tích động học Solidworks Simulation
Khóa học phân tích động học Solidworks SimulationKhóa học phân tích động học Solidworks Simulation
Khóa học phân tích động học Solidworks SimulationTrung tâm Advance Cad
 

What's hot (20)

Giáo trình mô phỏng phân tích lực trên Autodesk Inventor
Giáo trình mô phỏng phân tích lực trên Autodesk InventorGiáo trình mô phỏng phân tích lực trên Autodesk Inventor
Giáo trình mô phỏng phân tích lực trên Autodesk Inventor
 
HƯỚNG DẪN TẠO MẶT CẮT TRONG BẢN VẼ SOLIDWORKS
HƯỚNG DẪN TẠO MẶT CẮT TRONG BẢN VẼ SOLIDWORKSHƯỚNG DẪN TẠO MẶT CẮT TRONG BẢN VẼ SOLIDWORKS
HƯỚNG DẪN TẠO MẶT CẮT TRONG BẢN VẼ SOLIDWORKS
 
Solidworks
SolidworksSolidworks
Solidworks
 
Formato de papeles
Formato de papelesFormato de papeles
Formato de papeles
 
Mô phỏng chuyển động với Solidworks Motion (demo)
Mô phỏng chuyển động với Solidworks Motion (demo)Mô phỏng chuyển động với Solidworks Motion (demo)
Mô phỏng chuyển động với Solidworks Motion (demo)
 
Problemas
Problemas Problemas
Problemas
 
Giáo trình tự học Autodesk Inventor mới nhất
Giáo trình tự học Autodesk Inventor mới nhấtGiáo trình tự học Autodesk Inventor mới nhất
Giáo trình tự học Autodesk Inventor mới nhất
 
Thiết kế kim loại tấm -Sheetmetal Solidworks (demo)
Thiết kế kim loại tấm -Sheetmetal Solidworks (demo)Thiết kế kim loại tấm -Sheetmetal Solidworks (demo)
Thiết kế kim loại tấm -Sheetmetal Solidworks (demo)
 
7ed_Dennis G. Zill_Michael R Cullen_ Ecuaciones_Diferenciales_7ed.pdf
7ed_Dennis G. Zill_Michael R Cullen_ Ecuaciones_Diferenciales_7ed.pdf7ed_Dennis G. Zill_Michael R Cullen_ Ecuaciones_Diferenciales_7ed.pdf
7ed_Dennis G. Zill_Michael R Cullen_ Ecuaciones_Diferenciales_7ed.pdf
 
Prueba de evaluación CAD
Prueba de evaluación CADPrueba de evaluación CAD
Prueba de evaluación CAD
 
Hướng dẫn phân tích mô phỏng solidworks (demo)
Hướng dẫn phân tích mô phỏng solidworks (demo)Hướng dẫn phân tích mô phỏng solidworks (demo)
Hướng dẫn phân tích mô phỏng solidworks (demo)
 
Tutorial hướng dẫn mô phỏng Solidworks
Tutorial hướng dẫn mô phỏng Solidworks Tutorial hướng dẫn mô phỏng Solidworks
Tutorial hướng dẫn mô phỏng Solidworks
 
Giáo trình thiết kế kim loại tấm Solidworks 2016
Giáo trình thiết kế kim loại tấm Solidworks 2016 Giáo trình thiết kế kim loại tấm Solidworks 2016
Giáo trình thiết kế kim loại tấm Solidworks 2016
 
Thiết kế kim loại tấm Solidworks 2017
Thiết kế kim loại tấm Solidworks 2017Thiết kế kim loại tấm Solidworks 2017
Thiết kế kim loại tấm Solidworks 2017
 
sectional view
sectional viewsectional view
sectional view
 
Dung sai lap_ghep
Dung sai lap_ghepDung sai lap_ghep
Dung sai lap_ghep
 
Báo cáo thí nghiệm Vật liệu học
Báo cáo thí nghiệm Vật liệu họcBáo cáo thí nghiệm Vật liệu học
Báo cáo thí nghiệm Vật liệu học
 
Chapa Metálica Gran libro SOLIDWORKS.pdf
Chapa Metálica  Gran libro SOLIDWORKS.pdfChapa Metálica  Gran libro SOLIDWORKS.pdf
Chapa Metálica Gran libro SOLIDWORKS.pdf
 
Lập trình phay cnc
Lập trình phay cncLập trình phay cnc
Lập trình phay cnc
 
Khóa học phân tích động học Solidworks Simulation
Khóa học phân tích động học Solidworks SimulationKhóa học phân tích động học Solidworks Simulation
Khóa học phân tích động học Solidworks Simulation
 

Similar to 57359820 disenando-tubos-tuberias-y-mangueras-arvifesa(1)

Introduction to CATIA (KEY) - CAD/CAM
Introduction to CATIA (KEY) - CAD/CAMIntroduction to CATIA (KEY) - CAD/CAM
Introduction to CATIA (KEY) - CAD/CAMSisubalan Selvan
 
OFFPIPE Assistant User Manual 2.0.3
OFFPIPE Assistant User Manual 2.0.3OFFPIPE Assistant User Manual 2.0.3
OFFPIPE Assistant User Manual 2.0.3OFFPIPE Assistant
 
Project_PPT_Presentation.ppt
Project_PPT_Presentation.pptProject_PPT_Presentation.ppt
Project_PPT_Presentation.pptBIPLABNAYAK10
 
Workshop2 creep-geo
Workshop2 creep-geoWorkshop2 creep-geo
Workshop2 creep-geommd110
 
Viva Questions for Engineering Dawing and Graphics
Viva Questions for Engineering Dawing and GraphicsViva Questions for Engineering Dawing and Graphics
Viva Questions for Engineering Dawing and Graphicsshyamranjan2006
 
DesignSpark PCB Workshop Notes 2018
DesignSpark PCB Workshop Notes 2018DesignSpark PCB Workshop Notes 2018
DesignSpark PCB Workshop Notes 2018DesignSparkGC
 
Express pcb tutorial
Express pcb tutorialExpress pcb tutorial
Express pcb tutorialawazapki
 
PCB designing in PADS layout
PCB designing in PADS layoutPCB designing in PADS layout
PCB designing in PADS layoutAkash Jadhav
 
Using PCB wizard for PCB implementation
Using PCB wizard for PCB implementationUsing PCB wizard for PCB implementation
Using PCB wizard for PCB implementationMUSAAB HASAN
 
Dutch country clock
Dutch country clockDutch country clock
Dutch country clockIvanFarhan2
 
Dutch country clock_tutorial
Dutch country clock_tutorialDutch country clock_tutorial
Dutch country clock_tutorialFarhanAhmed866812
 
Dynasonics dxn manual badger meter portable clamp-on ultrasonic flow meter
Dynasonics dxn manual badger meter portable clamp-on ultrasonic flow meterDynasonics dxn manual badger meter portable clamp-on ultrasonic flow meter
Dynasonics dxn manual badger meter portable clamp-on ultrasonic flow meterENVIMART
 
Learn zwcad mechanical in a day
Learn zwcad mechanical  in a dayLearn zwcad mechanical  in a day
Learn zwcad mechanical in a dayVX
 
Umc90 lab2 il2222
Umc90 lab2 il2222Umc90 lab2 il2222
Umc90 lab2 il2222sunnysyed
 
Rubout Manual - version 1.1
Rubout Manual - version 1.1Rubout Manual - version 1.1
Rubout Manual - version 1.1Jessica Switzer
 
Autoboss v30 manual
Autoboss v30 manualAutoboss v30 manual
Autoboss v30 manualBill Zhao
 

Similar to 57359820 disenando-tubos-tuberias-y-mangueras-arvifesa(1) (20)

Tutorial ic design
Tutorial ic designTutorial ic design
Tutorial ic design
 
Introduction to CATIA (KEY) - CAD/CAM
Introduction to CATIA (KEY) - CAD/CAMIntroduction to CATIA (KEY) - CAD/CAM
Introduction to CATIA (KEY) - CAD/CAM
 
OFFPIPE Assistant User Manual 2.0.3
OFFPIPE Assistant User Manual 2.0.3OFFPIPE Assistant User Manual 2.0.3
OFFPIPE Assistant User Manual 2.0.3
 
Project_PPT_Presentation.ppt
Project_PPT_Presentation.pptProject_PPT_Presentation.ppt
Project_PPT_Presentation.ppt
 
Workshop2 creep-geo
Workshop2 creep-geoWorkshop2 creep-geo
Workshop2 creep-geo
 
Viva Questions for Engineering Dawing and Graphics
Viva Questions for Engineering Dawing and GraphicsViva Questions for Engineering Dawing and Graphics
Viva Questions for Engineering Dawing and Graphics
 
DesignSpark PCB Workshop Notes 2018
DesignSpark PCB Workshop Notes 2018DesignSpark PCB Workshop Notes 2018
DesignSpark PCB Workshop Notes 2018
 
Express pcb tutorial
Express pcb tutorialExpress pcb tutorial
Express pcb tutorial
 
PCB designing in PADS layout
PCB designing in PADS layoutPCB designing in PADS layout
PCB designing in PADS layout
 
Using PCB wizard for PCB implementation
Using PCB wizard for PCB implementationUsing PCB wizard for PCB implementation
Using PCB wizard for PCB implementation
 
Dutch country clock
Dutch country clockDutch country clock
Dutch country clock
 
Dutch country clock_tutorial
Dutch country clock_tutorialDutch country clock_tutorial
Dutch country clock_tutorial
 
Dynasonics dxn manual badger meter portable clamp-on ultrasonic flow meter
Dynasonics dxn manual badger meter portable clamp-on ultrasonic flow meterDynasonics dxn manual badger meter portable clamp-on ultrasonic flow meter
Dynasonics dxn manual badger meter portable clamp-on ultrasonic flow meter
 
Learn zwcad mechanical in a day
Learn zwcad mechanical  in a dayLearn zwcad mechanical  in a day
Learn zwcad mechanical in a day
 
Umc90 lab2 il2222
Umc90 lab2 il2222Umc90 lab2 il2222
Umc90 lab2 il2222
 
Dip trace tutorial
Dip trace tutorialDip trace tutorial
Dip trace tutorial
 
Rubout Manual - version 1.1
Rubout Manual - version 1.1Rubout Manual - version 1.1
Rubout Manual - version 1.1
 
Dtmf robot
Dtmf robotDtmf robot
Dtmf robot
 
Fadal Siemens Control Touch Probe Manual
Fadal Siemens Control Touch Probe ManualFadal Siemens Control Touch Probe Manual
Fadal Siemens Control Touch Probe Manual
 
Autoboss v30 manual
Autoboss v30 manualAutoboss v30 manual
Autoboss v30 manual
 

More from Miguel Moran Tello

Construcciones geometricas basicas
Construcciones geometricas basicas Construcciones geometricas basicas
Construcciones geometricas basicas Miguel Moran Tello
 
Capacidades básicas de dibujo en ingeniería
Capacidades básicas de dibujo en ingenieríaCapacidades básicas de dibujo en ingeniería
Capacidades básicas de dibujo en ingenieríaMiguel Moran Tello
 
224336916 letras-y-nuneros-uni
224336916 letras-y-nuneros-uni224336916 letras-y-nuneros-uni
224336916 letras-y-nuneros-uniMiguel Moran Tello
 
390312553 iii-cortes-2021Cortes-teoria-digital (2)
390312553 iii-cortes-2021Cortes-teoria-digital (2)390312553 iii-cortes-2021Cortes-teoria-digital (2)
390312553 iii-cortes-2021Cortes-teoria-digital (2)Miguel Moran Tello
 
390312553 iii-cortes-2018-teoria-digital (2)
390312553 iii-cortes-2018-teoria-digital (2)390312553 iii-cortes-2018-teoria-digital (2)
390312553 iii-cortes-2018-teoria-digital (2)Miguel Moran Tello
 
F2 silabo-BDI 02-dibujo en ingenieria ii (para escuela 2 hojas)-25 de abril2018
F2 silabo-BDI 02-dibujo en ingenieria ii (para escuela 2 hojas)-25 de abril2018F2 silabo-BDI 02-dibujo en ingenieria ii (para escuela 2 hojas)-25 de abril2018
F2 silabo-BDI 02-dibujo en ingenieria ii (para escuela 2 hojas)-25 de abril2018Miguel Moran Tello
 
Informe transmisiones flexibles
Informe transmisiones flexibles Informe transmisiones flexibles
Informe transmisiones flexibles Miguel Moran Tello
 
Uniones remachada sclase iris haydee silva
Uniones remachada sclase  iris haydee silvaUniones remachada sclase  iris haydee silva
Uniones remachada sclase iris haydee silvaMiguel Moran Tello
 

More from Miguel Moran Tello (20)

Construcciones geometricas basicas
Construcciones geometricas basicas Construcciones geometricas basicas
Construcciones geometricas basicas
 
Capacidades básicas de dibujo en ingeniería
Capacidades básicas de dibujo en ingenieríaCapacidades básicas de dibujo en ingeniería
Capacidades básicas de dibujo en ingeniería
 
Puntos de tangencia
Puntos de tangenciaPuntos de tangencia
Puntos de tangencia
 
Puntos de tangencia
Puntos de tangenciaPuntos de tangencia
Puntos de tangencia
 
224336916 letras-y-nuneros-uni
224336916 letras-y-nuneros-uni224336916 letras-y-nuneros-uni
224336916 letras-y-nuneros-uni
 
390312553 iii-cortes-2021Cortes-teoria-digital (2)
390312553 iii-cortes-2021Cortes-teoria-digital (2)390312553 iii-cortes-2021Cortes-teoria-digital (2)
390312553 iii-cortes-2021Cortes-teoria-digital (2)
 
Cortes problemas
Cortes problemasCortes problemas
Cortes problemas
 
390312553 iii-cortes-2018-teoria-digital (2)
390312553 iii-cortes-2018-teoria-digital (2)390312553 iii-cortes-2018-teoria-digital (2)
390312553 iii-cortes-2018-teoria-digital (2)
 
Dadas las vistas h y f
Dadas las vistas h y fDadas las vistas h y f
Dadas las vistas h y f
 
Cortes problemas
Cortes problemasCortes problemas
Cortes problemas
 
F2 silabo-BDI 02-dibujo en ingenieria ii (para escuela 2 hojas)-25 de abril2018
F2 silabo-BDI 02-dibujo en ingenieria ii (para escuela 2 hojas)-25 de abril2018F2 silabo-BDI 02-dibujo en ingenieria ii (para escuela 2 hojas)-25 de abril2018
F2 silabo-BDI 02-dibujo en ingenieria ii (para escuela 2 hojas)-25 de abril2018
 
Dibujo tecnico- Autocad
Dibujo tecnico- AutocadDibujo tecnico- Autocad
Dibujo tecnico- Autocad
 
Curso 2020
Curso  2020Curso  2020
Curso 2020
 
Clase de engranajes
Clase de engranajesClase de engranajes
Clase de engranajes
 
Reductor
ReductorReductor
Reductor
 
Informe transmisiones flexibles
Informe transmisiones flexibles Informe transmisiones flexibles
Informe transmisiones flexibles
 
Remaches iris haydee silva
Remaches  iris haydee silvaRemaches  iris haydee silva
Remaches iris haydee silva
 
Uniones remachada sclase iris haydee silva
Uniones remachada sclase  iris haydee silvaUniones remachada sclase  iris haydee silva
Uniones remachada sclase iris haydee silva
 
Soldadura y perfiles
Soldadura y perfilesSoldadura y perfiles
Soldadura y perfiles
 
Soldadura en Inventor
Soldadura en InventorSoldadura en Inventor
Soldadura en Inventor
 

Recently uploaded

Unit-IV; Professional Sales Representative (PSR).pptx
Unit-IV; Professional Sales Representative (PSR).pptxUnit-IV; Professional Sales Representative (PSR).pptx
Unit-IV; Professional Sales Representative (PSR).pptxVishalSingh1417
 
Dyslexia AI Workshop for Slideshare.pptx
Dyslexia AI Workshop for Slideshare.pptxDyslexia AI Workshop for Slideshare.pptx
Dyslexia AI Workshop for Slideshare.pptxcallscotland1987
 
This PowerPoint helps students to consider the concept of infinity.
This PowerPoint helps students to consider the concept of infinity.This PowerPoint helps students to consider the concept of infinity.
This PowerPoint helps students to consider the concept of infinity.christianmathematics
 
Making communications land - Are they received and understood as intended? we...
Making communications land - Are they received and understood as intended? we...Making communications land - Are they received and understood as intended? we...
Making communications land - Are they received and understood as intended? we...Association for Project Management
 
The basics of sentences session 3pptx.pptx
The basics of sentences session 3pptx.pptxThe basics of sentences session 3pptx.pptx
The basics of sentences session 3pptx.pptxheathfieldcps1
 
Grant Readiness 101 TechSoup and Remy Consulting
Grant Readiness 101 TechSoup and Remy ConsultingGrant Readiness 101 TechSoup and Remy Consulting
Grant Readiness 101 TechSoup and Remy ConsultingTechSoup
 
How to Give a Domain for a Field in Odoo 17
How to Give a Domain for a Field in Odoo 17How to Give a Domain for a Field in Odoo 17
How to Give a Domain for a Field in Odoo 17Celine George
 
TỔNG ÔN TẬP THI VÀO LỚP 10 MÔN TIẾNG ANH NĂM HỌC 2023 - 2024 CÓ ĐÁP ÁN (NGỮ Â...
TỔNG ÔN TẬP THI VÀO LỚP 10 MÔN TIẾNG ANH NĂM HỌC 2023 - 2024 CÓ ĐÁP ÁN (NGỮ Â...TỔNG ÔN TẬP THI VÀO LỚP 10 MÔN TIẾNG ANH NĂM HỌC 2023 - 2024 CÓ ĐÁP ÁN (NGỮ Â...
TỔNG ÔN TẬP THI VÀO LỚP 10 MÔN TIẾNG ANH NĂM HỌC 2023 - 2024 CÓ ĐÁP ÁN (NGỮ Â...Nguyen Thanh Tu Collection
 
ComPTIA Overview | Comptia Security+ Book SY0-701
ComPTIA Overview | Comptia Security+ Book SY0-701ComPTIA Overview | Comptia Security+ Book SY0-701
ComPTIA Overview | Comptia Security+ Book SY0-701bronxfugly43
 
Unit-V; Pricing (Pharma Marketing Management).pptx
Unit-V; Pricing (Pharma Marketing Management).pptxUnit-V; Pricing (Pharma Marketing Management).pptx
Unit-V; Pricing (Pharma Marketing Management).pptxVishalSingh1417
 
How to Manage Global Discount in Odoo 17 POS
How to Manage Global Discount in Odoo 17 POSHow to Manage Global Discount in Odoo 17 POS
How to Manage Global Discount in Odoo 17 POSCeline George
 
Understanding Accommodations and Modifications
Understanding  Accommodations and ModificationsUnderstanding  Accommodations and Modifications
Understanding Accommodations and ModificationsMJDuyan
 
Application orientated numerical on hev.ppt
Application orientated numerical on hev.pptApplication orientated numerical on hev.ppt
Application orientated numerical on hev.pptRamjanShidvankar
 
SOC 101 Demonstration of Learning Presentation
SOC 101 Demonstration of Learning PresentationSOC 101 Demonstration of Learning Presentation
SOC 101 Demonstration of Learning Presentationcamerronhm
 
How to Create and Manage Wizard in Odoo 17
How to Create and Manage Wizard in Odoo 17How to Create and Manage Wizard in Odoo 17
How to Create and Manage Wizard in Odoo 17Celine George
 
SKILL OF INTRODUCING THE LESSON MICRO SKILLS.pptx
SKILL OF INTRODUCING THE LESSON MICRO SKILLS.pptxSKILL OF INTRODUCING THE LESSON MICRO SKILLS.pptx
SKILL OF INTRODUCING THE LESSON MICRO SKILLS.pptxAmanpreet Kaur
 
Seal of Good Local Governance (SGLG) 2024Final.pptx
Seal of Good Local Governance (SGLG) 2024Final.pptxSeal of Good Local Governance (SGLG) 2024Final.pptx
Seal of Good Local Governance (SGLG) 2024Final.pptxnegromaestrong
 
Spellings Wk 3 English CAPS CARES Please Practise
Spellings Wk 3 English CAPS CARES Please PractiseSpellings Wk 3 English CAPS CARES Please Practise
Spellings Wk 3 English CAPS CARES Please PractiseAnaAcapella
 
Russian Escort Service in Delhi 11k Hotel Foreigner Russian Call Girls in Delhi
Russian Escort Service in Delhi 11k Hotel Foreigner Russian Call Girls in DelhiRussian Escort Service in Delhi 11k Hotel Foreigner Russian Call Girls in Delhi
Russian Escort Service in Delhi 11k Hotel Foreigner Russian Call Girls in Delhikauryashika82
 
Sociology 101 Demonstration of Learning Exhibit
Sociology 101 Demonstration of Learning ExhibitSociology 101 Demonstration of Learning Exhibit
Sociology 101 Demonstration of Learning Exhibitjbellavia9
 

Recently uploaded (20)

Unit-IV; Professional Sales Representative (PSR).pptx
Unit-IV; Professional Sales Representative (PSR).pptxUnit-IV; Professional Sales Representative (PSR).pptx
Unit-IV; Professional Sales Representative (PSR).pptx
 
Dyslexia AI Workshop for Slideshare.pptx
Dyslexia AI Workshop for Slideshare.pptxDyslexia AI Workshop for Slideshare.pptx
Dyslexia AI Workshop for Slideshare.pptx
 
This PowerPoint helps students to consider the concept of infinity.
This PowerPoint helps students to consider the concept of infinity.This PowerPoint helps students to consider the concept of infinity.
This PowerPoint helps students to consider the concept of infinity.
 
Making communications land - Are they received and understood as intended? we...
Making communications land - Are they received and understood as intended? we...Making communications land - Are they received and understood as intended? we...
Making communications land - Are they received and understood as intended? we...
 
The basics of sentences session 3pptx.pptx
The basics of sentences session 3pptx.pptxThe basics of sentences session 3pptx.pptx
The basics of sentences session 3pptx.pptx
 
Grant Readiness 101 TechSoup and Remy Consulting
Grant Readiness 101 TechSoup and Remy ConsultingGrant Readiness 101 TechSoup and Remy Consulting
Grant Readiness 101 TechSoup and Remy Consulting
 
How to Give a Domain for a Field in Odoo 17
How to Give a Domain for a Field in Odoo 17How to Give a Domain for a Field in Odoo 17
How to Give a Domain for a Field in Odoo 17
 
TỔNG ÔN TẬP THI VÀO LỚP 10 MÔN TIẾNG ANH NĂM HỌC 2023 - 2024 CÓ ĐÁP ÁN (NGỮ Â...
TỔNG ÔN TẬP THI VÀO LỚP 10 MÔN TIẾNG ANH NĂM HỌC 2023 - 2024 CÓ ĐÁP ÁN (NGỮ Â...TỔNG ÔN TẬP THI VÀO LỚP 10 MÔN TIẾNG ANH NĂM HỌC 2023 - 2024 CÓ ĐÁP ÁN (NGỮ Â...
TỔNG ÔN TẬP THI VÀO LỚP 10 MÔN TIẾNG ANH NĂM HỌC 2023 - 2024 CÓ ĐÁP ÁN (NGỮ Â...
 
ComPTIA Overview | Comptia Security+ Book SY0-701
ComPTIA Overview | Comptia Security+ Book SY0-701ComPTIA Overview | Comptia Security+ Book SY0-701
ComPTIA Overview | Comptia Security+ Book SY0-701
 
Unit-V; Pricing (Pharma Marketing Management).pptx
Unit-V; Pricing (Pharma Marketing Management).pptxUnit-V; Pricing (Pharma Marketing Management).pptx
Unit-V; Pricing (Pharma Marketing Management).pptx
 
How to Manage Global Discount in Odoo 17 POS
How to Manage Global Discount in Odoo 17 POSHow to Manage Global Discount in Odoo 17 POS
How to Manage Global Discount in Odoo 17 POS
 
Understanding Accommodations and Modifications
Understanding  Accommodations and ModificationsUnderstanding  Accommodations and Modifications
Understanding Accommodations and Modifications
 
Application orientated numerical on hev.ppt
Application orientated numerical on hev.pptApplication orientated numerical on hev.ppt
Application orientated numerical on hev.ppt
 
SOC 101 Demonstration of Learning Presentation
SOC 101 Demonstration of Learning PresentationSOC 101 Demonstration of Learning Presentation
SOC 101 Demonstration of Learning Presentation
 
How to Create and Manage Wizard in Odoo 17
How to Create and Manage Wizard in Odoo 17How to Create and Manage Wizard in Odoo 17
How to Create and Manage Wizard in Odoo 17
 
SKILL OF INTRODUCING THE LESSON MICRO SKILLS.pptx
SKILL OF INTRODUCING THE LESSON MICRO SKILLS.pptxSKILL OF INTRODUCING THE LESSON MICRO SKILLS.pptx
SKILL OF INTRODUCING THE LESSON MICRO SKILLS.pptx
 
Seal of Good Local Governance (SGLG) 2024Final.pptx
Seal of Good Local Governance (SGLG) 2024Final.pptxSeal of Good Local Governance (SGLG) 2024Final.pptx
Seal of Good Local Governance (SGLG) 2024Final.pptx
 
Spellings Wk 3 English CAPS CARES Please Practise
Spellings Wk 3 English CAPS CARES Please PractiseSpellings Wk 3 English CAPS CARES Please Practise
Spellings Wk 3 English CAPS CARES Please Practise
 
Russian Escort Service in Delhi 11k Hotel Foreigner Russian Call Girls in Delhi
Russian Escort Service in Delhi 11k Hotel Foreigner Russian Call Girls in DelhiRussian Escort Service in Delhi 11k Hotel Foreigner Russian Call Girls in Delhi
Russian Escort Service in Delhi 11k Hotel Foreigner Russian Call Girls in Delhi
 
Sociology 101 Demonstration of Learning Exhibit
Sociology 101 Demonstration of Learning ExhibitSociology 101 Demonstration of Learning Exhibit
Sociology 101 Demonstration of Learning Exhibit
 

57359820 disenando-tubos-tuberias-y-mangueras-arvifesa(1)

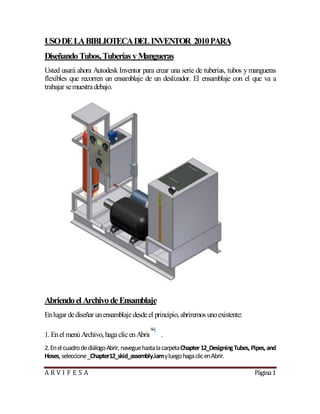
  • 1. A R V I F E S A Página1 USODELABIBLIOTECADELINVENTOR 2010PARA DiseñandoTubos,TuberíasyMangueras Usted usará ahora Autodesk Inventor para crear una serie de tuberías, tubos y mangueras flexibles que recorren un ensamblaje de un deslizador. El ensamblaje con el que va a trabajar semuestradebajo. AbriendoelArchivodeEnsamblaje Enlugar dediseñar unensamblajedesdeel principio, abriremos unoexistente: 1. Enel menúArchivo, hagaclicenAbrir . 2. EnelcuadrodediálogoAbrir, naveguehastalacarpetaChapter12_DesigningTubes, Pipes, and Hoses, seleccione_Chapter12_skid_assembly.iamyluegohagaclicenAbrir.
  • 2. A R V I F E S A Página2 EmpezandounDiseñodeConductodeTubería 1.-Enlabarradel Panel deEnsamblaje, haga, clicenlaherramientaCrear Conducto de Tubería, INVENTOR2009 y enINVENTOR2010. 2.-Enel cuadrodediálogoCrear Conducto, deTubos yTuberías, hagaclicenAceptar Para aceptar los parámetros por defecto. EnINVENTOR2009 EnINVENTOR2010
  • 3. A R V I F E S A Página3 Nota: El navegador del ModelomuestraahoraunacarpetallamadaConductos DeTubos yTuberías. Todos losconductoscreados enel ensamblajeprincipal se Almacenarán enestacarpetaautomáticamente. DefiniendounEstilodeTubería 1.-EnlabarradePanelTubosyTuberías, hagaclic, enlaherramientaEstilos deTubosyTuberías, 2.- EnlalistadeEstilos, hagaclicen ISO7598/ISO49-TuberíadeAcero RoscadaconAccesorios, deHierro. 3.-Hagaclicconelbotónderechosobreelnombredelestiloyseleccionela opciónActivadelmenúcontextual, luegohagaclicenAceptar. EnINVENTOR2009
  • 4. A R V I F E S A Página4 EnINVENTOR2010
  • 5. A R V I F E S A Página5 CreandounEnrutamientodeTubería 1.-GireyhagaZoomasumodelohastaquequededeformasimilar al delaimagen
  • 6. A R V I F E S A Página6 2.-En la barra de Panel Tubos y Tuberías, haga clic en, la herramienta Nuevo Enrutamiento En INVENTOR 2009 o En INVENTOR 2010 y después, hagaclicenAceptarparaaceptar el nombrepor, defectoparael archivodeenrutamiento. EnINVENTOR2010 3.- EnlabarradePanel Enrutamiento, hagaclicenlaherramientaEnrutamiento EnINVENTOR2009 y EnINVENTOR2010 4.-Detengasucursor sobreel diámetrointerior del accesorio. 5.- Cuando aparezca el punto verde y la fecha amarilla apunte hacia el exterior del accesorio, hagaclicparacolocar el primer nodo. Unpuntoazulsignificaque el segmentodetuberíacumplelamínima longitudpero es demasiado cortoparaunaccesorioocodoadicional. Unpuntoverdeindicauna ubicaciónválidaparasunuevonodo. UnaX amarillasignificaque su nodo no cumple con la longitud mínima del segmentoconfigurada.
  • 7. A R V I F E S A Página7
  • 8. A R V I F E S A Página8 Y UsandolaEntradadeValores Exactos Definael segundonododesuenrutamientousandolaentradanuméricaexacta: 1. En cualquier lugar frente al accesorio, detengael cursor sobre el eje ydespués haga clic conel botón DerechoyseleccioneIntroducirDistancia. 2. En el cuadro de diálogo Introducir Distancia, teclee 100 mmy después haga clic en la marcadevalidaciónverdeparaaceptar. UsandolaHerramientadeEnrutamiento3D, Ortogonal Defina el siguiente nodo de su enrutamiento usando la herramienta de orientación gráfica deEnrutamiento3DOrtogonal. Estaherramientaleasistedurantelacreaciónoreubicación delos nodos quedefinenel enrutamientodelatubería. 1.-Detengaelcursorsobrelaseccióninferiordel ejevertical, cuandoestadecolorverdehagaclic conelbotónderechoyseleccioneIntroducirDistancia.
  • 9. A R V I F E S A Página9 2. En el diálogo Introducir Distancia, teclee 200 mm y luego haga, clic en la marca de validaciónverdeparaaceptar. UsandoReferenciadePunto Acontinuación usará lafuncionalidad Referencia de Punto para definir el enrutamiento de la tubería en relación a otra geometría del ensamblaje. Puede crear nodos de enrutamiento tomando comoreferenciacaras, aristas opuntos de trabajoque existan en el ensamblajede tubos ytuberías. ReferenciadePuntosobre: 1.- Mientras detieneel cursor sobre el eje azul, hagaclic conel botónderechoy seleccione Referencia de Punto. Con la Referencia de Puntoactivada, puede ahorahacer referencia aotros objetos del ensamblaje.
  • 10. A R V I F E S A Página10 2. Desplace y detenga el cursor sobre objetos para ver como la Referencia de Punto determinasuubicación. 3. Detengael cursor sobrelacaradelavigadesoportequesemuestra(fecha). 4. Cuando aparezca el indicador de distancia, teclee 10 mmpara hacer aparecer el diálogo Introducir Distancia y luego haga clic en la marca de validación verde. Este nodo que acabadecrear sobrepasalavigaen10mm. EmpezandounDiseñodeMangueraFlexible 1.- Uselas herramientas ZoomyRotaciónparavisualizar el áreamostradaenlaimagen 2.- En la barra de Panel, haga clic en la herramienta Crear Conducto de Tubería y hagaclicenAceptar paraaceptarlos parámetros por defecto.
  • 11. A R V I F E S A Página11 DefiniendounEstilodeMangueraFlexible 1.- EnlabarradePanel Tubos yTuberías, hagaclicenEstilos deTubos yTuberías. 2.- En el menú desplegable de Estilo, seleccione Manguera hidráulica - Rosca recta machoyluegohagaclicenAceptar. CreandounEnrutamientodeMangueraFlexible Definalos puntos inicial yfinal parael enrutamiento: 1.- EnlabarradePanel Tubos yTuberías, hagaclicenlaherramienta NuevoEnrutamiento yhagaclicenAceptarparaaceptarlos Valores por defecto.
  • 12. A R V I F E S A Página12 2.- EnlabarradePanel deEnrutamiento, hagaclicenla herramientaEnrutamiento 3.- Seleccione la arista circular del accesorio DBW20:1 como se muestra a la derecha (fecha1). 4.- Paraelsegundoaccesorio,seleccionelaaristacircular. 5. - Para aceptar el auto-enrutamiento pre visualizado, en la ventana gráfica, Haga clic con el botónderechoyseleccioneTerminar. Terminandoel DiseñodelaMangueraFlexible 1.- Enlaventanagráfica, hagaclicconel botónderechoyseleccione Terminar Edición. 2.-EnlabarradePanel Tubos yTuberías, hagaclicenla herramientaLlenar Enrutamiento .
  • 13. A R V I F E S A Página13 HaciendounCambiodeDiseño Autodesk Inventor le permite hacer cambios de diseño y actualiza automáticamente sus diseños detubos, tuberías ymangueras. Hagauncambiodediseño: 1. Haga doble clic en _Chapter 12_skid_assembly.iam para activar el ensamblaje principal. 2. Hagaclicenel símbolomás (+) juntoaJunctionBox:1. 3. Hagaclicenlarestriccióndeensamblaje Mate:15(100.00mm). 4. Enlaparteinferior del navegador delmodelo,cambieel valor a 500mmy luegopulseEnter.
  • 14. A R V I F E S A Página14 ObservequecuandocambialaposicióndelaCajadeConexiones (Junction Box), el enrutamiento de la manguera se actualiza automáticamente de acuerdo con los criteriosdediseñoaplicados. HaciendounCambiodeDiseño Autodesk Inventor le permite hacer cambios de diseño y actualiza automáticamente sus diseños detubos, tuberías ymangueras. Hagauncambiodediseño: 1. Haga doble clic en _Chapter 12_skid_assembly.iam para activar el ensamblaje principal.
  • 15. A R V I F E S A Página15 2. Hagaclicenel símbolomás (+) juntoaJunctionBox:1. 3. Hagaclicenlarestriccióndeensamblaje Mate:15(100.00mm). 4. Enlaparteinferior del navegador delmodelo,cambieel valor a 500mmy luegopulseEnter. ObservequecuandocambialaposicióndelaCajadeConexiones (Junction Box), el enrutamiento de la manguera se actualiza automáticamente de acuerdo con los criterios dediseñoaplicados. EmpezandounDiseñodeTuboRígidoTubodecobresoldado Ahoracrearásuprimeraconduccióndetuboenelensamblaje: 1. EnlabarradePanel Ensamblaje, hagaclicenlaherramienta Crear ConductodeTubería
  • 16. A R V I F E S A Página16 2. Enel cuadrodediálogo, hagaclicenAceptarparaaceptar los parámetros por defecto. 3. Use las herramientas Rotación y Zoompara visualizar el áreamostrada en la imagen de laderecha. DefiniendounEstilodeTuboRígido Tubodecobresoldado Definael EstilodeTubos yTuberías: 1. En la barra de Panel Tubos y Tuberías, haga clic en la herramienta Estilos de Tubos y Tuberías 2. En la lista desplegable de Estilos, seleccione ASTM B 88-ASME B16.22 - Tubo de cobresoldadoyluego hagaclicenAceptar. CreandounEnrutamientodeTuboRígido Tubodecobresoldado
  • 17. A R V I F E S A Página17 Definael enrutamiento: 1. En la Barra de Panel Tubos y Tuberías, haga clic en la herramienta Nuevo Enrutamiento y luego haga, clic en Aceptar para aceptar los parámetros por defecto. 2. Asegúresedequeestátrabajandoenmilímetros: En el menú Herramientas,haga clic en Parámetros del Documento. En el diálogo Parámetros del Documento, haga clic en la pestaña Unidades y, paralaLongitud, seleccionemilímetrodelalista. Haga clic en Aceptar. 3. EnlaBarradePanel deEnrutamiento, hagaclicenlaherramienta Enrutamiento 4. Seleccionelaaristacircular del accesoriocomoprimer punto, asegurándosedequelafechaamarillaapuntahaciael exterior del accesorio. UseIntroducir Distanciaparadefinir el enrutamientodeltubo: 1. Detengasucursor sobreel eje, hagaclicconel botónderecho yseleccioneIntroducirDistancia. 2. Teclee100mmenel diálogoIntroducir Distanciayluego pulseEnter.
  • 18. A R V I F E S A Página18 3. Detengasucursor sobreelejeverdequeseextiendehacialaderecha, haga clicconelbotónderechoyseleccioneIntroducirDistancia. 4. Teclee200mmeneldiálogoIntroducir Distanciayluegopulse Enter. 5. Paradefnir elpuntofnaldelenrutamiento, seleccioneeldiámetrode laaperturadelapartesuperior delabombona. 6. Haga clic en el botón de Selección Verde para aceptar la primera solución mostrada. 7. PresioneEscparasalir delcomando, después hagaclicconel botónderechoyseleccione TerminarEdición. TerminandoelDiseñodeTuboRígido Tubodecobresoldado
  • 19. A R V I F E S A Página19 En la barra de Panel Tubos y Tuberías, haga clic en la herramienta LlenarEnrutamiento TerminandoelDiseñodeTuboRígido Tubodecobresoldado
  • 20. A R V I F E S A Página20 En la barra de Panel Tubos y Tuberías, haga clic en la herramienta LlenarEnrutamiento Nuts Frutos decáscara USODELABIBLIOTECADELINVENTOR 2010PARA DiseñandoTubos, Tuberías yMangueras Pág 01 Abriendoel ArchivodeEnsamblaje Pág. 01 EmpezandounDiseñodeConductodeTubería Pág. 02 DefiniendounEstilodeTubería Pág. 03 CreandounEnrutamientodeTubería Pág. 05 UsandolaEntradadeValores Exactos Pág. 08 EmpezandounDiseñodeMangueraFlexible Pág. 10 HaciendounCambiodeDiseño Pág. 13 EmpezandounDiseñodeTuboRígidoTubodecobresoldado Pág. 15 CURSO: USO DE LA BIBLIOTECA DEL INVENTOR 2010 PARA el Diseño de Tubos, Tuberías yMangueras TEMAS DiseñandoTubos, Tuberías yMangueras Abriendoel ArchivodeEnsamblaje EmpezandounDiseñodeConductodeTubería DefiniendounEstilodeTubería CreandounEnrutamientodeTubería UsandolaHerramientadeEnrutamiento3D, Ortogonal
  • 21. A R V I F E S A Página21 EmpezandounDiseñodeMangueraFlexible LO MAS USADO populateroute, pueblanlaruta fittings , accesorios ben, done, HECHO sweep, barrido Environments, Ambientes Ribbon, Cinta Overview, Descripcióngeneral Pattern, patrónoArreglo
  • 22. A R V I F E S A Página22