SlideShare a Scribd company logo
1 of 36
Download to read offline
사용자 매뉴얼
Ver.1
교육용
I. 개발 배경 _ 4
II. 제품 소개 _ 8
III. 사용 방법 _ 14
IV. 임상 케이스 _ 20
V. 제품 사양 _ 32
Contents
개발 배경
I
1. 일반적인 상악동 거상술
2. 3S SINUS 개발 배경
6 I 3S SINUS User Manual I 개발 배경
•일반적으로 상악 구치부에 임플란트를 식립할 때 잔존치조골 높이에 따라 임플란트 식립의 방법이
달라지게 됩니다.
① 잔존치조골 10mm 내외
•통상적인 임플란트 식립 방법입니다.
③ 잔존치조골 2-4mm 내외
•치조골쪽으로 접근하지 못하고 상악동 측벽에 window(lateral approach)를 형성하여, 이곳으로 접근하여
상악동 거상술을 시행한 다음 치조골쪽으로 임플란트 식립합니다.
•임플란트 식립을 치조정쪽에서 진행하여, 측벽 및 치조정 2개의 수술 부위가 존재하고 수술 시 상당한
시간이 소요됩니다. 특히, window 하방경계와 임플란트 협면경계 사이에 잔존골이 부족할 경우
임플란트식립 시 치조골 파절가능성이 있습니다.
② 잔존치조골 4-8mm
•Summer’s osteotome technique으로 식립합니다.
1. 일반적인 상악동 거상술
개발 배경
개발 배경 I 3S SINUS User Manual I 7
•상악동 거상술 시술 시 기존 수술 기구들은 잔존 치조골이 2-4mm 내외 일 경우, 시술에 어려움이 있습니다.
•잔존 치조골이 2-4mm 내외이더라도 안전하게 치조정에서 바로 거상하고 같은 부위에 식립 할 수 있는
기구가 있다면 수술도 간단하며 시술 시간도 짧아져 환자와 시술자 모두에게 도움이 될 수 있습니다.
2. 3S SINUS 개발 배경
제품 소개
1. 3S SINUS의 특징
2. 3S SINUS의 구성
3. 3S SINUS의 차별성
IIII
10 I 3S SINUS User Manual I 제품 소개
잔존골이 2-4mm의 경우에도 window를 열지 않고 crestal로 접근하여 15-20분 만에 시술하는 3S SINUS
technique입니다.
1. 3S SINUS의 특징
Simple
- 여러 직경의 drill 또는 osteotome을 사용했던 기존 술식과 달리 1개의 diamond bur와
osteotome을 사용함으로 시술이 간단해집니다.
Speed
- 상악동 측벽을 열지 않고, 기구 교환이 없는 간단한 시술과정, chairside 1:1 low
speed를 통해 신속한 치조골 삭제가 가능하여 상악동거상술을 빠르게 진행할 수
있습니다.
Safe
- Low speed straight(contra angle)용 4.2mm diamond bur를 사용해 천공가능성을
줄여줍니다.
- 기존 천공의 가능성이 있는 sinus curette 대신 약 4mm 직경의 osteotome으로 막을
거상합니다.
- 이로 인해 시술시간이 짧고, 수술 후 생길 수 있는 환자의 합병증 가능성을 줄여줍니다.
제품 소개
제품 소개 I 3S SINUS User Manual I 11
2. 3S SINUS의 구성
▶ Diamond Bur
•Straight 또는 contra-angle
low speed에 연결
•여러 직경의 임플란트 드릴
대체가능
▶ Osteotome
•Bone 삽입 시 사용
•Straight, Curve 2가지 형태
▶ Bone Packer
•Bone 삽입 시, 상악동 내
기구 침범 방지
•Tapered 타입
▶ Mallet
•Bone 삽입 시 osteotome과
함께 사용
•플라스틱 소재로 환자의
충격 완화 시킴
•만족도 높은 그립감
▶ Bone Support
•상악동거상술시
bone graft가 hole에 바로
들어가게 하는 용도
▶ Bone Well
•Bone을 담아내는 용도
1) 기존방법 : Lateral Approach Technique (Window)
12 I 3S SINUS User Manual I 제품 소개
3. 3S SINUS의 차별성
긴 수술 시간
•여러 개의 직경의 드릴을 사용하여 상악동 거상술을 시술하게 되어 많은 시간이 소요됩니다.
Lateral Approach Cutter Lateral Approach Drill Curette Drill
2.5 2.8 3.1 3.6
2개의 수술 부위
•window 및 임플란트 hole 등 2개의 수술부위가 존재합니다.
안정성 부족
•상악동막 거상 시 기존의 sinus curette 모양은 단면적이 좁고 뾰족하여 천공가능성이 높습니다.
•기존의 실린더(Cylinder)모양의 bone packer는 골이식재를 넣을 때 힘 조절이 어렵습니다. 따라서 상악동
안으로 갑자기 밀려들어갈 가능성이 크므로 천공가능성이 높아집니다.
약한 초기 고정력
•하방 경계가 임플란트 협면 위치와 근접하는 경우 치조골이 파절되어 임플란트 초기 고정이 약해지는 경우가
있습니다.
2) 새로운 방법 : 3S SINUS Technique
제품 소개 I 3S SINUS User Manual I 13
1개의 수술 부위
•잔존골 2-4mm이더라도 window를 형성하지 않아 1개의 임플란트 수술 부위가 존재합니다.
높은 안정성
•1.6mm, 2.7mm 2가지의 직경을 가지는 bone packer는 5.2°의 tapered 형상이므로 골이식술 시 갑자기
상악동 안으로 기구가 들어가는 것을 방지할 수 있어 안전하게 상악동 거상술을 시행할 수 있습니다.
초기 고정력 양호
•임플란트 협면 치조골 파절을 방지하여 초기 고정력 확보가 용이합니다.
2.5 2.8 3.1 3.6
빠른 시술 시간
•Ø4.2mm diamond bur 1개만을 이용한 시술로, 기존 시술에서 이용되는 4-6개 드릴을 대체하는 효과가
있어 시술 시간이 절약됩니다.
※ 4.7mm 직경의 임플란트를 식립 경우, Point drill, 2.2mm, 2.8mm, 3.1mm, 3.6mm, countersink drill 이용함
•Chairside의 1:1 low speed(contra angle, straight)을 사용하여 빠른 시술이 가능합니다.Chairside의 1:1 low speed(contra angle, straight)을 사용하여 빠른 시술이 가능합니다.
III
사용 방법
1. 3S SINUS의 사용 방법
2. 3S SINUS의 주의사항 및 임상 Tip
16 I 3S SINUS User Manual I 사용 방법
1. 3S SINUS의 사용 방법
① 준비 ② 절개 ③ Bone 삭제
3S SINUS의 Ø4.2 diamond bur 1:1 (low
speed contra-angle/straight angle)로
상악동막 노출 직전까지 골을 삭제하여
식립 부위 hole 형성합니다.
•Ø4.2 Diamond bur
사용 방법
④ 치조골 정리 (Option) ⑤ 상악동 내 bone 삽입 ⑥ 상악동막 거상
Osteotome와 mallet을 사용해 상악동막
거상 및 상악동 막 내 bone 삽입합니다.
•Osteotome
•Mallet
Bone support와 bone packer를 사용해
상악동 내 bone을 삽입합니다.
•Bone Support
•Bone Packer
3S SINUS의 Ø3 diamond bur (low
speed contra-angle/straight angle)로
양쪽 반원 모양의 잔존 골을 삭제합니다.
•Ø3 Diamond bur
사용 방법 I 3S SINUS User Manual I 17
⑦ Fixture 삽입 ⑧ Screw 체결 ⑨ 봉합
18 I 3S SINUS User Manual I 사용 방법
2. 3S SINUS의 주의 사항 및 임상 Tip
1) Bone 삭제 단계에서의 핸드피스의 선택
•Diamond bur는 contra angle용과 straight angle용이 있으며 시술자가 편리한대로 사용하시면 됩니다.
※ 단, 1:1 핸드피스를 선택하시길 바랍니다. (chairside straight 또는 contra angle low speed 추천)
2) Bone 삽입 단계에서의 bone packer 선택
•Cylinder 모양의 bone Packer는 천공의 가능성을 높일 수 있어 3S Sinus의 tapered 형태의 bone packer
사용을 권장합니다.
3) Bone 삽입 단계에서의 osteotome 선택
•Osteotome은 푹 파인 형태, 가는 형태, 또는 실린더 형태가 아닌 볼록한 tapered 형태를 사용할 것을
권장합니다. (Fig.1)
•Osteotome을 깊이 삽입하지 않고 bone graft에 의해 상악동막이 자연스럽게 거상될 수 있도록 합니다. (Fig. 2)
Fig.1 Fig.2
사용 방법 I 3S SINUS User Manual I 19
4) 임플란트 식립 위치
•임플란트 식립 시 bone이 얇으므로 초기안정성을 위해 bone level 보다 0.5mm 정도 상방으로 식립하길
권장합니다.
Bone Level - 0.5mm Bone Level - 0.5mm
5) 임플란트 식립 ratchet 선택
•과도한 torque값이 전달되지 않도록 ratchet 또는 hand driver 사용하길 보다는 right angle driver의 사용을
권장합니다.
6) Contra angle용 Ø3 diamond bur의 활용
•임플란트 2차 수술에서 cover screw 상방의 bone 제거 시 유용합니다.
Cover screw 상방의 bone 삭제 전 Cover screw 상방의 bone 삭제 후
임상 케이스
IV
22 I 3S SINUS User Manual I 임상 케이스
Before After
Before  After
Fig1. Radiography before
extraction
Fig2. Pre-op radiography
(1.5 months after extraction)
Fig3. Pre-op intraoral
photo
Fig4. 3S diamond bur
drilling
Fig5. After drilling Fig6. #16 Ø4.2x10mm, #17 Ø4.7x8mm
OneQ-HA implant placement
Fig7. Post-op radiography
시술 과정
✚ Case I
임상 케이스
임상 케이스 I 3S SINUS User Manual I 23
Before After
Before  After
Fig1. Pre-op radiography Fig2. Pre-op intraoral photo Fig3. Drilling with 3S Ø4.2
(Low speed contra-
angle) diamond bur
Fig4. Filling the bone material
using 3S bone supporter
and bone packer
Fig6. After drilling Fig7. Ø4.2x10mm OneQ-HA
implant placement
Fig8. SuturingFig5. Pushing bone material
into the sinus using 3S
osteotome
Fig9. Post-op radiography
시술 과정
✚ Case II
24 I 3S SINUS User Manual I 임상 케이스
Before After
Before  After
✚ Case III
Fig1. Radiography before
extraction
Fig2. Pre-op radiography
(1.5 months after
extraction)
Fig3. Pre-op intraoral photo Fig4. Incision and flap
reflection
Fig6. After drilling Fig7. Filling the bone
material using 3S bone
supporter and bone
packer
Fig8. Pushing bone material
into the sinus using 3S
osteotome
Fig5. Drilling with 3S Ø4.2
(Low speed straight)
diamond bur
Fig10. Suturing Fig11. Post-op CT Fig12. Post-op radiographyFig9. Ø4.2x10mm OneQ-HA
implant placement
시술 과정
임상 케이스 I 3S SINUS User Manual I 25
Before After
Before  After
Fig1. Radiography before
extraction
Fig2. Pre-op radiography
(1.5 months after
extraction)
Fig3. Pre-op intraoral photo Fig4. Incision and flap
reflection
Fig9. Suturing Fig10. Post-op CT Fig11. Post-op radiography
Fig6. #16 implant installation Fig7. Cover screw
connection
Fig8. Resorbable barrier
membrane coverage
Fig5. #15 implant installation
and #16 drilling
시술 과정
✚ Case IV
26 I 3S SINUS User Manual I 임상 케이스
Before After
Before  After
✚ Case V
Fig1. Radiography before
extraction
Fig2. Before extraction
intraoral photo
Fig3. After extraction intraoral
photo
Fig4. Pre-op radiography (1.5
months after extraction)
Fig6. Incision and flap
reflection
Fig7.#26 implant installation
and #27 drilling with
diamond bur
Fig8. Cover screw connectionFig5. Pre-op intraoral photo
Fig10. Post-op radiography Fig11. Healing 2 weeksFig9. Suturing
시술 과정
임상 케이스 I 3S SINUS User Manual I 27
Before After
Before  After
✚ Case VI
Fig1. Pre-op radiography Fig2. Pre-op intraoral photo Fig3. Incision and flap
reflection
Fig4. Drilling with 3S Ø4.2
(Low speed straight)
diamond bur
Fig9. Cover screw connection Fig10. Suturing Fig11. Post-op radiography
Fig6. Filling the bone
material using 3S bone
supporter and bone
packer
Fig7. #26 OneQ-HA implant
placement and #27
drilling with 3S diamond
bur
Fig8. #27 OneQ-HA implant
placement Implant
Installation
Fig5. #26 drilling with 3S
diamond bur
시술 과정
28 I 3S SINUS User Manual I 임상 케이스
Before After
Before  After
✚ Case ⅤII
Fig1. Pre-op radiography Fig2. Pre-op intraoral photo Fig3. Incision and flap
reflection
Fig4. #16 drilling with 3S Ø4.2
(Low speed straight
angle) diamond bur
Fig6. #16 OneQ-HA implant
placement
Fig7. #17 drilling with 3S
diamond bur
Fig8. #17 bone material filled
with 3S osteotome
Fig5. #16 bone material filled
with 3S osteotome
Fig10. Cover screw
connection
Fig9. #17 OneQ-HA implant
placement
Fig11. Suturing Fig12. Post-op radiography
시술 과정
임상 케이스 I 3S SINUS User Manual I 29
Before After
Before  After
Fig1. Radiography before
extraction
Fig2. Pre-op radiography
(1.5 months after
extraction)
Fig3. Pre-op intraoral photo Fig4. Incision and flap
reflection
Fig6. #17 filling the bone
material using 3S bone
supporter and bone
packer
Fig7. #17 OneQ-HA implant
placement
Fig8. Cover screw connectionFig5. #14, 15 drilling with
3S Ø4.2 (Low speed
straight) diamond bur
Fig10. Resorbable barrier
membrane coverage
Fig9. Covered bone graft on
the cover screw
Fig11. Suturing Fig12. Post-op radiography
✚ Case ⅤIII
시술 과정
30 I 3S SINUS User Manual I 임상 케이스
Before After
Before  After
✚ Case IX
Fig1. Pre-op radiography Fig2. #25 pre-op intraoral
photo
Fig3. #25 incision and flap
reflection
Fig4. #25 drilling with 3S
Ø4.2 (Low speed
straight) diamond bur
Fig6. #25 after drilling Fig7. #25 filling the bone
material using 3S bone
supporter and bone
packer
Fig8. #25 implant installationFig5. #25 after drilling
시술 과정
임상 케이스 I 3S SINUS User Manual I 31
Fig10. #15 pre-op intraoral
photo
Fig9. #25 suturing Fig11. #15 incision and flap
reflection
Fig12. #15 drilling with 3S
Ø4.2 (Low speed
straight) diamond bur
Fig18. #15 suturingFig17. #15 implant installation Fig19. Post-op radiography
Fig14. #15 drilling with 3S Ø3
(Low speed straight)
diamond bur
Fig13. #15 drilling Fig15. #15 after drilling Fig16. #15 filling the bone
material using 3S
bone supporter and
bone packer
제품 사양
V
34 I 3S SINUS User Manual I 제품 사양
사양 CODE
Ø4.2 Diamond Bur(Contra-angle) DB-L42
Ø4.2 Diamond Bur(Straight) DB-H42
Ø3 Diamond Bur(Contra-angle) DB-L30
Ø3 Diamond Bur(Straight) DB-H30
Diamond Bur
Straight 또는 contra-angle low speed에 연결
Osteotome
Bone 삽입 시, 상악동 내 기구 침범 방지
사양 CODE
Ø4.3 Osteotome(Straight) R-S4.3
Ø4.3 Osteotome(Curved) R-C4.3
Ø5.0 Osteotome(Straight) R-S5.0
Ø5.0 Osteotome(Curved) R-C5.0
3S SINUS KIT
Crestal로 접근하여 시술하는 3S SINUS KIT
사양 CODE
3S SINUS KIT MSTSGD0161
제품 사양
제품 사양 I 3S SINUS User Manual I 35
Bone Packer
상악동거상술시 bone graft가 hole에 바로 들어가게 하는 용도
사양 CODE
Bone Packer BP-4350
사양 CODE
Mallet MT-03
Mallet
Bone 삽입 시 사용
사양 CODE
Bone support BC-4060
Bone Support
Bone 삽입 시 osteotome과 함께 사용
Bone Well
Bone을 담아내는 용도
사양 CODE
Bone Well BW-01
D-C-3SMG-V1-201611-KOR
본 지에 게재된 모든 정보는 사전 고지 없이 변경될 수 있습니다.
Copyright ⓒ DENTIS Co., LTD.
1899-2804고/ 객/ 센/ 터
www.dentisimplant.co.kr

More Related Content

Featured

Content Methodology: A Best Practices Report (Webinar)
Content Methodology: A Best Practices Report (Webinar)Content Methodology: A Best Practices Report (Webinar)
Content Methodology: A Best Practices Report (Webinar)contently
 
How to Prepare For a Successful Job Search for 2024
How to Prepare For a Successful Job Search for 2024How to Prepare For a Successful Job Search for 2024
How to Prepare For a Successful Job Search for 2024Albert Qian
 
Social Media Marketing Trends 2024 // The Global Indie Insights
Social Media Marketing Trends 2024 // The Global Indie InsightsSocial Media Marketing Trends 2024 // The Global Indie Insights
Social Media Marketing Trends 2024 // The Global Indie InsightsKurio // The Social Media Age(ncy)
 
Trends In Paid Search: Navigating The Digital Landscape In 2024
Trends In Paid Search: Navigating The Digital Landscape In 2024Trends In Paid Search: Navigating The Digital Landscape In 2024
Trends In Paid Search: Navigating The Digital Landscape In 2024Search Engine Journal
 
5 Public speaking tips from TED - Visualized summary
5 Public speaking tips from TED - Visualized summary5 Public speaking tips from TED - Visualized summary
5 Public speaking tips from TED - Visualized summarySpeakerHub
 
ChatGPT and the Future of Work - Clark Boyd
ChatGPT and the Future of Work - Clark Boyd ChatGPT and the Future of Work - Clark Boyd
ChatGPT and the Future of Work - Clark Boyd Clark Boyd
 
Getting into the tech field. what next
Getting into the tech field. what next Getting into the tech field. what next
Getting into the tech field. what next Tessa Mero
 
Google's Just Not That Into You: Understanding Core Updates & Search Intent
Google's Just Not That Into You: Understanding Core Updates & Search IntentGoogle's Just Not That Into You: Understanding Core Updates & Search Intent
Google's Just Not That Into You: Understanding Core Updates & Search IntentLily Ray
 
Time Management & Productivity - Best Practices
Time Management & Productivity -  Best PracticesTime Management & Productivity -  Best Practices
Time Management & Productivity - Best PracticesVit Horky
 
The six step guide to practical project management
The six step guide to practical project managementThe six step guide to practical project management
The six step guide to practical project managementMindGenius
 
Beginners Guide to TikTok for Search - Rachel Pearson - We are Tilt __ Bright...
Beginners Guide to TikTok for Search - Rachel Pearson - We are Tilt __ Bright...Beginners Guide to TikTok for Search - Rachel Pearson - We are Tilt __ Bright...
Beginners Guide to TikTok for Search - Rachel Pearson - We are Tilt __ Bright...RachelPearson36
 
Unlocking the Power of ChatGPT and AI in Testing - A Real-World Look, present...
Unlocking the Power of ChatGPT and AI in Testing - A Real-World Look, present...Unlocking the Power of ChatGPT and AI in Testing - A Real-World Look, present...
Unlocking the Power of ChatGPT and AI in Testing - A Real-World Look, present...Applitools
 
12 Ways to Increase Your Influence at Work
12 Ways to Increase Your Influence at Work12 Ways to Increase Your Influence at Work
12 Ways to Increase Your Influence at WorkGetSmarter
 
Ride the Storm: Navigating Through Unstable Periods / Katerina Rudko (Belka G...
Ride the Storm: Navigating Through Unstable Periods / Katerina Rudko (Belka G...Ride the Storm: Navigating Through Unstable Periods / Katerina Rudko (Belka G...
Ride the Storm: Navigating Through Unstable Periods / Katerina Rudko (Belka G...DevGAMM Conference
 
Barbie - Brand Strategy Presentation
Barbie - Brand Strategy PresentationBarbie - Brand Strategy Presentation
Barbie - Brand Strategy PresentationErica Santiago
 
Good Stuff Happens in 1:1 Meetings: Why you need them and how to do them well
Good Stuff Happens in 1:1 Meetings: Why you need them and how to do them wellGood Stuff Happens in 1:1 Meetings: Why you need them and how to do them well
Good Stuff Happens in 1:1 Meetings: Why you need them and how to do them wellSaba Software
 

Featured (20)

Content Methodology: A Best Practices Report (Webinar)
Content Methodology: A Best Practices Report (Webinar)Content Methodology: A Best Practices Report (Webinar)
Content Methodology: A Best Practices Report (Webinar)
 
How to Prepare For a Successful Job Search for 2024
How to Prepare For a Successful Job Search for 2024How to Prepare For a Successful Job Search for 2024
How to Prepare For a Successful Job Search for 2024
 
Social Media Marketing Trends 2024 // The Global Indie Insights
Social Media Marketing Trends 2024 // The Global Indie InsightsSocial Media Marketing Trends 2024 // The Global Indie Insights
Social Media Marketing Trends 2024 // The Global Indie Insights
 
Trends In Paid Search: Navigating The Digital Landscape In 2024
Trends In Paid Search: Navigating The Digital Landscape In 2024Trends In Paid Search: Navigating The Digital Landscape In 2024
Trends In Paid Search: Navigating The Digital Landscape In 2024
 
5 Public speaking tips from TED - Visualized summary
5 Public speaking tips from TED - Visualized summary5 Public speaking tips from TED - Visualized summary
5 Public speaking tips from TED - Visualized summary
 
ChatGPT and the Future of Work - Clark Boyd
ChatGPT and the Future of Work - Clark Boyd ChatGPT and the Future of Work - Clark Boyd
ChatGPT and the Future of Work - Clark Boyd
 
Getting into the tech field. what next
Getting into the tech field. what next Getting into the tech field. what next
Getting into the tech field. what next
 
Google's Just Not That Into You: Understanding Core Updates & Search Intent
Google's Just Not That Into You: Understanding Core Updates & Search IntentGoogle's Just Not That Into You: Understanding Core Updates & Search Intent
Google's Just Not That Into You: Understanding Core Updates & Search Intent
 
How to have difficult conversations
How to have difficult conversations How to have difficult conversations
How to have difficult conversations
 
Introduction to Data Science
Introduction to Data ScienceIntroduction to Data Science
Introduction to Data Science
 
Time Management & Productivity - Best Practices
Time Management & Productivity -  Best PracticesTime Management & Productivity -  Best Practices
Time Management & Productivity - Best Practices
 
The six step guide to practical project management
The six step guide to practical project managementThe six step guide to practical project management
The six step guide to practical project management
 
Beginners Guide to TikTok for Search - Rachel Pearson - We are Tilt __ Bright...
Beginners Guide to TikTok for Search - Rachel Pearson - We are Tilt __ Bright...Beginners Guide to TikTok for Search - Rachel Pearson - We are Tilt __ Bright...
Beginners Guide to TikTok for Search - Rachel Pearson - We are Tilt __ Bright...
 
Unlocking the Power of ChatGPT and AI in Testing - A Real-World Look, present...
Unlocking the Power of ChatGPT and AI in Testing - A Real-World Look, present...Unlocking the Power of ChatGPT and AI in Testing - A Real-World Look, present...
Unlocking the Power of ChatGPT and AI in Testing - A Real-World Look, present...
 
12 Ways to Increase Your Influence at Work
12 Ways to Increase Your Influence at Work12 Ways to Increase Your Influence at Work
12 Ways to Increase Your Influence at Work
 
ChatGPT webinar slides
ChatGPT webinar slidesChatGPT webinar slides
ChatGPT webinar slides
 
More than Just Lines on a Map: Best Practices for U.S Bike Routes
More than Just Lines on a Map: Best Practices for U.S Bike RoutesMore than Just Lines on a Map: Best Practices for U.S Bike Routes
More than Just Lines on a Map: Best Practices for U.S Bike Routes
 
Ride the Storm: Navigating Through Unstable Periods / Katerina Rudko (Belka G...
Ride the Storm: Navigating Through Unstable Periods / Katerina Rudko (Belka G...Ride the Storm: Navigating Through Unstable Periods / Katerina Rudko (Belka G...
Ride the Storm: Navigating Through Unstable Periods / Katerina Rudko (Belka G...
 
Barbie - Brand Strategy Presentation
Barbie - Brand Strategy PresentationBarbie - Brand Strategy Presentation
Barbie - Brand Strategy Presentation
 
Good Stuff Happens in 1:1 Meetings: Why you need them and how to do them well
Good Stuff Happens in 1:1 Meetings: Why you need them and how to do them wellGood Stuff Happens in 1:1 Meetings: Why you need them and how to do them well
Good Stuff Happens in 1:1 Meetings: Why you need them and how to do them well
 

3S SINUS 사용자 매뉴얼

  • 2.
  • 3. I. 개발 배경 _ 4 II. 제품 소개 _ 8 III. 사용 방법 _ 14 IV. 임상 케이스 _ 20 V. 제품 사양 _ 32 Contents
  • 4.
  • 5. 개발 배경 I 1. 일반적인 상악동 거상술 2. 3S SINUS 개발 배경
  • 6. 6 I 3S SINUS User Manual I 개발 배경 •일반적으로 상악 구치부에 임플란트를 식립할 때 잔존치조골 높이에 따라 임플란트 식립의 방법이 달라지게 됩니다. ① 잔존치조골 10mm 내외 •통상적인 임플란트 식립 방법입니다. ③ 잔존치조골 2-4mm 내외 •치조골쪽으로 접근하지 못하고 상악동 측벽에 window(lateral approach)를 형성하여, 이곳으로 접근하여 상악동 거상술을 시행한 다음 치조골쪽으로 임플란트 식립합니다. •임플란트 식립을 치조정쪽에서 진행하여, 측벽 및 치조정 2개의 수술 부위가 존재하고 수술 시 상당한 시간이 소요됩니다. 특히, window 하방경계와 임플란트 협면경계 사이에 잔존골이 부족할 경우 임플란트식립 시 치조골 파절가능성이 있습니다. ② 잔존치조골 4-8mm •Summer’s osteotome technique으로 식립합니다. 1. 일반적인 상악동 거상술 개발 배경
  • 7. 개발 배경 I 3S SINUS User Manual I 7 •상악동 거상술 시술 시 기존 수술 기구들은 잔존 치조골이 2-4mm 내외 일 경우, 시술에 어려움이 있습니다. •잔존 치조골이 2-4mm 내외이더라도 안전하게 치조정에서 바로 거상하고 같은 부위에 식립 할 수 있는 기구가 있다면 수술도 간단하며 시술 시간도 짧아져 환자와 시술자 모두에게 도움이 될 수 있습니다. 2. 3S SINUS 개발 배경
  • 8.
  • 9. 제품 소개 1. 3S SINUS의 특징 2. 3S SINUS의 구성 3. 3S SINUS의 차별성 IIII
  • 10. 10 I 3S SINUS User Manual I 제품 소개 잔존골이 2-4mm의 경우에도 window를 열지 않고 crestal로 접근하여 15-20분 만에 시술하는 3S SINUS technique입니다. 1. 3S SINUS의 특징 Simple - 여러 직경의 drill 또는 osteotome을 사용했던 기존 술식과 달리 1개의 diamond bur와 osteotome을 사용함으로 시술이 간단해집니다. Speed - 상악동 측벽을 열지 않고, 기구 교환이 없는 간단한 시술과정, chairside 1:1 low speed를 통해 신속한 치조골 삭제가 가능하여 상악동거상술을 빠르게 진행할 수 있습니다. Safe - Low speed straight(contra angle)용 4.2mm diamond bur를 사용해 천공가능성을 줄여줍니다. - 기존 천공의 가능성이 있는 sinus curette 대신 약 4mm 직경의 osteotome으로 막을 거상합니다. - 이로 인해 시술시간이 짧고, 수술 후 생길 수 있는 환자의 합병증 가능성을 줄여줍니다. 제품 소개
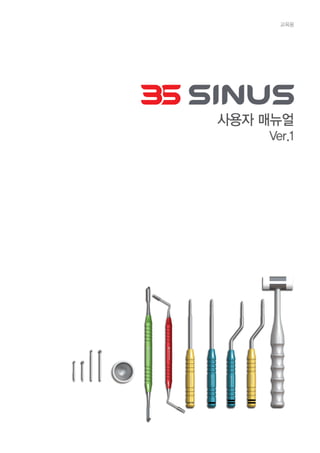
  • 11. 제품 소개 I 3S SINUS User Manual I 11 2. 3S SINUS의 구성 ▶ Diamond Bur •Straight 또는 contra-angle low speed에 연결 •여러 직경의 임플란트 드릴 대체가능 ▶ Osteotome •Bone 삽입 시 사용 •Straight, Curve 2가지 형태 ▶ Bone Packer •Bone 삽입 시, 상악동 내 기구 침범 방지 •Tapered 타입 ▶ Mallet •Bone 삽입 시 osteotome과 함께 사용 •플라스틱 소재로 환자의 충격 완화 시킴 •만족도 높은 그립감 ▶ Bone Support •상악동거상술시 bone graft가 hole에 바로 들어가게 하는 용도 ▶ Bone Well •Bone을 담아내는 용도
  • 12. 1) 기존방법 : Lateral Approach Technique (Window) 12 I 3S SINUS User Manual I 제품 소개 3. 3S SINUS의 차별성 긴 수술 시간 •여러 개의 직경의 드릴을 사용하여 상악동 거상술을 시술하게 되어 많은 시간이 소요됩니다. Lateral Approach Cutter Lateral Approach Drill Curette Drill 2.5 2.8 3.1 3.6 2개의 수술 부위 •window 및 임플란트 hole 등 2개의 수술부위가 존재합니다. 안정성 부족 •상악동막 거상 시 기존의 sinus curette 모양은 단면적이 좁고 뾰족하여 천공가능성이 높습니다. •기존의 실린더(Cylinder)모양의 bone packer는 골이식재를 넣을 때 힘 조절이 어렵습니다. 따라서 상악동 안으로 갑자기 밀려들어갈 가능성이 크므로 천공가능성이 높아집니다. 약한 초기 고정력 •하방 경계가 임플란트 협면 위치와 근접하는 경우 치조골이 파절되어 임플란트 초기 고정이 약해지는 경우가 있습니다.
  • 13. 2) 새로운 방법 : 3S SINUS Technique 제품 소개 I 3S SINUS User Manual I 13 1개의 수술 부위 •잔존골 2-4mm이더라도 window를 형성하지 않아 1개의 임플란트 수술 부위가 존재합니다. 높은 안정성 •1.6mm, 2.7mm 2가지의 직경을 가지는 bone packer는 5.2°의 tapered 형상이므로 골이식술 시 갑자기 상악동 안으로 기구가 들어가는 것을 방지할 수 있어 안전하게 상악동 거상술을 시행할 수 있습니다. 초기 고정력 양호 •임플란트 협면 치조골 파절을 방지하여 초기 고정력 확보가 용이합니다. 2.5 2.8 3.1 3.6 빠른 시술 시간 •Ø4.2mm diamond bur 1개만을 이용한 시술로, 기존 시술에서 이용되는 4-6개 드릴을 대체하는 효과가 있어 시술 시간이 절약됩니다. ※ 4.7mm 직경의 임플란트를 식립 경우, Point drill, 2.2mm, 2.8mm, 3.1mm, 3.6mm, countersink drill 이용함 •Chairside의 1:1 low speed(contra angle, straight)을 사용하여 빠른 시술이 가능합니다.Chairside의 1:1 low speed(contra angle, straight)을 사용하여 빠른 시술이 가능합니다.
  • 14.
  • 15. III 사용 방법 1. 3S SINUS의 사용 방법 2. 3S SINUS의 주의사항 및 임상 Tip
  • 16. 16 I 3S SINUS User Manual I 사용 방법 1. 3S SINUS의 사용 방법 ① 준비 ② 절개 ③ Bone 삭제 3S SINUS의 Ø4.2 diamond bur 1:1 (low speed contra-angle/straight angle)로 상악동막 노출 직전까지 골을 삭제하여 식립 부위 hole 형성합니다. •Ø4.2 Diamond bur 사용 방법 ④ 치조골 정리 (Option) ⑤ 상악동 내 bone 삽입 ⑥ 상악동막 거상 Osteotome와 mallet을 사용해 상악동막 거상 및 상악동 막 내 bone 삽입합니다. •Osteotome •Mallet Bone support와 bone packer를 사용해 상악동 내 bone을 삽입합니다. •Bone Support •Bone Packer 3S SINUS의 Ø3 diamond bur (low speed contra-angle/straight angle)로 양쪽 반원 모양의 잔존 골을 삭제합니다. •Ø3 Diamond bur
  • 17. 사용 방법 I 3S SINUS User Manual I 17 ⑦ Fixture 삽입 ⑧ Screw 체결 ⑨ 봉합
  • 18. 18 I 3S SINUS User Manual I 사용 방법 2. 3S SINUS의 주의 사항 및 임상 Tip 1) Bone 삭제 단계에서의 핸드피스의 선택 •Diamond bur는 contra angle용과 straight angle용이 있으며 시술자가 편리한대로 사용하시면 됩니다. ※ 단, 1:1 핸드피스를 선택하시길 바랍니다. (chairside straight 또는 contra angle low speed 추천) 2) Bone 삽입 단계에서의 bone packer 선택 •Cylinder 모양의 bone Packer는 천공의 가능성을 높일 수 있어 3S Sinus의 tapered 형태의 bone packer 사용을 권장합니다. 3) Bone 삽입 단계에서의 osteotome 선택 •Osteotome은 푹 파인 형태, 가는 형태, 또는 실린더 형태가 아닌 볼록한 tapered 형태를 사용할 것을 권장합니다. (Fig.1) •Osteotome을 깊이 삽입하지 않고 bone graft에 의해 상악동막이 자연스럽게 거상될 수 있도록 합니다. (Fig. 2) Fig.1 Fig.2
  • 19. 사용 방법 I 3S SINUS User Manual I 19 4) 임플란트 식립 위치 •임플란트 식립 시 bone이 얇으므로 초기안정성을 위해 bone level 보다 0.5mm 정도 상방으로 식립하길 권장합니다. Bone Level - 0.5mm Bone Level - 0.5mm 5) 임플란트 식립 ratchet 선택 •과도한 torque값이 전달되지 않도록 ratchet 또는 hand driver 사용하길 보다는 right angle driver의 사용을 권장합니다. 6) Contra angle용 Ø3 diamond bur의 활용 •임플란트 2차 수술에서 cover screw 상방의 bone 제거 시 유용합니다. Cover screw 상방의 bone 삭제 전 Cover screw 상방의 bone 삭제 후
  • 20.
  • 22. 22 I 3S SINUS User Manual I 임상 케이스 Before After Before After Fig1. Radiography before extraction Fig2. Pre-op radiography (1.5 months after extraction) Fig3. Pre-op intraoral photo Fig4. 3S diamond bur drilling Fig5. After drilling Fig6. #16 Ø4.2x10mm, #17 Ø4.7x8mm OneQ-HA implant placement Fig7. Post-op radiography 시술 과정 ✚ Case I 임상 케이스
  • 23. 임상 케이스 I 3S SINUS User Manual I 23 Before After Before After Fig1. Pre-op radiography Fig2. Pre-op intraoral photo Fig3. Drilling with 3S Ø4.2 (Low speed contra- angle) diamond bur Fig4. Filling the bone material using 3S bone supporter and bone packer Fig6. After drilling Fig7. Ø4.2x10mm OneQ-HA implant placement Fig8. SuturingFig5. Pushing bone material into the sinus using 3S osteotome Fig9. Post-op radiography 시술 과정 ✚ Case II
  • 24. 24 I 3S SINUS User Manual I 임상 케이스 Before After Before After ✚ Case III Fig1. Radiography before extraction Fig2. Pre-op radiography (1.5 months after extraction) Fig3. Pre-op intraoral photo Fig4. Incision and flap reflection Fig6. After drilling Fig7. Filling the bone material using 3S bone supporter and bone packer Fig8. Pushing bone material into the sinus using 3S osteotome Fig5. Drilling with 3S Ø4.2 (Low speed straight) diamond bur Fig10. Suturing Fig11. Post-op CT Fig12. Post-op radiographyFig9. Ø4.2x10mm OneQ-HA implant placement 시술 과정
  • 25. 임상 케이스 I 3S SINUS User Manual I 25 Before After Before After Fig1. Radiography before extraction Fig2. Pre-op radiography (1.5 months after extraction) Fig3. Pre-op intraoral photo Fig4. Incision and flap reflection Fig9. Suturing Fig10. Post-op CT Fig11. Post-op radiography Fig6. #16 implant installation Fig7. Cover screw connection Fig8. Resorbable barrier membrane coverage Fig5. #15 implant installation and #16 drilling 시술 과정 ✚ Case IV
  • 26. 26 I 3S SINUS User Manual I 임상 케이스 Before After Before After ✚ Case V Fig1. Radiography before extraction Fig2. Before extraction intraoral photo Fig3. After extraction intraoral photo Fig4. Pre-op radiography (1.5 months after extraction) Fig6. Incision and flap reflection Fig7.#26 implant installation and #27 drilling with diamond bur Fig8. Cover screw connectionFig5. Pre-op intraoral photo Fig10. Post-op radiography Fig11. Healing 2 weeksFig9. Suturing 시술 과정
  • 27. 임상 케이스 I 3S SINUS User Manual I 27 Before After Before After ✚ Case VI Fig1. Pre-op radiography Fig2. Pre-op intraoral photo Fig3. Incision and flap reflection Fig4. Drilling with 3S Ø4.2 (Low speed straight) diamond bur Fig9. Cover screw connection Fig10. Suturing Fig11. Post-op radiography Fig6. Filling the bone material using 3S bone supporter and bone packer Fig7. #26 OneQ-HA implant placement and #27 drilling with 3S diamond bur Fig8. #27 OneQ-HA implant placement Implant Installation Fig5. #26 drilling with 3S diamond bur 시술 과정
  • 28. 28 I 3S SINUS User Manual I 임상 케이스 Before After Before After ✚ Case ⅤII Fig1. Pre-op radiography Fig2. Pre-op intraoral photo Fig3. Incision and flap reflection Fig4. #16 drilling with 3S Ø4.2 (Low speed straight angle) diamond bur Fig6. #16 OneQ-HA implant placement Fig7. #17 drilling with 3S diamond bur Fig8. #17 bone material filled with 3S osteotome Fig5. #16 bone material filled with 3S osteotome Fig10. Cover screw connection Fig9. #17 OneQ-HA implant placement Fig11. Suturing Fig12. Post-op radiography 시술 과정
  • 29. 임상 케이스 I 3S SINUS User Manual I 29 Before After Before After Fig1. Radiography before extraction Fig2. Pre-op radiography (1.5 months after extraction) Fig3. Pre-op intraoral photo Fig4. Incision and flap reflection Fig6. #17 filling the bone material using 3S bone supporter and bone packer Fig7. #17 OneQ-HA implant placement Fig8. Cover screw connectionFig5. #14, 15 drilling with 3S Ø4.2 (Low speed straight) diamond bur Fig10. Resorbable barrier membrane coverage Fig9. Covered bone graft on the cover screw Fig11. Suturing Fig12. Post-op radiography ✚ Case ⅤIII 시술 과정
  • 30. 30 I 3S SINUS User Manual I 임상 케이스 Before After Before After ✚ Case IX Fig1. Pre-op radiography Fig2. #25 pre-op intraoral photo Fig3. #25 incision and flap reflection Fig4. #25 drilling with 3S Ø4.2 (Low speed straight) diamond bur Fig6. #25 after drilling Fig7. #25 filling the bone material using 3S bone supporter and bone packer Fig8. #25 implant installationFig5. #25 after drilling 시술 과정
  • 31. 임상 케이스 I 3S SINUS User Manual I 31 Fig10. #15 pre-op intraoral photo Fig9. #25 suturing Fig11. #15 incision and flap reflection Fig12. #15 drilling with 3S Ø4.2 (Low speed straight) diamond bur Fig18. #15 suturingFig17. #15 implant installation Fig19. Post-op radiography Fig14. #15 drilling with 3S Ø3 (Low speed straight) diamond bur Fig13. #15 drilling Fig15. #15 after drilling Fig16. #15 filling the bone material using 3S bone supporter and bone packer
  • 32.
  • 34. 34 I 3S SINUS User Manual I 제품 사양 사양 CODE Ø4.2 Diamond Bur(Contra-angle) DB-L42 Ø4.2 Diamond Bur(Straight) DB-H42 Ø3 Diamond Bur(Contra-angle) DB-L30 Ø3 Diamond Bur(Straight) DB-H30 Diamond Bur Straight 또는 contra-angle low speed에 연결 Osteotome Bone 삽입 시, 상악동 내 기구 침범 방지 사양 CODE Ø4.3 Osteotome(Straight) R-S4.3 Ø4.3 Osteotome(Curved) R-C4.3 Ø5.0 Osteotome(Straight) R-S5.0 Ø5.0 Osteotome(Curved) R-C5.0 3S SINUS KIT Crestal로 접근하여 시술하는 3S SINUS KIT 사양 CODE 3S SINUS KIT MSTSGD0161 제품 사양
  • 35. 제품 사양 I 3S SINUS User Manual I 35 Bone Packer 상악동거상술시 bone graft가 hole에 바로 들어가게 하는 용도 사양 CODE Bone Packer BP-4350 사양 CODE Mallet MT-03 Mallet Bone 삽입 시 사용 사양 CODE Bone support BC-4060 Bone Support Bone 삽입 시 osteotome과 함께 사용 Bone Well Bone을 담아내는 용도 사양 CODE Bone Well BW-01
  • 36. D-C-3SMG-V1-201611-KOR 본 지에 게재된 모든 정보는 사전 고지 없이 변경될 수 있습니다. Copyright ⓒ DENTIS Co., LTD. 1899-2804고/ 객/ 센/ 터 www.dentisimplant.co.kr