SlideShare a Scribd company logo
1 of 31
Download to read offline
www.eacademy.lk www.eacademy.lk
1 | P a g e
www.eacademy.lk
Microsoft Office Professional 2010 Course
Microsoft Office 2010 is a comprehensive system of programs, servers, services, and solutions, including a
dozen desktop productivity programs that you can install on your computer, and four new online program
versions. To meet the varying needs of individuals and organizations, Microsoft offers five different Office
2010 software suites, each consisting of a different subset of programs. The following table identifies the
programs available in each of the software suites. To download MS Office Professional 2010 please visit our
partner website www.files2pc.com .
Office Standard and Office Professional Plus are available only to volume licensing subscribers. The Office
Web Apps, which are available with Office Standard and Office Professional Plus, and available to the general
public through Windows Live, are online versions of Word, Excel, PowerPoint, and OneNote. You can store
documents online and work with them from within any Web browser window by using the Office Web Apps.
These are the programs which contain in MS Office Professional 2010.
● Microsoft Word 2010- A word-processing program with which you can quickly and efficiently author and
format documents.
● Microsoft Excel 2010- A spreadsheet program with which you can analyze, communicate, and manage
information.
● Microsoft PowerPoint 2010- A program with which you can develop and present dynamic, professional-
looking slide presentations.
● Microsoft OneNote 2010- A digital notebook program with which you can collect, organize, and quickly
locate many types of electronic information.
● Microsoft Outlook 2010- A personal information management program with which you can manage e-mail,
contacts, meetings, tasks, and other communications.
● Microsoft Access 2010- A database program with which you can collect information and output information
for reuse in a variety of formats.
www.eacademy.lk www.eacademy.lk
2 | P a g e
www.eacademy.lk
● Microsoft Publisher 2010- A desktop publishing program with which you can lay out newsletters, cards,
calendars, and other publications.
To download MS Office Professional 2010 please visit our partner website www.files2pc.com
Certification
Desktop computing proficiency is increasingly important in today’s business world. When screening, hiring,
and training employees, more employers are relying on the objectivity and consistency of technology
certification to ensure the competence of their workforce.
As an employee or job seeker, you can use technology certification to prove that you already have the skills you
need to succeed. A Microsoft Office Specialist (MOS) is an individual who has demonstrated worldwide skill
standards through a certification exam in one or more of the Office 2010 programs, including Microsoft Access,
Excel, Outlook, PowerPoint, or Word. To learn more about the MOS program, visit the Microsoft Office
Specialist Certification page at go.microsoft.com/fwlink/?LinkId=193884.
Explore Office 2010
Microsoft Office 2010 programs have a common user interface—the way the program looks and the way you
interact with it—which means that skills and techniques you learn in one program are also useful in the others.
Certain information that you provide in one Office 2010 program is made available to other Office 2010
programs so that you don’t have to provide it individually in each program. Other settings are specific to the
program you’re working in. The basic Office 2010 user interface includes a standard method of giving
commands by using tools gathered on a dynamic toolbar, called the ribbon. Commands are represented by
buttons, by lists or galleries from which you choose settings, or by fields in task panes and dialog boxes in
which you specify settings. You can customize some of the content that is available from the ribbon by hiding
sets of commands (tabs) or by creating custom tabs. You can also collect frequently used buttons, lists, and
galleries on a separate toolbar, the Quick Access Toolbar, so that they are available to you from anywhere in the
program.
Each program has standard settings based on the way that most people work with the program. However, you
can customize the settings to meet your specific needs and to fit the way that you work.
In this chapter, you’ll first familiarize yourself with the standard Office 2010 program working environment.
Then you’ll customize the working environment, ribbon, and Quick Access Toolbar in Microsoft Word 2010,
using techniques that are common to working in any Office 2010 program.
Working in the Program Environment
The most common way to start any Office 2010 program is from the Start menu, displayed when you click the
Start button at the left end of the Windows Taskbar. On the Start menu, click All Programs, click the Microsoft
Office folder, and then click the program you want to start.
When you start Microsoft Word, Excel, or PowerPoint without opening a specific file, the program window
appears, displaying a new blank document, workbook, or presentation.
When you start Microsoft OneNote without opening a specific notebook, the program window displays the
notebook you opened most recently.
www.eacademy.lk www.eacademy.lk
3 | P a g e
www.eacademy.lk
A typical Office 2010 program window contains the following elements:
● The title bar displays the name of the active document. At the left end of the title bar is the program icon,
which you click to display commands to move, size, and close the program window. Three buttons at the right
end of the title bar serve the same functions in all Windows programs: You can temporarily hide the program
window by clicking the Minimize button, adjust the size of the window by clicking the Restore
Down/Maximize button, and close the active document or exit the program by clicking the Close button.
● By default, the Quick Access Toolbar appears to the right of the program icon at the left end of the title bar.
Each program has a default set of Quick Access Toolbar buttons; most commonly, the default Quick Access
Toolbar displays the Save, Undo, and Redo buttons. You can change the location of the Quick Access Toolbar
and customize it to include any command to which you want to have easy access.
● Below the title bar is the ribbon. All the commands for working with file content are available from this
central location so that you can work efficiently with the program.
www.eacademy.lk www.eacademy.lk
4 | P a g e
www.eacademy.lk
● Across the top of the ribbon is a set of tabs. Clicking a tab displays an associated set of commands.
Tip: You might find it efficient to add all the commands you use frequently to the Quick Access Toolbar and
display it below the ribbon, directly above the workspace. For information, see “Customizing the Quick Access
Toolbar” later in this course.
● Commands related to managing the program and files (rather than file content) are gathered together in the
Backstage view, which you display by clicking the colored File tab located at the left end of the ribbon.
Commands available in the Backstage view are organized on named pages, which you display by clicking the
page tabs located in the left pane.
● Commands related to working with file content are represented as buttons on the remaining tabs. The Home
tab is active by default.
Tip: Don’t be alarmed if your ribbon has tabs not shown in our screens. You might have installed programs that
add their own tabs to the ribbon.
● On each tab, buttons are organized into named groups. Depending on your screen resolution and the size of
the program window, the commands in a group might be displayed as labeled buttons, as unlabeled icons, or as
one or more large buttons that you click to display the commands within the group. You might want to
experiment with the screen resolution and width of the program window to understand their effect on the
appearance of tab content.
● If a button label isn’t visible, you can display the command, a description of its function, and its keyboard
shortcut (if it has one) in a ScreenTip by pointing to the button.
Tip: You can control the display of ScreenTips and of feature descriptions in ScreenTips. Simply display the
Backstage view, click Options to open the program’s Options dialog box, and click the ScreenTip setting you
want in the User Interface Options area of the General page. For more information, see “Changing Program
Settings” later in this course.
www.eacademy.lk www.eacademy.lk
5 | P a g e
www.eacademy.lk
● Related but less common commands might be available in a dialog box or task pane, which you display by
clicking the dialog box launcher located in the lower right corner of the group.
Tip: You might find that less commonly used commands from earlier versions of a program are not available
from the ribbon. However, these commands are still available. You can make missing commands accessible by
adding them to the Quick Access Toolbar. For more information, see “Customizing the Quick Access Toolbar”
later in this chapter.
● Some buttons include an integrated or separate arrow. To determine whether a button and arrow are
integrated, point to the button or arrow to display its border. If a button and its arrow are integrated within one
border, clicking the button will display options for refining the action of the button. If the button and arrow have
separate borders, clicking the button will carry out the default action indicated by the button’s current icon. You
can change the default action of the button by clicking the arrow and then clicking the action you want.
The arrow of the Change Styles button is integrated, and the arrow of the Paste button is separate.
● Above the right end of the ribbon is the Minimize The Ribbon button. Clicking this button hides the
commands but leaves the tab names visible. You can then click any tab name to temporarily display its
commands. Clicking anywhere other than the ribbon hides the commands again. When the full ribbon is
temporarily visible, you can click the button at its right end, shaped like a pushpin, to make the display
permanent. When the full ribbon is hidden, you can click the Expand The Ribbon button to redisplay it.
Keyboard Shortcut Press Ctrl+F1 to minimize or expand the ribbon.
● Clicking the Help button at the right end of the ribbon displays the program-specific Help window in which
you can use standard techniques to find information.
Keyboard Shortcut Press F1 to display the Help window for the active program.
www.eacademy.lk www.eacademy.lk
6 | P a g e
www.eacademy.lk
● Across the bottom of the program window, the status bar displays information about the current file and
provides access to certain program functions. You can control the contents of the status bar by right-clicking it
to display the Customize Status Bar menu, on which you can click any item to display or hide it.
● At the right end of the status bar in the Word, Excel, and PowerPoint program windows are the View
Shortcuts toolbar, the Zoom button, and the Zoom slider. These tools provide you with convenient methods for
adjusting the display of file content.
You can change the file content view by clicking buttons on the View Shortcuts toolbar and change the
magnification by clicking the Zoom button or adjusting the Zoom slider.
The goal of all these features of the program environment is to make working in the program as intuitive as
possible. Commands for tasks you perform often are readily available, and even those you might use
infrequently are easy to find.
For example, when a formatting option has several choices available, they are often displayed in a gallery of
thumbnails. These thumbnails display visual representations of each choice. If you point to a thumbnail in a
gallery, the Live Preview feature shows you what that choice will look like if you apply it to the selected
content.
www.eacademy.lk www.eacademy.lk
7 | P a g e
www.eacademy.lk
Start & Explore (Tabs and Groups)
In this exercise, you’ll start Word and explore the tabs and groups on the ribbon. Along the way, you’ll work
with galleries and the Live Preview feature.
1. On the Start menu, click All Programs, click Microsoft Office, and then click Microsoft Word 2010.
The Word program window opens in Print Layout view, displaying a blank document. On the ribbon, the Home
tab is active. Buttons related to working with document content are organized on this tab in five groups:
Clipboard, Font, Paragraph, Styles, and Editing.
2. Point to each button on the Home tab. Word displays information about the button in a ScreenTip.
The ScreenTip for the Format Painter button displays the button’s name, keyboard shortcut, and function.
3. Click the Insert tab, and then explore its buttons.
www.eacademy.lk www.eacademy.lk
8 | P a g e
www.eacademy.lk
Buttons related to all the items you can insert into the document are organized on this tab in seven groups:
Pages, Tables, Illustrations, Links, Header & Footer, Text, and Symbols.
4. Click the Page Layout tab, and then explore its buttons. Buttons related to the appearance of the document
are organized on this tab in five groups: Themes, Page Setup, Page Background, Paragraph, and Arrange.
5. In the Page Setup group, display the ScreenTip for the Margins button. The ScreenTip tells you how you can
adjust the margins.
6. In the lower-right corner of the Page Setup group, click the Page Setup dialog box launcher.
The Page Setup dialog box opens.
7. Click Cancel to close the dialog box.
8. In the Themes group, click the Themes button. The group expands to display a gallery of the available
themes.
The theme controls the color scheme, fonts, and special effects applied to file content.
www.eacademy.lk www.eacademy.lk
9 | P a g e
www.eacademy.lk
9. Press the Esc key to close the gallery without making a selection.
10. In the Page Background group, click the Page Color button, and then in the top row of the Theme Colors
palette, point to each box in turn.
The blank document page shows a live preview of what it will look like if you click the color you are pointing
to. You can see the effect of the selection without actually applying it.
11. Press Esc to close the palette without making a selection.
12. Click the References tab, and then explore its buttons. Buttons related to items you can add to documents
are organized on this tab in six groups: Table Of Contents, Footnotes, Citations & Bibliography, Captions,
Index, and Table Of Authorities. You will usually add these items to longer documents, such as reports.
13. Click the Mailings tab, and then explore its buttons. Buttons related to creating mass mailings are organized
on this tab in five groups: Create, Start Mail Merge, Write & Insert Fields, Preview Results, and Finish.
www.eacademy.lk www.eacademy.lk
10 | P a g e
www.eacademy.lk
14. Click the Review tab, and then explore its buttons. Buttons related to proofreading documents, working in
other languages, adding comments, tracking and resolving document changes, and protecting documents are
organized on this tab in seven groups: Proofing, Language, Comments, Tracking, Changes, Compare, and
Protect.
15. Click the View tab, and then explore its buttons. Buttons related to changing the view and other aspects of
the display are organized on this tab in five groups: Document Views, Show, Zoom, Window, and Macros.
16. On the ribbon, click the File tab, which is color-coded to match the logo color of the Word program.
The Backstage view of Word 2010 is displayed. Commands related to managing documents (such as creating,
saving, and printing) are available in this view.
17. If the Info page is not already displayed in the Backstage view, click Info in the left pane. On the Info page
of the Backstage view, the middle pane provides options to control who can work on the document, to remove
properties (associated information), and to access versions of the document automatically saved by Word. The
right pane displays the associated properties, as well as dates of modification, creation, and printing, and the
names of people who created and edited the document.
The Info page displays and provides commands for changing the information attached to a document.
www.eacademy.lk www.eacademy.lk
11 | P a g e
www.eacademy.lk
18. In the left pane, click Recent. The Recent page displays the names of the documents you recently worked
on. By default a maximum of 20 names is displayed. You can change this number on the Advanced page of the
Word Options dialog box.
19. In the left pane, click New. The New page displays all the templates on which you can base a new
document.
20. In the left pane, click Print. The Print page displays all print-related commands and provides a pane for
previewing the current document as it will appear when printed.
21. In the left pane, click Share. The Share page displays all the commands related to making the current
document available to other people.
22. In the left pane, click Help. The Help page displays all the ways you can get help and support for Word.
The right pane of the Help page displays your Office edition, its version number, and your product ID, which
you will need if you contact Microsoft Product Support.
23. On the Help page, under Tools for Working With Office, click Options. The Word Options dialog box
opens. In this dialog box are program settings that control the way the program looks and performs.
24. At the bottom of the Word Options dialog box, click Cancel. You return to the blank document with the
Home tab active on the ribbon.
Changing Program Settings
Earlier in this chapter, we mentioned that you can change settings in the Options dialog box for each program to
customize the program environment in various ways. After you work with a program for a while, you might
want to refine more settings to tailor the program to the way you work. Knowing your way around the Options
dialog box makes the customizing process more efficient.
In this exercise, you’ll open the Word Options dialog box and explore several of the available pages. You don’t
need any practice files to complete this exercise. Open a blank document if necessary, and then follow the steps.
www.eacademy.lk www.eacademy.lk
12 | P a g e
www.eacademy.lk
1. On the Home tab, in the Font group, point to the Bold button. Word displays a ScreenTip that includes the
button name, its keyboard shortcut, and a description of its purpose.
2. Display the Backstage view, and click Options. The Word Options dialog box opens, displaying the General
page.
3. Under User Interface options, display the Color scheme list, and click Black.
4. Display the ScreenTip style list, and click Don’t show feature descriptions in ScreenTips.
5. Under Personalize your copy of Microsoft Office, verify that the User Name and Initials are correct, or
change them to the way you want them to appear.
6. Click OK to close the Word Options dialog box. The program window elements are now black and shades of
gray.
7. In the Font group, point to the Bold button. The ScreenTip now includes only the button name and its
keyboard shortcut.
8. Open the Word Options dialog box, and in the left pane, click Display. On this page, you can adjust how
documents look on the screen and when printed.
www.eacademy.lk www.eacademy.lk
13 | P a g e
www.eacademy.lk
9. In the left pane, click Proofing. This page provides options for adjusting the AutoCorrect settings and for
refining the spelling-checking and grammar-checking processes.
10. Display the Save page. On this page, you can change the default document format; the location and save
frequency of the Auto Recover file (a backup file created by Word while you’re working in the file); the default
location to which Word saves files you create; and the default location for files you check out from document
management servers (such as Microsoft SharePoint) and drafts of those files saved while you are working
offline.
The Save page also has options for specifying whether you want the fonts used within the current document to
be embedded in the document, in the event that someone who opens the document doesn’t have those fonts on
his or her computer.
www.eacademy.lk www.eacademy.lk
14 | P a g e
www.eacademy.lk
11. Under Save documents, display the Save files in this format list. Notice the many formats in which you can
save files. One of these is the Word 97‑2003 Document format that creates .doc files compatible with earlier
versions of Word. If you upgraded to Word 2010 but your colleagues are still working in an earlier version of
the program, you might want to select this option so that they will be able to view and work with any document
you create.
12. Click away from the list to close it, and then display the Language page. If you create documents for
international audiences, you can make additional editing languages available on this page. You can also specify
the display, Help, and ScreenTip languages.
13. Display the Advanced page.
This page includes options related to editing document content; displaying documents on-screen; printing,
saving, and sharing documents; and a variety of other options. Although these options are labeled Advanced,
they are the ones you’re most likely to want to adjust to suit the way you work.
www.eacademy.lk www.eacademy.lk
15 | P a g e
www.eacademy.lk
14. Take a few minutes to explore all the options on this page. In the General area at the bottom of the page are
two buttons:
 File Locations: You click this button to change the default locations of various types of files associated
with Word and its documents.
 Web Options: You click this button to adjust settings for converting a document to a Web page.
15. Skipping over the Customize Ribbon and Quick Access Toolbar pages, which we discuss in later topics in
this chapter, click Add-Ins. This page displays all the active and inactive add-ins and enables you to add and
remove them. (Add-ins are utility programs that provide additional functionality to an Office program.)
16. Display the Trust Center page. This page provides links to information about privacy and security. It also
provides access to the Trust Center settings that control the actions Word takes in response to documents that
are provided by certain people or companies, that are saved in certain locations, or that contain potentially
harmful elements such as ActiveX controls or macros.
www.eacademy.lk www.eacademy.lk
16 | P a g e
www.eacademy.lk
17. Under Microsoft Office Word Trust Center, click Trust Center Settings, and then in the left pane of the
Trust Center dialog box, click Trusted Locations. On this page, you can specify the locations from which Word
will not block content.
Close the Trust Center dialog box. Reverse any changes you don’t want to keep before moving on. Then close
the Word Options dialog box.
Customizing the Ribbon
The ribbon was designed to make all the commonly used commands visible so that people can more easily
discover the full potential of an Office 2010 program. But many people use an Office program to perform the
same set of tasks all the time, and for them, seeing buttons (or even entire groups of buttons) that they never use
is just another form of clutter.
Would you prefer to see fewer commands than appear on the ribbon by default? Or would you prefer to see
more specialized groups of commands? Well, you can. From the Customize Ribbon page of an Office 2010
program’s Options dialog box, you can control the tabs that appear on the ribbon, and the groups that appear on
the tabs.
www.eacademy.lk www.eacademy.lk
17 | P a g e
www.eacademy.lk
On this page, you can customize the ribbon in the following ways:
● If you rarely use a tab, you can turn it off.
● If you use the commands in only a few groups on each tab, you can remove the groups you don’t use. (The
group is not removed from the program, just from its tab.)
● You can move a predefined group by removing it from one tab and then adding it to another.
● You can duplicate a predefined group by adding it to another tab.
● You can create a custom group on any tab and then add commands to it. (You cannot add commands to a
predefined group.)
● You can create a custom tab on the ribbon. For example, you might want to do this if you use only a few
commands from each tab and you find it inefficient to flip between them.
Don’t be afraid to experiment with the ribbon to come up with the configuration that best suits the way you
work. If at any point you find that your new ribbon is harder to work with rather than easier, you can always
reset everything back to the default configuration.
Tip: If you upgraded from Office 2007 or an earlier version of Office, you might find that some commands
present in the earlier version are not available on the ribbon. A few old features have been abandoned, but
others that people used only rarely have simply not been exposed in the user interface. If you want to use one of
these hidden features, you can make it a part of your program environment by adding it to the ribbon or to the
Quick Access Toolbar. You can find a list of all the commands that do not appear on the ribbon but are still
available in a program by displaying the Customize Ribbon page of the program’s Options dialog box and then
clicking Commands Not In The Ribbon in the Choose Commands From list.
Start & Explore (Customizing the Ribbon)
In this exercise, you’ll customize the ribbon in the Word program window by using techniques that are common
to all Office 2010 programs. You’ll turn off tabs, remove groups, create a custom group, and add a command to
the group. Then you’ll create a tab and move groups of buttons to it. Finally, you’ll reset the ribbon to its default
state.
1. Open the Word Options dialog box, and then click Customize Ribbon. The Customize Ribbon page is
displayed.
2. In the list on the right, clear the check boxes of the Insert, Page Layout, References, Mailings, and Review
tabs. Then click OK. The ribbon now displays only the File, Home, and View tabs.
The only tab you can’t customize is the File tab, which is your link to the Backstage view.
www.eacademy.lk www.eacademy.lk
18 | P a g e
www.eacademy.lk
3. Redisplay the Customize Ribbon page of the Word Options dialog box, and in the right pane, select the Page
Layout check box. Then click the plus sign to display the groups on this tab.
4. Above the left pane, click Choose commands from and then, in the list, click Main Tabs. In the Main Tabs
list, click the plus sign adjacent to Page Layout to display the groups that are predefined for this tab.
5. In the right pane, click the Paragraph group, and then click Remove. The group is removed from the Page
Layout tab on the ribbon (the list on the right) but is still available in the list on the left. You can add it back to
the Page Layout tab or add it to a different tab at any time.
6. In the right pane, click the plus sign adjacent to Home to display its groups, and then click the word Home.
7. Below the right pane, click New Group. When the New Group (Custom) group is added to the bottom of the
Home group list, click Rename, type Final in the Display name box, and click OK. Then click the Move Up
button until the Final group is at the top of the list.
Because of its location in the list, the new group will appear at the left end of the Home tab.
8. In the Choose commands from list, click File Tab. The available commands list changes to include only the
commands that are available in the Backstage view, which you display by clicking the File tab.
9. In the available commands list, click Inspect Document, and click Add. Then repeat this step to add Mark as
Final. The two commands are added to the custom group.
www.eacademy.lk www.eacademy.lk
19 | P a g e
www.eacademy.lk
10. In the right pane, remove the Font, Paragraph, and Styles groups from the Home tab, and remove the Page
Background group from the Page Layout tab.
11. Click the word Home, and then below the list, click New Tab. A new tab is added to the right pane and is
selected for display on the ribbon. It has automatically been given one custom group.
12. Click Remove to remove the custom group.
13. Click New Tab (Custom), and then click Rename. In the Rename dialog box, type Formatting in the
Display name box, and click OK.
14. Display Main Tabs in the list on the left, and then expand the Home and Page Layout tabs.
15. With the Formatting tab selected in the right pane, add the Font, Paragraph, and Styles groups from Home
in the left pane, and then add Page Background from Page Layout. The right pane shows the new configuration
of the Home, Formatting, and Page Layout tabs.
16. In the Word Options dialog box, click OK. The Home tab displays the new Final group.
17. Click the Formatting tab. The formatting commands are now collected on the Formatting tab.
18. Display the Customize Ribbon page of the Word Options dialog box. In the lower right corner, click Reset,
and then click Reset all customizations. Then in the message box asking you to confirm that you want to delete
all ribbon and Quick Access Toolbar customizations, click Yes.
www.eacademy.lk www.eacademy.lk
20 | P a g e
www.eacademy.lk
19. Click OK to close the Word Options dialog box. The default ribbon configuration is restored.
Close the open document.
Customizing the Quick Access Toolbar
If you regularly use a few buttons that are scattered on various tabs of the ribbon and you don’t want to switch
between tabs to access the buttons or crowd your ribbon with a custom tab, you might want to add these
frequently used buttons to the Quick Access Toolbar. They are then always visible in the upper-left corner of
the program window.
Clicking Quick Access Toolbar in the left pane of a program’s Options dialog box displays the page where you
specify which commands you want to appear on the toolbar.
On this page, you can customize the ribbon in the following ways:
● You can define a custom Quick Access Toolbar for the program, or you can define a custom Quick Access
Toolbar for a specific file.
● You can add any command from any group of any tab, including contextual tabs, to the toolbar.
● You can display a separator between different types of buttons.
● You can move buttons around on the toolbar until they are in the order you want.
● You can reset everything back to the default Quick Access Toolbar configuration.
If you never use more than a few buttons, you can add those buttons to the Quick Access Toolbar and then hide
the ribbon by double-clicking the active tab or by clicking the Minimize The Ribbon button. Only the Quick
www.eacademy.lk www.eacademy.lk
21 | P a g e
www.eacademy.lk
Access Toolbar and tab names remain visible. You can temporarily redisplay the ribbon by clicking the tab you
want to view.
You can permanently redisplay the ribbon by double-clicking any tab or by clicking the Expand The Ribbon
button.
As you add buttons to the Quick Access Toolbar, it expands to accommodate them. If you add many buttons, it
might become difficult to view the text in the title bar, or not all the buttons on the Quick Access Toolbar might
be visible, defeating the purpose of adding them. To resolve this problem, you can move the Quick Access
Toolbar below the ribbon by clicking the Customize Quick Access Toolbar button and then clicking Show
Below The Ribbon.
Start & Explore (Quick Access Toolbar)
In this exercise, you’ll add a couple buttons to the Quick Access Toolbar for all documents, and then you’ll test
the buttons.
1. Open the Word Options dialog box, and then click Quick Access Toolbar. The Customize The Quick Access
Toolbar page displays a list of available commands on the left side, and a list of the currently displayed
commands on the right side.
2. At the top of the available commands list on the left, double-click Separator.
3. Scroll down the available commands list, click the Quick Print command, and then click Add.
4. Repeat step 3 to add the Text Highlight Color command. The Text Highlight Color command is added to the
list of commands that will appear on the Quick Access Toolbar.
5. Click OK to close the Word Options dialog box. The Quick Access Toolbar now includes the default Save,
Undo, and Repeat buttons and the custom Quick Print and Text Highlight Color buttons, separated by a line.
To print a document with the default settings, you no longer have to click the File tab to display the Backstage
view. Click Print in the left pane, and then click the Print button.
6. If you want to test printing from the Quick Access Toolbar, ensure that your printer is turned on, and then on
the Quick Access Toolbar, click the Quick Print button. Now let’s see how easy it is to highlight or remove
highlighting from text when you are working primarily with the commands on a tab other than the Home tab.
7. Click the Review tab. Then select the first highlighted paragraph, Proof of notice of meeting.
www.eacademy.lk www.eacademy.lk
22 | P a g e
www.eacademy.lk
8. On the Quick Access Toolbar, click the Text Highlight Color arrow, and then click No Color. The yellow
highlight is removed from the selection. The No Color option becomes the default for the Text Highlight Color
button.
9. Select the next highlighted paragraph, and on the Quick Access Toolbar, click the Text Highlight Color
button. The yellow highlight is removed from the selection.
10. Display the Quick Access Toolbar page of the Word Options dialog box, click Reset, and then click Reset
only Quick Access Toolbar.
11. In the Reset Customizations message box, click Yes to return the Quick Access Toolbar to its default
contents. Then click OK to close the Word Options dialog box.
Close the open document.
Work with Files
When working in Microsoft Word, Excel, or PowerPoint, you save content in individual files. In each program,
you can save files as different types depending on each file’s purpose. The standard files are Word documents,
Excel workbooks, and PowerPoint presentations.
Regardless of the program or file type, you use similar techniques for creating, saving, moving around in, and
viewing files in each program.
When working in OneNote, content is saved in individual files representing pages that are part of a notebook
structure. OneNote creates the files for you and saves your changes as you work, so you don’t need to.
However, you use some of the same techniques for moving around in and viewing files as you do in other
Microsoft Office 2010 programs.
In this chapter, you’ll practice working with files in Word, using techniques that are common to working in files
created in Word, Excel, or PowerPoint. First you’ll create and save a document and then save an existing
document in a different location. Then you’ll open an existing document, move around in it, and close it.
Finally, you’ll explore various ways of viewing file content.
Creating and Saving Files
When you start Word, Excel, or PowerPoint without opening a specific file, the program displays a blank
document, workbook, or presentation in which you can start entering content. A blinking cursor (in the form of
a vertical line) in the text pane or worksheet cell shows where the next character you type will appear.
When an Office 2010 program is running, you can create a new file from the New page of the Backstage view,
which you display by clicking the File tab on the ribbon.
Tip: More documents may be added to those available from Microsoft Office Online, so the templates available
on your New page might be different from those shown here.
The documents listed on the New page are based on templates, which are sets of formats that have been saved
in such a way that you can use them as a pattern for new documents.
In Word 2010 the icons in the top section of the Available Templates gallery are:
www.eacademy.lk www.eacademy.lk
23 | P a g e
www.eacademy.lk
 Blank document- Clicking this icon opens a document formatted with the standard. settings. The
document contains no content.
 Blog post- Clicking this icon opens a document containing the basic elements of a blog post in a
document window. The document window includes additional functionality enabling you to easily post
directly to an existing blog site from within Word.
 Recent templates- Clicking this icon displays a page on which you can select from the most recent
templates you have used.
 Sample templates- Clicking this icon displays a page on which you can select from sample documents
that come with Word.
 My templates- Clicking this icon displays a dialog box in which you can select a template you have
created as the basis for a new document.
 New from existing- Clicking this icon displays a dialog box in which you can select an existing
document as the basis for a new document.
The icons in the Office.com Templates section represent categories of common types of files for the program
you’re working in. Depending on how many templates are available in a category, the icon might be a folder.
Regardless, clicking one of these icons displays more templates that are available for download from the
Microsoft Office Online Web site. You can also search for specific file types by entering the type you want in
the Search Office.com for Templates box and clicking the Start Searching button.
When you find a template you might want to use as the basis for your new file, clicking its icon displays a
preview of that file in the right pane. You can then click the Create button in the right pane to create the file.
Each file you create from the New page of the Backstage view is temporary until you save it. To save a
document, workbook, or presentation for the first time, you click the Save button on the Quick Access Toolbar
or click Save in the Backstage view. Either action displays the Save As dialog box, where you can assign a
name and storage location to the file.
www.eacademy.lk www.eacademy.lk
24 | P a g e
www.eacademy.lk
If you want to save the file in a folder other than the one shown in the Address bar at the top of the dialog box,
you can click the arrow or chevrons in the Address bar or click locations in the Navigation pane on the left to
display the folder you want. If you want to create a folder in which to store the file, you can click the New
Folder button on the toolbar.
If you want to save a file in a format other than the one shown in the Save As Type box, click the Save As Type
arrow and then, in the Save As Type list, click the file format you want.
After you save a file the first time, you can save subsequent changes by clicking the Save button. The new
version of the file then overwrites the previous version. Keyboard Shortcut Press Ctrl+S to save the current
document.
If you want to keep both the new version and the previous version, click Save As in the Backstage view, and
then save the new version with a different name in the same location or with the same name in a different
location. (You can’t store two files of the same type with the same name in the same folder.)
File Compatibility with Earlier Versions of Office Programs
The Office 2010 programs use file formats based on a programming language called extended markup
language, or more commonly, XML. These file formats, called the Microsoft Office Open XML Formats, were
introduced with Microsoft Office 2007.
The Office Open XML formats provide the following benefits:
● File size is smaller because files are compressed when saved, decreasing the amount of disk space needed to
store the file, and the amount of bandwidth needed to send files in e-mail, over a network, or across the Internet.
● Recovering at least some of the content of damaged files is possible because XML files can be opened in a
text program such as Notepad.
● Security is greater because the standard file formats cannot contain macros, and personal data can be
detected and removed from the file. (Word 2010 and Word 2007 provide a different file format—.docm—for
documents that contain macros.)
www.eacademy.lk www.eacademy.lk
25 | P a g e
www.eacademy.lk
Each Office 2010 program offers a selection of file formats intended to provide specific benefits. The file
formats and file name extensions for Word 2010 documents include the following:
 Word Document (.docx)
 Word Macro-Enabled Document (.docm)
 Word Template (.dotx)
 Word Macro-Enabled Template (.dotm)
 Word XML Document (.xml)
The file formats and file name extensions for Excel 2010 documents include the following:
 Excel Workbook (.xlsx)
 Excel Macro-Enabled Workbook (.xlsm)
 Excel Binary Workbook (.xlsb)
 Excel Template (.xltx)
 Excel Macro-Enabled Template (.xltm)
 Excel Add-In (.xlam)
The file formats and file name extensions for PowerPoint 2010 documents include the following:
 PowerPoint Presentation (.pptx)
 PowerPoint Macro-Enabled Presentation (.pptm)
 PowerPoint Template (.potx)
 PowerPoint Macro-Enabled Template (.potm)
 PowerPoint Show (.ppsx)
 PowerPoint Macro-Enabled Show (.ppsm)
 PowerPoint Add-In (.ppam)
 PowerPoint XML Presentation (.xml)
 PowerPoint Picture Presentation (.pptx)
Other non–program specific file types, such as text files, Web pages, PDF files, and XPS files, are available
from the Save As dialog box of each program.
You can open a file created with Office 2003, Office XP, Office 2000, or Office 97 in an Office 2010 program,
but new features will not be available. The file name appears in the title bar with [Compatibility Mode] to its
right. You can work in Compatibility mode, or you can convert the document to the current file format by
displaying the Info page of the Backstage view and clicking the Convert button in the Compatibility Mode
section. You can also click Save As in the Backstage view to save a copy of the file in the current format.
If you work with people who are using Office 2003, Office XP, Office 2000, or Office 97, you can save your
documents in a format that they will be able to open and use by choosing the corresponding 97-2003 file format
in the Save As Type list, or they can download the Microsoft Office Compatibility Pack for Word, Excel, and
PowerPoint File Formats from the Microsoft Download Center (located at download.microsoft.com) so that
they can open current Office files in their version of Office.
Opening, Moving Around in, and Closing Files
If a program isn’t already running, you can start the program and simultaneously open an existing file by
double-clicking the file in Windows Explorer. While a program is running, you can open an existing document
www.eacademy.lk www.eacademy.lk
26 | P a g e
www.eacademy.lk
from the Backstage view. If you have recently worked on the document you want to open, you can display the
Recent page and simply click the document you want in the list. If the document is not available on the Recent
page, clicking Open in the left pane displays the Open dialog box.
By default, the Open dialog box displays your Documents library, with a combined view of your My
Documents folder and the Public Documents folder. If you display the dialog box again in the same Word
session, it displays the contents of the folder from which you last opened a file. To display the contents of a
different folder, you can use the standard Windows techniques described in ―Creating and Saving Files‖ earlier
in this chapter.
After you locate the document you want to work with, you can open it by clicking its file name and then
clicking Open in the lower-right corner of the dialog box, or by simply double-clicking the file name.
If you open a document that is too long to fit entirely on the screen, you can bring off-screen content into view
without changing the location of the cursor by using the vertical scroll bar in the following ways:
 Click the scroll arrows to move up or down by one line.
 Click above or below the scroll box to move up or down by the height of one window.
 Drag the scroll box on the scroll bar to display the part of the document corresponding to the location of
the scroll box. For example, dragging the scroll box to the middle of the scroll bar displays the middle of
the document.
If the document is too wide to fit on the screen, Word displays a horizontal scroll bar that you can use in similar
ways to move from side to side.
You can also move around in a document by moving the cursor. To place the cursor in a specific location, you
simply click there. To move the cursor one page backward or forward, you click the Previous Page and Next
Page buttons below the vertical scroll bar.
You can also press a keyboard key to move the cursor. For example, pressing the Home key moves the cursor to
the left end of a line.
The following table lists ways to use your keyboard to move the cursor.
www.eacademy.lk www.eacademy.lk
27 | P a g e
www.eacademy.lk
In a long document, you might want to move quickly among elements of a certain type; for example, from
graphic to graphic. Clicking the Select Browse Object button at the bottom of the vertical scroll bar displays a
gallery of browsing options, such as Browse By Page and Browse By Graphic. (These options are also available
on the Go To tab of the Find And Replace dialog box, which you display by clicking the Find arrow in the
Editing group of the Home tab and then clicking Go To.) You can also display the Navigation task pane and
move from heading to heading or page to page.
Keyboard Shortcut Press Ctrl+G to display the Go To tab of the Find And Replace dialog box.
If more than one document is open, you can close the active document without exiting Word by clicking the
Close button at the right end of the title bar. If only one document is open, clicking the Close button closes the
document and also exits Word. If you want to close that document but leave Word running, you must click
Close in the Backstage view.
Viewing Files in Different Ways
In each program, you can display the content of a file in a variety of views, each suited to a specific purpose.
You switch the view by clicking the buttons in the Document Views group on the View tab, or those on the
View Shortcuts toolbar in the lower-right corner of the program window. The views in each program are
specific to that program’s files.
Word 2010 includes the following views:
 Print Layout view- This view displays a document on the screen the way it will look when printed. You
can see page layout elements such as margins, page breaks, headers and footers, and watermarks.
 Full Screen Reading view- This view displays as much of the content of the document as will fit on the
screen at a size that is appropriate for reading. In this view, the ribbon is replaced by one toolbar at the
top of the screen with buttons for saving and printing the document, accessing references and other
tools, highlighting text, and making comments. You can move from page to page and adjust the view by
selecting options from the View Options menu. You can edit the document only if you turn on the Allow
Typing option on this menu, and you can switch views only by clicking the Close button to return to the
previous view.
www.eacademy.lk www.eacademy.lk
28 | P a g e
www.eacademy.lk
 Web Layout view- This view displays the document the way it will look when viewed in a Web
browser. You can see backgrounds and other effects. You can also see how text wraps to fit the window
and how graphics are positioned.
 Outline view- This view displays the structure of a document as nested levels of headings and body text,
and provides tools for viewing and changing its hierarchy.
 Draft view- This view displays the content of a document with a simplified layout so that you can type
and edit quickly. You can’t see page layout elements.
Excel 2010 includes the following views:
 Normal view- This view displays the worksheet with column and row headers.
 Page Layout view- This view displays the worksheet on the screen the way it will look when printed,
including page layout elements.
 Page Break Preview view- This view displays only the portion of the worksheet that contains content,
and any page breaks. You can drag page breaks in this view to move them.
PowerPoint 2010 includes the following views:
 Normal view- This view displays individual slides with active content objects such as text containers,
and a separate pane into which you can enter notes.
 Slide Sorter view- This view displays all the slides in a presentation. You can apply formatting to
individual slides and to groups of slides, but you can’t edit the slide content.
 Notes Page view- This view displays each slide and its accompanying notes as they will look when
printed in the Notes Page print layout.
 Reading view- This view displays individual slides as they will appear on the screen, without active
content objects. In this view, the ribbon is hidden. You can move from page to page and adjust the view
by selecting options from a menu on the status bar. You can’t edit slide content in this view.
When you want to focus on the layout of a document, worksheet, or slide, you can display rulers and gridlines
to help you position and align elements. Simply select the corresponding check boxes in the Show group on the
View tab. You can also adjust the magnification of the document by using the tools available in the Zoom group
on the View tab, or the Zoom button or Zoom slider at the right end of the status bar. Clicking the Zoom button
in either location displays a dialog box where you can select or type a percentage; or you can drag the Zoom
slider to the left or right or click the Zoom Out or Zoom In button on either side of the slider to change the
percentage incrementally.
You’re not limited to working with one file at a time. You can easily switch between open files, and you can
display more than one program window simultaneously. If you want to work with different parts of a document,
you can open the document in a second window and display both, or you can split a window into two panes and
scroll through each pane independently by using options in the Window group on the View tab. Not represented
on the View tab is a feature that can be invaluable when you are fine tuning the layout of a document. Clicking
the Show/Hide ¶ button in the Paragraph group on the Home tab turns the display of nonprinting and hidden
characters on and off. Nonprinting characters, such as tabs and paragraph marks, control the layout of your
document, and hidden characters provide the structure for behind-the-scenes processes, such as indexing. You
can control the display of these characters for each window.
www.eacademy.lk www.eacademy.lk
29 | P a g e
www.eacademy.lk
Getting Help with Office 2010
If your question is about one of the programs in the Microsoft Office Professional 2010 software suite, and not
about the content of this book, your first recourse is the Help system for the individual program. This system is
a combination of tools and files stored on your computer when you installed the software suite or program and,
if your computer is connected to the Internet, information available from the Microsoft Office Online Web site.
You can find Help information in the following ways:
● To find out about an item on the screen, you can display a ScreenTip. For example, to display a ScreenTip
for a button, point to the button without clicking it. The ScreenTip gives the button’s name, the associated
keyboard shortcut if there is one, and sometimes a description of what the button does when you click it.
● In the program window, you can click the Help button (a question mark in a blue circle) at the right end of
the ribbon to display the program-specific Help window.
● At the right end of the title bars of some dialog boxes is a Help button (also a question mark) that you can
click to display the program-specific Help window. Sometimes, topics related to the functions of that dialog box
are already identified in the window.
1. At the right end of the ribbon, click the Microsoft Word Help button. The Word Help window opens.
If you are connected to the Internet, clicking any of the buttons below the Microsoft Office banner (Products,
Support, Images, and Templates) takes you to a corresponding page of the Office Web site.
2. Below the bulleted list under Browse Word 2010 support, click see all. The window changes to display a list
of Help topics.
3. In the list of topics, click Activating Word. Word Help displays a list of topics related to activating Microsoft
Office programs.
You can click any topic to display the corresponding information.
www.eacademy.lk www.eacademy.lk
30 | P a g e
www.eacademy.lk
4. On the toolbar, click the Show Table of Contents button. The window expands to accommodate two panes.
The Table of Contents pane appears on the left. Like the table of contents in a book, it is organized in sections.
If you’re connected to the Internet, Word displays sections, topics, and training available from the Office Online
Web site as well as those stored on your computer.
5. In the Table of Contents pane, click a few sections and topics. Then click the Back and Forward buttons to
move among the topics you have already viewed.
6. At the right end of the Table of Contents title bar, click the Close button.
7. At the top of the Word Help window, click the Type words to search for box, type saving, and then press the
Enter key.
The Word Help window displays topics related to the word you typed.
www.eacademy.lk www.eacademy.lk
31 | P a g e
www.eacademy.lk
Next and Back buttons appear, making it easier to search for the topic you want.
8. In the results list, click the Recover earlier versions of a file in Office 2010 topic. The selected topic appears
in the Word Help window.
9. Below the title at the top of the topic, click Show All. Word displays any information that has been collapsed
under a heading and changes the Show All button to Hide All. You can jump to related information by clicking
hyperlinks identified by blue text.
Tip: You can click the Print button on the toolbar to print a topic. Only the displayed information is printed.
Click the Close button at the right end of the Word Help window. If your question is about an Office 2010
program or another Microsoft software product and you cannot find the answer in the product’s Help system,
please search the appropriate product solution center or the Microsoft Knowledge Base at:
support.microsoft.com
In the United States, Microsoft software product support issues not covered by the Microsoft Knowledge Base
are addressed by Microsoft Product Support Services. Location-specific software support options are available
from: support.microsoft.com/gp/selfoverview/
To download MS Office Professional 2010 FREE
Please visit our partner website
www.files2pc.com
Free Courses with Certificate now available on
www.eacademy.lk

More Related Content

Similar to MS Office Professional 2010 Course.pdf

Bea's powerpoint presentation
Bea's powerpoint presentationBea's powerpoint presentation
Bea's powerpoint presentationBea Nelene A. Que
 
Bea's powerpoint presentation
Bea's powerpoint presentationBea's powerpoint presentation
Bea's powerpoint presentationBea Nelene A. Que
 
Chapter.01
Chapter.01Chapter.01
Chapter.01klivsie
 
window_10_user_guide.pdf
window_10_user_guide.pdfwindow_10_user_guide.pdf
window_10_user_guide.pdfMertin2
 
Windowstechnicalpreviewqg
WindowstechnicalpreviewqgWindowstechnicalpreviewqg
WindowstechnicalpreviewqgAlex Carranza
 
Windows 10 Technical Preview - http://f2suporte.blogspot.com
Windows 10 Technical Preview - http://f2suporte.blogspot.comWindows 10 Technical Preview - http://f2suporte.blogspot.com
Windows 10 Technical Preview - http://f2suporte.blogspot.comWlademir RS
 
Trabajo en ingles[1]
Trabajo en ingles[1]Trabajo en ingles[1]
Trabajo en ingles[1]karenyarley
 
Microsoft Word Basics2.ppt
Microsoft Word Basics2.pptMicrosoft Word Basics2.ppt
Microsoft Word Basics2.pptJunaidRamzan4
 
Understanding microsoftword 2016 basics tutorial
Understanding microsoftword 2016 basics tutorialUnderstanding microsoftword 2016 basics tutorial
Understanding microsoftword 2016 basics tutorialbuildafricacompany
 
Microsoft Word Basics2.ppt
Microsoft Word Basics2.pptMicrosoft Word Basics2.ppt
Microsoft Word Basics2.pptAihamAltayeh1
 
Microsoft Word Basics2.ppt
Microsoft Word Basics2.pptMicrosoft Word Basics2.ppt
Microsoft Word Basics2.pptnithyanithi45
 
Microsoft Word Basics2.ppt
Microsoft Word Basics2.pptMicrosoft Word Basics2.ppt
Microsoft Word Basics2.pptSabrenaFenna2
 
Microsoft%20Word%20Basics23.pptx
Microsoft%20Word%20Basics23.pptxMicrosoft%20Word%20Basics23.pptx
Microsoft%20Word%20Basics23.pptxLeanTamsi1
 
Microsoft Word Basics2.ppt
Microsoft Word Basics2.pptMicrosoft Word Basics2.ppt
Microsoft Word Basics2.pptheybitch2
 
Microsoft Word Basics2.ppt
Microsoft Word Basics2.pptMicrosoft Word Basics2.ppt
Microsoft Word Basics2.pptpralayroy2
 

Similar to MS Office Professional 2010 Course.pdf (20)

Bea's powerpoint presentation
Bea's powerpoint presentationBea's powerpoint presentation
Bea's powerpoint presentation
 
Bea's powerpoint presentation
Bea's powerpoint presentationBea's powerpoint presentation
Bea's powerpoint presentation
 
Chapter.01
Chapter.01Chapter.01
Chapter.01
 
Chapter.01
Chapter.01Chapter.01
Chapter.01
 
window_10_user_guide.pdf
window_10_user_guide.pdfwindow_10_user_guide.pdf
window_10_user_guide.pdf
 
Windowstechnicalpreviewqg
WindowstechnicalpreviewqgWindowstechnicalpreviewqg
Windowstechnicalpreviewqg
 
Windows 10 Technical Preview - http://f2suporte.blogspot.com
Windows 10 Technical Preview - http://f2suporte.blogspot.comWindows 10 Technical Preview - http://f2suporte.blogspot.com
Windows 10 Technical Preview - http://f2suporte.blogspot.com
 
Trabajo en ingles[1]
Trabajo en ingles[1]Trabajo en ingles[1]
Trabajo en ingles[1]
 
Microsoft Word Basics2.ppt
Microsoft Word Basics2.pptMicrosoft Word Basics2.ppt
Microsoft Word Basics2.ppt
 
Understanding microsoftword 2016 basics tutorial
Understanding microsoftword 2016 basics tutorialUnderstanding microsoftword 2016 basics tutorial
Understanding microsoftword 2016 basics tutorial
 
Microsoft Word Basics2.ppt
Microsoft Word Basics2.pptMicrosoft Word Basics2.ppt
Microsoft Word Basics2.ppt
 
Microsoft Word Basics2.ppt
Microsoft Word Basics2.pptMicrosoft Word Basics2.ppt
Microsoft Word Basics2.ppt
 
Microsoft Word Basics2.ppt
Microsoft Word Basics2.pptMicrosoft Word Basics2.ppt
Microsoft Word Basics2.ppt
 
Microsoft Word Basics2.ppt
Microsoft Word Basics2.pptMicrosoft Word Basics2.ppt
Microsoft Word Basics2.ppt
 
Microsoft Word Basics2.ppt
Microsoft Word Basics2.pptMicrosoft Word Basics2.ppt
Microsoft Word Basics2.ppt
 
Microsoft%20Word%20Basics23.pptx
Microsoft%20Word%20Basics23.pptxMicrosoft%20Word%20Basics23.pptx
Microsoft%20Word%20Basics23.pptx
 
Microsoft Word Basics2.ppt
Microsoft Word Basics2.pptMicrosoft Word Basics2.ppt
Microsoft Word Basics2.ppt
 
Microsoft word basics2
Microsoft word basics2Microsoft word basics2
Microsoft word basics2
 
Microsoft Word Basics2.ppt
Microsoft Word Basics2.pptMicrosoft Word Basics2.ppt
Microsoft Word Basics2.ppt
 
Microsoft Word Basics2.ppt
Microsoft Word Basics2.pptMicrosoft Word Basics2.ppt
Microsoft Word Basics2.ppt
 

More from Udara Sandaruwan

More from Udara Sandaruwan (20)

8 Networking for ICT.pptx
8 Networking for ICT.pptx8 Networking for ICT.pptx
8 Networking for ICT.pptx
 
Project Management Course & Tutorial by eAcademy.lk
Project Management Course & Tutorial by eAcademy.lkProject Management Course & Tutorial by eAcademy.lk
Project Management Course & Tutorial by eAcademy.lk
 
Architecture of 5G
Architecture of 5GArchitecture of 5G
Architecture of 5G
 
What is 5g technology
What is 5g technologyWhat is 5g technology
What is 5g technology
 
Introduction of 5G Technology
Introduction of 5G TechnologyIntroduction of 5G Technology
Introduction of 5G Technology
 
5G future scope
5G future scope5G future scope
5G future scope
 
5G Technology and It's challenges
5G Technology and It's challenges5G Technology and It's challenges
5G Technology and It's challenges
 
5G applications
5G applications5G applications
5G applications
 
5G Advanced Features
5G Advanced Features5G Advanced Features
5G Advanced Features
 
5G advantages and disadvantages
5G advantages and disadvantages5G advantages and disadvantages
5G advantages and disadvantages
 
5. Community Cloud Model
5. Community Cloud Model5. Community Cloud Model
5. Community Cloud Model
 
3. Public Cloud Model
3. Public Cloud Model3. Public Cloud Model
3. Public Cloud Model
 
2. Cloud Computing Architecture
2. Cloud Computing Architecture2. Cloud Computing Architecture
2. Cloud Computing Architecture
 
Windows10 for beginners
Windows10 for beginnersWindows10 for beginners
Windows10 for beginners
 
E commerce course
E commerce courseE commerce course
E commerce course
 
Computer history timeline
Computer history timelineComputer history timeline
Computer history timeline
 
Computer hardware course
Computer hardware courseComputer hardware course
Computer hardware course
 
E commerce course
E commerce courseE commerce course
E commerce course
 
Cloud computing course and tutorials
Cloud computing course and tutorialsCloud computing course and tutorials
Cloud computing course and tutorials
 
Internet & www
Internet & wwwInternet & www
Internet & www
 

Recently uploaded

Salesforce Certified Field Service Consultant
Salesforce Certified Field Service ConsultantSalesforce Certified Field Service Consultant
Salesforce Certified Field Service ConsultantAxelRicardoTrocheRiq
 
Asset Management Software - Infographic
Asset Management Software - InfographicAsset Management Software - Infographic
Asset Management Software - InfographicHr365.us smith
 
GOING AOT WITH GRAALVM – DEVOXX GREECE.pdf
GOING AOT WITH GRAALVM – DEVOXX GREECE.pdfGOING AOT WITH GRAALVM – DEVOXX GREECE.pdf
GOING AOT WITH GRAALVM – DEVOXX GREECE.pdfAlina Yurenko
 
Cloud Management Software Platforms: OpenStack
Cloud Management Software Platforms: OpenStackCloud Management Software Platforms: OpenStack
Cloud Management Software Platforms: OpenStackVICTOR MAESTRE RAMIREZ
 
Dealing with Cultural Dispersion — Stefano Lambiase — ICSE-SEIS 2024
Dealing with Cultural Dispersion — Stefano Lambiase — ICSE-SEIS 2024Dealing with Cultural Dispersion — Stefano Lambiase — ICSE-SEIS 2024
Dealing with Cultural Dispersion — Stefano Lambiase — ICSE-SEIS 2024StefanoLambiase
 
Automate your Kamailio Test Calls - Kamailio World 2024
Automate your Kamailio Test Calls - Kamailio World 2024Automate your Kamailio Test Calls - Kamailio World 2024
Automate your Kamailio Test Calls - Kamailio World 2024Andreas Granig
 
React Server Component in Next.js by Hanief Utama
React Server Component in Next.js by Hanief UtamaReact Server Component in Next.js by Hanief Utama
React Server Component in Next.js by Hanief UtamaHanief Utama
 
What is Fashion PLM and Why Do You Need It
What is Fashion PLM and Why Do You Need ItWhat is Fashion PLM and Why Do You Need It
What is Fashion PLM and Why Do You Need ItWave PLM
 
Professional Resume Template for Software Developers
Professional Resume Template for Software DevelopersProfessional Resume Template for Software Developers
Professional Resume Template for Software DevelopersVinodh Ram
 
Building a General PDE Solving Framework with Symbolic-Numeric Scientific Mac...
Building a General PDE Solving Framework with Symbolic-Numeric Scientific Mac...Building a General PDE Solving Framework with Symbolic-Numeric Scientific Mac...
Building a General PDE Solving Framework with Symbolic-Numeric Scientific Mac...stazi3110
 
Building Real-Time Data Pipelines: Stream & Batch Processing workshop Slide
Building Real-Time Data Pipelines: Stream & Batch Processing workshop SlideBuilding Real-Time Data Pipelines: Stream & Batch Processing workshop Slide
Building Real-Time Data Pipelines: Stream & Batch Processing workshop SlideChristina Lin
 
ODSC - Batch to Stream workshop - integration of Apache Spark, Cassandra, Pos...
ODSC - Batch to Stream workshop - integration of Apache Spark, Cassandra, Pos...ODSC - Batch to Stream workshop - integration of Apache Spark, Cassandra, Pos...
ODSC - Batch to Stream workshop - integration of Apache Spark, Cassandra, Pos...Christina Lin
 
Implementing Zero Trust strategy with Azure
Implementing Zero Trust strategy with AzureImplementing Zero Trust strategy with Azure
Implementing Zero Trust strategy with AzureDinusha Kumarasiri
 
chapter--4-software-project-planning.ppt
chapter--4-software-project-planning.pptchapter--4-software-project-planning.ppt
chapter--4-software-project-planning.pptkotipi9215
 
Steps To Getting Up And Running Quickly With MyTimeClock Employee Scheduling ...
Steps To Getting Up And Running Quickly With MyTimeClock Employee Scheduling ...Steps To Getting Up And Running Quickly With MyTimeClock Employee Scheduling ...
Steps To Getting Up And Running Quickly With MyTimeClock Employee Scheduling ...MyIntelliSource, Inc.
 
Unveiling Design Patterns: A Visual Guide with UML Diagrams
Unveiling Design Patterns: A Visual Guide with UML DiagramsUnveiling Design Patterns: A Visual Guide with UML Diagrams
Unveiling Design Patterns: A Visual Guide with UML DiagramsAhmed Mohamed
 
Der Spagat zwischen BIAS und FAIRNESS (2024)
Der Spagat zwischen BIAS und FAIRNESS (2024)Der Spagat zwischen BIAS und FAIRNESS (2024)
Der Spagat zwischen BIAS und FAIRNESS (2024)OPEN KNOWLEDGE GmbH
 
(Genuine) Escort Service Lucknow | Starting ₹,5K To @25k with A/C 🧑🏽‍❤️‍🧑🏻 89...
(Genuine) Escort Service Lucknow | Starting ₹,5K To @25k with A/C 🧑🏽‍❤️‍🧑🏻 89...(Genuine) Escort Service Lucknow | Starting ₹,5K To @25k with A/C 🧑🏽‍❤️‍🧑🏻 89...
(Genuine) Escort Service Lucknow | Starting ₹,5K To @25k with A/C 🧑🏽‍❤️‍🧑🏻 89...gurkirankumar98700
 
Folding Cheat Sheet #4 - fourth in a series
Folding Cheat Sheet #4 - fourth in a seriesFolding Cheat Sheet #4 - fourth in a series
Folding Cheat Sheet #4 - fourth in a seriesPhilip Schwarz
 

Recently uploaded (20)

Salesforce Certified Field Service Consultant
Salesforce Certified Field Service ConsultantSalesforce Certified Field Service Consultant
Salesforce Certified Field Service Consultant
 
Asset Management Software - Infographic
Asset Management Software - InfographicAsset Management Software - Infographic
Asset Management Software - Infographic
 
GOING AOT WITH GRAALVM – DEVOXX GREECE.pdf
GOING AOT WITH GRAALVM – DEVOXX GREECE.pdfGOING AOT WITH GRAALVM – DEVOXX GREECE.pdf
GOING AOT WITH GRAALVM – DEVOXX GREECE.pdf
 
Cloud Management Software Platforms: OpenStack
Cloud Management Software Platforms: OpenStackCloud Management Software Platforms: OpenStack
Cloud Management Software Platforms: OpenStack
 
Dealing with Cultural Dispersion — Stefano Lambiase — ICSE-SEIS 2024
Dealing with Cultural Dispersion — Stefano Lambiase — ICSE-SEIS 2024Dealing with Cultural Dispersion — Stefano Lambiase — ICSE-SEIS 2024
Dealing with Cultural Dispersion — Stefano Lambiase — ICSE-SEIS 2024
 
Automate your Kamailio Test Calls - Kamailio World 2024
Automate your Kamailio Test Calls - Kamailio World 2024Automate your Kamailio Test Calls - Kamailio World 2024
Automate your Kamailio Test Calls - Kamailio World 2024
 
React Server Component in Next.js by Hanief Utama
React Server Component in Next.js by Hanief UtamaReact Server Component in Next.js by Hanief Utama
React Server Component in Next.js by Hanief Utama
 
Hot Sexy call girls in Patel Nagar🔝 9953056974 🔝 escort Service
Hot Sexy call girls in Patel Nagar🔝 9953056974 🔝 escort ServiceHot Sexy call girls in Patel Nagar🔝 9953056974 🔝 escort Service
Hot Sexy call girls in Patel Nagar🔝 9953056974 🔝 escort Service
 
What is Fashion PLM and Why Do You Need It
What is Fashion PLM and Why Do You Need ItWhat is Fashion PLM and Why Do You Need It
What is Fashion PLM and Why Do You Need It
 
Professional Resume Template for Software Developers
Professional Resume Template for Software DevelopersProfessional Resume Template for Software Developers
Professional Resume Template for Software Developers
 
Building a General PDE Solving Framework with Symbolic-Numeric Scientific Mac...
Building a General PDE Solving Framework with Symbolic-Numeric Scientific Mac...Building a General PDE Solving Framework with Symbolic-Numeric Scientific Mac...
Building a General PDE Solving Framework with Symbolic-Numeric Scientific Mac...
 
Building Real-Time Data Pipelines: Stream & Batch Processing workshop Slide
Building Real-Time Data Pipelines: Stream & Batch Processing workshop SlideBuilding Real-Time Data Pipelines: Stream & Batch Processing workshop Slide
Building Real-Time Data Pipelines: Stream & Batch Processing workshop Slide
 
ODSC - Batch to Stream workshop - integration of Apache Spark, Cassandra, Pos...
ODSC - Batch to Stream workshop - integration of Apache Spark, Cassandra, Pos...ODSC - Batch to Stream workshop - integration of Apache Spark, Cassandra, Pos...
ODSC - Batch to Stream workshop - integration of Apache Spark, Cassandra, Pos...
 
Implementing Zero Trust strategy with Azure
Implementing Zero Trust strategy with AzureImplementing Zero Trust strategy with Azure
Implementing Zero Trust strategy with Azure
 
chapter--4-software-project-planning.ppt
chapter--4-software-project-planning.pptchapter--4-software-project-planning.ppt
chapter--4-software-project-planning.ppt
 
Steps To Getting Up And Running Quickly With MyTimeClock Employee Scheduling ...
Steps To Getting Up And Running Quickly With MyTimeClock Employee Scheduling ...Steps To Getting Up And Running Quickly With MyTimeClock Employee Scheduling ...
Steps To Getting Up And Running Quickly With MyTimeClock Employee Scheduling ...
 
Unveiling Design Patterns: A Visual Guide with UML Diagrams
Unveiling Design Patterns: A Visual Guide with UML DiagramsUnveiling Design Patterns: A Visual Guide with UML Diagrams
Unveiling Design Patterns: A Visual Guide with UML Diagrams
 
Der Spagat zwischen BIAS und FAIRNESS (2024)
Der Spagat zwischen BIAS und FAIRNESS (2024)Der Spagat zwischen BIAS und FAIRNESS (2024)
Der Spagat zwischen BIAS und FAIRNESS (2024)
 
(Genuine) Escort Service Lucknow | Starting ₹,5K To @25k with A/C 🧑🏽‍❤️‍🧑🏻 89...
(Genuine) Escort Service Lucknow | Starting ₹,5K To @25k with A/C 🧑🏽‍❤️‍🧑🏻 89...(Genuine) Escort Service Lucknow | Starting ₹,5K To @25k with A/C 🧑🏽‍❤️‍🧑🏻 89...
(Genuine) Escort Service Lucknow | Starting ₹,5K To @25k with A/C 🧑🏽‍❤️‍🧑🏻 89...
 
Folding Cheat Sheet #4 - fourth in a series
Folding Cheat Sheet #4 - fourth in a seriesFolding Cheat Sheet #4 - fourth in a series
Folding Cheat Sheet #4 - fourth in a series
 

MS Office Professional 2010 Course.pdf

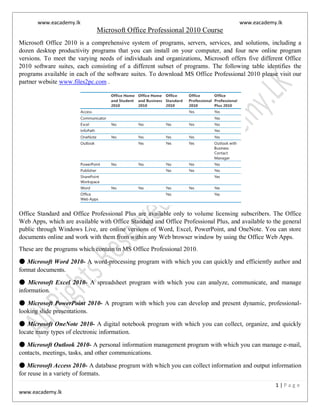
  • 1. www.eacademy.lk www.eacademy.lk 1 | P a g e www.eacademy.lk Microsoft Office Professional 2010 Course Microsoft Office 2010 is a comprehensive system of programs, servers, services, and solutions, including a dozen desktop productivity programs that you can install on your computer, and four new online program versions. To meet the varying needs of individuals and organizations, Microsoft offers five different Office 2010 software suites, each consisting of a different subset of programs. The following table identifies the programs available in each of the software suites. To download MS Office Professional 2010 please visit our partner website www.files2pc.com . Office Standard and Office Professional Plus are available only to volume licensing subscribers. The Office Web Apps, which are available with Office Standard and Office Professional Plus, and available to the general public through Windows Live, are online versions of Word, Excel, PowerPoint, and OneNote. You can store documents online and work with them from within any Web browser window by using the Office Web Apps. These are the programs which contain in MS Office Professional 2010. ● Microsoft Word 2010- A word-processing program with which you can quickly and efficiently author and format documents. ● Microsoft Excel 2010- A spreadsheet program with which you can analyze, communicate, and manage information. ● Microsoft PowerPoint 2010- A program with which you can develop and present dynamic, professional- looking slide presentations. ● Microsoft OneNote 2010- A digital notebook program with which you can collect, organize, and quickly locate many types of electronic information. ● Microsoft Outlook 2010- A personal information management program with which you can manage e-mail, contacts, meetings, tasks, and other communications. ● Microsoft Access 2010- A database program with which you can collect information and output information for reuse in a variety of formats.
  • 2. www.eacademy.lk www.eacademy.lk 2 | P a g e www.eacademy.lk ● Microsoft Publisher 2010- A desktop publishing program with which you can lay out newsletters, cards, calendars, and other publications. To download MS Office Professional 2010 please visit our partner website www.files2pc.com Certification Desktop computing proficiency is increasingly important in today’s business world. When screening, hiring, and training employees, more employers are relying on the objectivity and consistency of technology certification to ensure the competence of their workforce. As an employee or job seeker, you can use technology certification to prove that you already have the skills you need to succeed. A Microsoft Office Specialist (MOS) is an individual who has demonstrated worldwide skill standards through a certification exam in one or more of the Office 2010 programs, including Microsoft Access, Excel, Outlook, PowerPoint, or Word. To learn more about the MOS program, visit the Microsoft Office Specialist Certification page at go.microsoft.com/fwlink/?LinkId=193884. Explore Office 2010 Microsoft Office 2010 programs have a common user interface—the way the program looks and the way you interact with it—which means that skills and techniques you learn in one program are also useful in the others. Certain information that you provide in one Office 2010 program is made available to other Office 2010 programs so that you don’t have to provide it individually in each program. Other settings are specific to the program you’re working in. The basic Office 2010 user interface includes a standard method of giving commands by using tools gathered on a dynamic toolbar, called the ribbon. Commands are represented by buttons, by lists or galleries from which you choose settings, or by fields in task panes and dialog boxes in which you specify settings. You can customize some of the content that is available from the ribbon by hiding sets of commands (tabs) or by creating custom tabs. You can also collect frequently used buttons, lists, and galleries on a separate toolbar, the Quick Access Toolbar, so that they are available to you from anywhere in the program. Each program has standard settings based on the way that most people work with the program. However, you can customize the settings to meet your specific needs and to fit the way that you work. In this chapter, you’ll first familiarize yourself with the standard Office 2010 program working environment. Then you’ll customize the working environment, ribbon, and Quick Access Toolbar in Microsoft Word 2010, using techniques that are common to working in any Office 2010 program. Working in the Program Environment The most common way to start any Office 2010 program is from the Start menu, displayed when you click the Start button at the left end of the Windows Taskbar. On the Start menu, click All Programs, click the Microsoft Office folder, and then click the program you want to start. When you start Microsoft Word, Excel, or PowerPoint without opening a specific file, the program window appears, displaying a new blank document, workbook, or presentation. When you start Microsoft OneNote without opening a specific notebook, the program window displays the notebook you opened most recently.
  • 3. www.eacademy.lk www.eacademy.lk 3 | P a g e www.eacademy.lk A typical Office 2010 program window contains the following elements: ● The title bar displays the name of the active document. At the left end of the title bar is the program icon, which you click to display commands to move, size, and close the program window. Three buttons at the right end of the title bar serve the same functions in all Windows programs: You can temporarily hide the program window by clicking the Minimize button, adjust the size of the window by clicking the Restore Down/Maximize button, and close the active document or exit the program by clicking the Close button. ● By default, the Quick Access Toolbar appears to the right of the program icon at the left end of the title bar. Each program has a default set of Quick Access Toolbar buttons; most commonly, the default Quick Access Toolbar displays the Save, Undo, and Redo buttons. You can change the location of the Quick Access Toolbar and customize it to include any command to which you want to have easy access. ● Below the title bar is the ribbon. All the commands for working with file content are available from this central location so that you can work efficiently with the program.
  • 4. www.eacademy.lk www.eacademy.lk 4 | P a g e www.eacademy.lk ● Across the top of the ribbon is a set of tabs. Clicking a tab displays an associated set of commands. Tip: You might find it efficient to add all the commands you use frequently to the Quick Access Toolbar and display it below the ribbon, directly above the workspace. For information, see “Customizing the Quick Access Toolbar” later in this course. ● Commands related to managing the program and files (rather than file content) are gathered together in the Backstage view, which you display by clicking the colored File tab located at the left end of the ribbon. Commands available in the Backstage view are organized on named pages, which you display by clicking the page tabs located in the left pane. ● Commands related to working with file content are represented as buttons on the remaining tabs. The Home tab is active by default. Tip: Don’t be alarmed if your ribbon has tabs not shown in our screens. You might have installed programs that add their own tabs to the ribbon. ● On each tab, buttons are organized into named groups. Depending on your screen resolution and the size of the program window, the commands in a group might be displayed as labeled buttons, as unlabeled icons, or as one or more large buttons that you click to display the commands within the group. You might want to experiment with the screen resolution and width of the program window to understand their effect on the appearance of tab content. ● If a button label isn’t visible, you can display the command, a description of its function, and its keyboard shortcut (if it has one) in a ScreenTip by pointing to the button. Tip: You can control the display of ScreenTips and of feature descriptions in ScreenTips. Simply display the Backstage view, click Options to open the program’s Options dialog box, and click the ScreenTip setting you want in the User Interface Options area of the General page. For more information, see “Changing Program Settings” later in this course.
  • 5. www.eacademy.lk www.eacademy.lk 5 | P a g e www.eacademy.lk ● Related but less common commands might be available in a dialog box or task pane, which you display by clicking the dialog box launcher located in the lower right corner of the group. Tip: You might find that less commonly used commands from earlier versions of a program are not available from the ribbon. However, these commands are still available. You can make missing commands accessible by adding them to the Quick Access Toolbar. For more information, see “Customizing the Quick Access Toolbar” later in this chapter. ● Some buttons include an integrated or separate arrow. To determine whether a button and arrow are integrated, point to the button or arrow to display its border. If a button and its arrow are integrated within one border, clicking the button will display options for refining the action of the button. If the button and arrow have separate borders, clicking the button will carry out the default action indicated by the button’s current icon. You can change the default action of the button by clicking the arrow and then clicking the action you want. The arrow of the Change Styles button is integrated, and the arrow of the Paste button is separate. ● Above the right end of the ribbon is the Minimize The Ribbon button. Clicking this button hides the commands but leaves the tab names visible. You can then click any tab name to temporarily display its commands. Clicking anywhere other than the ribbon hides the commands again. When the full ribbon is temporarily visible, you can click the button at its right end, shaped like a pushpin, to make the display permanent. When the full ribbon is hidden, you can click the Expand The Ribbon button to redisplay it. Keyboard Shortcut Press Ctrl+F1 to minimize or expand the ribbon. ● Clicking the Help button at the right end of the ribbon displays the program-specific Help window in which you can use standard techniques to find information. Keyboard Shortcut Press F1 to display the Help window for the active program.
  • 6. www.eacademy.lk www.eacademy.lk 6 | P a g e www.eacademy.lk ● Across the bottom of the program window, the status bar displays information about the current file and provides access to certain program functions. You can control the contents of the status bar by right-clicking it to display the Customize Status Bar menu, on which you can click any item to display or hide it. ● At the right end of the status bar in the Word, Excel, and PowerPoint program windows are the View Shortcuts toolbar, the Zoom button, and the Zoom slider. These tools provide you with convenient methods for adjusting the display of file content. You can change the file content view by clicking buttons on the View Shortcuts toolbar and change the magnification by clicking the Zoom button or adjusting the Zoom slider. The goal of all these features of the program environment is to make working in the program as intuitive as possible. Commands for tasks you perform often are readily available, and even those you might use infrequently are easy to find. For example, when a formatting option has several choices available, they are often displayed in a gallery of thumbnails. These thumbnails display visual representations of each choice. If you point to a thumbnail in a gallery, the Live Preview feature shows you what that choice will look like if you apply it to the selected content.
  • 7. www.eacademy.lk www.eacademy.lk 7 | P a g e www.eacademy.lk Start & Explore (Tabs and Groups) In this exercise, you’ll start Word and explore the tabs and groups on the ribbon. Along the way, you’ll work with galleries and the Live Preview feature. 1. On the Start menu, click All Programs, click Microsoft Office, and then click Microsoft Word 2010. The Word program window opens in Print Layout view, displaying a blank document. On the ribbon, the Home tab is active. Buttons related to working with document content are organized on this tab in five groups: Clipboard, Font, Paragraph, Styles, and Editing. 2. Point to each button on the Home tab. Word displays information about the button in a ScreenTip. The ScreenTip for the Format Painter button displays the button’s name, keyboard shortcut, and function. 3. Click the Insert tab, and then explore its buttons.
  • 8. www.eacademy.lk www.eacademy.lk 8 | P a g e www.eacademy.lk Buttons related to all the items you can insert into the document are organized on this tab in seven groups: Pages, Tables, Illustrations, Links, Header & Footer, Text, and Symbols. 4. Click the Page Layout tab, and then explore its buttons. Buttons related to the appearance of the document are organized on this tab in five groups: Themes, Page Setup, Page Background, Paragraph, and Arrange. 5. In the Page Setup group, display the ScreenTip for the Margins button. The ScreenTip tells you how you can adjust the margins. 6. In the lower-right corner of the Page Setup group, click the Page Setup dialog box launcher. The Page Setup dialog box opens. 7. Click Cancel to close the dialog box. 8. In the Themes group, click the Themes button. The group expands to display a gallery of the available themes. The theme controls the color scheme, fonts, and special effects applied to file content.
  • 9. www.eacademy.lk www.eacademy.lk 9 | P a g e www.eacademy.lk 9. Press the Esc key to close the gallery without making a selection. 10. In the Page Background group, click the Page Color button, and then in the top row of the Theme Colors palette, point to each box in turn. The blank document page shows a live preview of what it will look like if you click the color you are pointing to. You can see the effect of the selection without actually applying it. 11. Press Esc to close the palette without making a selection. 12. Click the References tab, and then explore its buttons. Buttons related to items you can add to documents are organized on this tab in six groups: Table Of Contents, Footnotes, Citations & Bibliography, Captions, Index, and Table Of Authorities. You will usually add these items to longer documents, such as reports. 13. Click the Mailings tab, and then explore its buttons. Buttons related to creating mass mailings are organized on this tab in five groups: Create, Start Mail Merge, Write & Insert Fields, Preview Results, and Finish.
  • 10. www.eacademy.lk www.eacademy.lk 10 | P a g e www.eacademy.lk 14. Click the Review tab, and then explore its buttons. Buttons related to proofreading documents, working in other languages, adding comments, tracking and resolving document changes, and protecting documents are organized on this tab in seven groups: Proofing, Language, Comments, Tracking, Changes, Compare, and Protect. 15. Click the View tab, and then explore its buttons. Buttons related to changing the view and other aspects of the display are organized on this tab in five groups: Document Views, Show, Zoom, Window, and Macros. 16. On the ribbon, click the File tab, which is color-coded to match the logo color of the Word program. The Backstage view of Word 2010 is displayed. Commands related to managing documents (such as creating, saving, and printing) are available in this view. 17. If the Info page is not already displayed in the Backstage view, click Info in the left pane. On the Info page of the Backstage view, the middle pane provides options to control who can work on the document, to remove properties (associated information), and to access versions of the document automatically saved by Word. The right pane displays the associated properties, as well as dates of modification, creation, and printing, and the names of people who created and edited the document. The Info page displays and provides commands for changing the information attached to a document.
  • 11. www.eacademy.lk www.eacademy.lk 11 | P a g e www.eacademy.lk 18. In the left pane, click Recent. The Recent page displays the names of the documents you recently worked on. By default a maximum of 20 names is displayed. You can change this number on the Advanced page of the Word Options dialog box. 19. In the left pane, click New. The New page displays all the templates on which you can base a new document. 20. In the left pane, click Print. The Print page displays all print-related commands and provides a pane for previewing the current document as it will appear when printed. 21. In the left pane, click Share. The Share page displays all the commands related to making the current document available to other people. 22. In the left pane, click Help. The Help page displays all the ways you can get help and support for Word. The right pane of the Help page displays your Office edition, its version number, and your product ID, which you will need if you contact Microsoft Product Support. 23. On the Help page, under Tools for Working With Office, click Options. The Word Options dialog box opens. In this dialog box are program settings that control the way the program looks and performs. 24. At the bottom of the Word Options dialog box, click Cancel. You return to the blank document with the Home tab active on the ribbon. Changing Program Settings Earlier in this chapter, we mentioned that you can change settings in the Options dialog box for each program to customize the program environment in various ways. After you work with a program for a while, you might want to refine more settings to tailor the program to the way you work. Knowing your way around the Options dialog box makes the customizing process more efficient. In this exercise, you’ll open the Word Options dialog box and explore several of the available pages. You don’t need any practice files to complete this exercise. Open a blank document if necessary, and then follow the steps.
  • 12. www.eacademy.lk www.eacademy.lk 12 | P a g e www.eacademy.lk 1. On the Home tab, in the Font group, point to the Bold button. Word displays a ScreenTip that includes the button name, its keyboard shortcut, and a description of its purpose. 2. Display the Backstage view, and click Options. The Word Options dialog box opens, displaying the General page. 3. Under User Interface options, display the Color scheme list, and click Black. 4. Display the ScreenTip style list, and click Don’t show feature descriptions in ScreenTips. 5. Under Personalize your copy of Microsoft Office, verify that the User Name and Initials are correct, or change them to the way you want them to appear. 6. Click OK to close the Word Options dialog box. The program window elements are now black and shades of gray. 7. In the Font group, point to the Bold button. The ScreenTip now includes only the button name and its keyboard shortcut. 8. Open the Word Options dialog box, and in the left pane, click Display. On this page, you can adjust how documents look on the screen and when printed.
  • 13. www.eacademy.lk www.eacademy.lk 13 | P a g e www.eacademy.lk 9. In the left pane, click Proofing. This page provides options for adjusting the AutoCorrect settings and for refining the spelling-checking and grammar-checking processes. 10. Display the Save page. On this page, you can change the default document format; the location and save frequency of the Auto Recover file (a backup file created by Word while you’re working in the file); the default location to which Word saves files you create; and the default location for files you check out from document management servers (such as Microsoft SharePoint) and drafts of those files saved while you are working offline. The Save page also has options for specifying whether you want the fonts used within the current document to be embedded in the document, in the event that someone who opens the document doesn’t have those fonts on his or her computer.
  • 14. www.eacademy.lk www.eacademy.lk 14 | P a g e www.eacademy.lk 11. Under Save documents, display the Save files in this format list. Notice the many formats in which you can save files. One of these is the Word 97‑2003 Document format that creates .doc files compatible with earlier versions of Word. If you upgraded to Word 2010 but your colleagues are still working in an earlier version of the program, you might want to select this option so that they will be able to view and work with any document you create. 12. Click away from the list to close it, and then display the Language page. If you create documents for international audiences, you can make additional editing languages available on this page. You can also specify the display, Help, and ScreenTip languages. 13. Display the Advanced page. This page includes options related to editing document content; displaying documents on-screen; printing, saving, and sharing documents; and a variety of other options. Although these options are labeled Advanced, they are the ones you’re most likely to want to adjust to suit the way you work.
  • 15. www.eacademy.lk www.eacademy.lk 15 | P a g e www.eacademy.lk 14. Take a few minutes to explore all the options on this page. In the General area at the bottom of the page are two buttons:  File Locations: You click this button to change the default locations of various types of files associated with Word and its documents.  Web Options: You click this button to adjust settings for converting a document to a Web page. 15. Skipping over the Customize Ribbon and Quick Access Toolbar pages, which we discuss in later topics in this chapter, click Add-Ins. This page displays all the active and inactive add-ins and enables you to add and remove them. (Add-ins are utility programs that provide additional functionality to an Office program.) 16. Display the Trust Center page. This page provides links to information about privacy and security. It also provides access to the Trust Center settings that control the actions Word takes in response to documents that are provided by certain people or companies, that are saved in certain locations, or that contain potentially harmful elements such as ActiveX controls or macros.
  • 16. www.eacademy.lk www.eacademy.lk 16 | P a g e www.eacademy.lk 17. Under Microsoft Office Word Trust Center, click Trust Center Settings, and then in the left pane of the Trust Center dialog box, click Trusted Locations. On this page, you can specify the locations from which Word will not block content. Close the Trust Center dialog box. Reverse any changes you don’t want to keep before moving on. Then close the Word Options dialog box. Customizing the Ribbon The ribbon was designed to make all the commonly used commands visible so that people can more easily discover the full potential of an Office 2010 program. But many people use an Office program to perform the same set of tasks all the time, and for them, seeing buttons (or even entire groups of buttons) that they never use is just another form of clutter. Would you prefer to see fewer commands than appear on the ribbon by default? Or would you prefer to see more specialized groups of commands? Well, you can. From the Customize Ribbon page of an Office 2010 program’s Options dialog box, you can control the tabs that appear on the ribbon, and the groups that appear on the tabs.
  • 17. www.eacademy.lk www.eacademy.lk 17 | P a g e www.eacademy.lk On this page, you can customize the ribbon in the following ways: ● If you rarely use a tab, you can turn it off. ● If you use the commands in only a few groups on each tab, you can remove the groups you don’t use. (The group is not removed from the program, just from its tab.) ● You can move a predefined group by removing it from one tab and then adding it to another. ● You can duplicate a predefined group by adding it to another tab. ● You can create a custom group on any tab and then add commands to it. (You cannot add commands to a predefined group.) ● You can create a custom tab on the ribbon. For example, you might want to do this if you use only a few commands from each tab and you find it inefficient to flip between them. Don’t be afraid to experiment with the ribbon to come up with the configuration that best suits the way you work. If at any point you find that your new ribbon is harder to work with rather than easier, you can always reset everything back to the default configuration. Tip: If you upgraded from Office 2007 or an earlier version of Office, you might find that some commands present in the earlier version are not available on the ribbon. A few old features have been abandoned, but others that people used only rarely have simply not been exposed in the user interface. If you want to use one of these hidden features, you can make it a part of your program environment by adding it to the ribbon or to the Quick Access Toolbar. You can find a list of all the commands that do not appear on the ribbon but are still available in a program by displaying the Customize Ribbon page of the program’s Options dialog box and then clicking Commands Not In The Ribbon in the Choose Commands From list. Start & Explore (Customizing the Ribbon) In this exercise, you’ll customize the ribbon in the Word program window by using techniques that are common to all Office 2010 programs. You’ll turn off tabs, remove groups, create a custom group, and add a command to the group. Then you’ll create a tab and move groups of buttons to it. Finally, you’ll reset the ribbon to its default state. 1. Open the Word Options dialog box, and then click Customize Ribbon. The Customize Ribbon page is displayed. 2. In the list on the right, clear the check boxes of the Insert, Page Layout, References, Mailings, and Review tabs. Then click OK. The ribbon now displays only the File, Home, and View tabs. The only tab you can’t customize is the File tab, which is your link to the Backstage view.
  • 18. www.eacademy.lk www.eacademy.lk 18 | P a g e www.eacademy.lk 3. Redisplay the Customize Ribbon page of the Word Options dialog box, and in the right pane, select the Page Layout check box. Then click the plus sign to display the groups on this tab. 4. Above the left pane, click Choose commands from and then, in the list, click Main Tabs. In the Main Tabs list, click the plus sign adjacent to Page Layout to display the groups that are predefined for this tab. 5. In the right pane, click the Paragraph group, and then click Remove. The group is removed from the Page Layout tab on the ribbon (the list on the right) but is still available in the list on the left. You can add it back to the Page Layout tab or add it to a different tab at any time. 6. In the right pane, click the plus sign adjacent to Home to display its groups, and then click the word Home. 7. Below the right pane, click New Group. When the New Group (Custom) group is added to the bottom of the Home group list, click Rename, type Final in the Display name box, and click OK. Then click the Move Up button until the Final group is at the top of the list. Because of its location in the list, the new group will appear at the left end of the Home tab. 8. In the Choose commands from list, click File Tab. The available commands list changes to include only the commands that are available in the Backstage view, which you display by clicking the File tab. 9. In the available commands list, click Inspect Document, and click Add. Then repeat this step to add Mark as Final. The two commands are added to the custom group.
  • 19. www.eacademy.lk www.eacademy.lk 19 | P a g e www.eacademy.lk 10. In the right pane, remove the Font, Paragraph, and Styles groups from the Home tab, and remove the Page Background group from the Page Layout tab. 11. Click the word Home, and then below the list, click New Tab. A new tab is added to the right pane and is selected for display on the ribbon. It has automatically been given one custom group. 12. Click Remove to remove the custom group. 13. Click New Tab (Custom), and then click Rename. In the Rename dialog box, type Formatting in the Display name box, and click OK. 14. Display Main Tabs in the list on the left, and then expand the Home and Page Layout tabs. 15. With the Formatting tab selected in the right pane, add the Font, Paragraph, and Styles groups from Home in the left pane, and then add Page Background from Page Layout. The right pane shows the new configuration of the Home, Formatting, and Page Layout tabs. 16. In the Word Options dialog box, click OK. The Home tab displays the new Final group. 17. Click the Formatting tab. The formatting commands are now collected on the Formatting tab. 18. Display the Customize Ribbon page of the Word Options dialog box. In the lower right corner, click Reset, and then click Reset all customizations. Then in the message box asking you to confirm that you want to delete all ribbon and Quick Access Toolbar customizations, click Yes.
  • 20. www.eacademy.lk www.eacademy.lk 20 | P a g e www.eacademy.lk 19. Click OK to close the Word Options dialog box. The default ribbon configuration is restored. Close the open document. Customizing the Quick Access Toolbar If you regularly use a few buttons that are scattered on various tabs of the ribbon and you don’t want to switch between tabs to access the buttons or crowd your ribbon with a custom tab, you might want to add these frequently used buttons to the Quick Access Toolbar. They are then always visible in the upper-left corner of the program window. Clicking Quick Access Toolbar in the left pane of a program’s Options dialog box displays the page where you specify which commands you want to appear on the toolbar. On this page, you can customize the ribbon in the following ways: ● You can define a custom Quick Access Toolbar for the program, or you can define a custom Quick Access Toolbar for a specific file. ● You can add any command from any group of any tab, including contextual tabs, to the toolbar. ● You can display a separator between different types of buttons. ● You can move buttons around on the toolbar until they are in the order you want. ● You can reset everything back to the default Quick Access Toolbar configuration. If you never use more than a few buttons, you can add those buttons to the Quick Access Toolbar and then hide the ribbon by double-clicking the active tab or by clicking the Minimize The Ribbon button. Only the Quick
  • 21. www.eacademy.lk www.eacademy.lk 21 | P a g e www.eacademy.lk Access Toolbar and tab names remain visible. You can temporarily redisplay the ribbon by clicking the tab you want to view. You can permanently redisplay the ribbon by double-clicking any tab or by clicking the Expand The Ribbon button. As you add buttons to the Quick Access Toolbar, it expands to accommodate them. If you add many buttons, it might become difficult to view the text in the title bar, or not all the buttons on the Quick Access Toolbar might be visible, defeating the purpose of adding them. To resolve this problem, you can move the Quick Access Toolbar below the ribbon by clicking the Customize Quick Access Toolbar button and then clicking Show Below The Ribbon. Start & Explore (Quick Access Toolbar) In this exercise, you’ll add a couple buttons to the Quick Access Toolbar for all documents, and then you’ll test the buttons. 1. Open the Word Options dialog box, and then click Quick Access Toolbar. The Customize The Quick Access Toolbar page displays a list of available commands on the left side, and a list of the currently displayed commands on the right side. 2. At the top of the available commands list on the left, double-click Separator. 3. Scroll down the available commands list, click the Quick Print command, and then click Add. 4. Repeat step 3 to add the Text Highlight Color command. The Text Highlight Color command is added to the list of commands that will appear on the Quick Access Toolbar. 5. Click OK to close the Word Options dialog box. The Quick Access Toolbar now includes the default Save, Undo, and Repeat buttons and the custom Quick Print and Text Highlight Color buttons, separated by a line. To print a document with the default settings, you no longer have to click the File tab to display the Backstage view. Click Print in the left pane, and then click the Print button. 6. If you want to test printing from the Quick Access Toolbar, ensure that your printer is turned on, and then on the Quick Access Toolbar, click the Quick Print button. Now let’s see how easy it is to highlight or remove highlighting from text when you are working primarily with the commands on a tab other than the Home tab. 7. Click the Review tab. Then select the first highlighted paragraph, Proof of notice of meeting.
  • 22. www.eacademy.lk www.eacademy.lk 22 | P a g e www.eacademy.lk 8. On the Quick Access Toolbar, click the Text Highlight Color arrow, and then click No Color. The yellow highlight is removed from the selection. The No Color option becomes the default for the Text Highlight Color button. 9. Select the next highlighted paragraph, and on the Quick Access Toolbar, click the Text Highlight Color button. The yellow highlight is removed from the selection. 10. Display the Quick Access Toolbar page of the Word Options dialog box, click Reset, and then click Reset only Quick Access Toolbar. 11. In the Reset Customizations message box, click Yes to return the Quick Access Toolbar to its default contents. Then click OK to close the Word Options dialog box. Close the open document. Work with Files When working in Microsoft Word, Excel, or PowerPoint, you save content in individual files. In each program, you can save files as different types depending on each file’s purpose. The standard files are Word documents, Excel workbooks, and PowerPoint presentations. Regardless of the program or file type, you use similar techniques for creating, saving, moving around in, and viewing files in each program. When working in OneNote, content is saved in individual files representing pages that are part of a notebook structure. OneNote creates the files for you and saves your changes as you work, so you don’t need to. However, you use some of the same techniques for moving around in and viewing files as you do in other Microsoft Office 2010 programs. In this chapter, you’ll practice working with files in Word, using techniques that are common to working in files created in Word, Excel, or PowerPoint. First you’ll create and save a document and then save an existing document in a different location. Then you’ll open an existing document, move around in it, and close it. Finally, you’ll explore various ways of viewing file content. Creating and Saving Files When you start Word, Excel, or PowerPoint without opening a specific file, the program displays a blank document, workbook, or presentation in which you can start entering content. A blinking cursor (in the form of a vertical line) in the text pane or worksheet cell shows where the next character you type will appear. When an Office 2010 program is running, you can create a new file from the New page of the Backstage view, which you display by clicking the File tab on the ribbon. Tip: More documents may be added to those available from Microsoft Office Online, so the templates available on your New page might be different from those shown here. The documents listed on the New page are based on templates, which are sets of formats that have been saved in such a way that you can use them as a pattern for new documents. In Word 2010 the icons in the top section of the Available Templates gallery are:
  • 23. www.eacademy.lk www.eacademy.lk 23 | P a g e www.eacademy.lk  Blank document- Clicking this icon opens a document formatted with the standard. settings. The document contains no content.  Blog post- Clicking this icon opens a document containing the basic elements of a blog post in a document window. The document window includes additional functionality enabling you to easily post directly to an existing blog site from within Word.  Recent templates- Clicking this icon displays a page on which you can select from the most recent templates you have used.  Sample templates- Clicking this icon displays a page on which you can select from sample documents that come with Word.  My templates- Clicking this icon displays a dialog box in which you can select a template you have created as the basis for a new document.  New from existing- Clicking this icon displays a dialog box in which you can select an existing document as the basis for a new document. The icons in the Office.com Templates section represent categories of common types of files for the program you’re working in. Depending on how many templates are available in a category, the icon might be a folder. Regardless, clicking one of these icons displays more templates that are available for download from the Microsoft Office Online Web site. You can also search for specific file types by entering the type you want in the Search Office.com for Templates box and clicking the Start Searching button. When you find a template you might want to use as the basis for your new file, clicking its icon displays a preview of that file in the right pane. You can then click the Create button in the right pane to create the file. Each file you create from the New page of the Backstage view is temporary until you save it. To save a document, workbook, or presentation for the first time, you click the Save button on the Quick Access Toolbar or click Save in the Backstage view. Either action displays the Save As dialog box, where you can assign a name and storage location to the file.
  • 24. www.eacademy.lk www.eacademy.lk 24 | P a g e www.eacademy.lk If you want to save the file in a folder other than the one shown in the Address bar at the top of the dialog box, you can click the arrow or chevrons in the Address bar or click locations in the Navigation pane on the left to display the folder you want. If you want to create a folder in which to store the file, you can click the New Folder button on the toolbar. If you want to save a file in a format other than the one shown in the Save As Type box, click the Save As Type arrow and then, in the Save As Type list, click the file format you want. After you save a file the first time, you can save subsequent changes by clicking the Save button. The new version of the file then overwrites the previous version. Keyboard Shortcut Press Ctrl+S to save the current document. If you want to keep both the new version and the previous version, click Save As in the Backstage view, and then save the new version with a different name in the same location or with the same name in a different location. (You can’t store two files of the same type with the same name in the same folder.) File Compatibility with Earlier Versions of Office Programs The Office 2010 programs use file formats based on a programming language called extended markup language, or more commonly, XML. These file formats, called the Microsoft Office Open XML Formats, were introduced with Microsoft Office 2007. The Office Open XML formats provide the following benefits: ● File size is smaller because files are compressed when saved, decreasing the amount of disk space needed to store the file, and the amount of bandwidth needed to send files in e-mail, over a network, or across the Internet. ● Recovering at least some of the content of damaged files is possible because XML files can be opened in a text program such as Notepad. ● Security is greater because the standard file formats cannot contain macros, and personal data can be detected and removed from the file. (Word 2010 and Word 2007 provide a different file format—.docm—for documents that contain macros.)
  • 25. www.eacademy.lk www.eacademy.lk 25 | P a g e www.eacademy.lk Each Office 2010 program offers a selection of file formats intended to provide specific benefits. The file formats and file name extensions for Word 2010 documents include the following:  Word Document (.docx)  Word Macro-Enabled Document (.docm)  Word Template (.dotx)  Word Macro-Enabled Template (.dotm)  Word XML Document (.xml) The file formats and file name extensions for Excel 2010 documents include the following:  Excel Workbook (.xlsx)  Excel Macro-Enabled Workbook (.xlsm)  Excel Binary Workbook (.xlsb)  Excel Template (.xltx)  Excel Macro-Enabled Template (.xltm)  Excel Add-In (.xlam) The file formats and file name extensions for PowerPoint 2010 documents include the following:  PowerPoint Presentation (.pptx)  PowerPoint Macro-Enabled Presentation (.pptm)  PowerPoint Template (.potx)  PowerPoint Macro-Enabled Template (.potm)  PowerPoint Show (.ppsx)  PowerPoint Macro-Enabled Show (.ppsm)  PowerPoint Add-In (.ppam)  PowerPoint XML Presentation (.xml)  PowerPoint Picture Presentation (.pptx) Other non–program specific file types, such as text files, Web pages, PDF files, and XPS files, are available from the Save As dialog box of each program. You can open a file created with Office 2003, Office XP, Office 2000, or Office 97 in an Office 2010 program, but new features will not be available. The file name appears in the title bar with [Compatibility Mode] to its right. You can work in Compatibility mode, or you can convert the document to the current file format by displaying the Info page of the Backstage view and clicking the Convert button in the Compatibility Mode section. You can also click Save As in the Backstage view to save a copy of the file in the current format. If you work with people who are using Office 2003, Office XP, Office 2000, or Office 97, you can save your documents in a format that they will be able to open and use by choosing the corresponding 97-2003 file format in the Save As Type list, or they can download the Microsoft Office Compatibility Pack for Word, Excel, and PowerPoint File Formats from the Microsoft Download Center (located at download.microsoft.com) so that they can open current Office files in their version of Office. Opening, Moving Around in, and Closing Files If a program isn’t already running, you can start the program and simultaneously open an existing file by double-clicking the file in Windows Explorer. While a program is running, you can open an existing document
  • 26. www.eacademy.lk www.eacademy.lk 26 | P a g e www.eacademy.lk from the Backstage view. If you have recently worked on the document you want to open, you can display the Recent page and simply click the document you want in the list. If the document is not available on the Recent page, clicking Open in the left pane displays the Open dialog box. By default, the Open dialog box displays your Documents library, with a combined view of your My Documents folder and the Public Documents folder. If you display the dialog box again in the same Word session, it displays the contents of the folder from which you last opened a file. To display the contents of a different folder, you can use the standard Windows techniques described in ―Creating and Saving Files‖ earlier in this chapter. After you locate the document you want to work with, you can open it by clicking its file name and then clicking Open in the lower-right corner of the dialog box, or by simply double-clicking the file name. If you open a document that is too long to fit entirely on the screen, you can bring off-screen content into view without changing the location of the cursor by using the vertical scroll bar in the following ways:  Click the scroll arrows to move up or down by one line.  Click above or below the scroll box to move up or down by the height of one window.  Drag the scroll box on the scroll bar to display the part of the document corresponding to the location of the scroll box. For example, dragging the scroll box to the middle of the scroll bar displays the middle of the document. If the document is too wide to fit on the screen, Word displays a horizontal scroll bar that you can use in similar ways to move from side to side. You can also move around in a document by moving the cursor. To place the cursor in a specific location, you simply click there. To move the cursor one page backward or forward, you click the Previous Page and Next Page buttons below the vertical scroll bar. You can also press a keyboard key to move the cursor. For example, pressing the Home key moves the cursor to the left end of a line. The following table lists ways to use your keyboard to move the cursor.
  • 27. www.eacademy.lk www.eacademy.lk 27 | P a g e www.eacademy.lk In a long document, you might want to move quickly among elements of a certain type; for example, from graphic to graphic. Clicking the Select Browse Object button at the bottom of the vertical scroll bar displays a gallery of browsing options, such as Browse By Page and Browse By Graphic. (These options are also available on the Go To tab of the Find And Replace dialog box, which you display by clicking the Find arrow in the Editing group of the Home tab and then clicking Go To.) You can also display the Navigation task pane and move from heading to heading or page to page. Keyboard Shortcut Press Ctrl+G to display the Go To tab of the Find And Replace dialog box. If more than one document is open, you can close the active document without exiting Word by clicking the Close button at the right end of the title bar. If only one document is open, clicking the Close button closes the document and also exits Word. If you want to close that document but leave Word running, you must click Close in the Backstage view. Viewing Files in Different Ways In each program, you can display the content of a file in a variety of views, each suited to a specific purpose. You switch the view by clicking the buttons in the Document Views group on the View tab, or those on the View Shortcuts toolbar in the lower-right corner of the program window. The views in each program are specific to that program’s files. Word 2010 includes the following views:  Print Layout view- This view displays a document on the screen the way it will look when printed. You can see page layout elements such as margins, page breaks, headers and footers, and watermarks.  Full Screen Reading view- This view displays as much of the content of the document as will fit on the screen at a size that is appropriate for reading. In this view, the ribbon is replaced by one toolbar at the top of the screen with buttons for saving and printing the document, accessing references and other tools, highlighting text, and making comments. You can move from page to page and adjust the view by selecting options from the View Options menu. You can edit the document only if you turn on the Allow Typing option on this menu, and you can switch views only by clicking the Close button to return to the previous view.
  • 28. www.eacademy.lk www.eacademy.lk 28 | P a g e www.eacademy.lk  Web Layout view- This view displays the document the way it will look when viewed in a Web browser. You can see backgrounds and other effects. You can also see how text wraps to fit the window and how graphics are positioned.  Outline view- This view displays the structure of a document as nested levels of headings and body text, and provides tools for viewing and changing its hierarchy.  Draft view- This view displays the content of a document with a simplified layout so that you can type and edit quickly. You can’t see page layout elements. Excel 2010 includes the following views:  Normal view- This view displays the worksheet with column and row headers.  Page Layout view- This view displays the worksheet on the screen the way it will look when printed, including page layout elements.  Page Break Preview view- This view displays only the portion of the worksheet that contains content, and any page breaks. You can drag page breaks in this view to move them. PowerPoint 2010 includes the following views:  Normal view- This view displays individual slides with active content objects such as text containers, and a separate pane into which you can enter notes.  Slide Sorter view- This view displays all the slides in a presentation. You can apply formatting to individual slides and to groups of slides, but you can’t edit the slide content.  Notes Page view- This view displays each slide and its accompanying notes as they will look when printed in the Notes Page print layout.  Reading view- This view displays individual slides as they will appear on the screen, without active content objects. In this view, the ribbon is hidden. You can move from page to page and adjust the view by selecting options from a menu on the status bar. You can’t edit slide content in this view. When you want to focus on the layout of a document, worksheet, or slide, you can display rulers and gridlines to help you position and align elements. Simply select the corresponding check boxes in the Show group on the View tab. You can also adjust the magnification of the document by using the tools available in the Zoom group on the View tab, or the Zoom button or Zoom slider at the right end of the status bar. Clicking the Zoom button in either location displays a dialog box where you can select or type a percentage; or you can drag the Zoom slider to the left or right or click the Zoom Out or Zoom In button on either side of the slider to change the percentage incrementally. You’re not limited to working with one file at a time. You can easily switch between open files, and you can display more than one program window simultaneously. If you want to work with different parts of a document, you can open the document in a second window and display both, or you can split a window into two panes and scroll through each pane independently by using options in the Window group on the View tab. Not represented on the View tab is a feature that can be invaluable when you are fine tuning the layout of a document. Clicking the Show/Hide ¶ button in the Paragraph group on the Home tab turns the display of nonprinting and hidden characters on and off. Nonprinting characters, such as tabs and paragraph marks, control the layout of your document, and hidden characters provide the structure for behind-the-scenes processes, such as indexing. You can control the display of these characters for each window.
  • 29. www.eacademy.lk www.eacademy.lk 29 | P a g e www.eacademy.lk Getting Help with Office 2010 If your question is about one of the programs in the Microsoft Office Professional 2010 software suite, and not about the content of this book, your first recourse is the Help system for the individual program. This system is a combination of tools and files stored on your computer when you installed the software suite or program and, if your computer is connected to the Internet, information available from the Microsoft Office Online Web site. You can find Help information in the following ways: ● To find out about an item on the screen, you can display a ScreenTip. For example, to display a ScreenTip for a button, point to the button without clicking it. The ScreenTip gives the button’s name, the associated keyboard shortcut if there is one, and sometimes a description of what the button does when you click it. ● In the program window, you can click the Help button (a question mark in a blue circle) at the right end of the ribbon to display the program-specific Help window. ● At the right end of the title bars of some dialog boxes is a Help button (also a question mark) that you can click to display the program-specific Help window. Sometimes, topics related to the functions of that dialog box are already identified in the window. 1. At the right end of the ribbon, click the Microsoft Word Help button. The Word Help window opens. If you are connected to the Internet, clicking any of the buttons below the Microsoft Office banner (Products, Support, Images, and Templates) takes you to a corresponding page of the Office Web site. 2. Below the bulleted list under Browse Word 2010 support, click see all. The window changes to display a list of Help topics. 3. In the list of topics, click Activating Word. Word Help displays a list of topics related to activating Microsoft Office programs. You can click any topic to display the corresponding information.
  • 30. www.eacademy.lk www.eacademy.lk 30 | P a g e www.eacademy.lk 4. On the toolbar, click the Show Table of Contents button. The window expands to accommodate two panes. The Table of Contents pane appears on the left. Like the table of contents in a book, it is organized in sections. If you’re connected to the Internet, Word displays sections, topics, and training available from the Office Online Web site as well as those stored on your computer. 5. In the Table of Contents pane, click a few sections and topics. Then click the Back and Forward buttons to move among the topics you have already viewed. 6. At the right end of the Table of Contents title bar, click the Close button. 7. At the top of the Word Help window, click the Type words to search for box, type saving, and then press the Enter key. The Word Help window displays topics related to the word you typed.
  • 31. www.eacademy.lk www.eacademy.lk 31 | P a g e www.eacademy.lk Next and Back buttons appear, making it easier to search for the topic you want. 8. In the results list, click the Recover earlier versions of a file in Office 2010 topic. The selected topic appears in the Word Help window. 9. Below the title at the top of the topic, click Show All. Word displays any information that has been collapsed under a heading and changes the Show All button to Hide All. You can jump to related information by clicking hyperlinks identified by blue text. Tip: You can click the Print button on the toolbar to print a topic. Only the displayed information is printed. Click the Close button at the right end of the Word Help window. If your question is about an Office 2010 program or another Microsoft software product and you cannot find the answer in the product’s Help system, please search the appropriate product solution center or the Microsoft Knowledge Base at: support.microsoft.com In the United States, Microsoft software product support issues not covered by the Microsoft Knowledge Base are addressed by Microsoft Product Support Services. Location-specific software support options are available from: support.microsoft.com/gp/selfoverview/ To download MS Office Professional 2010 FREE Please visit our partner website www.files2pc.com Free Courses with Certificate now available on www.eacademy.lk