1. Align Palette: Adobe Indesign™
The Basics:
The Align palette allows you to quickly bring objects into alignment. Typically tabbed into the Transform
palette,the Align palette allows a variety of options for alignment.Represented by visual icons,these actions
are divided into three tiers, Align Objects, Distribute Objects and Distribute spacing. Located in the Distribute
Object section of the palette is the Align To: contextual menu. Using this feature is the key to successfully
making use of the Align palette. Clicking on this menu will reveal five additional options to choose from.
The settings in the AlignTo: drop down are: Align to Selection, Align to Key Object, Align to Margins, Align to Page
and Align to Spread. Each of these options provide a wealth of alignment actions, and when used properly can
take the guess work out and make quick work of aligning objects on a page. One item you may have noticed is
that the Align to Key Object is grayed out representing that it is not available for use.This action is dependent on
your selection choices,and will be discussed later in this tutorial.
Note: In order to utilize any of the features in the Align palette,the objects must be preselected.
The Align palette is by default nested into the Transform palette along with the Pathfinder palette. The
grouping of these palettes is intentional, as they all relate to an objects position or relativity to another
object. This tutorial will focus’ on the Align palette. In the screenshot below, you can see that the Align
palette is divided into three sections by horizontal rules. From top to bottom the sections are Align Objects,
Distribute Objects and Distribute Spacing.We will explore each of these functions in the steps ahead.
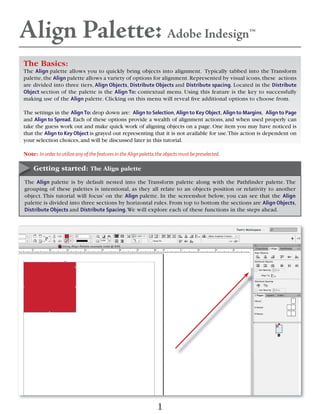
Getting started: The Align palette
1
2. 2
If you do not see the Align palette, got to the menu at the top and choose: Window > Object & Layout > Align.
You can also use the shortcut Shift F7. This will open the Align palette.
At the bottom of the DistributeObjects section of the Align palette, there is a contextual menu, labeled“Align
To:”.This menu not only provides additional options, it is the key to using the Align palette successfully. In
the AlignTo: tab you will see that you can align to a Selection, a Key Object, Margins, Page, and Spread.
Viewing the Align palette
Align To:
3. 3
The first the most used section of the Align palette is,AlignObjects.Starting with the left icon is the Align left edges
tab.Though there are several options available,using this function,we will start with the basics.Selecting the most
left object first,we then select the secondary object.With both now selected,click the Align left edges tab.
As you can see, the green box has aligned to the left side of the red box. If we had wanted the red box to
align with the left edge of the green box we would need to make use of the Align To: contextual menu.We
will explore that function later on in this tutorial.
Align Objects: Align left edges “before”
Align Objects: Align left edges “after”
4. 4
As you can see in the screenshot below the two objects have centered to each other. However, without the
selection of the Align to Key Object tab inside the Align To: contextual menu, the red box moved left.This is
because the objects found center based on each other and not by the center of the first object.
Align Objects: Align horizontal centers “after”
The next tab is Align horizontal centers, which will naturally, center align two or more objects.The key to
using this function depends on your preference,though it is best used with the Align to Key Object tab inside
the Align To: contextual menu.
Align Objects: Align horizontal centers “before”
5. 5
As mentioned previously, the Align To: contextual menu offers a variety of alignment options. When used in
conjunction with alignment tabs you not only can control what it aligns to,but how it aligns with other objects.
With the Align to Key Object selected,you can keep your initial selection stationary.
Align to Key Object is easy once you understand the steps required. First, you must select the object you want
everything else to align with, this is the “Key Object”. Now select the second object and in the Align palette
choose AlignTo: > Alignto Key Object.Now choose an alignment tab and the key object (first) will stay in place.
Align Objects: Align to Key Object “A”
Align Objects: Align to Key Object “B”
Key Object
(1st selected)
Key Object
(1st selected)
6. 6
Selecting the Align to Margins in the AlignTo: sub-menu allows alignment of objects to the page margins.
Note: Objects will only align to the exterior of a margin even when multiple columns are applied.
Selecting the Align to Page in the AlignTo: sub-menu allows alignment of objects to the edge of the page.
Note: There is no option to align objects to a documents bleed or artboard, this must be set manually.
Align Objects: Align to Margin
Align Objects: Align to Page
7. 7
Selecting the AligntoSpreadin the AlignTo:sub-menu allows alignment of objects to the documents page spreads. In
the screenshot below AligntoSpreadwas selected,and Alignhorizontalcenterschosen,thereby aligning the objects to
the center of the spread.Note: Objects will align to the exterior edges of a spread when Align left/right edges are chosen.
The center of the Align palette contains the DistributeObjects tabs.These tabs are similar to the AlignObjects tabs,in
that they have top,bottom,left,right,horizontal,and vertical options.Where they differ is that they are used to equally
distribute objects dependent on the outer most (anchor) objects.Note:Threeormoreobjectsarerequiredforthesefunctions.
Align Objects: Align to Spread
Distribute Objects
8. No movement
No movement
Distribute left
Distribute right
Distribute left
Distribute left
Distribute left
Distribute left
No movement
No movement
8
Choosing Distribute horizontal centers as seen in the screenshot below, distributes objects equally. Indesign
measures the distance between the outermost objects and distributes the remaining objects accordingly.
Using the DistributeObjectsamong objects of varying proportions can yield unexpected results.Notice below how
the blue box moves right of the black box.Indesign measures the mass of an object(s),and gives them priority.
Distribute Objects
Distribute Objects
9. 9
Another option in the DistributeObjects section of the Align palette is to check the UseSpacing box and click or enter
a number in the open field.In the screenshot below,I have entered 1/8”(.125 in) and selected the Distributeleftedges
tab. As seen the most left remains in place and the remainder are continuously staggered 1/8”of it’s left side.
Once we entered 1/8”(.125 in) into the UseSpacing field,Indesign ignores the most right objects initial positioning.
Note: This feature is best used in the alignment of objects that are already vertically aligned in a single row. i.e. (row of pictures)
Distribute Objects
Distribute Objects
Most left position
1/8” increments from
“Most left position”
MM
11/
“M
10. 10
Choosing Distributeverticalcenterswill equally distribute elements that are the same dimensions.In the screenshot
below,the four squares are equal in their size and therefor carry the same weight mathematically.
When objects vary in size, the larger elements carry more weight.As seen below, this will have a effect in
the distribution of these objects. Note: Becoming familiar with this section of the palette requires experimentation. For
everyday use you may prefer using “Distribute Spacing” at the bottom of the palette.
Distribute Objects: vertical
Distribute Objects: vertical (varied sizes)
11. 11
Finally, we will look at Distribute Spacing which is located at the bottom of the palette. For the average user,Align
Objectsand DistributeSpacingare used with the most frequency.In DistributeSpacingthe outermost objects become
anchors and regardless the size of content will evenly distribute space amongst them.
As seen below,even when the objects are varied in their height using DistributeSpacingwill calculate the dimensions
and equally distribute the object between the anchor objects.Note: Whenyouselect“AligntoMarginsorPageintheAlign
To:tabIndesignwillmovetheanchorstoeitherthemarginortheedgeofthepageautomatically.
Distribute Spacing: vertical
Distribute Spacing: vertical
12. 12
As with Distribute vertical space, the next tab, Distribute horizontal space, will equally distribute objects between
the outermost selected objects.As seen below, the vertical positioning has no effect on the horizontal spacing
of these objects.
Once again,varying sizes do not effect the balanced and precise spacing of objects when selecting the Distribute
horizontal space tab.
Distribute Spacing: horizontal
Distribute Spacing: horizontal (varying size)
13. Row of objects grouped first.
Row of objects grouped first.
Row of objects grouped first.
Row of objects grouped first.
Row of objects not grouped first.
13
The screenshot below demonstrates what will happen when you do not group the rows first.As you can see,the
objects are randomly distributed in the vertical space. Note: The alternative to grouping each row would be to select one
column at a time, then choose the Distribute vertical space tab.
Distribute Spacing: vertical (not grouped)
In this example,each row has been grouped in order to quickly space each row from top to bottom.Once you have all
the objects in your row(s) aligned,spaced and placed to your liking,simply select and group each row independently,
then select,Distributeverticalspace.Grouping rows prior to spacing takes the surprise element out,and saves you time.
Distribute Spacing: vertical (grouping rows)
14. top row remains stationary
all other rows move up to create 1/16” gap.
14
Distribute Spacing also has the ability to input a precise amount of space between objects when you check the Use
Spacingbox.Once you have entered a number in this box,Indesign will pull or push the objects to create that exact
amount of space between them.As seen below, entering a number here overrides any AlignTo: settings as well as
the outside anchors.Note:Typically Indesign will leave the top anchor row in place,and will pull or push the other
objects towards or away from that position
The key to understanding the Align palette its features and how they interact with each other is experimentation.
Though each feature in this palette has purpose, some features are used more than others. From my experience,
the Align Objects:, Distribute Spacing and the AlignTo: tab, are used most. Rarely have I used the Distribute Objects
section or the Use Spacing box.
Note: Because of redundency, not every button was demonstrated in this tutorial.As an example,Align left edges
preforms esentially the same function as Align right edges.
Distribute Spacing: vertical (grouping rows and Use Spacing setting)