This is a short tutorial on how to take better photographs of waterfalls. These tips and tricks can be applied to other situations to. Please see instagram.com/ablokecalledtom for more.
Neighborhood Guide To Atlanta’s Awe-Inspiring Art Galleries
Waterfall photography tips & tricks
1. Waterfall Photography
COMPOSITION
ABLOKECALLEDTOM TOMATHAWES.COM
SETTINGS (THIS CHANGES DEPENDING ON CONDITIONS)
GEAR
TAKING PICTURES
First of all, I suggest taking your time to assess the environment around you. This is great for
embracing the surroundings and helps your creative skills flourish. Try to look for interesting
foreground elements (plants/water movement / leading lines) and don’t be afraid of getting
your feet wet in the river (if safe)! Many of the best images can be found lower to the
ground. Attempt to resist temptation and don't settle on the first composition you think of
(it’s been done before).
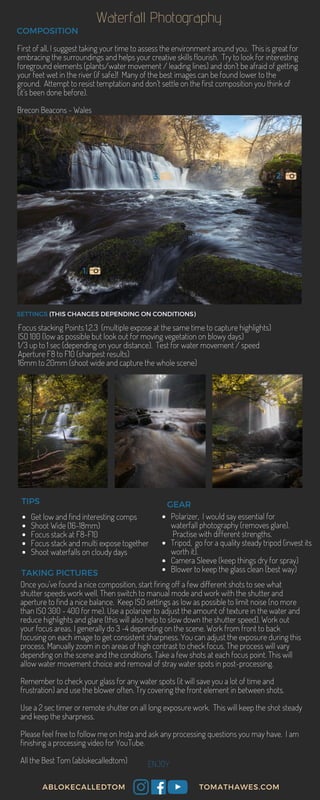
Brecon Beacons - Wales
1.
2.3.
Focus stacking Points 1.2.3 (multiple expose at the same time to capture highlights)
ISO 100 (low as possible but look out for moving vegetation on blowy days)
1/3 up to 1 sec (depending on your distance). Test for water movement / speed
Aperture F8 to F10 (sharpest results)
16mm to 20mm (shoot wide and capture the whole scene)
TIPS
Get low and find interesting comps
Shoot Wide (16-18mm)
Focus stack at F8-F10
Focus stack and multi expose together
Shoot waterfalls on cloudy days
Polarizer, I would say essential for
waterfall photography (removes glare).
Practise with different strengths.
Tripod, go for a quality steady tripod (invest its
worth it).
Camera Sleeve (keep things dry for spray)
Blower to keep the glass clean (best way)
Once you've found a nice composition, start firing off a few different shots to see what
shutter speeds work well. Then switch to manual mode and work with the shutter and
aperture to find a nice balance. Keep ISO settings as low as possible to limit noise (no more
than ISO 300 - 400 for me). Use a polarizer to adjust the amount of texture in the water and
reduce highlights and glare (this will also help to slow down the shutter speed). Work out
your focus areas. I generally do 3 -4 depending on the scene. Work from front to back
focusing on each image to get consistent sharpness. You can adjust the exposure during this
process. Manually zoom in on areas of high contrast to check focus. The process will vary
depending on the scene and the conditions. Take a few shots at each focus point. This will
allow water movement choice and removal of stray water spots in post-processing.
Remember to check your glass for any water spots (it will save you a lot of time and
frustration) and use the blower often. Try covering the front element in between shots.
Use a 2 sec timer or remote shutter on all long exposure work. This will keep the shot steady
and keep the sharpness.
Please feel free to follow me on Insta and ask any processing questions you may have. I am
finishing a processing video for YouTube.
All the Best Tom (ablokecalledtom) ENJOY