TataKelola dan KamSiber Kecerdasan Buatan v022.pdf
Manual caseta carte
1. CLAMSHELL BOX CONSTRUCTION
Update of Manual Guide 6A
Rev 4/05
The type of box described below completely encloses the protected item, and is recommended for the protection of: fragile
items to be preserved in original condition, important bindings, certain loose materials, or bindings with clasps or nails. The
box consists of three basic parts: lower tray, upper tray, and outer case.
Materials: Hand Tools:
Barrier board (20 pt) Bone folder
Binder's board (0.074 in.) Scissors
Buckram Glue Brush
PVA (adhesive) Ruler with cm units
Lightweight Folder Stock (10 pt.) (Lightweight bristol board) T-square and knife or mat cutter, or board shear
Heavyweight Folder stock (20 pt.) (Map folder stock)
MEASUREMENT of the Trays
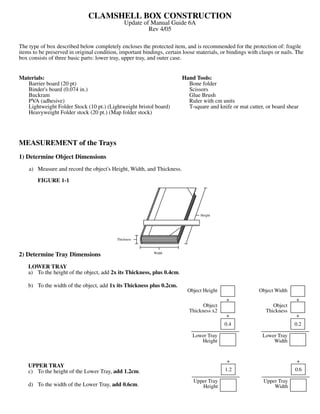
1) Determine Object Dimensions
a) Measure and record the object's Height, Width, and Thickness.
FIGURE 1-1
Height
Thickness
Width
2) Determine Tray Dimensions
LOWER TRAY
a) To the height of the object, add 2x its Thickness, plus 0.4cm.
b) To the width of the object, add 1x its Thickness plus 0.2cm.
Object Height Object Width
+ +
Object Object
Thickness x2 Thickness
+ +
0.4 0.2
Lower Tray Lower Tray
Height Width
+ +
UPPER TRAY
c) To the height of the Lower Tray, add 1.2cm. 1.2 0.6
Upper Tray Upper Tray
d) To the width of the Lower Tray, add 0.6cm. Height Width
2. CONSTRUCTION of Trays
3) Cut Tray Boards
a) Cut one board for each tray from 60 pt. barrier board (grain should run parallel to height of object) according to the
dimensions determined above.
b) After cutting, mark each board as Upper and Lower accordingly. Note: always mark the blue side.
If making multiple boxes, label each board according to the object it is being designed for.
4) Mark and Score Tray Boards (always on the blue surface)
a) Mark the object's Thickness measurement along 3 sides of the Lower Tray board.
b) Mark the object's Thickness measurement plus 0.3cm along 3 sides of the Upper Tray board.
FIGURE 4-1 Orientation of score lines
for a vertical book Orientation of score lines
for a horizontal book
c) Using a mat cutter, or a straight-edge and sharp knife, score the boards along the marked lines
- Score halfway through the blue layer until the white is just visible
d) Cut off and discard the 2 square corners of each board.
e) Fold up the sides of each board and nest them together as shown.
FIGURE 4-2
Upper Tray
Lower Tray
3. f) The bottom of the Lower Tray should be flush with the lower edges of the Upper Tray.
FIGURE 4-3
Flush along
bottom
Thin gap
TEST FIT! - If the object does not fit at this point, repeat previous steps. Confirm measurements, and double-check
accuracy of marks and scoring.
5) Reinforce Upper Tray
The width of the reinforcement strip = the thickness of the Upper Tray x the perimeter of the Upper Tray.
a) Determine the perimeter (sum of all three sides) of the Upper Tray. (A cloth tape measure works well.)
NOTE: If no cloth tape measure is available, calculate it as shown.
FIGURE 5-1
Tray Width
x2
+
Tray
Height
Strip Length
b) Determine the outside thickness of the Upper Tray (any side folded up).
c) Cut te Reinforcement Strip from a sheet of map folder stock (grain should run parallel to the perimeter of the tray ).
d) Glue out the strip and lay the Upper tray on it.
e) Roll the tray so the strip wraps around the walls (score corners, and keep flush with edges).
f) Rub well with a bone folder.
FIGURE 5-2
Score
Score
4. 6) Measure and Cut Tray Cloth
Determine length and width of cloth for covering the trays.
a) To determine the length, add 5.0cm to the length of the trayís perimeter.
b) To determine the width, double the thickness of the tray and add 6.0 cm. (Wrap a cloth tape measure around a side as
shown or use a strip of paper.
FIGURE 6-1
3cm
3cm
FIGURE 6-2
Tray
Thickness x2
+
6.0
Cloth Width
c) Cut two pieces of buckram according to these dimensions. Grain direction should run parallel to the perimeter.
7) Cover the Trays
a) Glue out one buckram strip.
b) Lay a tray onto the strip according to Figure 7-1.
c) Roll the tray so that the strip wraps around the walls.
FIGURE 7-1
5. d) Make cuts and turn cloth in.
FIGURE 7-2 5
B) 3 (discard) C)
A) 1
2
3 1
2
4
1
2
D)
E)
e) Be sure that corners and angles are fitted snugly.
f) Place bricks against inner and outer walls to hold shape while drying.
g) Repeat for next tray.
Test Fit! When dry - if the object does not fit at this point, repeat previous steps. Place Upper Tray over Lower Tray (as
in Figure 4-2) and check fit. Trays should not fit together too tightly .
CONSTRUCTION of the Outer Case
Note that if the box will require velcro tabs to keep it closed tightly, refer to
the Appendix for the remainder of box construction
The outer case is cut from 0.074 in. binder's board, and consists of a front board, a back board, and a spine piece.
8) Measurement of Outer Case
a) The height is the same for all three pieces.
Height of Case = (Height of Upper Tray plus 0.5 cm)
Width of each Board = Width of Upper Tray plus 0.3 cm.
Width of Spine = Thickness (outer depth) of Upper Tray
6. 9) Cut Case Boards
a) Cut the Front, Back, and Spine boards from 0.074 in. binder's board
b) Be sure that grain direction runs head to tail or parallel to the height.
Test Fit! - Make sure:
a) All three pieces are the same height
b) Case boards are wider and taller than upper tray
c) The width of the spine equals the thickness of the upper tray
10) Cut Case Cloth
a) Cut a piece of buckram to the size of all three pieces of the Outer Case laid out plus 3.0cm added to Height and Width.
Note: a space equal to 2x the board thickness must be left between each board.
FIGURE 11-1
b) Be sure that grain direction runs parallel to the height of the cloth/boards.
11) Cover the Case Boards
a) Glue out buckram.
b) Place the three Outer Case boards on the glued cloth with a roughly even margin of buckram overlap around, making
sure the top and bottom edges of the boards are even.
c) Make corner cuts and turn cloth in head and tail first, then pinch corners and turn in foredges.
Work cloth
FIGURE 11-2 B) around corner
Discard cutoffs
A)
C)
2 board thicknesses
from corner of board
Work cloth into joints
d) Place under board and blotter to dry. (inside and out)
7. 12) Final Assembly
a) Apply a light, but thorough layer of glue to the underside of the Lower Tray.
b) Lay Lower Tray on the inside of the Outer Case board to your right
c) Open edge of Tray should be flush with the inner edge (spine side) of the Outer Case board.
FIGURE 12-1
d) Place assembly in a press with pressing boards filling the Tray. (If a press is not available, a heavy weight will work.)
e) Apply pressure slowly to ensure that the Tray does not shift position.
f) Leave under pressure for approximately 15 seconds, and remove, repositioning boards if necessary for coverage.
g) Repeat for the Upper Tray, using the Lower Tray as a positioning guide
FIGURE 12-2
13) Cut Linings
a) Cut a strip of buckram to cover the inside of the Spine board, making sure the grain runs parallel to the height of the Spine
The buckram should fit just inside the Lower Tray, and should be approximately 4cm wider than the Spine board.
b) Make sure that grain runs along the height of the Spine strip.
c) Cut two same-sized pieces of Lightweight Bristol board to cover the insides of the Trays
D) They should be sized to loosely fit the inside of the Lower Tray. It will be slightly smaller for the Upper Tray, but is OK.
14) Line Trays
a) Glue the buckram strip, then place and smooth over inside Spine and open edges of both Trays.
b) Be sure to work cloth into the gap between boards.
c) Glue one piece of Bristol board and center in place. Rub down with a bone folder.
d) Repeat for second Tray and piece of Bristol.
e) Set completed box aside while open and allow to dry for half an hour. Do not close box until glue has set..
8. APPENDIX
CONSTRUCTION of the Outer Case With Velcro Tabs
If making a box with velcro enclosures, refer to these steps in place of the original instructions.
The outer case is cut from 0.074 in. binder's board, and consists of a front board, a back board, and a spine piece.
A1) Measurement of Outer Case
a) The height is the same for all three pieces.
Height of Case = (Height of Upper Tray plus 0.5 cm)
Width of each Board = Width of Upper Tray plus 0.4 cm (to allow for both foredge square and velcro tabs).
Width of Spine = Thickness (outer depth) of Upper Tray
A2) Cut Case Boards
a) Cut the Front, Back, and Spine boards from 0.074 in binder's board
b) Be sure that grain direction runs head to tail (parallel to the height).
Test Fit! - Make sure:
a) All three pieces are the same height
b) Case boards are wider and taller than upper tray
c) The width of the spine equals the thickness of the upper tray
A3) Mark Velcro Placement FIGURE A3-1
a) Line up Case boards and nested Trays (leave spine board aside).
b) With a pencil, trace foredge of Trays against inside of Outer Case Boards.
c) Set Trays aside and place both boards pencil-side up.
d) Place sample velcro in 2 balanced positions (roughly1/3rds) on one pencil mark.
e) Mark the same locations on the opposite board.
- Note that one Case Board will be the Back - this needs extra space to allow for lip of upper tray.
FIGURE A3-2 Front Board Back Board
Sample
Velcro
9. A4) Cut Out Velcro Recesses
a) With a sharp knife, score through several layers of the board along the pencil lines.
b) Pry out the material until it is uniform and the velcro sits fairly flush with the surface of the board.
A5) Cut Case Cloth
a) Cut a piece of buckram to the size of all three pieces of the Outer Case laid out plus 3.0cm added to Height and Width.
Note: a space equal to 2x the board thickness must be left between each board.
A6) Cover the Case Boards - As normal, except for adjustments needed for velcro attachment
a) Glue out buckram.
b) Place the three Outer Case boards on the glued cloth with a roughly even margin of buckram overlap around, making
sure the top and bottom edges of the boards are even.
c) Make corner cuts and turn cloth in head and tail first, then pinch corners and turn in foredges.
Discard cutoffs B)
A)
Work cloth
around corner
2 board thicknesses
from corner of board
C)
Work cloth into joints
(inside and out)
b) When the Case Board is freshly covered, make small cuts where the velcro recesses are overlapped.
c) Work the cloth into the recesses.
FIGURE A6-1
10. A7) Measure and Cut Velcro Tabs
a) Place one end of velcro in a recess.
b) Place tray on board
c) Cut velcro to length longer than edge of tray.
FIGURE A7-1
A8) Attach Velcro Tabs
a) Dab a small amount of glue into each recess.
Front Case Board
b) Place hook-side velcro into recesses, texture side up cover with wax paper and weights.
Back Case Board
c) Place fuzzy-side velcro into recesses, texture side down cover with wax paper and weights.
d) Let sit until glue has set.
FIGURE A8-1 Front Board Back Board
Hook Fuzz
side side
up down
A9) Final Assembly
a) Apply a light, but thorough layer of glue to the underside of the Lower Tray.
b) Lay Lower Tray on the inside of the Outer Case board to your right
c) Open edge of Tray should be flush with the inner edge (spine side)of the Outer Case board.
FIGURE A9-1
11. d) Place assembly in a press with pressing boards filling the Tray.(If a press is not available, a heavy weight will work.)
e) Apply pressure slowly to ensure that the Tray does not shift position.
f) Leave under pressure for approximately 15 seconds, and remove, repositioning boards if necessary for coverage.
g) Repeat for the Upper Tray, using the Lower Tray as a positioning guide
FIGURE A9-2
A10) Cut Linings
a) Cut a strip of buckram to cover the inside of the Spine board, making sure grain runs parallel to height of the Spine
The buckram should fit just inside the Lower Tray, and should be approximately 4cm wider than the Spine board.
b) Make sure that grain runs along the height of the Spine strip.
c) Cut two same-sized pieces of Lightweight Bristol board to cover the insides of the Trays
d) Should be sized to loosely fit the inside of the Lower Tray (will be slightly smaller for the Upper Tray, but is OK).
A11) Line Trays
a) Glue the buckram strip, then place and smooth over inside Spine and open edges of both Trays.
b) Be sure to work cloth into the gap between boards.
c) Glue one piece of Bristol board and center in place. Rub down with a bone folder.
d) Repeat for second Tray and piece of Bristol.
e) Set completed box aside while open and allow to dry for half an hour. Do not close box until glue has set..
A12) Finish Velcro Tabs
a) Trim velcro to slightly less than the thickness of the tray
b) Trim hook velcro into pointed shape
FIGURE A12-1