Mobile Application Development- Configuration and Android Installation
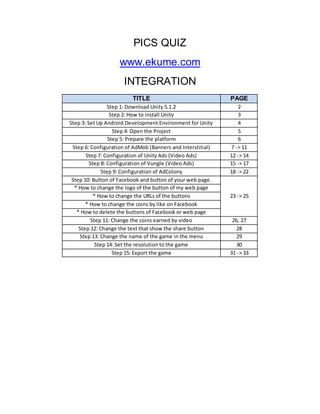
PICS QUIZ - INTEGRATION
1. PICS QUIZ
www.ekume.com
INTEGRATION
TITLE PAGE
Step 1: Download Unity 5.1.2 2
Step 2: How to install Unity 3
Step 3: Set Up Android Development Environment for Unity 4
Step 4: Open the Project 5
Step 5: Prepare the platform 6
Step 6: Configuration of AdMob (Banners and Interstitial) 7 -> 11
Step 7: Configuration of Unity Ads (Video Ads) 12 -> 14
Step 8: Configuration of Vungle (Video Ads) 15 -> 17
Step 9: Configuration of AdColony 18 -> 22
Step 10: Button of Facebook and button of your web page.
23 -> 25
* How to change the logo of the button of my web page
* How to change the URLs of the buttons
* How to change the coins by like on Facebook
* How to delete the buttons of Facebook or web page
Step 11: Change the coins earned by video 26, 27
Step 12: Change the text that show the share button 28
Step 13: Change the name of the game in the menu 29
Step 14: Set the resolution to the game 30
Step 15: Export the game 31 -> 33
2. Note: If you have Unity and you have the SDK of android installed for unity you
can jump to step 4.
Step 1: Download Unity 5.1.2
URL: http://unity3d.com/get-unity/download/archive
3. Step 2: Install
You can continue installing and remember create the account like personal (Free),
or if you are a company interested in buy the license of Unity you can do it, but you
don’t need unity pro.
4. Step 3: Set Up Android Development Environment for Unity.
Video part 1: https://www.youtube.com/watch?v=HlHa5DAx4Rs
Video part 2: https://www.youtube.com/watch?v=zklgd6kKMR4
(Those videos are not mine)
5. Step 4: Open the Project
If the Project is compressed in a ZIP or RAR file, uncompress and later enter in the
folder: Assets/Pics Quiz/Scenes
Later, double click on Quiz.unity
6. Step 5: Prepare the platform
1. Click on File - > Build Settings
2. Select Android and Click on Switch Platform
3. Search the folder Scenes of the folder Pics Quiz.
4. Drag and drop the scene Quiz to “Scenes In Build”
If you obtain errors in the console just press the button Clear.
If you have errors when you press the button Switch Platform you did not correctly
the step 3.
7. Step 6: Configuration of AdMob
If you don’t have an account of AdMob you will need create it.
https://www.google.com/admob/
Configuration of banners and interstitial:
Login on your AdMob account and press the “Monetize new app” button.
Click on “Add your app manually” and select Android platform. Later click on Add
app.
8. Click on “Do not analyze this app” and click on Save.
Put a name for this banner, example: Top Banner Menu. Click on Save.
9. Copy all unit ID.
In Unity select the object ADS-BANNER-TOP and in the Inspector paste the unit
ID. In visual settings select Banner and Top Position.
Return to the Admob page and create other banner of the same way and copy the
other Ad unit ID.
10. Return to Unity and select the object ADS-BANNER-BOTTOM.
Paste the Ad unit ID and select in visual settings the position Bottom.
Return to AdMob and now create new ad, but now select Interstitial:
11. Press the button Save and now copy the Ad unit ID.
Now in Unity select the Object ADS-INTERSTITIAL-CONTROL and paste the Ad
unit ID in the inspector:
12. Step 7: Configuration of Unity Ads
Login on Unity Ads: http://unityads.unity3d.com/
You can create an account if you don’t want.
Go to “Games” page and click on “+ Add New Game” button.
Later select the Android platform and do click in the link “here” because your app is
not actually in the Play Store.
Latter add a name for your game in the text field and click on “Add Game”.
13. Later select the option that you think corresponding. (Generally is the second
option). Later click on continue.
Now you can see this in the “Games” page:
Copy the Game ID and go to Unity.
Select the object VIDEO-ADS-CONTROL and paste the Unity Game ID in the
inspector.
14.
15. Step 8: Configuration of Vungle
Login on your Vungle Account: https://vungle.com/
If you don’t have an account on Vungle you can create one.
Go to Applications and later Click on New button.
Now fill the information:
16. In the fields that say: NOTHING leave blank (In URL too)
17. Later of create the app in Vungle, you can to see the App ID. In the status press
the button Active to active the normal video ads.
Copy the App ID and go to Unity.
Select VIDEO-ADS-CONTROL object and paste the App ID in the inspector.
18. Step 9: Configuration of AdColony
Login on your AdColony Account: https://vungle.com/
If you don’t have an account on Vungle you can create one.
Go to MONETIZATION page and later do click on Setup New App.
Select Android and put the name of your game. In Options is recommended no put
enabled this option.
19. Now in Children’s privacy you can put the thing that you consider convenient.
Now click on Create.
Copy the AdColony App ID
20. Now open Unity and select the object VIDEO-ADS-CONTROL and paste the ID:
Now return to your account of AdColony and click on the button: +Setup New Ad
Zone
22. Later that you did click on Create you can to see the Zone ID at the top of the
page:
Copy the Zone ID and open Unity.
Paste the Zone ID in the inspector.
23. Step 10: Button of Facebook and button of your web page.
Note about of Facebook like button: The game no detect if the player did click on
the button Like of your Facebook page, the game only open the link of your
Facebook page and later than 3 seconds the player earn X coins.
1. How to change the logo of the button of my web page:
- Drag and drop your logo image on the project:
- Click on button of the game, and later click on the “logoEkumeGames”
object in the Hierarchy.
24. - Now do click on the circle of the sprite to select a new sprite:
- Now adjust your logo:
25. 2. How to change the URLs of the buttons:
-Click on the Menu_Controller object.
-Change the values on the inspector.
3. How to Change the coins by like on Facebook:
- Do click on “Menu_Controller” and change the value on the inspector.
- Click on text button and change the text
4. What you can do if you want delete the button of Facebook Like or the
button of your web page?
You can’t delete the buttons of the scene because you will obtain errors, but
you can move the buttons to the gray zone:
26. Step 11: Change the coins earned by video:
Select the object VIDEO-ADS-CONTROL and change the value in the inspector:
Now select the text of the button of the menu and change:
And do the same thing with the button of the game:
Now search: WatchVideoButton in the project and drag and drop the object to the
scene:
27. Later you can do click on the text of the object and change it.
Later that you did the changes you should do click on “Apply” to save the changes.
Now delete the object of the scene (With the button Delete of your keyboard).
28. Step 12: Change the text that show the share button
Click on the object Game_Controller and later change the texts of the inspector:
29. Step 13: Change the name of the game in the menu
The name that you put on “Product name” will be the text of the menu when you
start the game.
30. Step 14: Set the resolution to the game
You will need create the Aspect Ratio: 9:16 and select it.
31. Step 15: Export the game
15.1 Go to the build settings and later open the Player Settings:
- Fill the fields with your company name and your game name. Change your icon
too (You can’t use the same logo of this template and you can’t use the same
name, you will need a new logo and name).
15.2 Open the Player Settings and later set the orientation in Auto
Rotation and set Portrait.
32. 15.3 In the bundle identifier put: com.YOURCOMPAYNAME.YOURGAMENAME
(Without spaces)
15.4 Create the KeyStore:
Click on Create New KeyStore and click on Browse Keystore and create
a new keystore.
Later write a password on the fields and create a Key Alias:
33. Now select the alias created and put the password:
15.5 Open the build settings again and click on Build, select one
folder and put one name to your APK.