BTS 35/50 Thermal Riflescope Manual
•
0 likes•344 views

https://www.optics-trade.eu/en/manufacturer-burris.html

Recommended
Recommended
More Related Content
What's hot
What's hot (19)
Similar to BTS 35/50 Thermal Riflescope Manual
Similar to BTS 35/50 Thermal Riflescope Manual (20)
More from Optics-Trade
More from Optics-Trade (20)
Recently uploaded
Recently uploaded (20)
BTS 35/50 Thermal Riflescope Manual
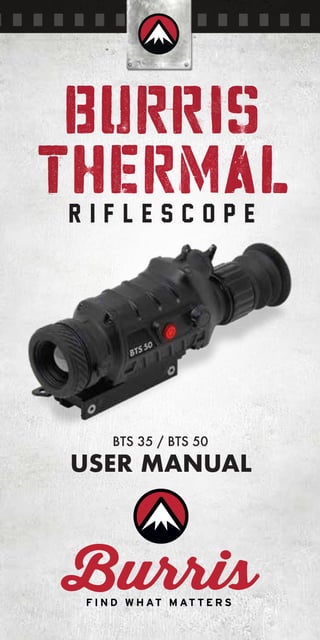
- 1. USER MANUAL BTS 35 / BTS 50 BURRIS THERMAL R I F L E S C O P E
- 2. 1 Congratulations on your purchase of a Burris Thermal Riflescope. Review this manual thoroughly before using and keep it available for future reference. This guide explains the operation of the BTS 35 and BTC 50 models. CAUTION • Thermal imagers shall not be pointed to high-strength energy sources (such as the sun, laser transmissions and their reflection sources), which can have a negative influence on its accuracy and permanently damage the infrared detector. USE AND OPERATION Functions and Features LENS FOCUSING RING BATTERY COMPARTMENT BLINDER VISIBILITY ADJUSTMENT RING ROLLER BUTTON POWER BUTTON LENS VIDEO OUTPUT
- 3. 2 Battery Installation • The thermal imager uses a single 18650 battery which should be installed in the following way Button Function S/N BUTTON GRAPHICAL REPRESENTATION FUNCTIONS 1 2 Power Button Roller Button Power-on, power off Press: enter menu/ determine function Rotation: select function MODEL TECHNICAL SPECIFICATIONS BURRIS THERMAL RIFLESCOPE Detector 35mm 50mm Resolution 400×300 Pixel Size 17µm Optical properties Focal length 35mm/F1.2 50mm/F1.2 Focusing Manual Focus FOV 10.7�×8.0� Imaging Frame Rate 50Hz Digital Zoom 2x, 4x Display Screen 1024×768 Color OLED Color Palletes Black hot, white hot, red hot 1, 2, and 3, green hot, blue hot Magnification Power Battery Type 1x18650 Working Time ≥3h standard, ≥5h with 3400 mAh high-output battery Interface Mounting Type Picatinny Video Output 4-pin LEMO External Connection n/a 7.5�×5.6� 1.7~6.8 2.3~9.2
- 4. 3 FUNCTION MENU STATUS BAR Power-On • To start the thermal imager, hold down the Power Button until the startup display Display Off • Hold down the Power Button until the shutdown progress bar comes up on the eyepiece screen. Release the button before shutdown progress is complete and the display will turn off Power-Off • Hold down the Power Button to display the shutdown progress bar on the eyepiece screen. When the shutdown progress bar is complete, release the button Image Interface Image interface of the thermal imager without function menu Image interface of the thermal imager with function menu
- 5. 4 Function Menu Press the Roller Button to open the function menu which appears on the left side of the image. The function menu provides complete access to all settings • Enter the menu - Press the Roller-Button to pop up the function menu. • Exit the menu - Select the ʻExitʼ in the menu top, press the hand wheel to exit the function menu. • Select Function - Rotate the Roller-Button to the desired menu and press the Roller-Button to make adjustments • Status bar - Shown at the bottom of the image, it displays the current model, palette and battery status Image Adjustment Image Calibration During extended use of the thermal imager, the device will heat up and may cause snow, jitter and instability of the infrared image. The calibration mode can be used to correct image and remove abnormalities. Before performing scene calibration, make sure that the lens cover is closed, or the lens is evenly aligned. Scene or Shutter Calibration Mode - Press the Power Button to recalibrate. Before performing scene calibration, make sure that the lens cover is closed, or the lens is evenly aligned. The display will read “Calibration Completed” when reset is complete.
- 6. 5 In the Auto-Calibration Mode, the device automati- cally corrects the image quality without any action Zoom In There are four zoom-in modes: 1x/2x/4x and Picture-In-Picture (PIP). The position of PIP is adjust- able, see the ʻPIPʼ chapter for details. When the menu bar is not displayed, rotate the Roller Button up or down to switch zoom power modes. The reticle line is synchronized with the zoom levels. • 1X - The main screen is displayed in the original size. • 2X - The central cursor area of the image is zoomed to 2 times with full screen. • 4X - The central cursor area of the image is zoomed to 4 times with full screen. • PIP - The main screen displays the original screen with PIP images magnified by a factor of two are displayed in the window above the screen. Color Palette The riflescope can be set to display infrared images in a variety of colors making it easier for users to observe and identify targets. Palette options include:
- 7. 6 white hot/black hot/red hot 1/red hot 2/red hot 3/green hot and blue hot. Brightness There are ten levels (1-10) of image brightness that can be adjusted to user preference. Contrast There also are ten levels (1-10) of image contrast that can be adjusted to user preference. Ranging The ranging function can estimate the distance of a target by a known target size. Three examples of targets are available on the device as a reference: 0.25m/0.8 ft., 0.5m/1.6 ft., 1.8m/5.9 ft., and real-time display of distance information of the three animals. Operation • Press the Roller-Button to enter the menu, select the ʻRangingʼ and press the knob to enter the ranging function • Align the lower horizontal line with the bottom of the target image, rotate the Roller-Button up or down to change the width between the upper and lower horizontal lines until the upper horizontal line is aligned with the top of the target icon. At this time, the distance can be calculated and displayed automatically. • By comparing the target size with the three reference animal sizes, the user can roughly calculate the distance of the target. Zeroing Before going afield, the riflescope and thermal imager must be sighted-in and the reticle zeroed. Zero-calibration can be performed and saved for six different models. For each model, only one zero calibration position can be stored.
- 8. 7 The zero-calibration distance of the thermal imager is automatically set at 100m, but users may select the zero-calibration distance to their own preference (i.e. 50 or 200 meters/yards). The principle of zero calibration for the thermal imager is that the aiming point on the reticle line is moved to the actual point of impact Zero-Calibration Process • Press the Roller-Button to enter the main menu and rotate the knob to select “Advanced” • Press the knob to enter “Advanced Menuʼ and rotate the knob to select “Model Select.” Choose the model number and select Return to return to main menu • Rotate the hand wheel, select zeroing;
- 9. 8 • Press the Roller-Button and enter the Zero- Calibration Distance selection • Aim at your target and shoot a group of 1-3 shots. Calculate the distance from the actual point of impact to your aiming point ■ Select the “X” or “Y” direction and move the center of the reticle to the actual point of impact. To do this, rotate the Roller-Button to select the “X” or “Y” axis in the box. Press the knob to select to enter adjustment ■ Rotate the hand wheel, move the aiming point in the center of the reticle line to the actual point of impact
- 10. 9 • Shoot another group and continue to adjust the position of the reticle until your actual point of impact hit your aiming point • To complete zero calibration, select “Save” and exit. If do not want to store the zero-calibration position, select exit without saving and exit Zero-Calibration. Advanced Meno Enter the “Advanced” menu, in order view the reticle details, the reticle is automatically adjusted to the center of the screen. When you exit this menu, the reticle is restored to its original position.
- 11. 10 Model Select The thermal imager store zeroing positions of six models. If the user has stored zero-calibration positions of several models, it is necessary to select the model of the current equipment. The thermal imager will automatically adapt to the selected model, to precision accuracy. • Enter the “Advanced” menu, select “Model select, choose the desired model number and exit. Reticle type The thermal imager is equipped with a selection of 10 reticles. Reticle number 1 is shown by default. Reticles 2 – 10 can be selected with the Advanced Menu. • Enter the Advanced Menu, select ʻReticle Typeʼ, select from 1-10. The selected reticle will be displayed in the center of the image. After zero calibration, the user can use the center of the reticle line to observe and aim.
- 12. 11 Reticle Color The reticle can be set to black or white. To choose a color, enter the “Advanced” menu, select “Reticle Color”, chose the color and exit. Setting Menu When you enter the “Setting Menu”, the reticle is hidden. When you exit this menu, the reticle will be displayed. Calibration Mode The thermal imager can be set with different calibration modes: automatic calibration, scene calibration, and shutter calibration. In scene and shutter calibration, you need to exit the menu bar
- 13. 12 and press the Power Button to perform the calibra- tion action. • Auto - The device automatically corrects the image quality without any action • Scene - The user manually corrects the image quality as needed, and the lens cover needs to be attached before calibration • Shutter - The user manually corrects the image quality as needed and the device shutter closes for calibration Picture-In-Picture (PIP) In the Zoom-In mode, the position of the PIP window can be adjusted. The available positions are left, middle, and right. You can also turn the PIP window off. When the PIP window is off, the zoom mode cycles through 1x/2x/4x. When the PIP window is on, the zoom mode cycle is PIP/2x/4x Hot track When hot track is on, the tracking box will track the area with the highest temperature in the image. Screen Brightness Users can adjust the screen brightness. Enter the ʻscreen BRIʼ —— to adjust the screen brightness. Auto-Off User can set the auto power off time. There are four options: Off, 15, 30 and 60 min. Reset By entering “Settingʼ——Reset”, users can restore the thermal imager to its factory settings. After a factory restore, all zeroing data will be lost and you need re-zero. Battery Status A battery status icon is located at the bottom right corner of the screen. The battery icon is shown in following table.
- 14. 13 S/N 1 2 3 4 5 6 ICON BATTERY STATUS High level Middle level Mid-high level Mid-low level Low level Power off level The thermal riflescope provides reverse battery connection protection. The battery can be installed positively or negatively. Before changing the battery, make sure that the thermal imager is powered off. With rechargeable battery, be sure to charge the battery for at least five hours before use. If you notice overheating, odor or discoloration or deformation of the battery, discontinue use immediately. Common Fault Analysis and Troubleshooting If your thermal riflescope has performance issues, the troubleshooting chart below will solve most problems. If these suggestions donʼt solve the problem, contact your dealer or Burris Company for service or repair. FAULT DETECTION FAULT LOCATING SOLUTIONS Thermal imager is not started after long pressing of power key Are batteries installed correctly? Open the battery cover to check to see whetehr the battery is put in the opposite direction Are batteries charged sufficiently? Take the battery out for charging Is battery cover screwed up? Screw up the lens cover
- 15. 14 Storage and Maintenance When the thermal riflescope will be not used for a long time, store the it in a dry, well-ventilated environment and charge the thermal imager at least four hours every two months during the storage The infrared lens of the thermal imager is coated with an anti-reflection film. Clean the lens only when dirt or smudges are present. Frequent scrubbing may damage the lens coating. To clean non-optical surfaces of the riflescope, do not scrub with chemical solvents or cleaners. On exterior surfaces, wipe with a soft and dry microfiber cloth. FAULT DETECTION FAULT LOCATING SOLUTIONS After startup, image quality is poor and blurry Lens is not focused Rotate the lens focusing ring till the image becoems clear Image has bright line, black edge / blurred screen Image needs to be corrected Do shutter / scene calibration Image is blurring Infrered lens is polluted Rotate the lens focusing ring till the image becoems clear Interface is not clear Use special cloth to clean the lens Different distance is observed Lens is not focused Rotate the lens focusing ring till the image becoems clear Eyepieceʼs visibility is not proper Lens is not focused Adjust the visibility based on the Manual Thermal imager, during use, shuts down suddenly The battery cover becomes loose Screw up the battery compartment cover Targeting is still unsuccessful after multiple time of calibration The initial position of the aim line does not return to zero Adjust the initial position of the aim line to “0” Precision reduces obviously during use The connecting base becomes loose Check to see whether the connecting base is completely locked.
- 16. Burris Company • 331 East 8th St., Greeley, CO 80631 (970) 356-1670 BurrisOptics.com • Facebook.com/BurrisOptics 10 Warranty The Burris Thermal Riflescope products are covered by Limited Warranty and Burris will repair or replace your product if it is defective. Do not disassemble the riflescope as this will void the warranty. Contact your nearest Burris dealer for assistance. For detailed warranty information scan the QR codes below. US Warranty International Warranty This manual is available in German, French, Italian and Spanish translations at https: https://www.burrisoptics.com/sites/default/files/- content/products/manuals/thermal/riflescope