
Recommended
More Related Content
Viewers also liked
Viewers also liked (20)
Similar to Rain Barrel Poster
Recently uploaded
Recently uploaded (20)
Rain Barrel Poster
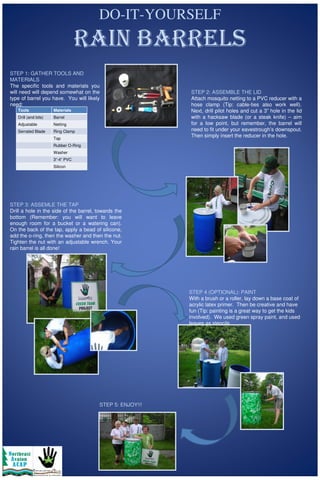
- 1. DO-IT-YOURSELF RAIN BARRELS STEP 1: GATHER TOOLS AND MATERIALS The specific tools and materials you will need will depend somewhat on the STEP 2: ASSEMBLE THE LID type of barrel you have. You will likely Attach mosquito netting to a PVC reducer with a need: hose clamp (Tip: cable-ties also work well). Tools Materials Next, drill pilot holes and cut a 3” hole in the lid Drill (and bits) Barrel with a hacksaw blade (or a steak knife) – aim Adjustable Netting for a low point, but remember, the barrel will Wrench Serrated Blade Ring Clamp need to fit under your eavestrough’s downspout. Tap Then simply insert the reducer in the hole. Rubber O-Ring Washer 3”-4” PVC Reducer Silicon STEP 3: ASSEMLE THE TAP Drill a hole in the side of the barrel, towards the bottom (Remember: you will want to leave enough room for a bucket or a watering can). On the back of the tap, apply a bead of silicone, add the o-ring, then the washer and then the nut. Tighten the nut with an adjustable wrench. Your rain barrel is all done! STEP 4 (OPTIONAL): PAINT With a brush or a roller, lay down a base coat of acrylic latex primer. Then be creative and have fun (Tip: painting is a great way to get the kids involved). We used green spray paint, and used leaves as stencils. STEP 5: ENJOY!!!