
Recommended
Recommended
More Related Content
Similar to Set up data sync in dest
Similar to Set up data sync in dest (20)
Recently uploaded
Recently uploaded (20)
Set up data sync in dest
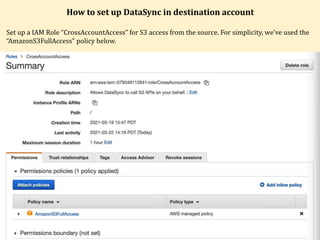
- 1. How to set up DataSync in destination account Set up a IAM Role “CrossAccountAccess” for S3 access from the source. For simplicity, we’ve used the “AmazonS3FullAccess” policy below.
- 2. How to set up DataSync in destination account Set up a IAM Role “CrossAccountAccess” for S3 access from the source. For simplicity, we’ve used the “AmazonS3FullAccess” policy below.
- 3. How to set up DataSync in destination account Click on the “Trust relationships” tab.
- 4. How to set up DataSync in destination account Click “Edit trust relationship.”
- 5. How to set up DataSync in destination account Add the following Trust Policy, which will show up under “Trusted entities.” { "Version": "2012-10-17", "Statement": [ { "Effect": "Allow", "Principal": { "Service": "datasync.amazonaws.com" }, "Action": "sts:AssumeRole" } ] }
- 6. How to set up DataSync in destination account Next, create a S3 bucket (“trellis-datasync-dst1”) in the destination account/region with default attributes. Create the cross account s3 location (for source A), from destination B using the AWS CLI below: ❯ aws datasync create-location-s3 --s3-bucket-arn arn:aws:s3:::trellis-datasync-src1 --s3-config '{"BucketAccessRoleArn":"arn:aws:iam::5555555555:role/C rossAccountAccess"}' --region eu-west-1
- 7. How to set up DataSync in destination account If the command works, the output below will be displayed: { "LocationArn": "arn:aws:datasync:eu-west- 1:079349112641:location/loc-054160bbd934e32c9" }