Users guide and features | Template manager | template generator for eBay tem...
CREATING A WIKI WEBSITE
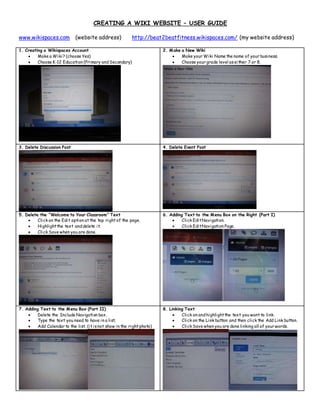
1. CREATING A WIKI WEBSITE – USER GUIDE
www.wikispaces.com (website address) http://beat2beatfitness.wikispaces.com/ (my website address)
1. Creating a Wikispaces Account
Make a Wiki? (choose Yes)
Choose K-12 Education (Primary andSecondary)
2. Make a New Wiki
Make your Wiki Name the name of your business.
Choose your grade level aseither 7 or 8.
3. Delete Discussion Post 4. Delete Event Post
5. Delete the “Welcome to Your Classroom” Text
Click on the Edit option at the top right of the page.
Highlightthe text anddelete it.
Click Save when you are done.
6. Adding Text to the Menu Box on the Right (Part I)
Click EditNavigation.
Click EditNavigation Page.
7. Adding Text to the Menu Box (Part II)
Delete the Include Navigation box.
Type the text you need to have in a list,
Add Calendar to the list. (it isnot show in the right photo)
8. Linking Text
Click on andhighlightthe text you want to link.
Click on the Link button and then click the Add Link button.
Click Save when you are done linking all of your words.
2. 9. Editing each of your Links
Click on the link page you wantto edit.
Click on the Edit button on the top right of the page.
10. Changing the Text Size, Text Color, Text Background, and
Alignment (Left, Center, and Right)
Click on highlightthe text you wantto change.
Click on the Color and Style button. (circled)
Click on Apply Styles.
Click Save when you are done.
11. Adding a Photo to Your Page (Part I)
Click on the Insert Images andFiles button. (circled)
Click on UploadFiles,
12. Adding a Photo to Your Page (Part II)
Click on Desktop.
Click on the photo you wantto add.
13. Adding a Photo to Your Page (Part III)
Click on the photo once it uploads(picture will show up)
Click Save when you are done.
14. Adding a Table to Your Page
Click on the Table button (circled)
Set your Columnsand Rowsandclick Insert Table.
Click on Save when you are done.
3. 15. Adding or Deleting a Row or Column from Your Table
Click on the button to the right of the table.
Click on either Row or Column
Click on either Add Row or Remove Row, or click on either
Add Column or Remove Column.
Click Save when you are done.
16. Adding a Video to Your Page (Part I)
Go to www.youtube.com andgetthe video you want.
Click on the Share option below the video.
Click on the Embed option
17 Adding a Video to Your Page (Part II)
Click on the Embed code and highlightit.
Click on Copy.
Click on the Widgetbutton. (circled)
18. Adding a Video to Your Page (Part III)
Click on Video on the top left.
Click on the You Tube on the top center.
19. Adding a Video to Your Page (Part IV)
Click on Paste.
Click on Save when you are done.
20. Creating Your Business Website
Day 1 – Create Wiki AccountandAdd Links
Day 2 – Home Page (Title, Slogan, Picture, ContactInfo,
Directions, & Map)
Day 3 – Mission Statementand ParagraphaboutBusiness
Day 4 – Productor Service Names, Pictures, Descriptions, &
Video
Day 5 – Price InformationTable
Day 6 – Insert Your Biography andType 3 Customer Reviews
Day 7 – Set up Your Calendar of Eventsfor March2015
4. CREATING YOUR OWN BUSINESS WEBSITE
Day 1 – Create Wiki Account and Add Links (see below)
-Home
-Business Description
-Products and Services
-Prices
-Calendar
-Owner Biography
-Customer Reviews
Day 2 – Home Page (Title, Slogan, Picture, Contact Info, Directions, & Map)
1. Title of Your Business Name
2. Slogan (a catch phrase statement about your business)
3. Picture (photo of the outside of the building)
4. Contact Information
Name of Business
Street Number Street Name
City, State Zip Code
Area Code Phone Number
Email Address
5. Directions (one sentence about how to get to your place)
6. Map (get this from Google images)
Day 3 – Mission Statement and Paragraph about Business
1. Mission Statement (one sentence that says what your business is trying to accomplish)
2. Paragraph (type a 6 – 8 sentence paragraph that describes how your business got started, and why it is needed)
Day 4 – Product or Service Names, Pictures, Descriptions, & Video)
1. Type the Names of the Products or Services
2. Upload Pictures of the Products or Services
3. Type a 4-5 Sentence Paragraph of each Product or Service
4. Upload a Video of Something Related to Your Business
Day 5 – Price Information Table
1. List the products or services and their prices in a table
Day 6 – Insert Your Biography and Type 3 Customer Reviews
1. Copy and Paste Your Biography into the Owner Biography Section
2. Type 3 Customer Reviews that are Positive into the Customer Review Section
Day 7 – Calendar
1. Set Up an Events Calendar for the Month of March 2015 with Different Events in each Day of the Week