1. Compiled and refined by Kojo Ahiakpa, 2015-2016 1
Lab Activity 1
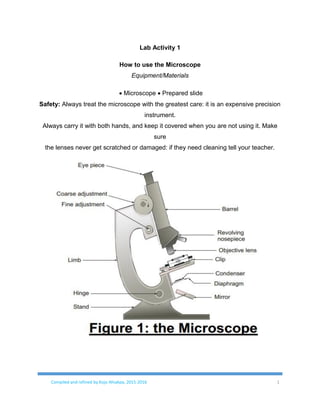
How to use the Microscope
Equipment/Materials
Microscope Prepared slide
Safety: Always treat the microscope with the greatest care: it is an expensive precision
instrument.
Always carry it with both hands, and keep it covered when you are not using it. Make
sure
the lenses never get scratched or damaged: if they need cleaning tell your teacher.
2. Compiled and refined by Kojo Ahiakpa, 2015-2016 2
Method
Objects to be viewed under the microscope are first placed on a glass slide and
covered with a thin piece of glass called a coverslip.
Place the slide on the stage of your microscope: arrange it so the specimen is in
the centre of the hole in the stage.
Fix the slide in place with the two clips.
Rotate the nosepiece so the low power (LP) objective lens is immediately above
the specimen: the nosepiece should click into position.
Place a lamp in front of the microscope, and set the angle of the plane mirror so
the light is directed up through the microscope.
Look down the microscope through the eyepiece. Adjust the iris diaphragm so the
field of vision is bright but not dazzling.
Look at the microscope from the side. Turn the coarse adjustment knob in the
direction of the arrow in the diagram. This will make the tube move downwards.
Continue turning the knob until the tip of the objective lens is close to the slide.
10. Now look down the microscope again. Slowly turn the coarse adjustment knob
in the other direction, so the tube gradually moves upwards. The specimen on the
slide should eventually come into view. Never move coarse adjustment
downwards when there is a slide on the stage of the microscope.
Use the coarse and fine adjustment knobs to focus the object as sharply as
possible.
If necessary readjust the iris diaphragm so the specimen is correctly illuminated.
You will get a much better picture if you don’t have too much light coming through
the microscope.
You are now looking at the specimen under low power, i.e. at low magnification.
To look at it under high power, i.e. at a greater magnification, proceed as follows:
Rotate the nosepiece so the high power (HP) objective lens is immediately above
the specimen. The nosepiece should click into position, as before.
3. Compiled and refined by Kojo Ahiakpa, 2015-2016 3
If the specimen is not in focus, focus it with the fine adjustment knob. Be
careful that the tip of the objective lens does not touch the slide.
Re-adjust the illumination if necessary.
You are now looking at the specimen under high power.
4. Compiled and refined by Kojo Ahiakpa, 2015-2016 4
Lab Activity 2
Observing plant cells under the Microscope.
Equipment / Materials Required;
Microscope
Cover slip
Slide
Mounted needle or Pin
Onion bulb
Iodine solution
Safety tip: Handle needle & fragile coverslips with care
Method
Strip off a piece of epidermis from the inside of one of the inner ‘fleshy’ leaves of
an onion bulb.
5. Compiled and refined by Kojo Ahiakpa, 2015-2016 5
Mount a small piece of the epidermis in iodine solution (as in diagram above).
Slowly remove the pin as you lower the cover slip so as to avoid air bubbles.
Observe one cell under low and high powers of the light microscope.
Identify the nucleus, cytoplasm and the cellulose cell wall.
The onion bulb does not contain chloroplasts: explain why.
What can you say about the three dimensional shape of the cells?
6. Compiled and refined by Kojo Ahiakpa, 2015-2016 6
Lab Activity 3
Estimating the Size of Onion Cells.
Equipment / Materials required:
Microscope
Small plastic ruler (with mm scale)
A temporary slide of onion cells (see B02)
Method
Observe your onion cells under HP (x 100)
How big do you think the cells are?
Count the number of cells in the field of view, lengthways and sideways.
Replace slide with a ruler. You should see an image like the one above.
Estimate the diameter of the field of view.
Convert your answer to micrometres (μm).
Complete the table below
Results Table
7. Compiled and refined by Kojo Ahiakpa, 2015-2016 7
Lab Activity 4
Observation of stages of mitosis in root tip.
Equipment / Materials required;
Microscope
Razor blade etc
-3)
N.B. Onion bulb should be suspended over a beaker of water for ten days before the
experiment starts. This enables the roots to grow.
Safety: Be careful not to stain clothes and skin
8. Compiled and refined by Kojo Ahiakpa, 2015-2016 8
Method
Cut off the apical 5mm from the tip of a growing lateral root of e.g. onion bulb.
Place the root tip in a watch glass containing ethanoic orcein stain and 1.0 mol dm-
3 hydrochloric acid in the proportions of ten parts of stain to one part of acid.
Warm, but do not boil, for five minutes on a hot plate or on a watch glass gently
heated over a Bunsen flame. The acid helps to macerate (or breakdown) the tissue
(why is this desirable?)
Place the stained root tip on a clean microscope slide. Cut it in half transversely
and discard the half furthest from the apex.
Add two or three drops of ethanoic orcein to the root tip on the slide.
Without interfering too much with the arrangement of the cells, break the root tip
up with a needle so as to spread it out as thinly as possible.
Put on a coverslip, cover it with filter paper and squash gently. If necessary, irrigate
with more stain.
Warm the slide on a hot plate for about ten seconds to intensify the staining. (The
slide should be very warm, but not too hot to touch).
Examine the slides for stages in mitosis under high power.
Supplement the information obtained from your own slide by observing mitotic
figures in a prepared longitudinal section of the root tip of e.g. onion (Allium sp.)
Compare the slides with mitosis in the models.
Make annotated sketches of the four major stages of mitosis in your practical book
showing the arrangement of chromosomes.
Discussion
a) In what situations, apart from those studied here, would you expect to find mitosis
taking place in plants?
b) Mitosis preserves the diploid state. Which particular events in mitosis ensure that this
is so?
9. Compiled and refined by Kojo Ahiakpa, 2015-2016 9
Lab Activity 5
Demonstrating Asexual Reproduction in Plants
Materials required include;
Sweet potato or carrot; Sticky toothpick, beaker, distilled water/ordinary water
Steps
Cut the potato or carrot in half and use the half with a “bud”.
Stick toothpicks into the potato/carrot and rest them on the rim of a beaker or clear
cup.
Pour water into the beaker/cup so that the “bud” of the carrot/potato is covered.
Observe daily and keep the “bud” covered with water. Plant growth will vary
depending on plant and environmental conditions; therefore, time span is not
specified.
Observe the plant cutting or carrot/potato daily and record in your journal any
changes you see until small roots form.
Place the plant with the new roots into potting soil. Place the potted plant in a
sunny/light place and keep the soil moist.
Observe and record in your journal new growth of the plant as it takes place.
Journal write-up: Describe the asexual reproduction you observed in this activity.
NB: Students will need to record their observation of the plant daily for three weeks. The
teacher will teach the concept of asexual reproduction during week three of this unit.
10. Compiled and refined by Kojo Ahiakpa, 2015-2016 10
Lab Activity 6
Demonstrating Dominant/Recessive Gene Activity
Steps
Fill one beaker half full with water colored with dark green food coloring.
Fill a second beaker half full with water colored with yellow food coloring.
Mark the water level in each beaker.
Pour some of the yellow water into the green water and ask students to make and
record observations.
Have students hypothesize where the yellow water has gone.
Lab Discussion
Pour all of the green water into the yellow water. Have students make and record
observations. Discuss what happened to the yellow water.
Lead students to the conclusion that the yellow water is still present but is covered
by the green water.
Lead students to make the connection that this is how a dominant gene “covers” a
recessive gene, realizing that the recessive gene is still present but is covered by
the dominant gene. Discussion should also include genotype, phenotype,
homozygous, heterozygous.
11. Compiled and refined by Kojo Ahiakpa, 2015-2016 11
Lab Activity 7
Genomic DNA Extraction in plants using NAOH Method
Description
The protocol is fast and permits genomic DNA isolation from a large number of samples
of small or large volumes. The procedure can be completed in 10-30 minutes with DNA
recovery of 70-100%. The isolated DNA can be used, without additional purification, for
southern analysis, dot blot hybridization, molecular cloning, RFLP, PCR and other
molecular biology and biotechnology applications.
Requirements
Leaves of any plant
Micropipette and pipette tips
Scalpel
Micro centrifuge tubes
Mortar and pestle
Centrifuge
Water bath
4oc freezer
-20oc freezer
Reagents
50mM NaOH solution
1M Tris-Cl
Procedure
Pluck out 20-100 mg of leaf samples using a sterile scalpel and a forceps.
Homogenize the leaves using sterile mortar and pestle.
Aliquot 100 μL of 50 mM NaOH in to a microfuge tube.
Transfer the homogenized leaves into this micro centrifuge tube.
12. Compiled and refined by Kojo Ahiakpa, 2015-2016 12
Incubate at 95°C for 20min in a water bath.
After the incubation, the tubes are allowed to cool at 4°C.
Add 1/10th volume of 1 M Tris-HCl (pH 8.0) for neutralizing the basic solution.
Centrifuge the sample at 5000rpm for 10mins to pellet the debris.
The supernatant obtained is collected in a fresh micro centrifuge tube (1-5μl of this
supernatant can be used immediately per 25 μL of PCR reaction mixture).
Store the sample for at least 3 months at 4°C or longer at -20°C freezer.
Storage
DNA Extract should be stored at room temperature. However, storing at lower
temperatures will cause the Guanidine Isothiocyanate to come out of the solution.
Handling Precautions
DNA Extract contains irritants. Handle with care, avoid contact with skin, and use eye
protection. In case of contact, wash skin with a large amount of water. Seek medical
attention.
Reference
Chomczynski, P. and Sacchi, N., Anal Biochem., 162:156-159 (1987).