6400 Series QQQ Vent and Clean Procedure
•
5 likes•703 views

This document provides instructions for venting and cleaning a 6400 Series QQQ mass spectrometer. Key steps include: 1. Venting the system and removing covers to access internal components. 2. Removing parts like the source, desolvation assembly, ion optics and ion transfer capillary. 3. Cleaning removable parts using a sonicator bath and preparing them for reinstallation. 4. Replacing any worn components such as canted spring coils. 5. Reinstalling components in reverse order and restoring vacuum to the system.

Recommended
More Related Content
What's hot
What's hot (20)
Similar to 6400 Series QQQ Vent and Clean Procedure
Similar to 6400 Series QQQ Vent and Clean Procedure (20)
Recently uploaded
Recently uploaded (20)
6400 Series QQQ Vent and Clean Procedure
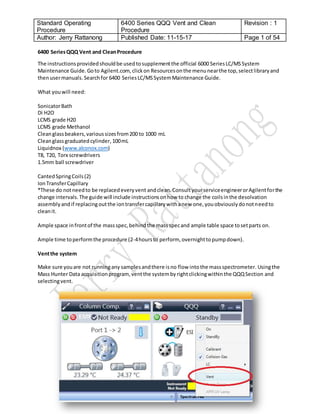
- 1. Standard Operating Procedure 6400 Series QQQ Vent and Clean Procedure Revision : 1 Author: Jerry Rattanong Published Date: 11-15-17 Page 1 of 54 6400 SeriesQQQ Vent and CleanProcedure The instructionsprovidedshouldbe usedtosupplementthe official 6000 SeriesLC/MSSystem Maintenance Guide.Goto Agilent.com,clickon Resourcesonthe menunearthe top,selectlibraryand thenusermanuals.Searchfor 6400 SeriesLC/MSSystemMaintenance Guide. What youwill need: SonicatorBath Di H2O LCMS grade H20 LCMS grade Methanol Cleanglassbeakers,varioussizesfrom200 to 1000 mL Cleanglassgraduatedcylinder,100mL Liquidnox (www.alconox.com) T8, T20, Torx screwdrivers 1.5mm ball screwdriver CantedSpringCoils(2) IonTransferCapillary *These do notneedto be replacedeveryvent andclean.ConsultyourserviceengineerorAgilentforthe change intervals.The guide will include instructionsonhow to change the coilsinthe desolvation assembly andif replacingoutthe iontransfercapillarywithanew one,youobviouslydonotneedto cleanit. Ample space infrontof the massspec,behindthe massspecand ample table space tosetparts on. Ample time toperformthe procedure (2-4hoursto perform, overnighttopumpdown). Ventthe system Make sure youare not runningany samplesandthere isno flow intothe massspectrometer. Usingthe Mass Hunter Data acquisitionprogram,ventthe systembyrightclickingwithinthe QQQSection and selectingvent.
- 2. Standard Operating Procedure 6400 Series QQQ Vent and Clean Procedure Revision : 1 Author: Jerry Rattanong Published Date: 11-15-17 Page 2 of 54 Whenselected,adialogbox appears withthe followingmessage: If you are sure youwant to proceed,clickyes. Whenthe processiscomplete anotherdialogbox appears:
- 3. Standard Operating Procedure 6400 Series QQQ Vent and Clean Procedure Revision : 1 Author: Jerry Rattanong Published Date: 11-15-17 Page 3 of 54 It isnow safe completelypoweroff the instrument.Startbyswitchingoff the powerbuttonfrontcover of the massspec.
- 4. Standard Operating Procedure 6400 Series QQQ Vent and Clean Procedure Revision : 1 Author: Jerry Rattanong Published Date: 11-15-17 Page 4 of 54 Next,unplugthe mainpowercable.The locationisbehindthe massspecandthe mainpowercable is the lowerleftone.The cable isremovedhere.
- 5. Standard Operating Procedure 6400 Series QQQ Vent and Clean Procedure Revision : 1 Author: Jerry Rattanong Published Date: 11-15-17 Page 5 of 54 Locate yourvacuum forelinepump,switchoff the powertothe vacuumand thenunplugit fromthe back of the Mass Spectrometer. Next,graspthe handle onthe front coverand pull ittowardsyou.
- 6. Standard Operating Procedure 6400 Series QQQ Vent and Clean Procedure Revision : 1 Author: Jerry Rattanong Published Date: 11-15-17 Page 6 of 54 Once it isangledtowardyou,pull straightupto remove itfromthe bottom.
- 7. Standard Operating Procedure 6400 Series QQQ Vent and Clean Procedure Revision : 1 Author: Jerry Rattanong Published Date: 11-15-17 Page 7 of 54 The LED cable is still attachedtothe cover to the backside of the cover. Release the cable byspreadingtabs apart. The cable isnow loose andcan be removed.
- 8. Standard Operating Procedure 6400 Series QQQ Vent and Clean Procedure Revision : 1 Author: Jerry Rattanong Published Date: 11-15-17 Page 8 of 54 Place the frontcover somewhereoutof the way.Withthe frontcoverout of the way,the nextstepisto remove the topcover.
- 9. Standard Operating Procedure 6400 Series QQQ Vent and Clean Procedure Revision : 1 Author: Jerry Rattanong Published Date: 11-15-17 Page 9 of 54 There are twoscrewsholdingthe topcoverinplace. Go around to the back and remove these screws.
- 10. Standard Operating Procedure 6400 Series QQQ Vent and Clean Procedure Revision : 1 Author: Jerry Rattanong Published Date: 11-15-17 Page 10 of 54 Liftthe top coverout and place it somewhere outof the way.Next,the leftside covernearthe source mustbe removed.Toaccomplishthat,we mustremove 4 screws. Use a Torx # 8 screwdrivertoremove them. Also,remove the solventlinefromthe columncompartmenttothe selectionvalve, if youhaven’t already.
- 11. Standard Operating Procedure 6400 Series QQQ Vent and Clean Procedure Revision : 1 Author: Jerry Rattanong Published Date: 11-15-17 Page 11 of 54 Life the coverand place itout of the way.Now,we are leftwithafew cablestodisconnectandremove fromthe auxiliarymodule.
- 12. Standard Operating Procedure 6400 Series QQQ Vent and Clean Procedure Revision : 1 Author: Jerry Rattanong Published Date: 11-15-17 Page 12 of 54 Remove the LED Cable fromthe displayboardslot,alsoremove the selectorvalve andleaksensor cables. The spray chamberhighvoltage cable onthe leftside canbe removedwhenthe tabispressedin.
- 13. Standard Operating Procedure 6400 Series QQQ Vent and Clean Procedure Revision : 1 Author: Jerry Rattanong Published Date: 11-15-17 Page 13 of 54 Nextloosenthe retainingscrewonthe bracketof the desolvationchamber.Then removethe nitrogen dryinggas line and dryinggasheatercable. The dryinggas heatercable can be removedbytwistingittorelease.
- 14. Standard Operating Procedure 6400 Series QQQ Vent and Clean Procedure Revision : 1 Author: Jerry Rattanong Published Date: 11-15-17 Page 14 of 54 The dryinggas line isremovedbyadjustable wrench,butthe Source mustbe removedbefore youcan have enoughclearance toremove the line.Remove the linefromyourselectorvalve to yourESIneedle firstand thenliftthe source off the twopinson the door hinge. Setthe Source off to the side.
- 15. Standard Operating Procedure 6400 Series QQQ Vent and Clean Procedure Revision : 1 Author: Jerry Rattanong Published Date: 11-15-17 Page 15 of 54 Remove the mainboard1 cable fromthe back of the auxillarymodule. Liftthe auxillary module upand setaside. Use a flatheadscrewdrivertoloosenthe drainhose tubinghere andremove it.
- 16. Standard Operating Procedure 6400 Series QQQ Vent and Clean Procedure Revision : 1 Author: Jerry Rattanong Published Date: 11-15-17 Page 16 of 54 Remove the spraysshieldbyturningcounterclockwise andsettothe side onaluminumfoil.Use aTorx T-10 screwdrivertoremove the twogoldscrewslocatedonthe front. Remove the face plate alongwith the middle piece and settothe side.Also, remove the capillarycap andsetto the side.
- 17. Standard Operating Procedure 6400 Series QQQ Vent and Clean Procedure Revision : 1 Author: Jerry Rattanong Published Date: 11-15-17 Page 17 of 54 Replace yourgloveswithfreshcleangloves,graspthe iontransfercapillaryandpull itstraightout.Pull straightout or riskbreakingitas you remove. Settothe side onto aluminumsheet.
- 18. Standard Operating Procedure 6400 Series QQQ Vent and Clean Procedure Revision : 1 Author: Jerry Rattanong Published Date: 11-15-17 Page 18 of 54 The desolvation assembly isremovednext. Use aT-20 Torx screwdrivertoremove the retainingscrews at the upperleftandlowerrightcorner.Slide itoutfromthe supportrods.Place the desolvation assembly ontoaluminumfoil andprepare tochange outthe two cantedspringcoils.
- 19. Standard Operating Procedure 6400 Series QQQ Vent and Clean Procedure Revision : 1 Author: Jerry Rattanong Published Date: 11-15-17 Page 19 of 54 Use a needle nose pliertoremove the twocables.Use aT20 Torx screwdrivertoremove the 4 screwson the front.
- 20. Standard Operating Procedure 6400 Series QQQ Vent and Clean Procedure Revision : 1 Author: Jerry Rattanong Published Date: 11-15-17 Page 20 of 54 Remove the frontpart of the desolvationassemblyandmake note of the orientationof the brown spacerscoveringthe opening thatholdsthe firstcantedspringcoil. Remove andsetto the side.
- 21. Standard Operating Procedure 6400 Series QQQ Vent and Clean Procedure Revision : 1 Author: Jerry Rattanong Published Date: 11-15-17 Page 21 of 54 Use a fine pointed forcepstoremove the coil fromthe holder.Place anew coil intothe holderby pushingwithyourfingers intothe channel withinthe holder. Avoidusingtoolstoinsert,asyoumay damage your newcoil. Insertone side of the coil intothe channel,holditinplace while youpushthe restintothe channel.Itwill expandandfit.
- 22. Standard Operating Procedure 6400 Series QQQ Vent and Clean Procedure Revision : 1 Author: Jerry Rattanong Published Date: 11-15-17 Page 22 of 54 Next,goto the back side of the desolvationassembly,removethe fourT-20 screws,pull the coveroff and disconnectthe twocables. Remove the 2nd cantedcoil springusingthe forceps.
- 23. Standard Operating Procedure 6400 Series QQQ Vent and Clean Procedure Revision : 1 Author: Jerry Rattanong Published Date: 11-15-17 Page 23 of 54 Place the newcantedspringcoil and pushitinto the channel toseatit. Reconnectthe 2 cablesand place the coverback on the Desolvation Chamber.Tightenthe 4screwsto secure. Reassemble the frontof the chamber,place the spacersinthe correct orientation secure with the 4 screwsand install the twocables. Setthe assembledchamberoff tothe side.Prepare toremove the ionoptics.
- 24. Standard Operating Procedure 6400 Series QQQ Vent and Clean Procedure Revision : 1 Author: Jerry Rattanong Published Date: 11-15-17 Page 24 of 54 Cleanawayany dustfrom the topof the manifold, loosenthe two retainingscrewson the rightside and use a Torx-T20 screwdrivertoremove the twoscrewsonthe left.
- 25. Standard Operating Procedure 6400 Series QQQ Vent and Clean Procedure Revision : 1 Author: Jerry Rattanong Published Date: 11-15-17 Page 25 of 54 Liftthe cover awayand place somewhere safe. Inthe vacuummanifold,take alook atthe cable connectionarrangementof the ionoptics. The greenwire ispluggedinontopandthe blackisplugged inthe bottom.The Lenscable isconnectedthrougha plugstyle harness.
- 26. Standard Operating Procedure 6400 Series QQQ Vent and Clean Procedure Revision : 1 Author: Jerry Rattanong Published Date: 11-15-17 Page 26 of 54 Disconnectall three cables. The nextstepis to remove the ionoptics. Use your righthand to pushon the back of the skimmer spacerwhile onthe frontside,use yourlefthandto gentlypull onthe skimmerspacer.There willbe some resistance until itsuddenly will be looseenoughtoremove.Ensure thatthe ionopticsdoesnot bang or droponto anything.Place the ionopticsontoaluminumfoilforfurtherdisassembly.
- 27. Standard Operating Procedure 6400 Series QQQ Vent and Clean Procedure Revision : 1 Author: Jerry Rattanong Published Date: 11-15-17 Page 27 of 54 At thispoint,if youhave an electron multiplierhornandwishtochange it out,now is the time to doso. If not changingout the electronicmultiplierhorn,place the manifoldcoverbackon to minimizedust.
- 28. Standard Operating Procedure 6400 Series QQQ Vent and Clean Procedure Revision : 1 Author: Jerry Rattanong Published Date: 11-15-17 Page 28 of 54 Locate the electron multiplierhornonthe rightside of the manifold.
- 29. Standard Operating Procedure 6400 Series QQQ Vent and Clean Procedure Revision : 1 Author: Jerry Rattanong Published Date: 11-15-17 Page 29 of 54 Disconnectthe signal wire fromthe electronmultiplierhorn.Release the Multiplierfromitscage by squeezingtogetherthe twohoops onthe retainingclip,pushdowntoclearthe hooksandliftup to open.
- 30. Standard Operating Procedure 6400 Series QQQ Vent and Clean Procedure Revision : 1 Author: Jerry Rattanong Published Date: 11-15-17 Page 30 of 54 Remove the electronmultiplierhornandreplace withanew one.Seatin the new multiplier Secure withthe retailingclipandreconnectthe signal wire.Now let’sgobackto the previouslyremoved ionopticsassembly.
- 31. Standard Operating Procedure 6400 Series QQQ Vent and Clean Procedure Revision : 1 Author: Jerry Rattanong Published Date: 11-15-17 Page 31 of 54 Remove the twoscrewsonthe frontof the ion skimmer. Grasp the edgesof the skimmer withyourleftfingers,holdthe assemblybythe blackspacerwiththe otherand pull outthe skimmer. Donot dropthe skimmer.
- 32. Standard Operating Procedure 6400 Series QQQ Vent and Clean Procedure Revision : 1 Author: Jerry Rattanong Published Date: 11-15-17 Page 32 of 54 Setthe skimmeronflatsurface,make sure nothingtouchesthe centercone opening. Restthe assemblyonthe spacerskimmer suchthat the lens 2 is facingup.Use a 1.5mm ball screwdriver to remove the twoscrewshere.
- 33. Standard Operating Procedure 6400 Series QQQ Vent and Clean Procedure Revision : 1 Author: Jerry Rattanong Published Date: 11-15-17 Page 33 of 54 Remove the Lens 2, setto the side. Remove the spacerinsulatordirectly beneath.ThenRemove Lens1. Remove the lastspacer.Setall to the side.
- 34. Standard Operating Procedure 6400 Series QQQ Vent and Clean Procedure Revision : 1 Author: Jerry Rattanong Published Date: 11-15-17 Page 34 of 54 Nextremove these twoscrewsthatholdthe octopole tothe skimmerspacer.Holdontothe octopole tube while doingso,donotdrop it.
- 35. Standard Operating Procedure 6400 Series QQQ Vent and Clean Procedure Revision : 1 Author: Jerry Rattanong Published Date: 11-15-17 Page 35 of 54 Setthe skimmeroff tothe side,disconnectthe redandwhite wires onthe octopole.Make note of the orientationbefore youremove. The skimmerspacerisstill tetheredtothe Octopole bythe blue wire.Remove thatscrew usingatorx screwdriver,removethe electrical harnessandplace the screw backinand tightendownsoyoudon’t lose it. Leave the yellowwire connectiontothe skimmerspaceralone.
- 36. Standard Operating Procedure 6400 Series QQQ Vent and Clean Procedure Revision : 1 Author: Jerry Rattanong Published Date: 11-15-17 Page 36 of 54 Let’sgatherall the parts to gointo the sonicator.Don’tforgetthe sprayshield,face plate andcapillary cap from before.Ensure thatyoudonot sonicate anyspacersor o-rings.If youdid notreplace the ion transfercapillarywithanewone,theninclude itforcleaning.
- 37. Standard Operating Procedure 6400 Series QQQ Vent and Clean Procedure Revision : 1 Author: Jerry Rattanong Published Date: 11-15-17 Page 37 of 54 Place two1mL pipette tipsoneachendof the Iontransfercapillary.Use scissorstocut the endof each tip. Place the iontransfercapillaryintoa glass graduatedcylinder.Place the Ionsweepcone,iontransfer cap, face plate intoa cleanbeaker.Place the Lens1 and Lens2 intoa separate cleanbeaker.Finally, place the octopole assemblyintoacleanbeaker.
- 38. Standard Operating Procedure 6400 Series QQQ Vent and Clean Procedure Revision : 1 Author: Jerry Rattanong Published Date: 11-15-17 Page 38 of 54 Cleanandsonicate parts. (Handle eachcleaningstepwithfreshgloves) Prepare a solutionof 1%Liquidnox indeionizedwaterorLCMS grade water.Fill eachbeakerto completelysubmergeall partsandsonicate for10 - 15 mins.Do not sonicate formore longerthanthat. Discard the solutionineachbeakerandone byone,rinse off the solutionfromthe partswithcopious amountof tap water. Place all partsintonew cleanbeakersandgraduatedcylinder.Filleachbeaker withLCMS grade Isopropanol andsonicate for5 mins.Remove the solventsfromthe beakersandfill up withLCMS grade Methanol.Proceedtosonicate for5 minsagain.Performthe previousstepagainto remove all tracesof residue fromeachsonicatedpart.
- 39. Standard Operating Procedure 6400 Series QQQ Vent and Clean Procedure Revision : 1 Author: Jerry Rattanong Published Date: 11-15-17 Page 39 of 54 To dry each part withhouse nitrogengas,keepit submergedinthe methanol until readytocompletely dry withthe nitrogen.Dryeachpart, one at a time andsetonto cleanaluminumfoil.If house nitrogenis not available,place all partsontoaluminumfoil andallow toairdry. Re assemble the IonOptics Place the octopole ontothe skimmerspacer.Holdinplace andsecure withthe twoscrews.
- 40. Standard Operating Procedure 6400 Series QQQ Vent and Clean Procedure Revision : 1 Author: Jerry Rattanong Published Date: 11-15-17 Page 40 of 54 Place the spacerback onto the endof the octopole assembly,thenplace lens1intothe assemblyby locatingthe correct hole thatthe pinwill insertinto. Place the otherspacer backonto the lens1 theninstall the lens2.Secure withthe twoscrews.
- 41. Standard Operating Procedure 6400 Series QQQ Vent and Clean Procedure Revision : 1 Author: Jerry Rattanong Published Date: 11-15-17 Page 41 of 54 Reconnectthe white andredwires ontothe octopole assembly. Screw the blue wire backon. Install the O-ringtothe back of the skimmer.Ensure thatthe skimmerspacerhasitsO-ringinstalledas well.
- 42. Standard Operating Procedure 6400 Series QQQ Vent and Clean Procedure Revision : 1 Author: Jerry Rattanong Published Date: 11-15-17 Page 42 of 54 It islikelythatthe O-ringcouldstill be stuckinthe vacuummanifold.Trytokeepitsecure here or on the skimmerspacerwhile re-installingthe ion opticsassembly.Youmayneedtotry a few timestogetit seatedandseal properly.
- 43. Standard Operating Procedure 6400 Series QQQ Vent and Clean Procedure Revision : 1 Author: Jerry Rattanong Published Date: 11-15-17 Page 43 of 54 Slide the ionopticsbackintothe manifold.Re-connectthe blackandgreenwiresasshown.Reconnect the electrical harness.
- 44. Standard Operating Procedure 6400 Series QQQ Vent and Clean Procedure Revision : 1 Author: Jerry Rattanong Published Date: 11-15-17 Page 44 of 54 Place the manifoldcoverbackon.Secure withtwoscrewson the leftside andtightendownthe two screwon the right.
- 45. Standard Operating Procedure 6400 Series QQQ Vent and Clean Procedure Revision : 1 Author: Jerry Rattanong Published Date: 11-15-17 Page 45 of 54 Next,reassemble the 3piecesthatwill installtothe frontside of the desolvationassembly.
- 46. Standard Operating Procedure 6400 Series QQQ Vent and Clean Procedure Revision : 1 Author: Jerry Rattanong Published Date: 11-15-17 Page 46 of 54 Alignthe face plate tothe twoholeshere.Screw tosecure but do not tightenall the way. Instead,screwthe sprayshield inall the way,andonce it isseatedand connectscrew inanymore,align the hole onthe topof the spray shield tothe 12 o’clock position,holdthatposition andfinally,tighten the two screws.Remove the sprayshield andre-install sprayshield toensure thatthe hole onthe front still linesupatthe 12 o’ clock positon. Removethe sprayandsetto the side,fornow.
- 47. Standard Operating Procedure 6400 Series QQQ Vent and Clean Procedure Revision : 1 Author: Jerry Rattanong Published Date: 11-15-17 Page 47 of 54 Alignthe twoguide postsontothe desolvation assembly.Slide the desolvation assembly tothe endand secure withthe twoscrews. Lubricate the iontransfercapillarybysprayingthe sideswithLCMSgrade Isopropanol.Insertintothe desolvation assembly.Goslowlyandstraightin.Youwill meetresistance ataroundthisposition.
- 48. Standard Operating Procedure 6400 Series QQQ Vent and Clean Procedure Revision : 1 Author: Jerry Rattanong Published Date: 11-15-17 Page 48 of 54 Pushthe iontransfercapillarybackevenfurther,until youreachthisposition. Place the iontransfercapillarycapback. Screw in the sprayshield.
- 49. Standard Operating Procedure 6400 Series QQQ Vent and Clean Procedure Revision : 1 Author: Jerry Rattanong Published Date: 11-15-17 Page 49 of 54 Alignthe auxillarymodule upwiththe slotonthe rightside.Place the auxillarymodule inposition.
- 50. Standard Operating Procedure 6400 Series QQQ Vent and Clean Procedure Revision : 1 Author: Jerry Rattanong Published Date: 11-15-17 Page 50 of 54 Reconnectthe draintubingonthe bottomof the desolvationassembly,reconnectthe nitrogen drying gas line and dryinggas heatercable. Insertcable intothe mainboard,locatedon the back of the auxillarymodule.
- 51. Standard Operating Procedure 6400 Series QQQ Vent and Clean Procedure Revision : 1 Author: Jerry Rattanong Published Date: 11-15-17 Page 51 of 54 Reconnectthe spraychamberhighvoltage cable,andtightenthe retainingscrew locatedonthe bracket. Replace the cover.Secure withthe 4 screws.Reconnect the displayboardLED,selectionvalveandleak Sensorcables.
- 52. Standard Operating Procedure 6400 Series QQQ Vent and Clean Procedure Revision : 1 Author: Jerry Rattanong Published Date: 11-15-17 Page 52 of 54 Place the Source back onto the twohingesonthe door. Plugthe line fromselectorvalvebacktothe ESI probe.Place the line fromthe columncompartmentbackintothe massspec. Place the lowerendof the mass specfrontcover on.Attach the LED displaycable. Pushthe frontcover forwardto secure iton the front the instrument.
- 53. Standard Operating Procedure 6400 Series QQQ Vent and Clean Procedure Revision : 1 Author: Jerry Rattanong Published Date: 11-15-17 Page 53 of 54 Pluginthe mainpowercordand the foreline pumppowercord.Ensure everythingisconnect properly and correctly.Poweronthe switchonthe back of the vacuum pump.
- 54. Standard Operating Procedure 6400 Series QQQ Vent and Clean Procedure Revision : 1 Author: Jerry Rattanong Published Date: 11-15-17 Page 54 of 54 FinallyPoweronthe MassSpec.Allowroughlyafull dayto pumpdownthe mass spec.You are finally finished.