
Recommended
More Related Content
What's hot
What's hot (20)
Similar to Drawing 6 apples beginning drawing
Similar to Drawing 6 apples beginning drawing (20)
More from Jason Eoff
Recently uploaded
Recently uploaded (20)
Drawing 6 apples beginning drawing
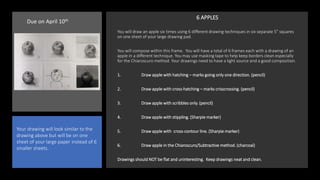
- 1. 6 APPLES You will draw an apple six times using 6 different drawing techniques in six separate 5” squares on one sheet of your large drawing pad. You will compose within this frame. You will have a total of 6 frames each with a drawing of an apple in a different technique. You may use masking tape to help keep borders clean especially for the Chiaroscuro method. Your drawings need to have a light source and a good composition. 1. Draw apple with hatching – marks going only one direction. (pencil) 2. Draw apple with cross-hatching – marks crisscrossing. (pencil) 3. Draw apple with scribbles only. (pencil) 4. Draw apple with stippling. (Sharpie marker) 5. Draw apple with cross-contour line. (Sharpie marker) 6. Draw apple in the Chiaroscuro/Subtractive method. (charcoal) Drawings should NOT be flat and uninteresting. Keep drawings neat and clean. Your drawing will look similar to the drawing above but will be on one sheet of your large paper instead of 6 smaller sheets. Due on April 10th
- 2. Place your apple to observe on a clean white surface or large sheet of paper. Experiment with the room lighting to create strong directional lighting on your apple. This will create a light side with highlights and a dark side that casts a shadow on the ground.
- 3. 1. HATCHING - Choosing one pencil (HB, B, 2B or No.2), shade the apple using marks going mostly in one direction. You are increasing the vocabulary of your mark making so it is preferable to see the marks rather than blend them all together so that they are invisible. With a ruler, lightly draw your first 5” square on your paper. Then you will draw and shade using hatching.
- 4. Studying the light and shadow on a sphere that has strong directional lighting is very informative. Notice the variety of tones in this simple sphere. Notice the hint of reflected light that is in the shadow. Notice the difference between the highlight and the light.
- 5. 2. Cross-hatching - Choosing one pencil (HB, B, 2B or No.2) shade the apple using marks that criss-cross. Cross-hatching and hatching can give your drawing a rough-hewn charm so allow the lines show. Watch this basic short tutorial on cross-hatching. With a ruler, lightly draw your second 5” square on your paper. Then you will draw and shade using cross-hatching.
- 6. With a ruler, lightly draw your third 5” square on your paper. Then you will draw and shade using scribbles. • Scribbling – Choosing one pencil (HB, B, 2B or No.2) shade the apple making scribble marks. Don’t be afraid to be a little loose with your marks. Scribbles can give your image a movement or kind of charming energy. Check out the possibilities. Next slide . . . .
- 7. The frenetic scribbles and mark making are part of the charm.
- 8. With a ruler, lightly draw your fourth 5” square on your paper. Then you will draw using a marker making only dots. 4. Stippling – Using your Sharpie marker or a micron pen, shade your apple using only dots. • More dots and closer together = darker. • Less dots and further apart = lighter.
- 9. With a ruler, lightly draw your fifth 5” square on your paper. Then you will draw using cross-contour. Check out this video on cross-contour. Now check out this video on drawing an apple. 5. Cross-contour – Using your pencil you can lightly draw your apple with cross-contour lines. Capture the topography of the form and shape of your apple. Re-trace with a sharpie marker. Lines should be elegant and clean. Don’t color in or sketch.
- 10. With a ruler, lightly draw your fifth 5” square on your paper. Carefully mask off the edges with tape. 6. Chiaroscuro/Subtractive -Cover your 5” square with charcoal dust or you can apply soft vine charcoal. Then with a paper towel or shammy, gently rub/smudge the entire square into a nice even middle value of gray. Try to make it look like a smooth piece of slate. Use your eraser to carve out the light areas and use your charcoal to draw the darks. Carefully smudge the lights and dark together to create gradations. For naturalistic drawings, remember shapes have edges but not outlines. Lines are important for finding your form but they must eventually belong to the object or the background. If lines are independent of object and ground they are outlines which will flatten your drawings. You can smudge and blend with your fingers but be careful not to constantly rub areas repeatedly with your finger because your skin has oil in it that can be rubbed into your paper. If this happens it can be difficult to erase marks.
- 11. Check out this informative video on Shading. Your final drawing is due on Friday April 10th. You will post a clear photo (jpeg) of your drawing onto Canvas under the relevant Discussion board called Six Apples Exercise. I will post instructions on how to upload visible images. After images are finally posted you will be required to add criticism/commentary on 5 different works by other students.