Get Your Windows 8 Device Connected with the Right Wi.pdf
•
0 likes•61 views

https://dudehightech.com/index.php/2022/05/16/get-your-windows-8-device-connected-with-the-right-wi-fi-settings/

Recommended
Recommended
More Related Content
Similar to Get Your Windows 8 Device Connected with the Right Wi.pdf
Similar to Get Your Windows 8 Device Connected with the Right Wi.pdf (20)
More from Get Up To Dated
More from Get Up To Dated (20)
Recently uploaded
Recently uploaded (20)
Get Your Windows 8 Device Connected with the Right Wi.pdf
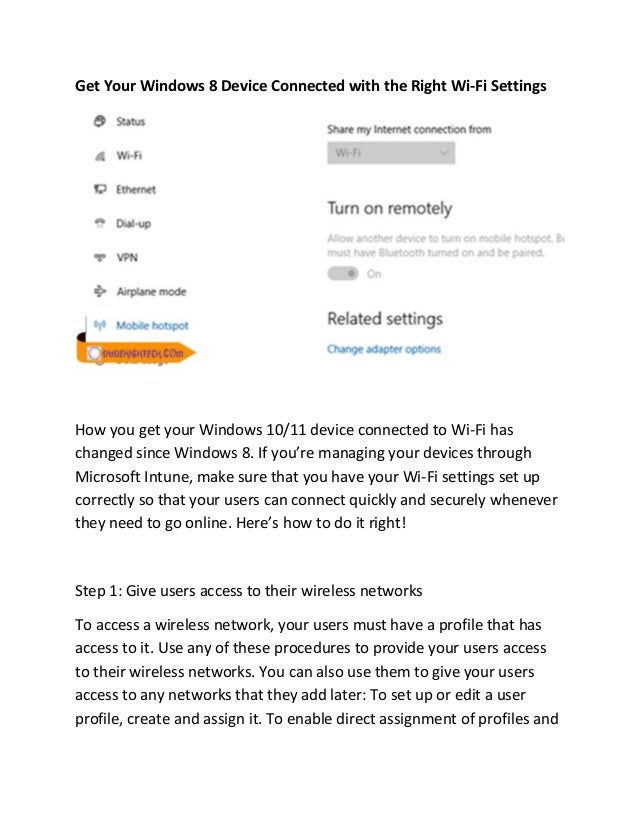
- 1. Get Your Windows 8 Device Connected with the Right Wi-Fi Settings How you get your Windows 10/11 device connected to Wi-Fi has changed since Windows 8. If you’re managing your devices through Microsoft Intune, make sure that you have your Wi-Fi settings set up correctly so that your users can connect quickly and securely whenever they need to go online. Here’s how to do it right! Step 1: Give users access to their wireless networks To access a wireless network, your users must have a profile that has access to it. Use any of these procedures to provide your users access to their wireless networks. You can also use them to give your users access to any networks that they add later: To set up or edit a user profile, create and assign it. To enable direct assignment of profiles and
- 2. devices, you may want to import profiles from an LDAP directory service (for example, Active Directory) into Intune. For details about how to do so, see Set up LDAP synchronization for Microsoft Intune clients and Prepare for device enrollment. Step 2: Configure primary connection types Open Settings and then click Network & Internet. In Network & Internet, click Wi-Fi. On your keyboard, press and hold or right-click Networks > Advanced options > Primary connection type. In Advanced options, select a connection type to use on all networks as your primary connection (recommended), then select Save. Step 3: Configure additional connection options In some cases, you’ll need to connect your Windows 10/11 device to your organization’s network. For example, if your work or school network requires a proxy server for Internet access, you’ll need to configure those settings on each device. The easiest way to do that is in Microsoft Intune. In Microsoft Intune, go to Configuration > Platform and update policies > WiFi and Mobile > Additional connection options. Select Choose additional connection options and then select Next. Step 4: Publish these profiles through group policy Go to your Azure Active Directory > Select Azure AD under Enterprise Applications > Right click on Configuration and select New and choose
- 3. Group Policy Object. Name it as you like, I usually name them after where they will apply (domain or OU). Go to Group Policy Management and select your GPO for editing. Once it opens in the MMC Editor, right click on User Configuration > Policies > Administrative Templates. Now drill down to Preferences -> Control Panel Settings and double click on Desktop Icon Settings. Set both options to Disabled (or not configured) as shown in image below: Do a gpupdate /force on all devices! Step 5: Expose SSIDs via NetBIOS broadcast Since almost every enterprise controls its wireless access points, it's not a big deal to allow users to roam freely without having to configure their PC. There are two ways to broadcast SSIDs via NetBIOS: ScopeId and Free Busy Information. Both can be configured in Group Policy Preferences under Computer Configuration > Preferences > Control Panel Settings > Network List Manager Policies. Allow SSID broadcasts by enabling Specify client TCP/IP properties. Free Busy Information broadcasts at regular intervals whether or not an IP connection is active on your device, so there's a small hit on battery life for mobile devices if you enable that option. When enabled, clients will send updates about SSIDs they're connected to; when disabled, only those currently connected to an SSID will be sent. Step 6a: Set a profile as default on every WiFi capable computer or device your user has (Windows 7 or later) READ MORE