Gas street
•
0 likes•150 views

Special Instructions for Installation of GAS Street Line for CAT Gas Engines

Recommended
More Related Content
What's hot
What's hot (20)
Similar to Gas street
Similar to Gas street (20)
Recently uploaded
Recently uploaded (20)
Gas street
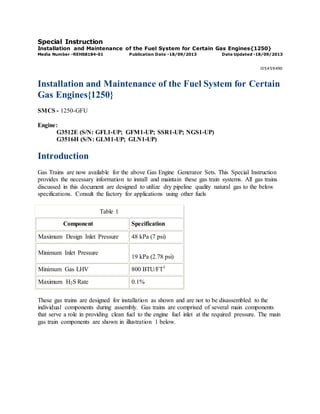
- 1. Special Instruction Installation and Maintenance of the Fuel System for Certain Gas Engines{1250} Media Number -REHS8184-01 Publication Date -18/09/2013 Date Updated -18/09/2013 i05459490 Installation and Maintenance of the Fuel System for Certain Gas Engines{1250} SMCS - 1250-GFU Engine: G3512E (S/N: GFL1-UP; GFM1-UP; SSR1-UP; NGS1-UP) G3516H (S/N: GLM1-UP; GLN1-UP) Introduction Gas Trains are now available for the above Gas Engine Generator Sets. This Special Instruction provides the necessary information to install and maintain these gas train systems. All gas trains discussed in this document are designed to utilize dry pipeline quality natural gas to the below specifications. Consult the factory for applications using other fuels Table 1 Component Specification Maximum Design Inlet Pressure 48 kPa (7 psi) Minimum Inlet Pressure 19 kPa (2.78 psi) Minimum Gas LHV 800 BTU/FT3 Maximum H2S Rate 0.1% These gas trains are designed for installation as shown and are not to be disassembled to the individual components during assembly. Gas trains are comprised of several main components that serve a role in providing clean fuel to the engine fuel inlet at the required pressure. The main gas train components are shown in illustration 1 below.
- 2. Illustration 1 (A) Weldable flange (B) Manual Isolation Valve (C) Pressure Gauge (D) Gas Filter (E) Pressure Regulator (F) Dual Solenoid Shutoff Valve (G) Flexible Hose Main Components Weldable Flanges Inlet and outlet flanges are provided with each gas train designed to be welded to customer supplied piping. These flanges can then be bolted directly to the inlet or outlet of the gas train. The outlet weldable flanges are not required as the outlet connection on the flexible hose can mate directly to the engine fuel inlet. Manual Isolation Valves A manual isolation valve is provided with each gas train on the inlet side prior to the gas filter. The manual valve allows for isolation of the gas train and engine from the fuel source. The manual isolation valve will either be a ball valve or a butterfly valve depending on the specific
- 3. gas train purchased. When leak testing gas supply piping this valve should be closed to prevent a pressure spike from damaging the gas train components. Note: Quickly opening the manual isolation valve can permanently damage other gas train components. The manual isolation valve should be opened slowly to allow for a gradual build of pressure in the system. Pressure Gauges Illustration 2 (A) Manual push button Three pressure gauges are provided with the typical gas trains. The gauges will either be 0 - 70 kPa (0 - 10 psi)or 0-600 mbar gauges depending on the intended market for installation. The first two are on the inlet and outlet sides of the gas filter to show differential pressure across the filter. The third gauge is on the outlet side of the shutoff valves to show inlet fuel pressure feeding into the engine. Each gauge is equipped with a manually operated shutoff device between the measuring line and pressure gauge. In the normal state, the push-button cock is closed. Therefore, the pressure gauge is relieved of pressure. The push button must be pushed to apply pressure on the pressure gauge (illustration 2). Gas Filter
- 4. Filter systems are utilized to increase the service life of gas engines. Gas lines contain varying amounts of scale and rust which can cause malfunction or damage to the gas train and engine components. The filters used on the gas trains filter to the following levels: 1 micron at 96% efficiency, 2 microns at 99.5% efficiency. Note: Prior to removing the condensation drain plug or the filter element, the manual isolation valve must be closed. Verify that the system is not pressurized before removing the plug or filter. Illustration 3 (A) Filter housing cover (B) Condensation drain plug The differential pressure gauges should be used when determining if the filter element needs to be replaced. If, the pressure difference between the filter inlet and outlet gauges is greater than 104 M Bar (1.5 psi)the element should be serviced. In order to change the filter element the filter housing lid must be removed. All of the bolts on the lid must be removed and the element will be removed vertically from the filter housing. Do not introduce foreign debris into the filter housing when replacing the filter element. Replace the two sealing O-rings at the same time the filter element is replaced. The filter housing is also equipped with a condensation drain and plug on the bottom of the filter housing. Water vapor in the gas can sometimes build and condensation can pool on the bottom of the housing. The drain plug should be removed periodically to drain this water from the system. Pressure Regulator
- 5. Illustration 4 (A) Vent/breather connection (B) External feedback pressure connection (C) Upstream pressure connection The pressure regulator is designed to reduce the inlet pressure into the gas train down to an acceptable level for use by the engine. Refer to Illustration 4 for pressure tap locations of the pressure regulator. Illustration 5 (A) Breather plug (D) Breather hole
- 6. The pressure regulator has a breather plug (A) that threads into the regulators vent connection. When, installing the gas train this plug should not be removed unless venting outdoors is required. This plug is not the vent limiter, and the plug prevents debris from entering the upper chamber of the regulator. Debris in the upper chamber of the regulator could adversely affect regulator performance. The pressure regulator must also be able to exchange air through breather hole (D) in order to operate. Do not plug the breather hole and clean out the hole if necessary. If external venting of the regulator is required, follow the local code for vent sizing and termination requirements. The vent line should be terminated at an approved location based on local code requirements. Install an insect screen and terminate the pipe with the exit facing downward. If venting the regulator, the vent line is to be connected to the upper dome of the regulator to the breather plug location. In general, the piping run should be as short and direct as possible. Illustration 6 An external pressure feedback is not required with this regulator type. If, an external impulse feedback is desired then the internal impulse must be plugged. Seal the internal impulse connection with a silicone or RTV sealant suitable for exposure to natural gas, propane, or butane.
- 7. Illustration 7 If, inlet pressure to the gas train is between 19 to 48 kPa (2.78 to 7 psi)the outlet pressure to the engine will be between 10 to 34 kPa (1.5 to 5 psi). The spring installed in the regulator from the factory is designed to operate in the pressure range and does not require adjustment. Refer to the steps listed below and Illustration 7 in order to adjust the outlet pressure. 1. Remove the black cover on top of the regulator 2. To increase the outlet pressure, turn the adjustment spindle clockwise 3. To decrease the outlet pressure, turn the adjustment spindle counterclockwise 4. Utilize the downstream pressure gauge to verify that the outlet pressure is in the desired range. 5. Reinstall the black adjustment cover.
- 8. Illustration 8 6. To prevent unauthorized adjustment, holes in the black cover and the side of the regulator can be used to secure a lead seal. Personal injury can result from parts and/or covers under spring pressure. Spring force will be releasedwhen covers are removed. Be prepared to hold spring loaded covers as the bolts are loosened.
- 9. Illustration 9 1. Remove the adjustment cover 2. Release the spring tension by turning the adjustment spindle counterclockwise. 3. Remove the aluminum cap. 4. Remove the spring. 5. Install one new spring. 6. Reinstall the aluminum cap with the adjustment spindle. 7. Reinstall the adjustment cover. 8. Adjust as necessary Dual Solenoid Shutoff Valve The gas shutoff valve (GSOV) is one of the most important safety devices in the gas train. The valve allows gas to the engine only when the engine is ready to use the gas. The GSOV positively blocks the gas supply line to stop gas flow when the engine is shut down. The GSOV utilizes two safety shutoff valves in series in one compact housing. Both of these valves must open for gas to flow to the engine. Both solenoids operate in a default shutdown condition, requiring actuation to allow gas to flow. The valves are commonly referred to as an "energize to run" system. The two valves can be wired independently or in parallel. Refer to local code requirements to determine if independent valve wiring is required. Electrical connections are on the top of the valve
- 10. Table 2 Gas Shutoff Valve Specifications Maximum Body Pressure 103 kPa (15 psi) Maximum Operating Pressure 48 kPa (7 psi) Supply Voltage 24 VDC 110-120 VAC / 50-60 Hz Approximate Operating Current 5.6 A at 24 VDC 1.12 A at 120 VAC Electrical Connection DIN connector with 1/2 inch NPT conduit adapter Opening Time (to maximum flow) less than one second Closing Time less than one second Illustration 10 g03401766
- 11. Top View of the GSOV and Electrical Connections Illustration 11 The valve can be wired to operate on either AC or DC power supplies. Refer to Illustration 11for AC and DC wiring. Due to the current draw exceeding or being near the maximum capability of most engine ECMs, a relay is to be used. During normal operation of the generator set, the GSOV solenoids will open and close as signaled by the engine. During normal stop conditions the engine will close the GSOV while the ignition system is left active while the engine runs down. Closing the valve helps to burn the fuel in the fuel lines between the GSOV and the combustion cylinders. Closing the valve also prevents fuel from being pumped into the exhaust system. In an emergency shutdown, the GSOV is closed and the ignition system is grounded immediately. The ignition system is grounded to stop the engine as quickly as possible but can leave unburned fuel in the engine and exhaust system. The unburned gas poses a hazard and can result in exhaust stack explosions. Thus an emergency shutdown should only be utilized in case of emergencies and not used for normal shutdowns. Note: Ensure that the engine and exhaust lines are purged following an emergency shutdown. Purging the engine and exhaust will help avoid exhaust stack explosions due to unburned fuel in the system. Purging the fuel can be accomplished by cranking the engine while keeping the GSOV closed and the ignition system inactive. Flexible Hose The connection between the gas train and the engine fuel inlet is an important junction. Because the engine is subject to vibration during operation, the fuel inlet can move relative to the fixed piping of the gas train installation. If, a rigid connection was used, vibration transmitted to the gas supply piping could lead to fatigue and failure resulting in a dangerous gas leak. Flexible lines help to isolate the engine vibration from the gas supply lines.
- 12. Each flexible line consists of a stainless steel annular corrugated flexible metal hose with a single braided stainless steel outer cover. The inlet side of the hose consists of a mating flange designed to mate directly to the outlet side of the GSOV. The outlet side of the flexible hose consists of a mating flange which should mate directly to the engine fuel inlet. Other Components Table 3 Guidelines/Regulations Component AS5601/3814 CSA B149.1 EN 746- 2 NFPA 37 Switch with visual position indicator X X X X High Pressure Switch 100 to 500 mbar - Auto Reset X X High Pressure Switch 10 to 50 kPa (40 to 200 inch of H2O) - Manual Reset X X Low Pressure Switch 5 to 150 mbar - Auto Reset X X Low Pressure Switch 3 to 15 kPa (12 to 60 inch of H2O) - Auto Reset X X Valve Proving System - Tightness Controller X X X Normally Open Vent Valve X The gas train may contain other components based on the region and specific requirements it was intended to be compliant with. Table 3 specifies which components are provided for each of the regional gas train designs. Switch with Visual Position Indicator The position indicator signifies both physically and electrically when a valve is either in the closed or open position. The indicator switches mount directly to the GSOV. The switch indicator indicates orange when the valve is open and green when the valve is closed. Table 4
- 13. Switch Type SPDT Contact Rating 10A res, 8 FLA, 48 LRA at 120 VAC 1 A maximum at 24 VDC Valve Open Green Light Valve Closed Orange Light Indicator light consumes 20 mA when energized Illustration 12 (A) Indicator Switches
- 14. Illustration 13 g03402040 Follow local regulations as required when wiring the indicator switches. Do not exceed the electrical rating of the switches and use at least 14 or 16 AWG wire rated for at least 75C (167F). For NEMA 4 applications, NEMA 4 conduit or wiring methods must be used. Refer to Illustration 13 for referenced wiring locations. 1. Connect one wire to the L1 terminal (common). 2. Connect one wire to the ground terminal. 3. Connect one wire from Terminal 2 (proof terminal) to proof of closure terminal of the flame Safeguard. Note: If the neutral is not wired to Terminal L2 on the switch, the lights will not indicate the valve position. 4. Connect one wire from the neutral to Terminal L2. Note: Do not wire the switch to close a circuit that will directly power another safety shutoff valve. Doing so could result in a safety valve being energized and opened rather than remaining closed.
- 15. If the switch is not operating properly and is in need of calibration, refer to the steps listed below. 1. The switch must be mounted to the GSOV and the GSOV must be closed. 2. Disconnect all power to the switch to prevent electrical shock and equipment damage. 3. Remove the clear cover. 4. Turn the adjustment dial counterclockwise until the dial stops. 5. Turn the adjustment dial clockwise until the switch trips. The switch should make an audible noise. 6. Note the position of the set point in reference to the white lines on the scale. 7. Turn the adjustment dial two additional increments clockwise to the same relative position. 8. Install the clear cover. The valve should be checked for continuity annually. Refer to the steps listed below. 1. Turn the manual shutoff valve to the off position. 2. Check the continuity between Terminal T3 (common) and Terminal T2 (proof terminal).The continuity between Terminals T3 and T1 should not exceed 0.2 Ohms. Note: Terminal T3 and T1 should not have continuity. 3. Energize the GSOV solenoids and verify the continuity for each switch between Terminals T3 and T1. The continuity between Terminals T3 and T1 should not exceed 0.2 Ohms. Note: Terminal T3 and T2 should not have continuity. 4. Replace the switch if the continuity is not correct. 5. Verify that the repair eliminated the problem. NFPA 37 and CSA B149.1 High and Low Pressure Switches
- 16. Illustration 14 g03402434 (A) Low Pressure Switch (B) High Pressure Switch The high and low-pressure switches for NFPA and CSA-compliant gas trains are mounted to the side of the GSOV body as shown in Illustration 14. The switches can be utilized to ensure that the proper gas pressure range is provided to the engine. Table 5 Switch Specifications Switch Type SPDT Contact Rating 10A resistive at 120 VAC 3A inductive at 120 VAC 1A at 12-48 VDC Maximum Operating Pressure 7 psi (500 mbar) Electrical Connection Screw terminals via 1/2 inch NPT conduit connection Incorporates a vent limiter per UL353 and limits escape of gas less than 1.0 cfh at 48 kPa (7 psi) if internal switch diaphragm ruptures. No vent line is required when accepted by
- 17. the authority having jurisdiction. Wiring the Low and High Pressure Switches 1. Remove the clear cover from the switch. 2. Use 14 or 16 AWG wire rated for at least 75° C (167° F). 3. Route the wires through the conduit connector 4. Install a conduit plug between the switch and the closest panel that contains switching contacts to prevent possible gas leaks into the conduit. Illustration 15 5. Connect the wires to the appropriate terminals. Refer to Illustration 15. Adjusting the Set Point of the Switches
- 18. Illustration 16 (C) Set Point Dial (D) Reset Button (E) Clear Cover Follow the steps listed below to adjust the set point The High Pressure set point should be set to 35 kPa (140 inch of H2O). The low-pressure set point should be set to 10 kPa (42 inch of H2O). 1. Remove the clear cover
- 19. Illustration 17 g03402781 2. Turn the dial until the desired trip pressure is opposite of the white arrow of the dial face. 3. After readjusting the set point for normal operation, verify that the gas pressure switch operates as adjusted. Note: Use the upstream pressure gauge to verify proper operation of the pressure switch. 4. Reinstall the clear cover. Illustration 18 g03402495 For the high-pressure switch with manual reset, as pressure rises above the set point 2 NO closes, 1 NC opens, and a Neon light will turn on signifying a fault as the switch trips and locks out. The same process will happen for the low-pressure switch but as the pressure falls below the set point 2 NO will close, 1 NC opens, and a neon light will turn on. For the low-pressure switch with automatic reset the switch will trip but will not lock out. The low-pressure switch will reset automatically when the gas pressure returns to a level above the set point. To reset the high-pressure switch manually, wait until the gas pressure returns to a
- 20. normal operating level. Then press and release the clear cover over the red reset button in the center of the yellow dial face shown in Illustration 16. Removing the cover is not necessary. EN746-2 and AS 5601/3814 High and Low Pressure Switches Illustration 19 g03402434 (A) Low Pressure Switch (B) High Pressure Switch The high and low-pressure switches for EN746-2 and AS5601/3814 compliant gas trains are mounted to the side of the GSOV body as shown in Illustration 19. The pressure switches can be utilized to ensure that the proper gas pressure range is provided to the engine. Table 6 Pressure Switch Specifications Voltage Rating 24-250 VAC 24-48 VDC Current Rating 20 mA AC minimum 20 mA DC minimum
- 21. 1A DC maximum Maximum Operating Pressure 500 mbar (7 psi) Wiring the Low and High Pressure Switches 1. Remove the clear cover from the switch. 2. Use 14 or 16 AWG wire rated for at least 75° C (167° F). 3. Route the wires through the conduit connector 4. Install a conduit plug between the switch and the closest panel that contains switching contacts or other sparking devices to prevent possible gas leaks into the conduit. Illustration 20 g03402516 5. Connect the wires to the appropriate terminals. Refer to Illustration 21.
- 22. Illustration 21 g03402518 The high and low-pressure switches for these applications are automatic reset and will not lock out if the pressure falls above or below the set point. For the high-pressure switch, as pressure rises above the set point 2 NO closes, 1 NC opens signifying a fault as the switch trips. The same process will happen for the low-pressure switch but as the pressure falls below the set point 2 NO will close, 1 NC opens signifying the fault as the switch trips. Adjusting the Set Point of the Switches Follow the steps listed below to adjust the set point The High Pressure set point should be set to 35 kPa (140 inch of H2O). The low-pressure set point should be set to 10 kPa (42 inch of H2O). 1. Remove the clear cover
- 23. Illustration 22 g03402781 2. Turn the dial until the desired trip pressure is opposite of the white arrow of the dial face. 3. After readjusting the set point for normal operation, verify that the gas pressure switch operates as adjusted. Note: Use the upstream pressure gauge to verify proper operation of the pressure switch. 4. Reinstall the clear cover. Valve Proving System Tightness Controller Illustration 23 g03402789 (F) Valve Proving System The valve proving system (VPS) mounts to the side of the GSOV and is used to verify that both safety shutoff valves in the gas train are fully closed before a system start-up or after a shutdown. Table 7
- 24. Valve Proving System Specifications Maximum Operating Pressure 500 mbar (7 psi) Maximum Body Pressure 1000 mbar (15 psi) Electrical Ratings 110-120 VAC at 60 Hz 24 VDC Switch Output Rating 4 A at 24 VDC at Run 1 A at 24 VDC at Alarm Power Ratings (Consumption) Test Period: 60 V A In operation: 17 V A Electrical Connection Screw terminals with 1/2 inch NPT conduit connection Operating Time 100% duty cycle, mas 20 test cycles per hour Test Volume Maximum .(0004)m3 ( 0.14 ft3 )/min Release Signal Timing Roughly 10 seconds for test volume less than (.014m3 )(0.5 ft3 ) More than 10 seconds (26 seconds maximum) for test volume great than (.01 4m3 )(0.5 ft3 ) Detectable leakage rate through both valves (0.006 cubic meter)(0.2 cubic feet) to (0.03 cubic meter)(1 cubic feet)/hour at (500 mbar)(7 psi) inlet pressure
- 25. Illustration 24 g03402830 Programming the VPS Illustration 25 g03403882 1. During an idle state the GSOV valves one and two are closed. 2. During valve proving the internal pump in the VPS pumps gas pressure from the P1 safety valve to the volume between the two safety valves. 3. The P2 pressure between the two valves increases 2 kPa (8 inch of H2O) above P1. 4. If P2 pressure increases 2 kPa (8 inch of H2O) above P1, the motor pump is switched off and no leak is detected. 5. The contact RUN T5 is energized after 26 seconds maximum and the yellow signal lamp illuminates continuously. For 24 VDC system, terminal B is energized. 6. If, P2 does not increase 2 kPa (8 inch of H2O) above P1 the motor pump is switched as a leak is detected. 7. The Alarm contact T3 is energized after about 26 seconds and the red signal lights continuously. For 24 VDC system, terminal S is energized. 8. During operation the VPS remains off. The RUN contact remains energized and both safety valves are open.
- 26. Normally Open Vent Valve Illustration 26 g03403883 (G) Normally open valve (H) Vent line connection The normally open vent valve is provided on gas trains intended for NFPA37 compliant installations. The valve allows for venting of gas trapped between the two valves. The vent line connected to this vent valve should be installed and vented to appropriate location according to local regulations and code. The normally open valve is mounted on a line on the side of the GSOV. Note: Energize the normally open vent valve during operation. If both safety shutoff valves are open but the vent valve is not energized, gas will vent through the vent valve. Energize the valve to close shortly before or at the same time the safety shutoff valves are energized and allowed to open.
- 27. Illustration 27 g03403888 Electrical connections for the vent valve Maintenance Intervals Table 8 Maintenance Schedule Interval Procedure Daily Check filter Differential Pressure Check fuel inlet pressure to gas train, adjust knock down regulator if greater than 48 kPa (7 psi). Check fuel inlet pressure to engine, adjust with gas train regulator if greater than 34 kPa (5 psi). Every 2000 Service Hours Shut manual valve, remove condensation drain plugs from regulator and filter bodies, drain, and replace plugs Annually Replace the filter element In Frame Overhaul : 40,000 Rebuild Regulator with regulator kit, replacing diaphragms and
- 28. Service Hours seals Major Overhaul : 80,000 Service Hours Replace all valve position switches, high and low-pressure switches, and valve coils