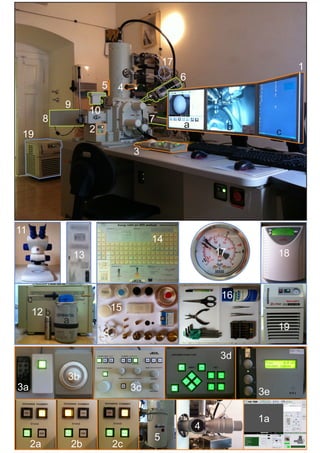
3. JEOL JSM-7600F Operation
CAUTIONS:
Always use gloves while preparing/(un)loading the sample!
Always make sure there is enough clearance between the top surface of the sample and the lens!
LOADING THE SAMPLE AND OBTAINING THE IMAGE
1.Switch monitors on
SEM (1a), Infrared chamber scope (1b), Analytical tools (1c).
2.Contaminator (Optional)
The built-in anti-contamination trap (5), located on the left side of the specimen chamber, can be filled with liquid Nitrogen to reduce
visible contamination on the specimen by collecting any grease, dirt, or impurities that can impede image observation, especially
at high magnifications. The cold finger has a capacity of 330 ml and is usable for nearly 4 hours once liquid Nitrogen is injected.
Pour in slowly at first and allow the trap to chill down for several minutes, then add liquid Nitrogen until overflow occurs.
It is important to maintain the trap fully cooled throughout your session because trapped gases will release if warmed -
increasing specimen contamination.
3.Prepare the sample
Wear gloves before opening a table desiccators and using any sample holder or tools. Mount your sample on an sample stub with
suitable sample holder, use self-adhesive carbon conductive tab if needed (15). Tighten the screws to secure the sample in holder,
inspect the sample to ensure that its highest point is flush with the edge or the sample holder as not hit any SEM components (16).
4.Vent the chamber
In the Vacuum Mode module click on the Vent button (2a), after about 15 sec Vacum Status will indicate “Vented” and the indicator
box will become red. Pull the chamber fastener and open the chamber door.
5.Place the sample
Attach Sled with sample holder to the Specimen Exchange Rod (read caution), close the chamber door with fastener.
6.Pump the chamber
In the Vacuum Mode module click on the Pump button (2b), Vacuum Status will show “Pumping” and the indicator box will become
yellow. After 1 min Vacum Status will indicate “Vacuum” and the indicator box will become green.
7.Load the sample
Push the rod Specimen Exchange Rod in completely, so that the specimen base is securely inserted into the mating receiver on
the stage (2c). Pull back slightly on rod to ensure disengagement.
8.Select starting work conditions
Set the number of the Aperture diaphragm to 4 for imaging or 1 in the case of EDS microanalysis (4), set the Work Distance to
approximately 10 mm (III-z or 3d), set magnification at about 25-50× (Low Magnification mode, V-LM or 3c), select the Accelerating
Voltage 10-20 keV (0,1-3 keV for charging and beam sensitive samples, I) and the Probe Current (Spot Size, IV) 6-14. Conditions
can be loaded from previous successfully generated image, right mouse click on the image and choose Set Conditions (X).
9.Turn high voltage on
Press the HV button on the Work page (I), an image appears in the active Quad.
10.Optimize the focus, contrast and brightness
Press Auto Contrast and Brightness (ABC) button (3c). Correct the focus, contrast and brightness by relevant knobs (3c).
11.Correct the astigmatism
Bring the image just slightly out focus – the image appears to become sharper in one direction whereas in perpendicular direction
image distortion increases (blurring or stretching of the image), defocus in the other direction to observe a opposite astigmatic
distortion, focus to the midpoint between the two distortions, adjust image sharpness with the stigmator X and Y knobs until the
best image is achieved, repeat whole procedure as necessary (3c or 4).
12.Alignment
Once the image is well focused and initial astigmatism compensation has been performed, the alignment procedure should be
performed. In fact, any time a detector, operating condition, or voltage is changed, the alignment sequence should be completed.
Aperture and astigmatism align should be carried out at successively higher magnifications. Click on Wobbler (3c) and adjust image
wobbling by relevant knobs on Aperture (4 or 3c), objects in the image should stretch uniformly in all directions.
13.Capture the image
Reduce the magnification to the desired value, choose the image quality of the scan and click on the Photo button, the image will
be paused at the end of the scan (alternatively you can use the Pause button) and the request for image saving will appear, where
you can choose the format, directory and save an image (3c).
REMOVING THE SAMPLE AND ENDING THE SESSION
14.Turn high voltage off
Set the Accelerating Voltage to 5keV, Low Magnification and click off the HV button on the Work page (I). Remove any
detectors (VII), which you might have inserted at the beginning of your session and click Change Position (VI).
15.Retract your sample
See step #7.
16.Vent the chamber
See step #4.
17.Remove the sample
Open the Chamber Door and withdraw the Sample Holder from the Specimen Exchange Rod, close the door. Loosen the screw
and remove the sample.
18.Pump the chamber
See step #6. Always leave the chamber under high vacuum.
19.Switch monitors off