
Recommended
More Related Content
What's hot
What's hot (20)
Similar to Biological width
Similar to Biological width (20)
Recently uploaded
Recently uploaded (20)
Biological width
- 1. BIOLOGICAL WIDTH BY: DR/ ESRAA RIAD
- 2. CONTENTS Definition of biologic width Importance Categories Significant factors related to biologic width Evaluation of b. w. violation Correction of b. w. violation Ferrule effect B. w. in implants Conclusion refrences
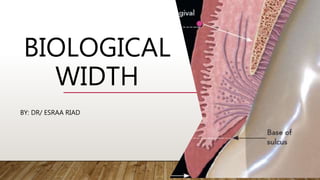
- 3. DEFINITION OF B.W. • Biological width is defined as the combined width of connective tissue and junctional epithelial attachment formed adjacent to a tooth and superior to the crestal bone. (2.04mm in depth) • the dimension of soft tissue which is attached to the portion of the tooth coronal to the crest of alveolar bone. ( Gargiulo et al 1961) • biological width was found to be 2.044 which represents: 1. a sulcus depth of 0.6mm , 2. an epithelial attachment of 0.97mm 3. and connective tissue attachment of 1.07mm. • Its dimensions are variable from tooth to tooth and also from one surface to another.
- 4. IMPORTANCE • Acts as a barrier and prevents penetration of microorganisms into the periodontium. • Maintenance of biologic width is essential to preserve the periodontal health and to remove any irritation that may damage the periodontium
- 5. CATEGORIES (3) • categories of biological width based on bone crest and the sulcus depth following bone sounding measurements.
- 6. • Normal crest patients: The midfacial measurement is 3mm and the proximal measurement range from 3mm to 4.5mm . It occurs approximately 85% of the time. The gingival tissues tend to be stable in patients. • High crest patients: It occurs in approximately 2% of the time. There is one area where the crest is seen more often, in a proximal surface adjacent to an edentulous site. In these patients, the mid- facial measurement is less than 3mm. • Low crest patients: It occurs approximately 13%of the time. The mid-facial measurement is greater than 3mm and the proximal measurement is greater than 4.5mm
- 7. SIGNIFICANT FACTORS ( HOW TO PRESERVE) 1-Restorative margin location 2-Margin nature 3-Displacement of gingival tissues 4-Crown contours and proximal contacts 5-Pontic design 6-Provisional restorations 7-Subgingival debris
- 8. HOW TO PRESERVE? (SIGNIFICANT FACTORS) 1-RESTORATIVE MARGIN LOCATION • The location, fit and finish of restorative margins are critical factors in the maintenance of periodontal health. • So, a huge consideration and care should have performed during isolation and retraction (even with digital impression techniques) besides tooth preparation to the biological width to ensure the healthy standards and maintenance the normal values of the periodontium.
- 9. There are three options available for the placement of margins: • supra gingival, • equigingival • and sub gingival.
- 10. 1. SUPRAGINGIVAL It is better to place the finishing line supragingivally fore the reasons: 1. Preparation of the tooth and finishing of the margin is easiest. 2.Easier duplication of the margins with impressions. 3. Fit and finish of the restoration and removal of excess material is easiest. 4. Verification of the marginal integrity of restoration is easiest. 5. The Supragingival margins are least irritating to the gingival tissues .
- 11. 2. EQUI-GINGIVAL MARGIN It was thought that placement of equi-gingival margins caused more plaque accumulation than supragingival or sub gingival margin resulting in gingival inflammation. But today the restorative margins can be esthetically blended with the tooth and finished to provide a smooth,polished interface at the gingival margin.
- 12. 3. SUBGINGIVAL MARGIN subgingival restoration demonstrated more quantitative and qualitative changes in the micro flora, increased plaque index, gingival index, recession, pocket depth and gingival fluid. Indication: Aesthetic areas Subgingival caries Dentinal hypersensitivity Subgingival discoloration Short clinical crown
- 13. GUIDE IN SUBGINGIVAL MARGIN PLACEMENT RELATED TO SULCULAR DEPTH • Finish line placement According to Ingber et al. 1977, at least 3mm space is required from finish line to the crest of alveolar bone to adequate healing and definitive restoration on tooth • Rule 1: If probing depth for gingival sulcus is 1.5mm or less then finish line should be 0.5mm below the gingiva • Rule 2: If probing depth is more than 1.5mm then finish line is placed on half of its sulcus depth. • Rule 3: If more than 2mm, advised gingivectomy up to sulcus depth of 1.5mm then finish line is placed according to rule 1.
- 14. WHICH BETTER? • Most of the studies prove that supra-gingival margins are most congruent in regard to periodontal health. Hence it should be positively considered in non aesthetic zones. • The equi-gingival finish line can be considered in aesthetic zones with care during tooth preparation and appropriate maintenance. • In unavoidable clinical conditions, subgingival finish line can be established but without iatrogenic damage to periodontium and accurate treatment planning.
- 15. Despite of the material, the margin should be smooth , rounded with good finish and polish 2-MARGIN NATURE
- 16. 3-DISPLACEMENT OF GINGIVAL TISSUES (GINGIVAL RETRACTION) Objectives of gingival retraction: 1. Create an access for the impression material to the area of the preparation that is located sub- gingivally. 2. To provide enough thickness of the impression material at the area of the finishing line to prevent distortion of the impression. 3. Providing the best possible condition for the impression material, fluid control. 4. Reduce fluid a mount in the sulcus that might cause void in the impression.
- 17. GINGIVAL RETRACTION TECHNIQUES: 1)) Mechanical.(plain Retraction cord ,Retraction Crown, Copper band or tube , Anatomic compression caps, Matrices and wedges, Rubber dam ) 2) )) Chemo mechanical (combination of mechanical and chemical) • a) )) Impregnated Retraction cord ,with one of following; (« aluminum sulfate„« epinephrine, « ferric sulfate, « zinc chloride, « aluminum chloride ) • b) )) Displacement polymer & paste (Cordless technique) 3) )) surgical ( Gingitage , Electro- surgical, Laser).
- 18. DOUBLE (DUAL) CORD TECHNIQUE • When 2 cords are need, it requires that about 1 mm of intact tooth structure remains between the top of the initial cord and the preparation margin. • First Cord is Thin, Remain during Impression while the Second Cord is thick. In this technique, a thin cord is placed without overlap at the bottom of the gingival crevice. • A second cord is placed on top to achieve lateral tissue displacement and removed immediately before impression making, whereas the initial cord is left in place to help minimize seepage during Impression, • be careful not to exert excessive pressure on the tissues, which can damage the epithelial attachment (Biological Width).
- 20. 4-CROWN CONTOURS AND PROXIMAL CONTACTS Periodontal health and clinical crown contour are interrelated. Over-contouring of restoration has to be avoided in every case. Gradual and smooth curvatures should be included in crown contour so as to facilitate the rubbing and function of the lips, cheeks, and tongue. Contour of interproximal area should be self cleansing and patient should be able to clean them comfortably. Height of subgingival contour facio-lingually should not be more than ½ of the thickness of the gingiva. This protects the gingival crevice and helps in maintaining knifelike free gingival margin, with plaque control
- 21. 5-PROVISIONAL RESTORATIONS • Three critical areas must be effectively managed to produce a favorable biologic response to provisional restorations during the interval until the final restorations are delivered. 1. The marginal fit, 2. crown contour, 3. surface finish of the restorations • Temporary restorations that are improperly adapted at the margins, that are over or under contoured, and that have rough or porous surfaces can result in inflammation, overgrowth, or recession of gingival tissues. • The outcome can be unpredictable; and unfavorable changes in the tissue structures can compromise the success of the final restoration.
- 22. 6-SUBGINGIVAL DEBRIS • An adverse periodontal response can be created if debris is left below the tissues during restorative procedures. • The source can be retraction cord, impression material, provisional material, or either temporary or permanent cement • The diagnosis of debris as the cause of gingival inflammation can be confirmed by examining the sulcus surrounding the restoration with an explorer, removing any foreign bodies, and then monitoring the tissue response. • It may be necessary to provide tissue anesthesia for patient comfort during the procedure.
- 23. 7-HYPERSENSITIVITY TO DENTAL MATERIALS • Inflammatory gingival responses have been reported related to the use of nonprecious alloys in dental restorations • Typically, the responses have occurred to alloys containing nickel, although the frequency of these occurrences is controversial • Hypersensitivity responses to precious are extremely rare, and these alloys provide an easy solution to the problems encountered with the nonprecious alloys. • In clinical research, porcelain ,highly polished gold, and highly polished resin all show similar plaque accumulation. • Regardless of the restorative material selected, a smooth surface is essential on all materials subgingivally.
- 24. 8-CEMENTATION • Excess cement in subgingival spaces can be described as an “artificial calculus” and may have a similar irritating effect as a calcified calculus on periodontally involved teeth and hence affecting the biologic width.
- 25. EVALUATION OF BIOLOGIC WIDTH VIOLATION 1-Clinical sign and symptoms 3-Radiographic evaluation 2-Bone sounding The biologic width has inter-personal and intra-personal variability.
- 26. 1. CLINICAL SIGNS AND SYMPTOMS OF BIOLOGIC WIDTH VIOLATION • The presence of discomfort during examination of restoration margins indicates biologic width violation. • The clinical signs and sequel of biologic width violation are: 1.Chronic progressive gingival inflammation around the restoration 2.Bleeding on probing 3.Localized gingival hyperplasia with minimal bone loss 4.Pocket formation 5.Gingival recession 6.Clinical attachment loss 7.Alveolar bone loss • Invasion of restoration into biologic width initiates crestal bone resorption. • This occurs to allow space for establishment of a minimum biologic width
- 27. 2-BONE SOUNDING 1. Measurements carried out with a calibrated periodontal probe. 2. Probe fitted tightly with a silicon rubber sliding 'stoper.’ 3. Under local anesthesia the probe was placed in the corono-apical direction, held against the tooth, and advanced apically so that the rubber stop would stay at the incisal edge with the probe tip at the base of sulcus in parallel direction to the tooth axis. 4. This distance was assessed with Vernier calipers 5. The probe was then advanced further apically until osseous tissue (crestal bone)was felt, and this distance was also recorded. 6. The difference of the two recorded measurements indicated the biological width • If this distance is less than 2mm at one or more locations, a diagnosis of biological width violation can be confirmed. • This measurement must be performed on teeth with healthy gingiva and should be repeated on more than one tooth to ensure accurate assessment and reduce individual and site variations.
- 29. 3- RADIOGRAPHIC EVALUATION Radiographs are useful non-invasive tools in the assessment of biological width encroachment. Parallel profile radiographic (PPR) technique has been introduced to measure the dimensions. This technique is limited for anterior region and only for labial surface in healthy teeth.
- 30. The most apical point of the gingival sulcus was assessed by probing [Figure 1]. To highlight the soft tissue structures on the radiograph, the auxiliary elements used were gutta percha and lead foil because of their opaque nature. After probing, gutta percha was cut to the sulcus depth [Figure 2, 3], The lead foil was cut appropriately [Figure 4] and then positioned over the gingival surface, aligned with the long axis of the tooth. The paralleling device was placed in such a way that the film was positioned on the lateral vestibule When the patient fixes teeth on the bite block fig 5 The radiographs thus obtained were digitized using a scanner fig 6. The images were imported to Adobe Photoshop CS2.
- 31. THE FOLLOWING MEASUREMENTS CAN BE OBTAINED: 1-Distance between the bottom of the gingival sulcus (apical end of gutta percha) and the bone crest - thus, the length of the DGU 2-Thickness of labial soft tissue measured from the palatal face of the lead plate to the root surface - thus, the width of the DGU The limitation of this technique is that it cannot be used in posterior teeth and unhealthy periodontal tissues.
- 32. METHOD TO CORRECT BIOLOGIC WIDTH VIOLATION BY CROWN LENGTHENING EITHER SURGICALLY OR ORTHO: • 1. Surgical crown lengthening: 1. Gingivectomy 2. APF with osseous reduction 3. Surgical extrusion • 2. Orthodontic procedure 1. Forced eruption ( slow orthodontic extrusion) 2. Forced eruption combined with fiberotomy (rapid orthodontic extrusion)
- 33. 1-GINGIVECTOMY • It is the Excision of the gingiva. • The incision should be beveled at approximately 45 degrees to the tooth surface, and it should re-create the normal festooned pattern of the gingiva. • Indications : 1. Elimination of suprabony pockets if the pocket wall is fibrous and firm 2. Elimination of gingival enlargements • Contraindications 1.Access to bone required 2.Narrow zone of keratinized tissue 3.Patients with high postoperative risk of bleeding
- 34. • Advantages: ease and simplicity of the procedure, but it has the • Disadvantages of more postoperative discomfort and an increased chance of postoperative bleeding. It also sacrifices keratinized tissue and does not allow for osseous recontouring. • Types (how to perform) 1.Surgical gingivectomy 2.Laser gingivectomy 3.Chemosurgery gingivectomy 4.Electrosurgical gingivectomy
- 37. 2-APF WITH OSSEOUS REDUCTION It is the most common procedure for clinical crown lengthening. It is done in inadequate zone of attached gingiva and biologic width less than 3 mm. Dis adv: Detailed evaluation should be done before carrying out osseous reduction as it compromises periodontal support of the tooth, causes furcation involvement, poor crown-to root ratio and gingival recession. It should not be done during surgical crown lengthening of a single tooth in the esthetic zone. In such cases, forced eruption should be considered to prevent negative architecture.
- 42. 3-SURGICAL EXTRUSION Fig. Surgical extrusion of tooth 1.2 with insufficient ferrule effect (a,b). Tooth was extracted with an atraumatic method (c) and then reimplanted and splinted, waiting for healing (d–f). Fig. Prosthetic rehabilitation.
- 43. ORTHODONTIC PROCEDURES: 1-FORCED ERUPTION (SLOW ORTHODONTIC EXTRUSION) • In forced eruption, tooth is intentionally moved in a coronal direction using gentle continuous force. • The force stretches gingival and periodontal fibers resulting in a coronal shift of gingiva and bone. • Orthodontic extrusion requires an activation period of 4-6 weeks and 6-8 weeks retention period for tooth to become stabilized in its new position. • Additional surgical crown lengthening may be required after forced eruption. • The contraindications are inadequate crown-to-root ratio, lack of occlusal clearance and periodontal complications.
- 45. 2-FORCED ERUPTION WITH FIBEROTOMY (RAPID ORTHO EXTRUSION) • Combination of orthodontic extrusion and severance of supra-crestal fibers, termed supra-crestal fiberotomy is also used for crown lengthening. • If fibrotomy is performed during the forced tooth eruption procedure, the crestal bone, and the gingival margin are retrieved at their pretreatment location. Thus, the tooth-gingiva interface at adjacent teeth is unaltered. • Fibrotomy is performed once every 7-10 days during the phase of forced tooth eruption
- 47. FERRULE EFFECT: • A ferrule effect is defined as a ‘‘360 metal collar of the crown surrounding the parallel walls of the dentine extending coronal to the shoulder of the preparation. The result is an elevation in resistance form of the crown from the extension of dentinal tooth structure • More precisely, parallel walls of dentin extending coronally from the crown margin provide a ‘‘ferrule,’’ which after being encircled by a crown provides a protective effect by reducing stresses within a tooth called the ‘‘ferrule effect’’ • The presence of a 1.5- to 2-mm ferrule has a positive effect on fracture resistance of endodontically treated teeth. • If the clinical situation does not permit a circumferential ferrule, an incomplete ferrule is considered a better option than a complete lack of ferrule
- 49. IMPLANT AND B.W. AVERAGE OF B.W AROUND IMPLANT???
- 51. Summary video
- 52. CONCLUSION the study of the periodontal-prosthodontic relationship is necessary for the ultimate success of the prostheses In dentistry the area of biological width along with sulcus, around natural teeth or an implant is sometimes called Bermuda Triangle or Devil’s Triangle. Like the Bermuda triangle, this biological width area is the most violated and misused area in dentistry, by almost all the dentists irrespective of their specialty. Hence, this region should be evaluated prior to treatment planning of the restorative phase. The maintenance of the normal structure of the biological tissues should be done and the concept of biologic width must be followed at each procedure . The periodontal health is an important key for the longevity of dental prostheses.
- 53. REFERENCES 1. Divya Khanna and Nikita Dhingra. “Biological Width-A Dilemma”. EC Dental Science 19.9 (2020): 67-69. 2. Galgali Sushama R, Gontiya Gauri. Evaluation of an innovative radiographic technique - parallel profile radiography - to determine the dimensions of dentogingival unit. Year : 2011 | Volume: 22 | Issue Number: 2 | Page: 237-241 3. Preetha Selvan, Biologic Width and Its Importance in Dentistry, JMSCR Volume 2 Issue 5 May 2014 4. Cordaro, M.; Staderini, E.;Torsello, F.; Grande, N.M.; Turchi, M.;Cordaro, M. Orthodontic Extrusion vs. Surgical Extrusion to Rehabilitate Severely Damaged Teeth: A Literature Review. Int. J. Environ. Res. Public Health 2021, 18, 9530. https:// doi.org/10.3390/ijerph18189530 5. Nikita Ambegaokar et al. Biologic width violation – A wake up call literature review, International Journal of Current Research, Vol. 10, Issue, 03, pp.67212-67216, 2018 6. Rajendran, Maheaswari et al. “Biologic Width - Critical Zone for a Healthy Restoration.” IOSR Journal of Dental and Medical Sciences 13 (2014): 93-98. 7. Sirajuddin, Syed, et al. "Suppl 1: M11: Iatrogenic Damage to Periodontium by Restorative Treatment Procedures: An Overview." The Open Dentistry Journal 9 (2015): 217.
Editor's Notes
- Dgu dento gingival unit
- External bevel gingivectomy is both successful and predictable surgical procedure and is indicated in hyperplasia or pseudo-pocket along with presence of adequate amount of keratinized tissue. Internal bevel gingivectomy is carried out if reduction of excessive pocket depth and exposure of coronal tooth is required in absence of sufficient zone of attached gingiva
- The peri implant b w is composed of sulcus, supra-crestal epith., and connective tissue component