Creative Pumpkin Decorating Ideas Under 40 Characters
1. OCTOBER 2015
38
PHOTOGRAPHS BY ALLIE COTTRILL
CRAFT STYLING BY SHABD SIMON-ALEXANDER
WARDROBE STYLING BY SABRINA STRELITZ
GROOMING BY KATHLEEN SCHIFFMANN
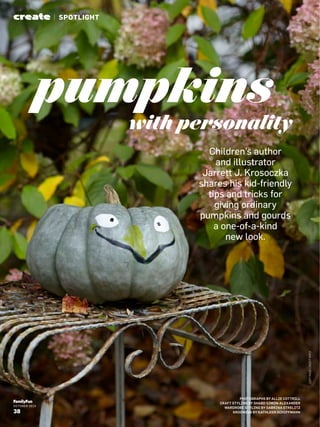
with personality
pumpkins
Children’s author
and illustrator
Jarrett J. Krosoczka
shares his kid-friendly
tips and tricks for
giving ordinary
pumpkins and gourds
a one-of-a-kind
new look.
create | SPOTLIGHT
LEFTPAGECREDITINFO
3. SEPTEMBER 2015
40
LEFTPAGECREDITINFO
Ilike
gourdswith
imperfections,
suchasthe
brownspots
onthisone.
Theyaddto
thecharmof
ourcreations.
<
Weliketousedisposablepaperpalette
pads(availableatartstores)formixing
paints,butpaperplatesworkwell,too..
OUR STORY
My family—wife Gina,
daughters Zoe and Lucy—and
I are big fans of Halloween. We
love decorating the house so
much that my neighbors have
taken to calling me the Clark
Griswold of Halloween. But
here’s the story: while we put in
effort, we don’t have much free
time to transform the house for
All Hallow’s Eve. What family
does? As an artist and a dad,
I’ve come up with a few simple
steps to make our house a
destination for trick-or-treaters
and, in the process, create
some outstanding memories for
my family.
FINDING GOURDS
When I go to the pumpkin
patch with my family, I don’t
just look for the perfect, most
orange pumpkin. I look for
pumpkins and gourds that
already have personality. I
encourage my girls to look
at some of the oddly shaped
gourds and ask them what kind
of character they see. Is there a
sad, scary, or happy face there?
Don’t choose the pumpkins, let
the pumpkins choose you!
TWO-FACED PUMPKINS
Since we like to decorate
in early October, we found
that our jack-o-lanterns
were looking pretty rough
by October 31. So instead of
carving early in the season,
we paint faces on one side of
the pumpkins; then, as we get
a couple of days away from
Halloween, we carve the other
side for the big night.
CHOOSING PAINT
Painting pumpkins is our go-
to-method of decorating. Not
only is it more convenient, but
it’s also much safer (no sharp
implements!) and empowering
for our kids. We use acrylic
paints because they fare much
better in the rain. Tip: Have
kids wear smocks since acrylic
paints can stain.
4. SEPTEMBER 2015
41
DECORATIONS THAT SIT—AND STAY
One of my family’s favorite creations
was this pug pumpkin, or pugkin, a
Halloween version of our dog, Ralph.
To attach the eyes and ears, we made
holes in each gourd with a hammer
and nail and used pieces of wire coat
hanger to join them (a parent’s job).
My daughter Zoe suggested we give it
a tongue. We painted a leftover piece
of pumpkin red and placed it in the
mouth. The perfect finishing touch!
PETITE PUMPKINS ARE PERFECT
Lining the driveway with large
pumpkins can get expensive, so we
buy a dozen or so sugar pumpkins.
These small squashes cost much less,
plus painting them all fills up the kids’
time. To give them more character, we
cut slits for their mouths (an idea that
came about one year when we didn’t
have time to carve full pumpkins).
The little fellows end up looking
fantastically creepy. We paint the
interior of the mouth dark brown to
give them extra depth.
Asmallshiftintheshapeofthemouthor
placementofthepupilscandramatically
alteryourpumpkin’sexpression.Watcha
videoofJarrett’sdrawingtipsat
familyfunmag.com/tkurl.
<
RIGHTPAGECREDITINFO(ALIGNEDTOBOTTOM)
Ourpug,Ralph
Macchio,
inspiredthis
jack-o-
lantern.We
attachedthe
gourdswith
piecesofwire
coathanger.
5. CHOOSE YOUR COLORS
I studied illustration at Rhode Island School of
Design, and the most important classes I took were
in painting and color theory. Not only do I apply that
knowledge to my illustrations, but my family uses
those tips when we paint our Halloween pumpkins.
While you and your kids can use basic colors, I’ve
found the following combinations work particularly
well with the complexion of a pumpkin.
1. Mix Ultramarine Blue with Burnt Umber to get
a great black. In art school we were taught to never
use black from a tube. It kills the color of a piece.
2. Mix Cadmium Yellow Medium with Naples Yel-
low to get a nice highlight color. You can use this for
the highlight above an eyebrow or above a lip.
3. Mix Cadmium Red Medium with Cadmium
Orange Hue to give your pumpkin rosy cheeks. You
breathe life into a character when you apply a reddish
hue to their cheeks, nose, or ears—it’s giving the illu-
sion that there is blood pumping underneath the skin.
4. Mix Burnt Sienna with Cadmium Red Medium
to give the sense of a shadow on the pumpkin’s
skin, such as underneath the eyebrows or below their
bottom lip. Or if the pumpkin is haggard looking,
underneath their eyes! Spooky!
+ =
+ =
+ =
+ =
1
2
3
4
6. JarrettJ.Krosoczkaisthe
authorandillustratorofmore
than25children’sbooks,
includingThe Lunch Lady and
thePlatypus Police Squad
series.
LIGHT UP THE SCENE
When we set the pumpkins in
front of the house, we use white
holiday lights. Not only are they
safer than candles, the glow is nice
and bright and you can be assured
that your jack-o-lanterns will shine
throughout the night. I carve out
a square on the opposite side of
the face to insert the lights. Group
your pumpkins close together so
you can string the lights from one
jack-o-lantern to the next. When
I break out my outdoor extension
cord and plug in the lights, it truly
is my Clark Griswold moment.
EXTEND THE SEASON
Art isn’t always permanent.
When November arrives, you’ll
be left with all of these wonderful
pumpkin faces. But the fun doesn’t
need to end there. If you are able
to compost the pumpkins in your
backyard, place them face up and
revisit them every few weeks.
I guarantee they will look far
creepier in January!
<