SlideShare a Scribd company logo
1 of 52
1
CONTENTS
PAGE NO
1. INTRODUCTION - 2-5
2. BASIC PRINCIPLES OF PROCEDURE - 6-9
3. PRECLEANING - 10-17
4. PROPERTIES OF PENETRANT - 18-21
5. PT PROCESS - 22-39
6. INTERPRETATION OF INDICATIONS - 40-43
7. QUALITY CONTROL OF TEST SYSTEMS - 44-49
8. ACCEPTANCE STANDARDS AND HEALTH & SAFETY
PRECAUTIONS - 50-52
2
ASNT NDT LEVEL II
LIQUID PENETRANT TESTING
CHAPTER 1
INTRODUCTION
MAJOR METHODS OF NDT
Many NDT methods have reached a stage of development where a semi-skilled operator,
following the detailed procedural instructions, with safeguards built in to the equipment, can
use them. The advent of microcomputers allows procedures to be pre-programmed and
crosschecked, so that a component operator does not necessarily need to understand the
physics of the technique being used.
Major methods of conventional Non-destructive testing (NDT) include:
1) Penetrant testing (PT)
2) Magnetic particle testing (MPT)
3) Ultrasonic testing (UT)
4) Radiography testing (RT)
There are also ranges of other new techniques that have particular specialized applications in
limited fields. They include
1) Eddy current testing
2) Acoustic emission testing
3) Infrared testing
4) Leak testing
However, it is desirable that the supervisors of inspection, the designers who specify the
techniques to be used in terms of their performance and attainable sensitivity, and the
development engineers working on new methods; do have a thorough scientific
understanding of their fundamental physics involved.
One of the problems in NDT is that there is often too large a choice of methods and
techniques, with too little information on performance of each in terms of overall defect
sensitivity, speed of operation, running costs or overall reliability. Some NDT methods have
been much over-sold in the recent years.
However, there are rapid developments made in the computer modelling of electrical
magnetic and radiation fields, which appear to have considerable potential in realistically
representing the conditions met in practical specimens.
3
The term “non-destructive testing” and “non-destructive inspection” are taken to be
interchangeable, but a newer term “non-destructive evaluation” is coming into use. In NDT
or NDI in flaw detection applications, the end product is taken to be the description of flaws,
which have been detected their nature, Size and location. From this, either in conjunction
with a standard for acceptable/reject able flaws, or knowledge, for example fracture
mechanism, a decision if then made on the serviceability of the tested item.
USE OF NDT
Why should we require liquid penetrant inspection? The reasons are the same as those which
answer the broader questions, ‘why should management use any non-destructive test?
“Typical reasons are
1. To have money, by weeding out defective raw material at receiving inspection,
before accepting and paying for it
2. To detect significant flaws that occur during manufacturing, before spending time
and money on further processing
3. To improve processing techniques, by checking parts before and after operations
4. To promote safety for the public, and avoid expensive litigation for the
manufacturer, by assuring necessary quality in the finished product
5. To promote safety for the workers, by periodic inspection of factory equipment to
find defects before they cause failure
6. To obtain quality information economically without deleterious effects
7. To confirm integrity of parts during maintenance overhauls to ensure continued
safe operation of machinery or structural components
REASONS FOR USING PT
Liquid penetrant inspection is often the first Non-destructive testing method management
considers for inspection of industrial products because (1) is often requires minimum capital
expenditure for implementation, and (2) it can accommodate a variety of test-object
materials, shapes and sizes, test locations, and environmental conditions. However, the
outcome of a penetrant inspection is largely dependent on the human operator. penetrant
inspection is a labour-intensive technique. Therefore, labour constitutes a high recurring
inspection cost. In short, the quality of the inspection and the cost of inspection warrant
considerable management attention to the selection, training management, and audit of
penetrant inspection personnel.
Liquid penetrant inspection detects only those discontinuities that are present on or are open
to the surface of the part. Therefore, if only surface detects are of interest, liquid penetrant
process may be used in the following situations:
1. When the test material is a nonmagnetic metal (such as annealed austenitic stainless
steel, titanium, aluminium, magnesium and copper alloys) or a non-metallic material
(such as plastics or ceramics)
4
2. When the geometry of the part is such that the shape itself may hide or obscure
indications (of surface defects) produced by another Non-destructive test techniques.
For instance, a forged steel bracket might have a sharp change of section that test
processes such as magnetic particle tests would show non-relevant indications in that
area. Or a weld might be so located that a change in thickness could mask the x-ray
indication of a shallow surface crack.
3. When the size or shapes of the surface detect is such that it can escape detection by
other techniques. An aluminium forging may have a forging lap, almost sealed shut,
which is so small that only liquid penetrant inspection can show it. A tiny crack in the
radius of a turbine bucket is very difficult to find by any means of other than liquid
penetrant inspection.
4. When parts are to be inspected in locations where electric power is not available, or is
too expensive or too inconvenient to use, or where the use of electricity creates a
safety hazard. When the surface of parts must be checked in the field, perhaps in
remote areas, liquid penetrant systems are especially advantageous.
However, if the test material is ferromagnetic, magnetic particle tests may offer advantages
over penetrant tests in detection of near-surface defects and surface defects that do not permit
entry of a liquid penetrant .if test for both internal and surface soundness are required entry
then liquid penetrant inspection can be used in addition to other non-destructive test methods
such as penetrating radiation, ultrasonic, or eddy current tests.
When the decision to use liquid penetrant inspection has been made, which system should be
selected? These are varieties of penetrants, penetrant removal systems, developers; there are
also many ways to combine these penetrant system elements. The manager must consider his
specific application. For the great majority of parts, the conventional water-washable or post-
emulsification penetrants are suitable and adequate. However, many factors must be
considered when selecting the optimum penetrant system. For example, the preferred system
should:
1. Indicate significant flaws open to part surfaces
2. Not adversely affect the material or the part in later service
3. Not cost so much that it is economically unfeasible
4. Not take so much time it unreasonably disrupts production schedules
TEST MATERIAL
Most materials, both metallic and non-metallic, can be satisfactorily inspected by
conventional fluorescent or visible dye penetrants. But austenitic stainless steels, nickel base
alloys and titanium (at elevated temperatures) are subject to stress corrosion; for these metals,
the penetrant materials should be low in sulphur and in halogens, especially chlorine. There
are other materials which are harmed by water; for these a non aqueous system is indicated.
Some non-metallic materials are affected by oil-base penetrants or emulsifiers; for these test
objects, a water-based penetrant system should be selected.
5
DEFECT SIZE
Some penetrant processes can detect discontinuities less than a nanometre in size, but is this
extreme sensitivity needed? The optimum penetrant indicates surface flaws that could
adversely affect the serviceability of test parts while minimizing non-relevant indications
from such causes as surface roughness. To select this optimum system, management must
decide which flaws are important: what type, size, and location will really affect service.
Prior history from similar parts is very helpful in making such decisions. If the operations is
new, or lacking good service records, management can draw on the experience of penetrant
system suppliers over the past 30 years. For instance, if small shallow flaws are of major
concern, this is not best choice, because trapped penetrant can be washed out of shallow
defects so the flaw indications cannot be formed. Sometimes, one part will present a special
problem because both large and small defects are of consequence; a special penetrant may be
the solution in this case.
After having established the size and type of defect that must be found, managers may find
that there are several liquid penetrant systems that would probably be equally suitable.
Therefore, the choice in this case, will usually be based on cost factors such as the capital
investment required, the materials used, the necessity for treating waste water, or the plant
space needed for test operations.
PARTS TO BE CHECKED
After having established the size and type of the defect that must be found, managers may
find that there are several liquid penetrant systems that would probably be equally suitable.
Therefore, the choice in this case, will usually be based on cost factors such as the capital
investment required, the materials used, the necessity for treating waste water, or the plant
space needed for test operations.
6
CHAPTER 2
BASIC PRINCIPLES OF PROCEDURE
DEFINITION OF LIQUID PENETRANT INSPECTION
Liquid penetrant testing is a physical and chemical test used for detecting and making visible
to the naked eye surface related discontinuities in non-porous materials. Because of using
physical and chemical tests rather than electrical and thermal, it can be used in the field, far
from power sources
Liquid penetrant inspection is a method that is used to reveal surface breaking flaws by bleed
out of a coloured or fluorescent dye from the flaw. The technique is based on the ability of a
liquid to be drawn into a “clean” surface breaking flaw by capillary action. After a period of
time called the “dwell” excess surface penetrant is removed and a developer applied. This
acts as a “blotter”. It draws the penetrant from the flaw to reveal its presence. Coloured
(contrast) penetrants require good white light while fluorescent penetrants need to be used in
darkened conditions with an ultraviolet “black light”.
PURPOSE OF LIQUID PENETRANT INSPECTION
Liquid penetrant inspection can be defined as physical – chemical non-destructive inspection
procedure designed to detect and expose surface discontinuities in engineering materials. The
method can also reveal subsurface discontinuities that have an opening to part of the surface
to which the liquid penetrant has been applied. The objective of the liquid penetrant method
of flaw detections is to detect cracks, porosity, laps, seams and other surface defects rapidly
and economically with a high degree of reliability. The length of the defect on the test surface
can be accurately imaged. The depth to which the discontinuity extends below the exposed
surface cannot be determined by this method. Evaluation of a discontinuity as a flaw implies
its severity, location or orientation and removes the part unserviceable for its intended
application.
Because liquid penetrant inspection utilizes physical and chemical properties rather than
electrical or thermal phenomena, it can be used in the field, far from power sources. Test
equipment can be as simple as a small kit of aerosol cans, or as extensive as large mechanized
and automated installations. However, in all cases, the success of liquid penetrant inspection
is critically dependent upon cleanliness of test material surfaces, absence of contamination or
surface conditions that can close the surface openings to discontinuities, and care by test
operators to ensure proper techniques and observation of test indications. Also, prior
processing during manufacture may inhibit detection of some types of discontinuities by
liquid penetrants. For example, many seams and laps are forged shut by the hot rolling or
piercing processes that create these elongated discontinuities. Thus, local welding of the
metal or trapping of heat-treat products within the opening can inhibit or prevent entry of the
penetrant. In this case, magnetic particle inspection offers advantages over penetrant testing
of ferromagnetic materials such as steel.
7
EARLIER USE OF OIL AND WHITING METHOD
The liquid penetrant test is one of the oldest methods of NDT. It is based on the old oil and
whiting process, formerly widely employed on steel parts, particularly in the railroad
industry. The oil and whiting method consisted of applying dirty penetrating oil to the test
surface, wiping the oil from the surface after a few minutes, and then coating parts with an
alcohol-chalk suspension solution. Where cracks existed, the dirty oil speeded through the
white coating, thus indicating the presence of discontinuities. Obviously, only gross cracks or
surface cavities could be revealed by the oil-stained powder streaks that formed the
indications with oil and whiting inspection technique.
ADDITION OF VISIBLE DYE AND FLUORESCENT DYE TO
INSPECTION PENETRANT
When magnetic particle inspection was introduced in the 1930’s, it replaced the oil and
whiting method for the inspection of steel or ferromagnetic metal parts because its ability to
reveal discontinuities filled or coated with contaminants that could prevent entry and
formation of indications by liquid penetrants. However, industries using nonferrous or non-
magnetisable metals especially aircraft, needed a far more sophisticated and dependable tool
than the older oil and whiting method. As a result, the oil and whiting method was refined.
Dyestuffs were introduced in the oil. In 1941, fluorescent dyestuff was placed in the
penetrating oil, so the surface discontinuities were visible under ultraviolet light as luminous
indications with high brightness contrast. Coloured dyestuff, usually a brilliant red, was later
introduced into liquid penetrant inspection media. Linear surface indications appear as
streaks, and surface porosity indications were seen as collections of round dots or smears,
with either type of indicating trace dye.
DEVELOPMENT OF LIQUID PENETRANT INSPECTION
Since the 1940’s penetrant inspection has been developed from a method used by very few
plants to a method employed in thousands of plants in all types of industries. It has achieved
recognition as a basic non-destructive test method. Techniques other than wiping have been
found to remove the excess surface oil or penetrant from test objects. Agents other than
whiting were found to develop and enhance the flaw indications. As with other inspection
techniques, no single penetrant material or process serves best in all test applications in
industry. Thus an adequate understanding of penetrant test technology is an invaluable aid to
management, test supervision, and test operators who seek to attain optimum results with the
variety of material and methods available.
BASIC PROCEDURES FOR LIQUID PENETRANT INSPECTION
The procedure of penetrant inspection is quiet simple. The penetrant (or inspection liquid)
carries a visible or fluorescent dye tracer in a penetrating liquid vehicle.
The penetrant test procedure consists of six basic processing steps
8
1. Pre-cleaning and drying of test object surfaces to be inspected
2. Applying liquid penetrant to surface to be inspected, and permitting it to seep into
surface discontinuities
3. Removing excess liquid penetrant from test surface
4. Applying developer to test surface to enhance indications formed by penetrant
entrapments in discontinuities
5. Inspecting surface for penetrant indications
6. Post-cleaning to remove process residues (in some cases, a treatment to prevent
corrosion may be required)
These six basic steps are followed regardless of the type of dye (fluorescent or visible colour
tracer) used to form the penetrant indications. The fourth step, application of a developer, is
sometimes omitted with fluorescent penetrants, but at the price of reduced visibility of
indications.
Materials that can be inspected by PT
Penetrant testing is one the best methods of inspections for all types of surface cracks and
porosity in solid non-permeable materials. Laminations and lack of bond between layers of
laminated materials can be detected with penetrant can enter and indications can be observed.
Penetrant inspection has been used with excellent success on ferrous and nonferrous metals
and alloys, fired ceramics and cements, powdered metal products, glass, and some types of
plastics and synthetic organic material. Liquid penetrants are employed for detections of leak
in tubing, tanks, and components.
Advantages of liquid penetrant testing
1. High sensitivity (small discontinuities can be detected).
2. Few material limitations (metallic and nonmetallic, magnetic and nonmagnetic, and
conductive and nonconductive materials may be inspected).
3. Rapid inspection of large areas and volumes.
9
4. Suitable for parts with complex shapes.
5. Indications are produced directly on the surface of the part and constitute a visual
representation of the flaw.
6. Portable (materials are available in aerosol spray cans)
7. Low cost (materials and associated equipment are relatively inexpensive)
Disadvantages of liquid penetrant testing
1. Only surface breaking defects can be detected.
2. Only materials with a relatively nonporous surface can be inspected.
3. Pre-cleaning is critical since contaminants can mask defects.
4. Metal smearing from machining, grinding, and grit or vapour blasting must be
removed.
5. The inspector must have direct access to the surface being inspected.
6. Surface finish and roughness can affect inspection sensitivity.
7. Multiple process operations must be performed and controlled.
8. Post cleaning of acceptable parts or materials is required.
9. Chemical handling and proper disposal is required.
Limitations of penetrant inspection on smeared metal surfaces
Liquid penetrant cannot reveal the location or provide indications of discontinuities on
surfaces the have been peened or smeared over by mechanical treatments. Operations such as
shot peening, machine honing, dry abrasive blasting, buffing, power wire brushing, or
sanding will smear or peen surface layers of metals and shut the openings to discontinuities.
Therefore, specifications require pre-penetrant etch, water rinse or drying operations prior to
penetrant application. If etching cannot or will not be done prior to the normally scheduled
penetrant inspection, then inspection must be done prior to the fore mentioned mechanical
operations.
Limitations of PT of porous materials
Penetrant inspection is difficult or impractical on excessively porous test materials with
interconnected porosity networks. Its use on such porous materials would typically result in
an overall colour or fluorescent that could mask indications of individual discontinuities.
Difficulties can also be encountered when test object surfaces are rough. These tend to trap
penetrants so that removal of background colour or fluorescence is difficult or consuming.
(Special penetrant material and processing techniques that reduce these undesirable
background effects have been developed)
10
CHAPTER 3
PRECLEANING
Without adequate removal of surface contaminations, indications from discontinuities may be
missed so adequate pre-cleaning of work pieces prior to penetrant inspection is absolutely
necessary for accurate results. Hence much of the reliability of inspection depends on the
thoroughness of the pre-cleaning process. If any contaminants, or the liquids used for
cleaning, or any deposits produced by these liquids, fill the cracks, the discontinuity will not
be detected.
Reasons for pre-cleaning include
1. May stop the penetrant from entering into the flaw.
2. The penetrant may lose its ability to identify the flaw as it has already reacted with
some other component.
3. The surface immediately surrounding the flaw retains enough penetrant to mask
the true appearance of the flaw.
Types of contaminant
Types of contaminants includes, but not limited to:
1. All purposely applied paint and coatings such as plating or sprayed coatings.
2. Scales from heat treatment or welding
3. Welding flux and weld spatters
4. Brazing flux or stop off, and burrs.
5. Dirt or dust that gets settled on the surface of the job.
6. Oils, greases, and other chemical impurities.
7. Polishing components, and other metal chips typically from machine shop.
8. Metal finishing processes such as phosphating, oxidizing, anodizing, chromating,
electro deposition, and metalizing.
9. All other components which may prevent a penetrant from entering a flaw.
These contaminants are collectively referred to as “soils”
Preparation of test parts prior to PT
One of the most critical steps in the penetrant inspection process is preparing the part for
inspection. All coatings, such as paints, varnishes, plating, and heavy oxides must be
removed to ensure that defects are open to the surface of the part. If the parts have been
machined, sanded, or blasted prior to the penetrant inspection, it is possible that a thin layer
of metal may have smeared across the surface and closed off defects. Also, some cleaning
operations, such as steam cleaning, can cause metal smearing in softer materials. This layer
of metal smearing must be removed before inspection.
Table 3.1 contaminants on the test object surface of contained in voids or discontinuities
11
Type of contaminants Interference effects Removal procedure or
treatment
Preservative, forming,
machining or lubricating oils
Most oils fluorescence under
black-light; this fluorescence
can obscure a true defect
indication by a fluorescent
penetrant or produce a false
indication; oily surfaces also
tend to impair the action of
the liquid penetrant
1. Vapour degreasing
2. Hot tank alkaline cleaning
3. Steam cleaning
4. Solvent emulsion cleaning
5. Water emulsion cleaning
6. Solvent washing
Carbon, varnish, or other
tightly held soil
Surface soils tend to adsorb
or absorb
penetrant, resulting in
background colour or
fluorescence; may also
obstruct penetration into
defects; impedes wetting
action, bridges
discontinuities
1. Solvent-type carbon remover
2. Alkaline type removers
3. Wire brushing (caution)*
4. Vapour or sand blasting*
Note: agitation such as used in
ultrasonic cleaning may be beneficial
with above methods
Scale, rust, oxides and
corrosion products
Surface soils tend to adsorb
or a absorb
penetrant, resulting in
background colour or
fluorescence; may also
obstruct penetration into
defects; impedes wetting
action, bridges
discontinuities
1. Alkaline or acid type removers
2. Wire brushing*
3. Vapour or sand blasting*
4. Electro cleaning
Paint coatings Impede wetting; obscure or
bridge surface discontinuity
openings
1. Solvent-type carbon removers
2. Alkaline type paint removers
3. Abrasive removal procedures*
4. burning
*mechanical processes that peen or smear surface material may act to close openings into
discontinuities so that penetrant indications cannot be formed. Such abrasive cleaning
methods are often prohibited, or require a subsequent acid etching treatment to remove the
discontinuity to the part surfaces do that penetrant can enter.
A primary requirement for operation for all penetrant processes is that the penetrant must
enter the surface openings of discontinuities if it is to identify them by test indications. The
inspector must also be able to distinguish indications of significant defects despite
background colour of fluorescence. Conditions that can interfere with the entry and
penetration of inspection penetrant into discontinuities or which might otherwise affect the
process might be classed into three groups:
1. Contaminants on the test surfaces or within the voids and discontinuities open the
surface.
12
2. Surface irregularities and texture variations such as roughness, scratches, or
smeared metal resulting from forming operations or surface abrasion, as by shot
blasting, sanding, or machining.
3. Crack closure stresses associated with fatigue cracks and under external
compressive load
Undesirable effects of surface contaminants on test objects
Unless the test object surface to be inspected is free of soil, foreign material, paint oxides,
and other surface contaminants that may cover discontinuities, contaminate the penetrant or
perhaps later disguise the indications, reliable penetrant inspection cannot be expected.
Obviously, the liquid penetrant test can tolerate no materials or surface conditions that cover
the openings into discontinuities and prevent from entering existing defects.
Vapour degreasing for removal of soluble contaminants on test objects
One of the most common methods for preparing parts to penentrant inspection is vapour
degreasing. This process is particularly suitable for removing soluble non-polar contaminants
such as mineral oils and greases. Vapour degreasing is not effective for the removal of solid
contaminants such as carbon, vanish, paints, scale, corrosion to vapour degreasing, if any of
these solid contaminants are involved.
Since vapour degreasing usually employs a chlorinated solvent, the aerospace and nuclear
industries have become concerned about the effects of vapour degreasing on titanium,
austenitic stainless steel and other chloride-sensitive alloys. Some specifications forbid use of
the vapour degreasing method of cleaning, thereby eliminating possible effects of chlorine or
chlorides resulting from the chlorinated solvents or their decomposition products. Air
pollution has become another concern with vapour degreasing. Special equipment and
modified processes have been developed to overcome this problem.
Other methods for removal of oils and greases from test objects
Oils and greases can be removed from test objects by pre-cleaning methods such as steam
cleaning, hot alkaline cleaning, solvent washing, solvent emulsion cleaning or water-base
emulsion cleaning. Hot alkaline cleaning can be corrosive to metals such as aluminium alloys
and sensitized austenitic steels. Oil and grease residues are quite common and, since they
inhibit surface action and wetting by the penetrants and also are usually fluorescent to some
degree, it is particularly important to remove them completely from test object surfaces prior
to processing parts for penetrant inspection. The fluorescence test (examining part surface
under black light) can be used as a qualitative test for the presence of residual hydrocarbons.
However, this fluorescence test will not reveal contamination by silicones or other saturated
oils.
The solvent cleaner usually supplied with the hand-wipe penetrant system for removal of
excess penetrant may also be adequate for pre-cleaning oil and grease residues from test
objects before the liquid penetrant is applied. The operator should make certain that sufficient
13
time has elapsed after use of solvent pre-cleaners for the cleaner to have evaporated
completely form any discontinuities that may be present, as well as from the exposed
surfaces, before applying liquid penetrant to test parts.
Mechanical removal of scale, rust, corrosion products, and oxides
Scale, rust, oxides, and other corrosion products must be removed from test parts prior to
penetrant inspection. These solid surface contaminants tend to cover defects and may cause
confusing indications by trapping and holding penetrant on the surface of the parts. The
removal of Scale, rust, oxides should be accomplished by pre-cleaning methods that do not
cover the surface openings of the defects that may be present in test parts. Grit blasting with
soft grit or gentle hand brushing with clean wire brushes is not particularly objectionable
when used on the test object materials with hardness of Rockwell C 40 or greater. Stainless
steel brushes are suitable for use n iron base and nickel-base alloys. Generally, abrasive
methods are used in surfaces that are file hard. However, such techniques must minimize
plastic metal flow to avoid a covering defect at the surfaces. If it is suspected that
discontinuity openings may have been closed, some method such as etching should be used to
reopen the imperfection prior to testing. Pre-cleaning methods that are not recommended
include harsh abrasive removal methods such as shot blasting, sand blasting carbon steel wire
brushing, filling, or metal scarping. High-speed rotary brushes should be avoided since they
can smear the surface of the metal over defects. These mechanical cleaning methods will
cover up discontinuities by peening or smearing of metal on the test object surface,
particularly on the soft metals and alloys such as aluminium, titanium, or stainless steels.
However, use of abrasive methods of surface preparation is not always avoidable. Where it is
found necessary to use abrasive treatments, a chemical etching treatment following abrasive
pre-cleaning is required to reopen surface access to discontinuities for reliable inspection.
Removal of high-temperature alloy oxides from test objects
Unique alloys are employed in the hot section of aircraft jet engineers, rocket chambers, and
some nuclear applications. Under the high-temperature operating conditions in which these
alloys operate, complex oxide deposits are produced. When these oxides are encountered on
the test objects, special removal procedures involving several stages are usually required
high-temperature alkaline cleaning processes, fused salts, acid processing, electrolytic
cleaning, alkaline oxidizing solutions, and combinations of these cleaning agents and
techniques are commonly employed.
Vapour honing or dry abrasive blasting with soft, fine particles are commonly required as the
final step in the removal of tenacious high-temperature oxides which are integral with the
metal surface. Oxide removal is mandatory if inspection of the surfaces by penetrants is to be
successful. It is recommended that specialists in removal of these types of oxides be
consulted for recommendations and assistance when problems are met.
Effects of acid and chromate residues on test objects
14
Acid and chromate residues can absorb black light so that little or no near ultraviolet
radiation is left to excite penetrant fluorescence. They can also have adverse effects upon the
dyes in inspection penetrants. These chemicals decompose the dyes, thus causing loss of
visibility of penetrant indications, and can also form residual products that deposit in the
flaws and block penetrant entry. For this reason, it is desirable to rinse thoroughly test object
surfaces that been exposed to acids or chromates prior to penetrant inspection. A mildly
alkaline neutralizing rinse prior to final water rinsing may also desirable. To avoid any acid
reactions, it is preferable to:
1. Conduct penetrant inspections of aluminium alloys prior to their anodizing or
conversion coating
2. Conduct penetrant inspections of stainless steel prior to assonating them
3. Conduct penetrant inspections of magnesium alloys prior to applying protective
coatings
Removal of paint coatings from test surfaces
Paint on test objects can obscure or bridge discontinuities in the underlying metal, and must
be removed to obtain effective penetrant test indications. Paint removers of various types for
both in place and dip tank application are available from manufactures specializing in paint
removal. Abrasion methods or ignition are occasionally used for paint removal. Since paint-
removal technology is somewhat complex, it is recommended that a reputable supplier of
paint removers be consulted for assistance when problems are encountered. While some
conventional paints are easily removed without unique procedures, recent advances in paint
technology have resulted in finish systems removable only with special products, procedure,
and techniques. Factors that influence paint removal include:
1. Surface preparation prior to painting
2. Type of paint primer
3. Type of paint
4. Number of coats of paint
5. Age of cure of the paint finish
6. Type of paint removers used
7. Nature of the substrate
Care is required when pre-cleaning critical aircraft structures, since removal of protective
coatings may cause premature failure due to corrosion resulting from exposure of the metallic
surfaces.
Removal of carbon deposits and varnish from test objects
Carbon and varnish removal is akin to paint removal in that many of the procedures and
products used for removal of paint are also used for removal of carbon and varnish. Solvent-
type varnish removers are available for application by brush, spray, or dip tank. Dip tank
carbon removers are available for operation of ambient ore elevated temperatures. Carbon
may also be removes by alkaline carbon remover products, depending upon the conditions
15
and the nature of the carbonaceous deposits. Mechanical removal means are also employed
for soils like carbon and varnish.
Removal of water from test objects
If the parts have been in contact with water, it is important that this be removed prior to
penetrant inspection. Water must be removed not only from the surfaces of test parts but also
from within any surface discontinuities that may be present. Otherwise, the water may
associated with penetrant inspection equipment is an excellent mean for drying test parts
before inspection. Surface water can also be removed with forced air or by simply allowing
the surfaces to air dry. Air drying under ambient conditions may take an excessively long
time. Auxiliary drying methods are usually used for this reason. If the drying process raises
the part temperature above the maximum allowed by the examination procedure, the part
must be cooled prior to conducting the penetrant examination.
Moisture can drive from many sources, so it is necessary to be its formation or presence at all
times. Condensation from high humidity or low temperature conditions may occur and not be
denoted unless the operator is alert. During spot cleaning with a volatile solvent, for example,
its rapid evaporation may cause cooling of test surfaces to the temperature at which
condensation occurs in moist atmospheres. The effect of moisture on test object surfaces is to
impede penetrating action when liquid penetrants are applied.
Cleaning and preservation of test following PT
Following completion of penetrant inspection (and a salvage or repair operation on test parts
that contain defects that can be repeated) the acceptable test parts usually must be cleaned to
remove the developer coating and all traces of the liquid penetrants or processing materials.
Cleaning can be a critical operation on parts to be used in nuclear or liquid oxygen systems
where residues of penetrant materials might prove detrimental. Steel and magnesium parts,
from which all traces of oil have been removed, may require a new protective coating
application to prevent rusting or corroding. If these residues are not removed, they can impair
subsequent operations such as soldering, brazing, or welding, or interfere with the application
of paint, electroplating, or other surface finishes. It should be noted that during evaporation of
penetrant, solvents may be replaced by moisture from the atmosphere; developer powders
will also absorb moisture. Either condition can lead to corrosion on some parts (Mg, Al, etc.)
Post-inspection removal of penetrant residues from test parts
Penetrant residues can be removed by hot tank cleaning procedures provided that these
processing materials have not been decomposed by high-temperature baking or extended
aging. If process material residues are tightly held within recesses, agitation during cleaning
is beneficial and may even be mandatory. Ultrasonic agitation has been found to be
particularly effective for penetrant residues that are especially difficult to remove.
Cleaning methods
16
They are generally classified as chemical, mechanical, solvent, or therof. The cleaning
methods and type of contaminants removed are discussed below:
MECHANICAL METHODS
Abrasive tumbling
Removing light scales, burrs, welding flux, braze stop off, rust, casting mold and core
material. It should not be used on soft metals such as aluminium, magnesium or titanium.
Dry abrasive grit blasting
Removes light or heavy scale, flux stop off, rust, casting mold or core material, sprayed,
coating, and carbon deposits, and in general, any friable deposits.
Wet abrasive grit blasting
Same as dry except where deposits are light; better surface and control of dimensions are
required.
Wire brushing
Removing light deposits of scale, flux, and stop off. This method is generally avoided as
there is a chance of the metal chips to be removed may close the discontinuity.
High-pressure waterand steam
Ordinarily used with an alkaline cleaner or detergent. It removers typical machine shop soils
such as cutting oils, polishing components, grease, chips and deposits from electrical
discharge machining. Used when surface finish must be maintained. It is inexpensive.
Ultrasonic cleaning
Ordinarily used with detergent and water or with a solvent. Removes adherent shop soils
from large quantities of small parts.
Mechanical methods should be used with care, because they often mask flaws by smearing
adjacent metal over them or by filling them with abrasive material. This is more likely to
happen with soft metals than with hard metals. Hence, before a decision is made to use a
specific method, it is good practice to test the method on known flaws to ensure that this will
not mask the true flaws.
CHEMICAL METHODS
Alkaline cleaning
Removes typical machine shop soils as cutting oils, polishing components, grease, chips and
carbon deposits. Ordinarily used on large articles where methods in hand are too laborious.
17
Acid cleaning
Typically known as “etching” uses acid to remove scales and smeared metal pieces due to
matching operation. Concentrated solution for removing heavy scales; mild solutions for light
scales; weak solution for removing lightly smeared metal is recommended and removing
heavy scale. A chemical cleaning method should be carefully chosen to ensure that neither
the braze nor the components of the assembly is attacked.
SOLVENT CLEANING METHODS
Vapour degreasing
Removers typical shop soils, oil and grease. Usually employs chlorinated solvents, not
suitable for titanium.
Solvent wiping
Same as vapour degreasing, except a hand operation. May employ non-chlorinated solvents.
Used for localized low volume cleaning.
Surface finish of the work piece must always be considered. When further processing is
scheduled, such as matching or polishing, an abrasive cleaning method is frequently is good
choice. Generally chemical cleaning methods have less degrading effects on the surface
finish than mechanical methods.
The choice of cleaning method is based on such factors as;
1. Type of contaminant to be removed, since one method does not remove all the
contaminants equally well.
2. Effect of the cleaning method on the part
3. Practically of the cleaning method for the part, for example, a large part cannot be put
into a small degreaser or ultrasonic cleaner.
4. Specific cleaning requirements of the purchaser.
18
CHAPTER 4
PROPERTIES OF PENETRANT
PENETRANTS
Penetrants are carefully formulated to produce the level of sensitivity desired by the
inspector. The penetrant must possess a number of important characteristics:
1. spread easily over the surface of the material being inspected to provide complete and
even coverage.
2. Be drawn into surface breaking defects by capillary action.
3. Remain in the defect but remove easily from the surface of the part.
4. Remain fluid so it can be drawn back to the surface of the part through the drying and
developing steps.
5. Be highly visible or fluoresce brightly to produce easy to see indications.
6. Not be harmful to the material being tested or the inspector.
Penetrant materials are not designed to perform the same. Penetrant manufactures have
developed different formulations to address a variety of inspection applications. Some
applications call for the detection of the smallest defects possible while in other applications,
the rejectable defect size may be larger. The penetrants that are used to detect the smallest
defect will also produce the largest amount of irrelevant indications.
Standard specifications classify penetrant materials according to their physical characteristics
and their performance.
PHYSICAL PROPERTIES OF PENETRANT
The above mentioned qualities of a penetrant are controlled by the physical properties of the
penetrant. They are:
Viscosity: viscosity is the property of fluid by virtue of which it offers resistance to relative
motion between its different layers. The layer in contact with a fixed horizontal plane will be
at rest due to adhesive forces between molecules of liquid and plane.
Variations of viscosity
1. Effect of temperature is a factor, which changes the viscosity of a penetrant viscosity
tends to decrease with an increase in temperature.
2. Effect of pressure is also a factor which causes considerable change in the viscosity.
Viscosity increase with an increase in pressure.
Viscosity has no actual bearing on the ability of a penetrant to “penetrate”, although it
does affect the rate of preparation.
Kinematic viscosity is generally expressed as a ratio of dynamic viscosity and specific mass.
Viscosity is measured in square centimetre. One square centimetre per second equivalent to
one “stoke”. Viscosity is measured in terms of centistokes (cst). The viscosity of the
penetrant should not exceed 5cst. High viscous penetrants have slower rate of penetration;
low viscous penetrants drain away too rapidly.
19
Capillarity: the ability of a liquid to rise or fall in narrow openings is due to capillary action.
It is demonstrated by a simple experiment, which uses two tubes of varying cross-section.
The tubes are then immersed into a container filled with water. It was observed that level of
water in the thinner tube rises faster. This experiment proves that, a liquid with a low
viscosity penetrates much faster into narrow openings. So cavities, which offer narrow
openings, such as a tight crack or fatigue cracks of hairline type are best detected narrow
opening. When repeating the experiment with a liquid such as mercury, the level of mercury
falls down in the thinner tube. The height to which the liquid is raised is determined largely
by surface tension and the wetting ability if the liquid. Also, lifting ability due to capillary
action increases, as the diameter of thebore decreases. Capillary forces will be less in a closed
tube than in an open tube, because of the air trapped in the former. This can be compare with
a discontinuity, which has a closed end on one side. The air that is trapped inside will be
dissolved by the penetrant and is diffused at the surface.
Fluidity: the ability of a liquid to flow is termed as fluidity. The penetrant should have the
ability to drain away from the component well, but without dragging the penetrant from the
defects.
Surface tension: the force acting per unit length of an imaginary line drawn on the surface on
the liquid being normal to the surface is called surface tension.
It is the property of a liquid to act like a stretched membrane. Surface tension plays an
important role in the effectiveness of a penetrant. High surface tension liquids are usually are
excellent solvents and will easily dissolve the dyes but however, low surface tension liquids
provide the penetrating power and spreading properties necessary for a good penetrant.
Wetting ability: the ability of a liquid to wet the surface is referred to as wetting ability. It is
a measure of the area of contact with the surface. This property is dependent on contact angle
and surface tension of the liquid. The lesser the contact angle, the higher is the wetting
ability. Contact angle of penetrant should preferably be less than 50.
One way to quantify a liquid’s surface wetting characteristics is to measure the contact angle
of a drop of liquid placed on the surface of the subject object. The contact angle is the angle
formed by the solid/liquid interface and the liquid/vapour interface measured from the side of
the liquid (Fig 4.1). Liquids wet surfaces when the contact angle is less than 90 degrees. For a
penetrant material to be effective, the contact angle should be as small as possible. In fact, the
contact angle for most liquid penetrants is very close to zero degrees.
20
Volatility: penetrants should essentially be non-volatile liquids. A small amount of
evaporation at the discontinuity could help to intensify dye brilliance and also prevent
excessive spreading of indications. However, low volatility is desirable to minimize the
losses due to evaporation of penetrants stored in open tanks.
Flammability: penetrants should have high flash point as a matter of safety in use.
Flashpoint is defined as the lowest temperature at which the liquid gives a flash. When small
flame is passed across its surface, the liquid gets heated up and subsequently burns. Flash
point of a penetrant should not be less than 1350F.
Chemical activity: Chemical activity, we mean, the ability of the penetrant to cause
corrosion on the metals which are tested. This is due to presence of halogens, elements which
belong of a highly reactive group. Examples of such type of elements are chlorine, fluorine,
bromine, and iodine. No penetrant is without the presence of halogens, and should be noted
that these can cause corrosion on the metal surface, if not removed.
This is the primary reason why post-cleaning operation is essential in penetrant testing.
Hence penetrants with presence of halogens are usually restricted on austenitic steels,
titanium, and other high-nickel alloys.
Drying characteristics: the penetrant must resist drying out, and complete bleed out, during
hot air drying of the component after the wash operation has been completed. Ideally, heat
should aid the penetrant in promoting a return of penetrant to the component surface in order
to produce a sharply defined indication.
Density/specific gravity: specific gravity has no significant bearing on a penetrants
performance. Most penetrant should have a specific gravity of less than 1.
Liquid vehicle properties and penetrating ability of penetrants
Unfortunately, there is neither a simple rule for formulating a highly penetrating inspection
penetrant nor is there a fixed set of characteristics which, if provided, will ensure a final
material that is completely satisfactory. Some properties that would seem absolutely
necessary have little or no effect on the ability of the penetrant to enter surface
discontinuities, although there may be other reasons for their control. Viscosity of liquid
penetrants serves as a good illustration. It would seem logical to assume that a low viscosity,
but this is not always true. Many highly viscous liquids are excellent penetrants, while there
is numerous low- viscosity liquids that exhibit very little tendency to enter surface openings
unless the openings are comparatively large. The chemical composition of the penetrant
material also influences the penetrant’s ability to seep into cracks.
The penetrating ability of a complete penetrant material is mainly a function of the properties
of the liquid carrier or vehicle of the penetrant material. The functions of the liquid carrier or
vehicle are to:
1. Hold the dye in solution or suspension
21
2. Distribute the inspection penetrant evenly and completely over the surface to be
inspected.
3. Carry the inspection penetrant in to any discontinuities present on the test surface.
Volatility of liquid penetrants
In addition to inherent penetrating ability of the carrier liquid, numerous secondary qualities
are necessary to permit utilization of its penetrating power. The material should have
sufficient body to hold the dye throughout the time necessary for penetration to take place.
Some penetrants exhibit a certain amount of volatility. It is reasoned that a small amount of
evaporation at the discontinuity could help to intensify dye brilliance and also prevent
excessive spreading of indications. At the same time, a liquid that is too highly volatile is
undesirable the highly volatile penetrants will evaporate rapidly from processing tanks. This
evaporation can change the performance characteristics of the penetrant material and release
vapours that may be a nuisance or even a hazard.
Wetting ability of liquid penetrants
Wetting ability is another property that does not seem to correlate directly with ability to
penetrant, but does not have an important effect on overall performance. A material that has
good wetting properties will spread completely over the surface of the treated part in a
smooth, even film despite the presence of a reasonable amount of surface contamination. On
the other hand, a liquid of poor wetting characteristics will pull back on itself, leaving areas
of the test surface completely devoid of penetrant. When this occurs, discontinuities that may
be present in the uncovered areas will not be shown, since there is no indicating material to
enter them. This is very important when the test surface is smooth (as with stainless steel
forging)
Characteristics of a good penetrant
1. Readily penetrate into fine openings
2. Ability to remain in relatively coarse openings
3. Can be applied and removed easily
4. Bleeds from discontinuities when developer is applied
5. Be inert w.r.t materials being tested and to the containers
6. Odourless
7. Exhibit stability under conditions of storage and use
8. Non-flammable
9. Non-toxic
10. Low cost
11. Have performance of colour, when exposed to heat and light
22
CHAPTER 5
PENETRANT TESTING PROCESS
Penetrant
Penetrant materials come in two basic types. These types are listed below:
Type 1- fluorescent penetrants
Type 2 – visible penetrants
Type 2 penetrants are then classified based on the strength or detectability of the indication
that is produced for a number of very small and tight fatigue cracks. The five sensitivity
levels are shown below:
Level ½ -ultra low sensitivity
Level 1 - Low sensitivity
Level 1 - Medium sensitivity
Level 3 -High sensitivity
Level 4 –ultra-high sensitivity
Emulsifiers
When removal of the penetrant from the defect due to over-washing of the part is a concern, a
post emulsifiable penetrant system can be used. Post emulsifiable penetrants require a
separate emulsifier to break the penetrant down and make it water washable. Most penetrant
inspection specifications classify penetrant systems into four methods of excess penetrant
removal. These are listed below:
Method A: Water- Washable
Method B: Post emulsifiable, Lipophilic
Method C: Solvent Removable
Method D: Post emulsifiable, Hydrophilic
Types of emulsifiers
1. Hydrophilic emulsifiers
2. Lipophilic emulsifiers
Hydrophilic emulsifiers are made of a non-ionic substances concentrate, which may be in the
form of dry powder or concentrated liquid. They must be dissolved or diluted in water
carefully as per manufacturer’s recommendations. Concentration may usually vary from 5 to
23
50 percent emulsifier in water. Hydrophilic or water based emulsifiers are dependent on
detergent or dissolving action. So they need a force full water spray to strip away the excess
surface penetrant.
Lipophilic emulsifiers are oil-based. Their action is chiefly by diffusion of the surface
penetrant. The diffusion rate varies depending on the viscosity of the emulsifier. When it is
necessary to detect minute defects, high-sensitivity penetrants that are not water washable are
usually employed. Such penetrants have an oil-base, and require an additional processing
step. An emulsifier renders the excess penetrant soluble in water and hence, capable of being
rinsed away. Any penetrant within the flaws is not affected, provided the process is careful
controlled.
With a viscosity of 100mm2/s react slowly, the time required by them being 2 or 4 minutes,
whereas, the emulsifiers with viscosity of 30 to 50 mm2/s react relatively at a faster rate. The
time required by them being up to 2 minutes.
Emulsification time being as soon as the emulsifier is applied. The length of time that the
emulsifier is allowed to remain on the work piece and in contact with the penetrant depends
mainly on the type of emulsifier i.e., fast-acting or slow-acting, water-based or oil-based and
the surface roughness of the component under inspection. Recommendations from the
manufacturers can serve only as guidelines, but the optimum time for the specific work piece
is to be determined experimentally. The period range from a few seconds to several minute
typically 15 s to 4 min., although a maximum time of 5 min, is established by some
specifications.
Emulsification time is critical in determining the sensitivity of inspection. If the
Emulsification is too short, all the excess penetrant will not be removed properly and hence
may lead to misinterpretation of indications. If too long a time is used, penetrant with in the
discontinuity will also become water washable and subsequently is rinsed off the surface
along with excess penetrant. This could cause even a relevant indication to be missed.
Advantages of post-emulsificationpenetrant systems
1. High sensitivity and very fine discontinuities
2. Highly preferable for wide and shallow discontinuities
3. Penetrant easily washed with water after emulsification.
4. Penetrant inside cavities is not over-washed.
Disadvantagesofpost-emulsificationpenetrant systems
1. It is step process and requires additional time in making the penetrant water-washable.
2. Separable emulsifications are required additionally, which raises the cost of
inspection.
3. It becomes a cumbersome operation to remove penetrants form keyways, threads,
blind holes and rough surfaces.
24
Pre-washtechnique for penetrant removal with hydrophilic emulsifiers
The Pre-wash or prior-wash technique for removal of excess surface penetrant from test arts
is a variation of the post –emulsification technique utilizing hydrophilic emulsifiers. Like the
post –emulsification technique, the Pre-wash technique requires us of a non-water-soluble
liquid penetrant. The pre-wash technique uses to plain water rinses. The first rinse
mechanically removes the bulk of the excess surface penetrant. After this first wash, only a
thin film of penetrant held by molecular attraction usually remains on the test part surfaces.
The emulsifier is applied following this prior wash. Since there is water carryover from the
first wash, only the hydrophilic type of emulsifier is practical for this technique. The
hydrophilic emulsifier used with agitation is usually diluted with two to three parts of water.
After a brief dwell time in this dilute emulsifier, test parts are given a second water rinse to
remove emulsified penetrant from part surfaces. Thereafter, the processing procedure is
similar to that for the conventional post-emulsification technique.
Since the prior water rinse removes the bulk of the surface penetrant, emulsifier
contamination is minimized. Emulsifier diluted with three parts of water leaves only a thin
surface film so emulsifier drag-out is reduced. The pre-wash hydrophilic emulsifier technique
decreases emulsifier consumption and lowers emulsifier cost. The biggest advantage of this
technique may be its improved control of pollution caused by penetrant process waste
materials. The residual penetrant removed in the first water rinse is not water soluble. It
separates from the rinse water since it is lighter than water. The penetrant waste floats and
can ne skimmed off the surface of the water, which prevents discharge of oily waste into
sewers and streams. In some cases, the penetrant materials collected in this manner can be
recycled and reused.
Procedure used in water-washable penetrant process
To ensure that inspection is reliable, and remains sufficiently sensitive for the purpose
intended, the water-washable penetrant inspection procedure includes the following
operational steps:
1. Pre-clean and dry the test surfaces to be inspected. A contaminated surface will not
provide reliable penetrant indications. In some cases, etching may be necessary to
open up entrapment areas under smeared metal surfaces.
2. Apply penetrant to the dry test parts surface and allow sufficient time (termed “dwell
time”) for the surface penetrant to enter the discontinuities to form penetrant
entrapments. Penetrant should wet the entire test surface with a uniform liquid film. It
should not “pull away” so as to leave bare free from liquid penetrant.
3. Following a suitable dwell time, remove the excess surface penetrant by warm water
rinsing with a coarse spray applied at an angle. Rinsing should continue until no
traces of residual penetrant are visible on test surfaces when viewed under suitable
illumination. If wet aqueous developer it to be used, it should be applied to the wet
part surfaces following water rinsing.
25
4. If dry or non-aqueous developers will be used later, dry the test arts thoroughly
following removal of excess surface penetrant. If wet aqueous developer was used,
dry the test parts as soon as the excess developer coating has drained off the test parts.
Over drying may be desirable to dying time. In the drying step, it is necessary to
guard against excessive exposure to high temperature. Excessive oven temperature
can degrade the dyes in the penetrant and/or evaporate volatile constituents from its
liquid vehicle. This can decrease test sensitivity or prevent formation of an indication
on subsequent processing by deterioration of trapped penetrant.
5. If aqueous wet developer has not previously been applied to the wet parts, apply dry
or non-aqueous developer to the dry test parts. Penetrant is drawn out of discontinuity
entrapments to the part surface during the so called “development time”. This
penetrant may spread into the developer coating to form enhanced indications.
6. Observe and interpret the penetrant indications of surface discontinuities under
suitable illumination. Evaluate each test indication to determine if the indications
constitute cause for rejection, rework, disposal, or other action.
This materials evaluation must be considered to be an essential step in any inspection
process.
Solvent technique for hand-wipe penetrant removal
The procedure is for the third method of removing penetrant by hand wiping or solvent
removal. Materials used to remove excess surface penetrant may be referred to as “removers”
or as “cleaners”, so either term may be encountered. The term “cleaning” refers to
preparation of the surface prior to inspection and not to the removal of penetrant process
residues following completion of the inspection process. The term “remover” is more
appropriate to describe the solvents used for removal of excess surface penetrant during
processing of the test parts in penetrant inspection. With the solvent removal process, the
available removers are often used also for pre-cleaning and for post-cleaning of test objects to
remove penetrant processing residues. However, the primary purpose of the solvent removers
is removal of excess (non-water-soluble) liquid penetrant prior to application of developer.
Removers are normally petroleum-base or chlorinated solvents, but may be any solvent
combination. Often an emulsifier contains enough solvencies to function as a remover.
Alternatively, a product may be formulated for the express purpose of functioning as either a
remover or an emulsifier. Removers are subject to the same precautions in use as those
described for use of penetrants and emulsifiers
Procedures for hand-wipe solvent removal of surface penetrant
Penetrant removers are utilized to remove excess surface penetrant following the penetrant
applications. Since they function by solvent action, over-removal may be a problem if
remover is used to excess. The recommended “hand wipe” removal procedure includes three
steps:
1. Remove the bulk of the penetrant by draining
26
2. Wipe test object surfaces with a dry wiping instrument such as a dry rag or soft
absorbent paper.
3. Remove the remaining penetrant residues by wiping with a wiping instrument
containing just sufficient solvent to be effective.
When fine, shallow discontinuities are under examination on smooth surfaces such as the
cracked chrome test panels, dry wiping is sufficient. Se of any remover will result in over-
removal of penetrant residues and resultant loss in sensitivity.
Caution: the hand-wipe method is difficult to use on test parts with rough surfaces or on
recesses such as threads because of the difficulty of wiping to the bottom of small, sharp
recesses or cleaning deep grooves. In addition, the cleaning cloth or paper should only be
moistened lightly with solvent for removal of surface penetrant residues. Never immerse the
cloth in solvent nor saturate it with sprayed –on solvent when removing excess surface
penetrant from test parts. The excess solvent would then diffuse into penetrant entrapments
within discontinuities, and tend to remove part or all of the penetrant needed to form visible
test indications.
Cleaner/removers
Various solvent compositions are used in cleaner/removers. Basically, they are either
flammable and of lower toxicity, or non-flammable and of higher toxicity because of their
chlorinated solvent content. Dry developers are inappropriate for use with visible penetrants;
they provide no contrast for the test indications.
Advantages of the solvent-removable systems
1. Portability
2. Good for spot checking
3. No water required
4. Good on anodized specimens
5. Excellent repeatability
Disadvantages of the solvent-removable systems
1. May contain flammable materials.
2. Removal of excess penetrant is time consuming.
3. Materials cannot be stored in open tanks as they are volatile.
4. Difficult to use on rough surfaces such as cast magnesium.
SELECTION OF PENETRANT TEST SYSTEMS
FLUOROSCENT PENETRANT
1. Water-washable penetrant
a. Inspecting large volumes of parts
b. For detecting discontinuities that are not wider than their depth.
27
c. For material with rough surfaces.
d. Excellent for inspection of threads and keyways
2. Post-emulsifiable penetrants
a. Large volumes of parts
b. Requirement of high sensitivity.
c. Parts contaminated with acid or harmful chemicals, which will harm the materials.
d. Parts which may have defects contaminated with in-service soils
e. For detection of stress corrosion, inter-granular, and grinding cracks.
VISIBLE DYE PENETRANTS
1. Water-washable penetrant
a. When lowest sensitivity is required
b. When large volumes of parts are to be inspected.
2. Post-emulsifiable penetrants
a. more sensitivity is required
b. Inspection of large volume of parts, when time is not a constraint.
3. Solvent removable penetrant
a. Spot inspection
b. Where water wash is not feasible because of part size, weight and surface condition.
c. When inspecting small volumes of parts.
The appropriate process to be used on any specific application is based on:
1. Extent of flaw sensitivity required
2. Surface finish of the component
3. Compatibility of the materials with the components
4. The size, shape and accessibility of the area to be inspected.
5. The ultimate use of component.
The equipment available can be divided into three types as follows:
1. Portable kits for carrying out inspection of small areas; for use on site; these often are
contained in pressurized aerosol cans.
2. Fixed installations are used for testing components on a continuous basis, with a
series of processing stations in sequential order to form a flow line. Increasingly,
these are automated component handling and timing.
3. Self-contained processing booths are used for testing components, which cannot be
moved for testing.
Dwell time or penetration time
The period of time during which penetrate is permitted to remain on the specimen is a vital
part of the test. Tis time is often referred to as penetration time or dwell time. Normally this
time is dependent on the nature of discontinuities, which are of most importance.
28
Tight crack-like discontinuities may require in excess of 30 in, to give an adequate indication.
However, gross discontinuities will produce indication within 3 to 5 min. the temperature of
the penetrate and part can affect the dwell time. Warning the specimen to 700F and shortens
dwell time. However, care should be taken not to overheat the specimen too much, as this
may accelerate the evaporation of penetrate from the discontinuity.
Table: Minimum dwell time
Material Form Type of
discontinuity
Penetrant
dwell time
Developer dwell
time
Al, Mg, steel,
bronze, Ti and
high temp alloys
Casting welds Cold shuts,
porosity, lack of
fusion, cracks
(all forms)
5 7
Wrought
materials
extrusions,
forgings plates.
Laps, cracks (all
forms)
10 7
Carbide tipped
tools
Plastic, glass,
ceramics
Note: temperature ranges from 500F to 1250F
Dwell time are based on the assumption that penetrate will remain wet on the part surface.
Additional penetrate also be applied if found insufficient. The penetrate manufacturer will
suggest the required dwell time for the particular type of penetrate.
DEVELOPER
The most important basic function of a developer in penetrant inspection is to extract
penetrant from an entrapment within a flaw or surface discontinuity below the test part
surface and to transfer at least some of this penetrant to the surface to form a penetrant
indication that can be seen by the inspector. The developer may also provide a mechanism
whereby the effective thickness of the surface film of penetrant exuded from the penetrant
entrapment is increased to levels above the threshold of visibility. Another developer function
is to spread or disperse the penetrant at the part surface, thus increasing the apparent size of
the indication exposed to the eye. The developer also provides an increase in contrast which
enhances detection of an indication.
29
Under black light, the developer appears blue-black while the entrapped penetrant
fluorescence yellowish green. Visible dye developers provide a white background for the red
or orange penetrant indication. They also reduce light reflection from shiny surfaces of test
parts, which can lessen eye fatigue.
Developer forms
The AMS 2644 and MIL-I-25135 classify Developers into six standard forms. These forms
are listed below
Form a – dry powder
Form b – water soluble
Form c – water suspendible
Form d – Nonaqueous type 1- fluorescent (solvent based)
Form e – Nonaqueous type 2- Visible dye (solvent based)
Form f – special applications
Actions of Developers in forming penetrant indications
Developer action appears to be a combination of solvency effect, adsorption, and absorption
(adsorption implies collection by adhesion to a surface. Absorption refers to assimilation of
liquid in to the bulk of an absorbent material). The developer powder exerts a combination of
adsorptive-absorptive effects on penetrant residue, drawing entrapped penetrant to the test
part surface. As the penetrant disperses in the developer powder, it forms test indications that
can be readily observed by the inspector. In the case of non-aqueous wet and film-type
Developers, solvent action has been shown to play a part in promoting the withdrawal action
and enhancing the penetrant test indications.
Undesirable actions of improperly applied penetrant Developers
Care is required to assure that excess surface penetrant has been removed from test object
surfaces and that thin uniform developer coatings of excessive thickness can cover, obscure,
or extinguish the fluorescent or visible colour flaw indications by the thick overlying layer of
porous powder Developer. A normal effect of Developer layers of appropriate thickness is the
lateral diffusion or “bleeding” of penetrant from flaw entrapments. This lateral migration of
liquid penetrant through the Developer coating may cause small adjacent flaw indications to
eventually become lost within the spreading indications from large flaw entrapments. For this
reason, it is often desirable for test operations to examine the test parts soon after Developer
application, and periodically thereafter throughout the recommended development time, to
observe the initial appearance and growth of defect indications.
Techniques for applying dry developer
30
The dry Developer is readily distinguishable from the powder used in water for “wet type
Developers” by the very fluffy nature and low-bulk density of dry Developer. In normal use,
the dry Developer is blown on to the surface of test parts from which excess penetrant has
been removed and surfaces have been completely dried. A “flock-type” spray gun or an
electrostatic spray gun can be used to apply this dry powder.
Alternatively, fluidized bed systems create clouds of dry powder which are effective in
coating dry test parts with a thin film of Developer. The powder cloud can be created when a
small amount of dry Developer powder is agitated by means of an air blast from the bottom
of the dry Developer tank. In other cases, test operators dip dry test parts into tank of fluffy
dry Developer powder. With each application system, and especially when dipping parts into
dry powder, excess Developer is removed either by blowing it off with air or by shaking the
test objects. The fine adhering dry Developer particles tend to absorb residual entrapped
penetrant and draw it from discontinuities. Penetrant indications usually appear within a few
minutes after Developer application as entrapped penetrant bleeds back into contaminated
with excess penetrant left on test parts. Visual examination of the Developer powder under
black (near-ultraviolet) light will show fluorescent indications of this contamination. This
simple check should be made periodically and contaminated Developer replaced with fresh
clean Developer when needed.
Advantages of dry Developer
The major advantage of using dry Developer is the simplicity of handling it. It is easy to
apply (even though assurance of coverage is absent). Dry powder Developer is in no way
corrosive, and it gives off no hazardous vapours. It leaves no film behind to hinder
subsequent processing or operations.
Disadvantages of dry Developer
An obvious disadvantage of dry Developer is their extreme dustiness which requires air
cleaning equipment and/or the use of respirators. Because dry developers leave an invisible
film, it is often impossible to determine if a test surface has been adequately covered without
voids in the developer coating.
A subtle, but extremely important disadvantage of dry powder developer stems from the fact
that the test surface must be dried before developer application. Excessive drying at test piece
temperatures over 60 0C (140 0F) for 10 min or longer can evaporate a significant portion of
the entrapped residue is more viscous and may have shrunk to the point where it cannot
contact the developer at all and so an indication cannot be developed. Solvent developers
avoid this failure to form indications because the solvent reaches the diminished entrapment
and leaches it to the surface. Aqueous developers do not encounter this problem because the
heating does not take place until the developer is already in position.
Types of aqueous wet developers
31
Two types of aqueous wet developers are in common use in penetrant inspection. The first
consists of insoluble developer particles suspendible in water, while the second contains a
developer that is actually soluble (or dilutable) in water. The suspended wet aqueous
developer is mixed into water in a concentration recommended by its manufacturer. Frequent
stirring or agitation may be needed to prevent the developer powder from settling out of its
water suspension.
The water-soluble or dilutable wet developers are prepared merely by diluting them with
water in the proportions recommended by their manufacturers. These developers are applied
to test parts in the same manner as the wet aqueous suspension developers just described.
With soluble developers, agitation is not required to maintain uniform consistency after the
developer has been initially mixed with water.
Aqueous wet developers usually contain wetting agents and corrosion inhibitors to minimize
attack on test objects and penetrant processing equipment. When applied by dipping or
flowing, the thickness of the dried developer coating on test objects after evaporation of the
water vehicle is determined by the concentration of developer in the water. With spray
application of aqueous wet developer, coating thickness must be carefully controlled. If a
heavy coating thickness tends to obscure or hide penetrant test indications. And so reduces
the reliability of penetrant inspection.
Techniques for applying aqueous wet developer
Wet aqueous powder developer can be applied to test part surface that have previously been
processed by penetrant application, dwell time, and removal of excess surface penetrant by
water washing. The preferred method of application of wet developer is dry spraying it
directly onto test parts. No provision is made for collecting overspray or dripping of excess
developer for reuse, since these developer residues could be contaminated with penetrants or
emulsifiers. Manufacturers do not recommend dipping test pieces aqueous developer
solutions. Aqueous developers necessarily contain wetting agents and function much like
dilute hydrophilic remover stations. Not only does the additional and unwanted re-removal
occur, but the removed penetrant also contaminates the developer with its fluorescence.
Flow-on application is also to be avoided for the same reason.
Since the developer is in water suspension or solution, it is possible to apply it to test objects
whose surface penetrant has been removed by water spraying without requiring intermediate
drying of the test parts. Following the application of aqueous wet developer, test parts are
normally dried in ovens operating at temperatures adequate to evaporate the water from the
surface, to leave a uniform coating of dried developer. Care is required to assure that an
excessive amount of wet developer is not applied since a high build-up of developer coating
will obscure or hide flaw indications.
Much less build-up occurs with soluble developers since only a limited amount of soluble
developer can be dissolved in water.
Techniques for drying of wet aqueous developer coatings
32
It is preferable to heat test part surface after the application of wet aqueous developers in
order to promote drying into uniform coatings. Many users refer to apply the wet developer
suspension by spraying it onto the test part surface resulting from the post emulsification or
water-washable removal process. Following the developer application, the surface is oven
dried to promote evaporation of water from the developer coating. As with drying operations
using other developers, test piece temperature should not exceed 60 0C (140 0F). Indication
dimming by heat is minimal, and the test pieces can be handled less cautiously.
Advantages of using aqueous developers
Aqueous developers give of no noxious and/or flammable vapours and no annoying or
hazardous dusts, and thus require no use of elaborate safety equipment. Compared to solvent
developers, harmless and inexpensive water is being driven off, not costly and hazardous
solvents. Whereas dry developers do not produce visible coatings, aqueous developers have
the advantage of making the extent of developer coverage visible. If there is a void in
coverage, it is obvious.
Disadvantages of using wet aqueous developers
The wetting agent functions as a penetrant remover when aqueous developer is applied by
dipping or flowing onto test parts. As a result, wet developers must be applied with some care
to prevent developer loss and contamination. Spraying can lead to a non-uniform coating of
developer, leaving some areas devoid and others with excessive coating which can hide
indications. Being liquid, aqueous developers flow (like solvent developers) before being
fixed by drying, and may fill up recesses with gross excess of developer. Avoidance of this
requires care in application and positioning test pieces. A further disadvantage of those
aqueous developers that contain insoluble pigments in suspension is that the dried developer
is difficult and sometimes impossible to remove after the inspection. This interfaces with
subsequent processing of test objects. Compared with solvent-based developers, aqueous
developers suffer a disadvantage (shared with dry developers) in that there is no solvent
action to assist informing indications, only capillary action. This makes aqueous (and dry)
developers noticeably less sensitive that some solvent developers.
Advantages of water-soluble wet developers
A recent innovation in wet developers has been the introduction of a type that is water soluble
rather than being suspendable. This feature eliminates the necessity of agitating the developer
to keep undissolved solids in suspension while retaining the other advantages of the wet
developer. Drying results in a uniform film which perform the developer function. The
soluble wet aqueous developers eliminate the disadvantages of streaks and excessively heavy
developer coatings. In addition, since the dried developer coating is water soluble, it is much
easier to remove the developer coating during post-cleaning as compared with the insoluble
water-suspended developer coating.
Disadvantages of water-soluble wet developers
33
The water soluble wet developer also retains some of the disadvantages of the suspension
type powder developer. It does not have much solvent action. Dip application may result in
local accumulations or non-uniform developer film, thus impairing penetrant test sensitivity.
It has also been found that some types of water-soluble developers may tend to shift light
emitted by fluorescent penetrants towards the blue end of the visible spectrum, reducing the
visibility of the fluorescent penetrants. However, recent improvements in water-soluble
developers have improved visibility of fluorescent indications. Water-soluble developers (like
all wet aqueous developers) are not preferred, although they can be used with caution with
water-washable penetrants. Such usage tends to cause blurring of flaw indications since
penetrant entrapments are subject to detergent action and removal by wetting agents in the
developer system.
Techniques for application of non-aqueous wet developer
Another common developer type is so-called “non-aqueous” suspended in a volatile solvent.
The volatile solvent tends to pull penetrant from indications by solvent action. It also
accelerates drying so that a supplementary drying operation is not required. However, the test
part surface must be completely dried before applying the non-aqueous developer.
A thin film of the non-aqueous wet developer is desirable to give the ultimate in sensitivity.
Electrostatic spray gun or a fine atomizing spray from a paint spray gun will provide this fine
developer coverage. As with the suspension type wet developer, it is necessary to agitate the
non-aqueous wet developer prior to use to ensure that developer particles fully suspended.
Agitation before application is essential with non-aqueous wet developer s package in spray
cans. The use of non-aqueous developer results in indications with high visibility and enables
reliable detection of smaller flaws.
Techniques for application of film-type developer
The film-type developer, as the name implies, forms a plastic film over the penetrated area as
it dries. It is normally spay applied, as with the non-aqueous wet type, and the solvent carrier
acts to draw penetrant into the developer film. As the film dries, the exposed penetrant
indications set in a pattern indicative of the discontinuities in the surface being inspected.
This film provides a permanent record of the discontinuity pattern and can be peeled from the
surface and retained for reference. Resolution of the film-type developer is of a high order,
but its use is somewhat restricted to special applications because of the labour involved in
stripping the film from test parts. This is more difficult than the ordinary tank-type removal
methods used for other types of developer.
Safety consideration for developers
All of the developers produced as dry powders offer, to some extent, the possibility of
personnel inhalation of developer dust. The extremely fine particle size of the dry developer
makes it the most likely to be airborne in reasonably high concentrations. Preferably, this
product should be applied in a well-ventilated area or within a hood equipped with an exhaust
system to reduce inhalation hazard. Use of the non-aqueous wet developer also involves some
34
hazard because of inhalation of the solvent carriers in which the developer particles are
suspended. The solvent carriers are normally either relatively flammable, relatively toxic, or
both. Precautions for use of flammable or toxic solvents should be observed when using non-
aqueous type developers.
Sensitivity ranking of developers
Sensitivity ranking (highest to lowest)
Ranking Developer form Method of application
1 Non-aqueous wet solvent spray
2 Plastic film spray
3 Water-soluble spray
4 Water suspendible spray
5 Water-soluble immersion
6 Water suspendible immersion
7 dry Dust cloud (electrostatic)
8 dry Fluidized bed
9 dry Dust cloud (air agitation)
10 dry Fluidized bed
Reference: ASNT non-destructive testing-handbook
DRYINGOF JOBS
Drying is effective as water traces on the surface can prevent proper absorption of penetrant
and is necessary prior to applying non-aqueous developer or following the application of
aqueous developer. Drying time will vary with the size, and number of parts under
examination.
Drying modes
Parts can be dried using a hot-air re-circulating oven, a hot or cold air blast, or by exposure to
ambient temperature, particularly when excess penetration is removed with a solvent. Drying
is best done in a thermostatically controlled recirculating hot-air drier. Local heating or
cooling of parts is permitted, provided, the temperature of the part remains in the range of 50-
100 0F for fluorescent methods, and from 50-125 0F for visible methods. Drying oven
temperature should be carefully controlled and should not exceed 71 0C (160 0F).
Drying time limits
The parts are not allowed to remain in the drying oven any longer than is necessary to dry the
surface. Normally, times over 30 min. In the drier may impair the sensitivity of the
examination.
Viewing conditions
A minimum light intensity of 50-foot candles (500 lux) is necessary to ensure adequate
sensitivity during the examination and evaluation of indications.
35
Fluorescent penetrants
With fluorescent penetrants, the process is essentially the same as that of a colour contrast
penetrant. The exception being that, the examination of fluorescent indication is performed
using an ultraviolet light called a black light. The examination shall be performed as follows:
1. It shall be performed in a darkened area.
2. The examiner shall be in the darkened area for at least 1 min prior to performing the
examination to enable his eyes to adapt to the darkness. When the inspector is in
sudden darkness, the cornea of the eye tends to open up, enabling too much light
coming to the eyes of the operator. This will not enable him to see the smallest
indication properly, thereby reducing the sensitivity.
3. The examiner is also not allowed to wear glasses or lens which are photosensitive.
This may minimize the reflection from the smallest indications, reducing the
sensitivity.
4. The black light should be allowed to warm up from a minimum of 5 min. prior to the
measurement of the intensity of the ultraviolet light emitted.’
5. Contrast spectacles made with lenses of sodium glass, give an increased contrast with
fluorescent penetrants and block the objectionable UV or black light.
6. The intensity of black light is measured with a light meter, a digital radiometer. A
minimum of 1000 microwatts/cm2 is required on the surface of the part being
inspected.
7. The black light intensity shall be measured at least once in every 8-hour shift, and
whenever the workstation is changed.
INDICATION
The appearance of indication is a major factor, which allows the operator to interpret the
indication. However, a thorough knowledge of various process and defect associated with a
particular process, aids the interpreter in determining the exact nature of the indications. The
types of discontinuities that they show characterize the indications.
The size and concentration (number of indications in an area) determine the sensitivity. A
tight crack, such as a fatigue or a stress-corrosion crack, can show a bluish-white indication
by a fluorescent penetrant, whereas white crack indication using the same penetrant, will
show a greenish-yellow indication. The reason for this being that a tight crack is too small for
the colour forming dye to penetrant. Hence, the light, which is reflected, has a wavelength,
which falls in the bluish-white range of the light spectrum.
The type of developer can significantly influence the appearance of indications, as follows:
1. A dry developerwill provide a sharper, less spreading indication with better resolution
of individual indications in areas of high concentration of indications.
2. Wet developer provides a broader indication, as the uniform coat of powder provides
for more lateral spreading of the penetrant into the developer. A group of indications,
36
such as cluster porosity, can spread and merge into one single large indication,
thereby reducing the resolution.
3. Solvent suspendible developers will provide sharp indications with good resolution, if
applied uniformly. A heavier coating of solvent-suspendible developers will be used
with the colour contrast penetrants that provide sharp indications, which will continue
to bleed out and fade in colour w.r.t time.
Variables that influence the persistence of indications
1. Pre-cleaning methods (traces of acids or alkalis on the surface can fade indications)
2. Type of penetrant and its dye system.
3. The processing procedure-over washing.
4. Concentration of emulsifier and dwell time.
5. Type of developer
Visibility of penetrant test indications
Probably the one factor most responsible for the effectiveness of a penetrant is its visibility,
often referred to as brightness, contrast, or brilliance. Carefully conducted experiments with
glass plates clamped together and viewed under monochromatic light have shown that
penetrant materials of only “medium”or “low” performance can enter openings that are
smaller in width. Penetrant was determined to have entered to a point where the plates were
separated by only 130 m.
Taking into consideration the extremely small amount of penetrant contained in a
discontinuity of this size, and the fact that only a small portion of this penetrant can be bleed
back t the surface to become visible. It is obvious that everything that will enhance visibility
should be utilized if maximum penetrant test performance is to be obtained.
Contrast of visible dye penetrant indications
In the case of visible dye penetrants, increasing indication visibility means incorporation the
largest possible quantities of dye in the penetrant vehicle and choosing the most intense dye
colours with the highest contrast w.r.t the background against they will be viewed. In nearly
37
all cases, this contrast is heightened by forming and using the developer in such a manner that
developer (1) Serves to ring penetrant out of the discontinuity and (2) Also covers the surface
with a smooth, light-coloured coating which the indication stands out sharply.
All of the visible dye penetrants presently in use make themselves perceptible to the eye in
one of two ways-either be reflecting a considerably smaller amount of light than the
background or by reflecting light of a different colour than the background (colour contrast).
The incident light is neither all absorbed by the penetrant, nor does the background reflect all
the light that strikes in. The actual contrast ratios are extremely difficult to measure but have
been estimated at from 10:1 to 20:1; the maximum contrast theoretically obtainable.
Contrast of fluorescent penetrant test indications
In that case of fluorescent penetrant flaw indications, visual perceptibility is enhanced by
light emission mechanisms within the penetrant indication, and conditions of viewing are
quite different. Using brightness contrast, the bright yellow-green indication is seen against a
nearly black or at least a very dark background. The indication itself is actually a source of
light which, even though small, is quite intense. Contrast can be exceptionally high. Some
estimates give it a value as high as 100:1 or even much greater, since it is the presence of
light compared to obscene of light
With fluorescent penetrants, the most effective way to increase visibility and improve
resolution of fine discontinuities is to increase the fluorescent brilliance of the substantial of
visible light, so that the background remains unseen.
Visibility of fluorescent penetrant indications
From the point of view of colour contrast, most fluorescent penetrants provide yellow or
yellow-green indications against a black background. This has been proven by research into
visibility of such objects as highway signs to be one of the most “seeable” combinations
possible.
The normal human eye has its highest sensitivity in fine source of light of high brightness.
Under this condition are generally viewed in the substantial absence of visible light, so that
the background remains unseen.
Background fluorescent caused by rough or porous surfaces
In some practical applications where the test object surface is porous or rough, fluorescent
penetrant tends to be retained on the surface as well as in discontinuities. This condition
reduces contrast between the background and indications and may impair discrimination. For
this reason, a compromise between the removability of surface penetrant and intensity of
fluorescent is necessary to reduce the background fluorescent to a practical limit.
Physiological effect of black lights
38
Of interest to hygiene directors and safety engineers are the effects of black light on the
operator. It has been rather conclusively demonstrated that black light in the wavelength
range normally used for inspection purpose can cause no permanent damage to person
exposed, so long as recommended filters are used on the black lights.
Effect of black light radiation wavelengths
The 365 nm (3650 A0) near-ultraviolet wavelength is well out of the range where
physiological effect takes place. Such effects as damage to the eye, sunburn and destruction
of tissue do not come into evidence until wavelengths are reduced to the neighbourhood of
320 nm. Here they become definitely injurious.
Placement of light sources in penetrant inspection booth
Consideration should be given to the disposition of lights with in an inspection booth and to
the effect upon an operator of placement of light sources. While black light will not damage
the eye permanently, some of the layers of the eyeball exhibit strong tendencies to
fluorescent. If the inspections light are placed so that its rays fall directly or are reflected in to
the eyes operators, this eyeball fluorescence can become extremely annoying and will impair
inspector effectiveness to a very marked degree.
Use of special filtering eyeglasses will increase operator perception and reduce fatigue.
Yellow-tined eyeglasses filter out the black light before it reaches the eyes, yet they do not
reduce the visibility of fluorescent indications.
Human factors influencing detection of penetrant indications
Since the human eye is the usual signal receptor in all visual tents and inspection techniques,
the inspector’s visual limitations control the detecting ability (or “see-ability”) of penetrant
test indications. Defects with dimensions as small as 25 µm (0.001 in.) have been found
regularly in critical penetrant inspection. Use is sometimes made of magnifying glasses (3X
to 10X magnification) in observation of smaller penetrant indications. However, penetrant
operators and inspectors should have regular eye examinations to determine colour
sensitivity, brightness contrast sensitivity, threshold of detection, and other visual factors
influencing ability to discriminate between test indications and background conditions. Some
theoretical considerations w.r.t the human eye’s response to penetrant indications have been
proposed, but relatively little work has been reported on the correlation of visual acuity with
reliability of seeing penetrant indications.
RECORDING OF INDICATION
Penetrant indications can obviously be photographed, or video recorded with CCTV camera.
As with magnetic indications, with specialized method can be photographed to retain some
identifying background. The dry indication can be lifted off the surface with a transparent
adhesive tape or a replica can made of the surface with a process called Replica Transfer
Coating (RTC). This is a resin a volatile solvent, a white pigment and a silicone depending
39
agent. RTC is applied instead of developer, by aerosol spray, and allowed to dry. After
drying, the edges are trimmed with knifes, and the replica is placed off.
POST CLEANING
Some residues will remain on the work piece after the penetrant inspection is completed.
These residues can result in the formation of voids during subsequent welding or stop-off
brazing, in the contamination of surfaces or in unfavourable reactions in chemical processing
operations. Postcleaning is particularly important where residual penetrant materials weight
combine with other factors in service to produce corrosion. A suitable technique, such as a
simple water spray, water rinse, machine wash, vapour degreasing solvent soaking, or
ultrasonic cleaning may be employed. If it is recommended to remove the developer, it
should be carried out as promptly as possible, preventing fixing of developer.
LIMITATIONS OF PERFORMANCE OF PENETRANT SYSTEMS
With properly processed specimens of solid, non-porous materials, detection of surface
discontinuities by the penetrant inspection method is limited only by the experience,
concentration, and visual acuity of the penetrant inspector and by the performance
capabilities of the penetrant system being used. The interpretation of the observed test
indications requires competent test operators who have been properly trained and qualified
for the specific inspection tasks involved. Such inspectors and their supervisors should be
certified to appropriate levels of capability. These personnel also be familiar with the
materials to be tested, their prior fabrication and processing, and their intended uses and
service conditions.
CHAPTER 6
INTERPRETATION OF INDICATIONS
Interpretation of penetrant indications
40
The term Interpretation and evaluation are often confused by testing personnel. Actually, the
terms to two entirely different steps in the testing process.
To interpret an indication means to decide what condition caused it. It may be a crack,
porosity, lack of bond, or merely penetrant remaining on the surface due to some no relevant
cause. Evaluation follows interpretation. If a discontinuity exists, its effect on the usefulness
of the article requires evaluation. i.e., the article is either accepted as is reworked, or
scrapped. The success and reliability of the Interpretation and evaluation of liquid penetrant
test is not method by which a specimen is processed through a machine that separates the
good article from the bad. Testing personnel are required to carefully process each specimen,
interpret indications, evaluate the seriousness of discontinuities and determine disposition.
Classification of indications
1. Relevant indications
2. Non-relevant indications
3. False indications
Non-relevant indications
Outside the realm of truly indications there is a category of non-relevant indications, which
testing personnel can recognize. These are true indications in the sense that they are caused
by surface discontinuities, but the discontinuities are there by design and are in way a true
discontinuity to some feature of the assembly that accounts for their presence. Some feature
of assembly such as articles that are press fitted, keyed, spilled, or riveted are cause for the
indications. Non-relevant indicationsinclude those that appear on articles that are press-fitted,
keyed, splined, riveted, or spot welded together and those appearing on castings as a result of
loosely adherent scale or a rough surface due to burned in sand. Such Non-relevant
indications, however, must be carefully examined since they may interfere with correct
interpretation.
Non-relevant indications are actual surface discontinuities that in most cases are there by
design. Loose scales or a rough surface on a forging or a casting can also cause them. The
operator normally identifies them, by looking at the design drawing or sketches. Loose scales
are often identified when the operator, before the actual inspection of the work piece, carries
out a usual visual inspection. Any indication believed to be No relevant, shall be termed as
relevant, until it is confined by re-examination by the same or different NDT method
Non-relevant indications are:
1. Weld inspector arc welds spherical or surface
2. Incomplete penetration filet welds open, full weld length
3. Surface expulsion resistance welds raised metal at weld edge
4. Scuff marks scam welds surface of seam welds
5. Press-fit interface press fits outlines press fits
6. Braze runoff brazed parts edge of excess braze
NDT
NDT
NDT
NDT
NDT
NDT
NDT
NDT
NDT
NDT
NDT
NDT

More Related Content

What's hot

Liquid penetrant testing
Liquid penetrant testingLiquid penetrant testing
Liquid penetrant testingyash patel
 
Dye penetrant inspection
Dye penetrant inspectionDye penetrant inspection
Dye penetrant inspectionbszala
 
Introduction & uses of non destructive testing
Introduction & uses of non destructive testingIntroduction & uses of non destructive testing
Introduction & uses of non destructive testingndtindia123
 
NDE Non Destructive Evaluation
NDE Non Destructive EvaluationNDE Non Destructive Evaluation
NDE Non Destructive Evaluationarivumani ravanan
 
Leak Testing: Different Types Of Leak Testing Methods | Helium Leak Testing
Leak Testing: Different Types Of Leak Testing Methods | Helium Leak Testing Leak Testing: Different Types Of Leak Testing Methods | Helium Leak Testing
Leak Testing: Different Types Of Leak Testing Methods | Helium Leak Testing Kryovess Pvt. Ltd.
 
L&T Valves - Role of NDT in Valve Industries
L&T Valves - Role of NDT in Valve IndustriesL&T Valves - Role of NDT in Valve Industries
L&T Valves - Role of NDT in Valve IndustriesBabu Kuriakose
 
Introduction to ndt
Introduction to ndtIntroduction to ndt
Introduction to ndtzoha nasir
 
Non Destructive Testing Of Materials
Non Destructive Testing Of Materials Non Destructive Testing Of Materials
Non Destructive Testing Of Materials Vinay M
 
DUCT-ARMOR-ASBESTOS-TEST-630141
DUCT-ARMOR-ASBESTOS-TEST-630141DUCT-ARMOR-ASBESTOS-TEST-630141
DUCT-ARMOR-ASBESTOS-TEST-630141Duct Doctors, LLC
 
W3 330-Water-Vapor-Transmission-rate-Test-System
W3 330-Water-Vapor-Transmission-rate-Test-SystemW3 330-Water-Vapor-Transmission-rate-Test-System
W3 330-Water-Vapor-Transmission-rate-Test-SystemLabthink International,Inc.
 
Basic of ultrasonic testing part 8 by rohit sahu
Basic of ultrasonic testing part 8 by rohit sahuBasic of ultrasonic testing part 8 by rohit sahu
Basic of ultrasonic testing part 8 by rohit sahuRohitSahu103
 
Non-destructive testings basic introduction
Non-destructive testings basic introductionNon-destructive testings basic introduction
Non-destructive testings basic introductionRipuranjan Singh
 
various nondestructive testing techniques and their inspections on aircraft s...
various nondestructive testing techniques and their inspections on aircraft s...various nondestructive testing techniques and their inspections on aircraft s...
various nondestructive testing techniques and their inspections on aircraft s...kd11
 
W3 230-water-vapor-transmission-rate-test-system
W3 230-water-vapor-transmission-rate-test-systemW3 230-water-vapor-transmission-rate-test-system
W3 230-water-vapor-transmission-rate-test-systemEmilywu12
 
L&T Valves - Effects of Stem and Stuffing Box Roughness on Valve Fugitive Emi...
L&T Valves - Effects of Stem and Stuffing Box Roughness on Valve Fugitive Emi...L&T Valves - Effects of Stem and Stuffing Box Roughness on Valve Fugitive Emi...
L&T Valves - Effects of Stem and Stuffing Box Roughness on Valve Fugitive Emi...Babu Kuriakose
 

What's hot (17)

Liquid penetrant testing
Liquid penetrant testingLiquid penetrant testing
Liquid penetrant testing
 
Dye penetrant inspection
Dye penetrant inspectionDye penetrant inspection
Dye penetrant inspection
 
Introduction & uses of non destructive testing
Introduction & uses of non destructive testingIntroduction & uses of non destructive testing
Introduction & uses of non destructive testing
 
NDE Non Destructive Evaluation
NDE Non Destructive EvaluationNDE Non Destructive Evaluation
NDE Non Destructive Evaluation
 
Leak Testing: Different Types Of Leak Testing Methods | Helium Leak Testing
Leak Testing: Different Types Of Leak Testing Methods | Helium Leak Testing Leak Testing: Different Types Of Leak Testing Methods | Helium Leak Testing
Leak Testing: Different Types Of Leak Testing Methods | Helium Leak Testing
 
L&T Valves - Role of NDT in Valve Industries
L&T Valves - Role of NDT in Valve IndustriesL&T Valves - Role of NDT in Valve Industries
L&T Valves - Role of NDT in Valve Industries
 
NDT
NDTNDT
NDT
 
Introduction to ndt
Introduction to ndtIntroduction to ndt
Introduction to ndt
 
Non Destructive Testing Of Materials
Non Destructive Testing Of Materials Non Destructive Testing Of Materials
Non Destructive Testing Of Materials
 
DUCT-ARMOR-ASBESTOS-TEST-630141
DUCT-ARMOR-ASBESTOS-TEST-630141DUCT-ARMOR-ASBESTOS-TEST-630141
DUCT-ARMOR-ASBESTOS-TEST-630141
 
W3 330-Water-Vapor-Transmission-rate-Test-System
W3 330-Water-Vapor-Transmission-rate-Test-SystemW3 330-Water-Vapor-Transmission-rate-Test-System
W3 330-Water-Vapor-Transmission-rate-Test-System
 
Basic of ultrasonic testing part 8 by rohit sahu
Basic of ultrasonic testing part 8 by rohit sahuBasic of ultrasonic testing part 8 by rohit sahu
Basic of ultrasonic testing part 8 by rohit sahu
 
Non-destructive testings basic introduction
Non-destructive testings basic introductionNon-destructive testings basic introduction
Non-destructive testings basic introduction
 
B1071014
B1071014B1071014
B1071014
 
various nondestructive testing techniques and their inspections on aircraft s...
various nondestructive testing techniques and their inspections on aircraft s...various nondestructive testing techniques and their inspections on aircraft s...
various nondestructive testing techniques and their inspections on aircraft s...
 
W3 230-water-vapor-transmission-rate-test-system
W3 230-water-vapor-transmission-rate-test-systemW3 230-water-vapor-transmission-rate-test-system
W3 230-water-vapor-transmission-rate-test-system
 
L&T Valves - Effects of Stem and Stuffing Box Roughness on Valve Fugitive Emi...
L&T Valves - Effects of Stem and Stuffing Box Roughness on Valve Fugitive Emi...L&T Valves - Effects of Stem and Stuffing Box Roughness on Valve Fugitive Emi...
L&T Valves - Effects of Stem and Stuffing Box Roughness on Valve Fugitive Emi...
 

Similar to NDT

presentation1-150427120409-conversion-gate01
presentation1-150427120409-conversion-gate01presentation1-150427120409-conversion-gate01
presentation1-150427120409-conversion-gate01Dil Nawaz
 
Internal corrosion and its monitoring techniques
Internal corrosion and its monitoring techniquesInternal corrosion and its monitoring techniques
Internal corrosion and its monitoring techniquesDil Nawaz
 
Jamshed alam seinar report copy
Jamshed alam seinar report copyJamshed alam seinar report copy
Jamshed alam seinar report copyJAMSHED ALAM
 
35 Insp, Ndt, Stat Reqmts Fope
35 Insp, Ndt, Stat Reqmts Fope35 Insp, Ndt, Stat Reqmts Fope
35 Insp, Ndt, Stat Reqmts Fopejubin
 
NDT for boilers by LABORELEC
NDT for boilers by LABORELECNDT for boilers by LABORELEC
NDT for boilers by LABORELECOsama Lari
 
ndt grp8..pptx
ndt grp8..pptxndt grp8..pptx
ndt grp8..pptxhemal_2911
 
non-destructive testing ppt
non-destructive testing pptnon-destructive testing ppt
non-destructive testing pptJAMSHED ALAM
 
liquid penetrant test and ultrasonic test
liquid penetrant test and ultrasonic testliquid penetrant test and ultrasonic test
liquid penetrant test and ultrasonic testJaya Teja
 
IRJET- Detection of Weld Metal Defects using DT and NDT -A Review
IRJET-  	  Detection of Weld Metal Defects using DT and NDT -A ReviewIRJET-  	  Detection of Weld Metal Defects using DT and NDT -A Review
IRJET- Detection of Weld Metal Defects using DT and NDT -A ReviewIRJET Journal
 
Non Destructive Testing
Non Destructive TestingNon Destructive Testing
Non Destructive TestingSukesh O P
 
A REVIEW OF CHARACTERIZATION TECHNIQUES OF COMPOSITE MATERIALS
A REVIEW OF CHARACTERIZATION TECHNIQUES OF COMPOSITE MATERIALSA REVIEW OF CHARACTERIZATION TECHNIQUES OF COMPOSITE MATERIALS
A REVIEW OF CHARACTERIZATION TECHNIQUES OF COMPOSITE MATERIALSIRJET Journal
 
Improved Technologies for Mill Roll Inspection
Improved Technologies for Mill Roll InspectionImproved Technologies for Mill Roll Inspection
Improved Technologies for Mill Roll InspectionInnerspec Technologies
 
InspectionSamplingProceduresFineCoarseAggregates.pdf
InspectionSamplingProceduresFineCoarseAggregates.pdfInspectionSamplingProceduresFineCoarseAggregates.pdf
InspectionSamplingProceduresFineCoarseAggregates.pdfRiSovannaphumi
 
Non-destructive Testing
Non-destructive TestingNon-destructive Testing
Non-destructive TestingGulfam Hussain
 
CUI PAPER Bahrain v2 - 7April2015 (2)- edited 02 November 2015 Short
CUI PAPER Bahrain v2 - 7April2015 (2)- edited 02 November 2015 ShortCUI PAPER Bahrain v2 - 7April2015 (2)- edited 02 November 2015 Short
CUI PAPER Bahrain v2 - 7April2015 (2)- edited 02 November 2015 ShortGary Penney
 
Testing & Engineering Services Company Limited Trinidad and Tobago
Testing & Engineering Services Company Limited Trinidad and TobagoTesting & Engineering Services Company Limited Trinidad and Tobago
Testing & Engineering Services Company Limited Trinidad and Tobagocompsoltt
 

Similar to NDT (20)

presentation1-150427120409-conversion-gate01
presentation1-150427120409-conversion-gate01presentation1-150427120409-conversion-gate01
presentation1-150427120409-conversion-gate01
 
Internal corrosion and its monitoring techniques
Internal corrosion and its monitoring techniquesInternal corrosion and its monitoring techniques
Internal corrosion and its monitoring techniques
 
Jamshed alam seinar report copy
Jamshed alam seinar report copyJamshed alam seinar report copy
Jamshed alam seinar report copy
 
35 Insp, Ndt, Stat Reqmts Fope
35 Insp, Ndt, Stat Reqmts Fope35 Insp, Ndt, Stat Reqmts Fope
35 Insp, Ndt, Stat Reqmts Fope
 
NDT for Boilers
NDT for BoilersNDT for Boilers
NDT for Boilers
 
NDT for boilers by LABORELEC
NDT for boilers by LABORELECNDT for boilers by LABORELEC
NDT for boilers by LABORELEC
 
ndt grp8..pptx
ndt grp8..pptxndt grp8..pptx
ndt grp8..pptx
 
INTRODUCTION OF NDT
INTRODUCTION OF NDTINTRODUCTION OF NDT
INTRODUCTION OF NDT
 
non-destructive testing ppt
non-destructive testing pptnon-destructive testing ppt
non-destructive testing ppt
 
liquid penetrant test and ultrasonic test
liquid penetrant test and ultrasonic testliquid penetrant test and ultrasonic test
liquid penetrant test and ultrasonic test
 
IRJET- Detection of Weld Metal Defects using DT and NDT -A Review
IRJET-  	  Detection of Weld Metal Defects using DT and NDT -A ReviewIRJET-  	  Detection of Weld Metal Defects using DT and NDT -A Review
IRJET- Detection of Weld Metal Defects using DT and NDT -A Review
 
Non Destructive Testing
Non Destructive TestingNon Destructive Testing
Non Destructive Testing
 
A REVIEW OF CHARACTERIZATION TECHNIQUES OF COMPOSITE MATERIALS
A REVIEW OF CHARACTERIZATION TECHNIQUES OF COMPOSITE MATERIALSA REVIEW OF CHARACTERIZATION TECHNIQUES OF COMPOSITE MATERIALS
A REVIEW OF CHARACTERIZATION TECHNIQUES OF COMPOSITE MATERIALS
 
Introduction to NDT
Introduction to NDT Introduction to NDT
Introduction to NDT
 
Improved Technologies for Mill Roll Inspection
Improved Technologies for Mill Roll InspectionImproved Technologies for Mill Roll Inspection
Improved Technologies for Mill Roll Inspection
 
InspectionSamplingProceduresFineCoarseAggregates.pdf
InspectionSamplingProceduresFineCoarseAggregates.pdfInspectionSamplingProceduresFineCoarseAggregates.pdf
InspectionSamplingProceduresFineCoarseAggregates.pdf
 
Importance of ndt
Importance of ndtImportance of ndt
Importance of ndt
 
Non-destructive Testing
Non-destructive TestingNon-destructive Testing
Non-destructive Testing
 
CUI PAPER Bahrain v2 - 7April2015 (2)- edited 02 November 2015 Short
CUI PAPER Bahrain v2 - 7April2015 (2)- edited 02 November 2015 ShortCUI PAPER Bahrain v2 - 7April2015 (2)- edited 02 November 2015 Short
CUI PAPER Bahrain v2 - 7April2015 (2)- edited 02 November 2015 Short
 
Testing & Engineering Services Company Limited Trinidad and Tobago
Testing & Engineering Services Company Limited Trinidad and TobagoTesting & Engineering Services Company Limited Trinidad and Tobago
Testing & Engineering Services Company Limited Trinidad and Tobago
 

Recently uploaded

Sheet Pile Wall Design and Construction: A Practical Guide for Civil Engineer...
Sheet Pile Wall Design and Construction: A Practical Guide for Civil Engineer...Sheet Pile Wall Design and Construction: A Practical Guide for Civil Engineer...
Sheet Pile Wall Design and Construction: A Practical Guide for Civil Engineer...Dr.Costas Sachpazis
 
Architect Hassan Khalil Portfolio for 2024
Architect Hassan Khalil Portfolio for 2024Architect Hassan Khalil Portfolio for 2024
Architect Hassan Khalil Portfolio for 2024hassan khalil
 
What are the advantages and disadvantages of membrane structures.pptx
What are the advantages and disadvantages of membrane structures.pptxWhat are the advantages and disadvantages of membrane structures.pptx
What are the advantages and disadvantages of membrane structures.pptxwendy cai
 
Decoding Kotlin - Your guide to solving the mysterious in Kotlin.pptx
Decoding Kotlin - Your guide to solving the mysterious in Kotlin.pptxDecoding Kotlin - Your guide to solving the mysterious in Kotlin.pptx
Decoding Kotlin - Your guide to solving the mysterious in Kotlin.pptxJoão Esperancinha
 
SPICE PARK APR2024 ( 6,793 SPICE Models )
SPICE PARK APR2024 ( 6,793 SPICE Models )SPICE PARK APR2024 ( 6,793 SPICE Models )
SPICE PARK APR2024 ( 6,793 SPICE Models )Tsuyoshi Horigome
 
microprocessor 8085 and its interfacing
microprocessor 8085  and its interfacingmicroprocessor 8085  and its interfacing
microprocessor 8085 and its interfacingjaychoudhary37
 
Software and Systems Engineering Standards: Verification and Validation of Sy...
Software and Systems Engineering Standards: Verification and Validation of Sy...Software and Systems Engineering Standards: Verification and Validation of Sy...
Software and Systems Engineering Standards: Verification and Validation of Sy...VICTOR MAESTRE RAMIREZ
 
ZXCTN 5804 / ZTE PTN / ZTE POTN / ZTE 5804 PTN / ZTE POTN 5804 ( 100/200 GE Z...
ZXCTN 5804 / ZTE PTN / ZTE POTN / ZTE 5804 PTN / ZTE POTN 5804 ( 100/200 GE Z...ZXCTN 5804 / ZTE PTN / ZTE POTN / ZTE 5804 PTN / ZTE POTN 5804 ( 100/200 GE Z...
ZXCTN 5804 / ZTE PTN / ZTE POTN / ZTE 5804 PTN / ZTE POTN 5804 ( 100/200 GE Z...ZTE
 
Study on Air-Water & Water-Water Heat Exchange in a Finned Tube Exchanger
Study on Air-Water & Water-Water Heat Exchange in a Finned Tube ExchangerStudy on Air-Water & Water-Water Heat Exchange in a Finned Tube Exchanger
Study on Air-Water & Water-Water Heat Exchange in a Finned Tube ExchangerAnamika Sarkar
 
VIP Call Girls Service Hitech City Hyderabad Call +91-8250192130
VIP Call Girls Service Hitech City Hyderabad Call +91-8250192130VIP Call Girls Service Hitech City Hyderabad Call +91-8250192130
VIP Call Girls Service Hitech City Hyderabad Call +91-8250192130Suhani Kapoor
 
VICTOR MAESTRE RAMIREZ - Planetary Defender on NASA's Double Asteroid Redirec...
VICTOR MAESTRE RAMIREZ - Planetary Defender on NASA's Double Asteroid Redirec...VICTOR MAESTRE RAMIREZ - Planetary Defender on NASA's Double Asteroid Redirec...
VICTOR MAESTRE RAMIREZ - Planetary Defender on NASA's Double Asteroid Redirec...VICTOR MAESTRE RAMIREZ
 
(MEERA) Dapodi Call Girls Just Call 7001035870 [ Cash on Delivery ] Pune Escorts
(MEERA) Dapodi Call Girls Just Call 7001035870 [ Cash on Delivery ] Pune Escorts(MEERA) Dapodi Call Girls Just Call 7001035870 [ Cash on Delivery ] Pune Escorts
(MEERA) Dapodi Call Girls Just Call 7001035870 [ Cash on Delivery ] Pune Escortsranjana rawat
 
Oxy acetylene welding presentation note.
Oxy acetylene welding presentation note.Oxy acetylene welding presentation note.
Oxy acetylene welding presentation note.eptoze12
 
Internship report on mechanical engineering
Internship report on mechanical engineeringInternship report on mechanical engineering
Internship report on mechanical engineeringmalavadedarshan25
 
CCS355 Neural Network & Deep Learning UNIT III notes and Question bank .pdf
CCS355 Neural Network & Deep Learning UNIT III notes and Question bank .pdfCCS355 Neural Network & Deep Learning UNIT III notes and Question bank .pdf
CCS355 Neural Network & Deep Learning UNIT III notes and Question bank .pdfAsst.prof M.Gokilavani
 
Microscopic Analysis of Ceramic Materials.pptx
Microscopic Analysis of Ceramic Materials.pptxMicroscopic Analysis of Ceramic Materials.pptx
Microscopic Analysis of Ceramic Materials.pptxpurnimasatapathy1234
 
Call Girls Delhi {Jodhpur} 9711199012 high profile service
Call Girls Delhi {Jodhpur} 9711199012 high profile serviceCall Girls Delhi {Jodhpur} 9711199012 high profile service
Call Girls Delhi {Jodhpur} 9711199012 high profile servicerehmti665
 
OSVC_Meta-Data based Simulation Automation to overcome Verification Challenge...
OSVC_Meta-Data based Simulation Automation to overcome Verification Challenge...OSVC_Meta-Data based Simulation Automation to overcome Verification Challenge...
OSVC_Meta-Data based Simulation Automation to overcome Verification Challenge...Soham Mondal
 

Recently uploaded (20)

Sheet Pile Wall Design and Construction: A Practical Guide for Civil Engineer...
Sheet Pile Wall Design and Construction: A Practical Guide for Civil Engineer...Sheet Pile Wall Design and Construction: A Practical Guide for Civil Engineer...
Sheet Pile Wall Design and Construction: A Practical Guide for Civil Engineer...
 
Architect Hassan Khalil Portfolio for 2024
Architect Hassan Khalil Portfolio for 2024Architect Hassan Khalil Portfolio for 2024
Architect Hassan Khalil Portfolio for 2024
 
What are the advantages and disadvantages of membrane structures.pptx
What are the advantages and disadvantages of membrane structures.pptxWhat are the advantages and disadvantages of membrane structures.pptx
What are the advantages and disadvantages of membrane structures.pptx
 
Decoding Kotlin - Your guide to solving the mysterious in Kotlin.pptx
Decoding Kotlin - Your guide to solving the mysterious in Kotlin.pptxDecoding Kotlin - Your guide to solving the mysterious in Kotlin.pptx
Decoding Kotlin - Your guide to solving the mysterious in Kotlin.pptx
 
young call girls in Rajiv Chowk🔝 9953056974 🔝 Delhi escort Service
young call girls in Rajiv Chowk🔝 9953056974 🔝 Delhi escort Serviceyoung call girls in Rajiv Chowk🔝 9953056974 🔝 Delhi escort Service
young call girls in Rajiv Chowk🔝 9953056974 🔝 Delhi escort Service
 
SPICE PARK APR2024 ( 6,793 SPICE Models )
SPICE PARK APR2024 ( 6,793 SPICE Models )SPICE PARK APR2024 ( 6,793 SPICE Models )
SPICE PARK APR2024 ( 6,793 SPICE Models )
 
microprocessor 8085 and its interfacing
microprocessor 8085  and its interfacingmicroprocessor 8085  and its interfacing
microprocessor 8085 and its interfacing
 
Software and Systems Engineering Standards: Verification and Validation of Sy...
Software and Systems Engineering Standards: Verification and Validation of Sy...Software and Systems Engineering Standards: Verification and Validation of Sy...
Software and Systems Engineering Standards: Verification and Validation of Sy...
 
ZXCTN 5804 / ZTE PTN / ZTE POTN / ZTE 5804 PTN / ZTE POTN 5804 ( 100/200 GE Z...
ZXCTN 5804 / ZTE PTN / ZTE POTN / ZTE 5804 PTN / ZTE POTN 5804 ( 100/200 GE Z...ZXCTN 5804 / ZTE PTN / ZTE POTN / ZTE 5804 PTN / ZTE POTN 5804 ( 100/200 GE Z...
ZXCTN 5804 / ZTE PTN / ZTE POTN / ZTE 5804 PTN / ZTE POTN 5804 ( 100/200 GE Z...
 
Study on Air-Water & Water-Water Heat Exchange in a Finned Tube Exchanger
Study on Air-Water & Water-Water Heat Exchange in a Finned Tube ExchangerStudy on Air-Water & Water-Water Heat Exchange in a Finned Tube Exchanger
Study on Air-Water & Water-Water Heat Exchange in a Finned Tube Exchanger
 
VIP Call Girls Service Hitech City Hyderabad Call +91-8250192130
VIP Call Girls Service Hitech City Hyderabad Call +91-8250192130VIP Call Girls Service Hitech City Hyderabad Call +91-8250192130
VIP Call Girls Service Hitech City Hyderabad Call +91-8250192130
 
VICTOR MAESTRE RAMIREZ - Planetary Defender on NASA's Double Asteroid Redirec...
VICTOR MAESTRE RAMIREZ - Planetary Defender on NASA's Double Asteroid Redirec...VICTOR MAESTRE RAMIREZ - Planetary Defender on NASA's Double Asteroid Redirec...
VICTOR MAESTRE RAMIREZ - Planetary Defender on NASA's Double Asteroid Redirec...
 
(MEERA) Dapodi Call Girls Just Call 7001035870 [ Cash on Delivery ] Pune Escorts
(MEERA) Dapodi Call Girls Just Call 7001035870 [ Cash on Delivery ] Pune Escorts(MEERA) Dapodi Call Girls Just Call 7001035870 [ Cash on Delivery ] Pune Escorts
(MEERA) Dapodi Call Girls Just Call 7001035870 [ Cash on Delivery ] Pune Escorts
 
Oxy acetylene welding presentation note.
Oxy acetylene welding presentation note.Oxy acetylene welding presentation note.
Oxy acetylene welding presentation note.
 
Internship report on mechanical engineering
Internship report on mechanical engineeringInternship report on mechanical engineering
Internship report on mechanical engineering
 
CCS355 Neural Network & Deep Learning UNIT III notes and Question bank .pdf
CCS355 Neural Network & Deep Learning UNIT III notes and Question bank .pdfCCS355 Neural Network & Deep Learning UNIT III notes and Question bank .pdf
CCS355 Neural Network & Deep Learning UNIT III notes and Question bank .pdf
 
Microscopic Analysis of Ceramic Materials.pptx
Microscopic Analysis of Ceramic Materials.pptxMicroscopic Analysis of Ceramic Materials.pptx
Microscopic Analysis of Ceramic Materials.pptx
 
Call Girls Delhi {Jodhpur} 9711199012 high profile service
Call Girls Delhi {Jodhpur} 9711199012 high profile serviceCall Girls Delhi {Jodhpur} 9711199012 high profile service
Call Girls Delhi {Jodhpur} 9711199012 high profile service
 
OSVC_Meta-Data based Simulation Automation to overcome Verification Challenge...
OSVC_Meta-Data based Simulation Automation to overcome Verification Challenge...OSVC_Meta-Data based Simulation Automation to overcome Verification Challenge...
OSVC_Meta-Data based Simulation Automation to overcome Verification Challenge...
 
9953056974 Call Girls In South Ex, Escorts (Delhi) NCR.pdf
9953056974 Call Girls In South Ex, Escorts (Delhi) NCR.pdf9953056974 Call Girls In South Ex, Escorts (Delhi) NCR.pdf
9953056974 Call Girls In South Ex, Escorts (Delhi) NCR.pdf
 

NDT

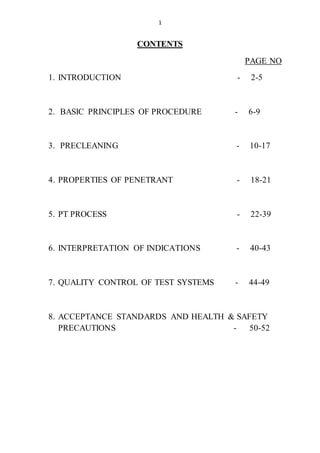
  • 1. 1 CONTENTS PAGE NO 1. INTRODUCTION - 2-5 2. BASIC PRINCIPLES OF PROCEDURE - 6-9 3. PRECLEANING - 10-17 4. PROPERTIES OF PENETRANT - 18-21 5. PT PROCESS - 22-39 6. INTERPRETATION OF INDICATIONS - 40-43 7. QUALITY CONTROL OF TEST SYSTEMS - 44-49 8. ACCEPTANCE STANDARDS AND HEALTH & SAFETY PRECAUTIONS - 50-52
  • 2. 2 ASNT NDT LEVEL II LIQUID PENETRANT TESTING CHAPTER 1 INTRODUCTION MAJOR METHODS OF NDT Many NDT methods have reached a stage of development where a semi-skilled operator, following the detailed procedural instructions, with safeguards built in to the equipment, can use them. The advent of microcomputers allows procedures to be pre-programmed and crosschecked, so that a component operator does not necessarily need to understand the physics of the technique being used. Major methods of conventional Non-destructive testing (NDT) include: 1) Penetrant testing (PT) 2) Magnetic particle testing (MPT) 3) Ultrasonic testing (UT) 4) Radiography testing (RT) There are also ranges of other new techniques that have particular specialized applications in limited fields. They include 1) Eddy current testing 2) Acoustic emission testing 3) Infrared testing 4) Leak testing However, it is desirable that the supervisors of inspection, the designers who specify the techniques to be used in terms of their performance and attainable sensitivity, and the development engineers working on new methods; do have a thorough scientific understanding of their fundamental physics involved. One of the problems in NDT is that there is often too large a choice of methods and techniques, with too little information on performance of each in terms of overall defect sensitivity, speed of operation, running costs or overall reliability. Some NDT methods have been much over-sold in the recent years. However, there are rapid developments made in the computer modelling of electrical magnetic and radiation fields, which appear to have considerable potential in realistically representing the conditions met in practical specimens.
  • 3. 3 The term “non-destructive testing” and “non-destructive inspection” are taken to be interchangeable, but a newer term “non-destructive evaluation” is coming into use. In NDT or NDI in flaw detection applications, the end product is taken to be the description of flaws, which have been detected their nature, Size and location. From this, either in conjunction with a standard for acceptable/reject able flaws, or knowledge, for example fracture mechanism, a decision if then made on the serviceability of the tested item. USE OF NDT Why should we require liquid penetrant inspection? The reasons are the same as those which answer the broader questions, ‘why should management use any non-destructive test? “Typical reasons are 1. To have money, by weeding out defective raw material at receiving inspection, before accepting and paying for it 2. To detect significant flaws that occur during manufacturing, before spending time and money on further processing 3. To improve processing techniques, by checking parts before and after operations 4. To promote safety for the public, and avoid expensive litigation for the manufacturer, by assuring necessary quality in the finished product 5. To promote safety for the workers, by periodic inspection of factory equipment to find defects before they cause failure 6. To obtain quality information economically without deleterious effects 7. To confirm integrity of parts during maintenance overhauls to ensure continued safe operation of machinery or structural components REASONS FOR USING PT Liquid penetrant inspection is often the first Non-destructive testing method management considers for inspection of industrial products because (1) is often requires minimum capital expenditure for implementation, and (2) it can accommodate a variety of test-object materials, shapes and sizes, test locations, and environmental conditions. However, the outcome of a penetrant inspection is largely dependent on the human operator. penetrant inspection is a labour-intensive technique. Therefore, labour constitutes a high recurring inspection cost. In short, the quality of the inspection and the cost of inspection warrant considerable management attention to the selection, training management, and audit of penetrant inspection personnel. Liquid penetrant inspection detects only those discontinuities that are present on or are open to the surface of the part. Therefore, if only surface detects are of interest, liquid penetrant process may be used in the following situations: 1. When the test material is a nonmagnetic metal (such as annealed austenitic stainless steel, titanium, aluminium, magnesium and copper alloys) or a non-metallic material (such as plastics or ceramics)
  • 4. 4 2. When the geometry of the part is such that the shape itself may hide or obscure indications (of surface defects) produced by another Non-destructive test techniques. For instance, a forged steel bracket might have a sharp change of section that test processes such as magnetic particle tests would show non-relevant indications in that area. Or a weld might be so located that a change in thickness could mask the x-ray indication of a shallow surface crack. 3. When the size or shapes of the surface detect is such that it can escape detection by other techniques. An aluminium forging may have a forging lap, almost sealed shut, which is so small that only liquid penetrant inspection can show it. A tiny crack in the radius of a turbine bucket is very difficult to find by any means of other than liquid penetrant inspection. 4. When parts are to be inspected in locations where electric power is not available, or is too expensive or too inconvenient to use, or where the use of electricity creates a safety hazard. When the surface of parts must be checked in the field, perhaps in remote areas, liquid penetrant systems are especially advantageous. However, if the test material is ferromagnetic, magnetic particle tests may offer advantages over penetrant tests in detection of near-surface defects and surface defects that do not permit entry of a liquid penetrant .if test for both internal and surface soundness are required entry then liquid penetrant inspection can be used in addition to other non-destructive test methods such as penetrating radiation, ultrasonic, or eddy current tests. When the decision to use liquid penetrant inspection has been made, which system should be selected? These are varieties of penetrants, penetrant removal systems, developers; there are also many ways to combine these penetrant system elements. The manager must consider his specific application. For the great majority of parts, the conventional water-washable or post- emulsification penetrants are suitable and adequate. However, many factors must be considered when selecting the optimum penetrant system. For example, the preferred system should: 1. Indicate significant flaws open to part surfaces 2. Not adversely affect the material or the part in later service 3. Not cost so much that it is economically unfeasible 4. Not take so much time it unreasonably disrupts production schedules TEST MATERIAL Most materials, both metallic and non-metallic, can be satisfactorily inspected by conventional fluorescent or visible dye penetrants. But austenitic stainless steels, nickel base alloys and titanium (at elevated temperatures) are subject to stress corrosion; for these metals, the penetrant materials should be low in sulphur and in halogens, especially chlorine. There are other materials which are harmed by water; for these a non aqueous system is indicated. Some non-metallic materials are affected by oil-base penetrants or emulsifiers; for these test objects, a water-based penetrant system should be selected.
  • 5. 5 DEFECT SIZE Some penetrant processes can detect discontinuities less than a nanometre in size, but is this extreme sensitivity needed? The optimum penetrant indicates surface flaws that could adversely affect the serviceability of test parts while minimizing non-relevant indications from such causes as surface roughness. To select this optimum system, management must decide which flaws are important: what type, size, and location will really affect service. Prior history from similar parts is very helpful in making such decisions. If the operations is new, or lacking good service records, management can draw on the experience of penetrant system suppliers over the past 30 years. For instance, if small shallow flaws are of major concern, this is not best choice, because trapped penetrant can be washed out of shallow defects so the flaw indications cannot be formed. Sometimes, one part will present a special problem because both large and small defects are of consequence; a special penetrant may be the solution in this case. After having established the size and type of defect that must be found, managers may find that there are several liquid penetrant systems that would probably be equally suitable. Therefore, the choice in this case, will usually be based on cost factors such as the capital investment required, the materials used, the necessity for treating waste water, or the plant space needed for test operations. PARTS TO BE CHECKED After having established the size and type of the defect that must be found, managers may find that there are several liquid penetrant systems that would probably be equally suitable. Therefore, the choice in this case, will usually be based on cost factors such as the capital investment required, the materials used, the necessity for treating waste water, or the plant space needed for test operations.
  • 6. 6 CHAPTER 2 BASIC PRINCIPLES OF PROCEDURE DEFINITION OF LIQUID PENETRANT INSPECTION Liquid penetrant testing is a physical and chemical test used for detecting and making visible to the naked eye surface related discontinuities in non-porous materials. Because of using physical and chemical tests rather than electrical and thermal, it can be used in the field, far from power sources Liquid penetrant inspection is a method that is used to reveal surface breaking flaws by bleed out of a coloured or fluorescent dye from the flaw. The technique is based on the ability of a liquid to be drawn into a “clean” surface breaking flaw by capillary action. After a period of time called the “dwell” excess surface penetrant is removed and a developer applied. This acts as a “blotter”. It draws the penetrant from the flaw to reveal its presence. Coloured (contrast) penetrants require good white light while fluorescent penetrants need to be used in darkened conditions with an ultraviolet “black light”. PURPOSE OF LIQUID PENETRANT INSPECTION Liquid penetrant inspection can be defined as physical – chemical non-destructive inspection procedure designed to detect and expose surface discontinuities in engineering materials. The method can also reveal subsurface discontinuities that have an opening to part of the surface to which the liquid penetrant has been applied. The objective of the liquid penetrant method of flaw detections is to detect cracks, porosity, laps, seams and other surface defects rapidly and economically with a high degree of reliability. The length of the defect on the test surface can be accurately imaged. The depth to which the discontinuity extends below the exposed surface cannot be determined by this method. Evaluation of a discontinuity as a flaw implies its severity, location or orientation and removes the part unserviceable for its intended application. Because liquid penetrant inspection utilizes physical and chemical properties rather than electrical or thermal phenomena, it can be used in the field, far from power sources. Test equipment can be as simple as a small kit of aerosol cans, or as extensive as large mechanized and automated installations. However, in all cases, the success of liquid penetrant inspection is critically dependent upon cleanliness of test material surfaces, absence of contamination or surface conditions that can close the surface openings to discontinuities, and care by test operators to ensure proper techniques and observation of test indications. Also, prior processing during manufacture may inhibit detection of some types of discontinuities by liquid penetrants. For example, many seams and laps are forged shut by the hot rolling or piercing processes that create these elongated discontinuities. Thus, local welding of the metal or trapping of heat-treat products within the opening can inhibit or prevent entry of the penetrant. In this case, magnetic particle inspection offers advantages over penetrant testing of ferromagnetic materials such as steel.
  • 7. 7 EARLIER USE OF OIL AND WHITING METHOD The liquid penetrant test is one of the oldest methods of NDT. It is based on the old oil and whiting process, formerly widely employed on steel parts, particularly in the railroad industry. The oil and whiting method consisted of applying dirty penetrating oil to the test surface, wiping the oil from the surface after a few minutes, and then coating parts with an alcohol-chalk suspension solution. Where cracks existed, the dirty oil speeded through the white coating, thus indicating the presence of discontinuities. Obviously, only gross cracks or surface cavities could be revealed by the oil-stained powder streaks that formed the indications with oil and whiting inspection technique. ADDITION OF VISIBLE DYE AND FLUORESCENT DYE TO INSPECTION PENETRANT When magnetic particle inspection was introduced in the 1930’s, it replaced the oil and whiting method for the inspection of steel or ferromagnetic metal parts because its ability to reveal discontinuities filled or coated with contaminants that could prevent entry and formation of indications by liquid penetrants. However, industries using nonferrous or non- magnetisable metals especially aircraft, needed a far more sophisticated and dependable tool than the older oil and whiting method. As a result, the oil and whiting method was refined. Dyestuffs were introduced in the oil. In 1941, fluorescent dyestuff was placed in the penetrating oil, so the surface discontinuities were visible under ultraviolet light as luminous indications with high brightness contrast. Coloured dyestuff, usually a brilliant red, was later introduced into liquid penetrant inspection media. Linear surface indications appear as streaks, and surface porosity indications were seen as collections of round dots or smears, with either type of indicating trace dye. DEVELOPMENT OF LIQUID PENETRANT INSPECTION Since the 1940’s penetrant inspection has been developed from a method used by very few plants to a method employed in thousands of plants in all types of industries. It has achieved recognition as a basic non-destructive test method. Techniques other than wiping have been found to remove the excess surface oil or penetrant from test objects. Agents other than whiting were found to develop and enhance the flaw indications. As with other inspection techniques, no single penetrant material or process serves best in all test applications in industry. Thus an adequate understanding of penetrant test technology is an invaluable aid to management, test supervision, and test operators who seek to attain optimum results with the variety of material and methods available. BASIC PROCEDURES FOR LIQUID PENETRANT INSPECTION The procedure of penetrant inspection is quiet simple. The penetrant (or inspection liquid) carries a visible or fluorescent dye tracer in a penetrating liquid vehicle. The penetrant test procedure consists of six basic processing steps
  • 8. 8 1. Pre-cleaning and drying of test object surfaces to be inspected 2. Applying liquid penetrant to surface to be inspected, and permitting it to seep into surface discontinuities 3. Removing excess liquid penetrant from test surface 4. Applying developer to test surface to enhance indications formed by penetrant entrapments in discontinuities 5. Inspecting surface for penetrant indications 6. Post-cleaning to remove process residues (in some cases, a treatment to prevent corrosion may be required) These six basic steps are followed regardless of the type of dye (fluorescent or visible colour tracer) used to form the penetrant indications. The fourth step, application of a developer, is sometimes omitted with fluorescent penetrants, but at the price of reduced visibility of indications. Materials that can be inspected by PT Penetrant testing is one the best methods of inspections for all types of surface cracks and porosity in solid non-permeable materials. Laminations and lack of bond between layers of laminated materials can be detected with penetrant can enter and indications can be observed. Penetrant inspection has been used with excellent success on ferrous and nonferrous metals and alloys, fired ceramics and cements, powdered metal products, glass, and some types of plastics and synthetic organic material. Liquid penetrants are employed for detections of leak in tubing, tanks, and components. Advantages of liquid penetrant testing 1. High sensitivity (small discontinuities can be detected). 2. Few material limitations (metallic and nonmetallic, magnetic and nonmagnetic, and conductive and nonconductive materials may be inspected). 3. Rapid inspection of large areas and volumes.
  • 9. 9 4. Suitable for parts with complex shapes. 5. Indications are produced directly on the surface of the part and constitute a visual representation of the flaw. 6. Portable (materials are available in aerosol spray cans) 7. Low cost (materials and associated equipment are relatively inexpensive) Disadvantages of liquid penetrant testing 1. Only surface breaking defects can be detected. 2. Only materials with a relatively nonporous surface can be inspected. 3. Pre-cleaning is critical since contaminants can mask defects. 4. Metal smearing from machining, grinding, and grit or vapour blasting must be removed. 5. The inspector must have direct access to the surface being inspected. 6. Surface finish and roughness can affect inspection sensitivity. 7. Multiple process operations must be performed and controlled. 8. Post cleaning of acceptable parts or materials is required. 9. Chemical handling and proper disposal is required. Limitations of penetrant inspection on smeared metal surfaces Liquid penetrant cannot reveal the location or provide indications of discontinuities on surfaces the have been peened or smeared over by mechanical treatments. Operations such as shot peening, machine honing, dry abrasive blasting, buffing, power wire brushing, or sanding will smear or peen surface layers of metals and shut the openings to discontinuities. Therefore, specifications require pre-penetrant etch, water rinse or drying operations prior to penetrant application. If etching cannot or will not be done prior to the normally scheduled penetrant inspection, then inspection must be done prior to the fore mentioned mechanical operations. Limitations of PT of porous materials Penetrant inspection is difficult or impractical on excessively porous test materials with interconnected porosity networks. Its use on such porous materials would typically result in an overall colour or fluorescent that could mask indications of individual discontinuities. Difficulties can also be encountered when test object surfaces are rough. These tend to trap penetrants so that removal of background colour or fluorescence is difficult or consuming. (Special penetrant material and processing techniques that reduce these undesirable background effects have been developed)
  • 10. 10 CHAPTER 3 PRECLEANING Without adequate removal of surface contaminations, indications from discontinuities may be missed so adequate pre-cleaning of work pieces prior to penetrant inspection is absolutely necessary for accurate results. Hence much of the reliability of inspection depends on the thoroughness of the pre-cleaning process. If any contaminants, or the liquids used for cleaning, or any deposits produced by these liquids, fill the cracks, the discontinuity will not be detected. Reasons for pre-cleaning include 1. May stop the penetrant from entering into the flaw. 2. The penetrant may lose its ability to identify the flaw as it has already reacted with some other component. 3. The surface immediately surrounding the flaw retains enough penetrant to mask the true appearance of the flaw. Types of contaminant Types of contaminants includes, but not limited to: 1. All purposely applied paint and coatings such as plating or sprayed coatings. 2. Scales from heat treatment or welding 3. Welding flux and weld spatters 4. Brazing flux or stop off, and burrs. 5. Dirt or dust that gets settled on the surface of the job. 6. Oils, greases, and other chemical impurities. 7. Polishing components, and other metal chips typically from machine shop. 8. Metal finishing processes such as phosphating, oxidizing, anodizing, chromating, electro deposition, and metalizing. 9. All other components which may prevent a penetrant from entering a flaw. These contaminants are collectively referred to as “soils” Preparation of test parts prior to PT One of the most critical steps in the penetrant inspection process is preparing the part for inspection. All coatings, such as paints, varnishes, plating, and heavy oxides must be removed to ensure that defects are open to the surface of the part. If the parts have been machined, sanded, or blasted prior to the penetrant inspection, it is possible that a thin layer of metal may have smeared across the surface and closed off defects. Also, some cleaning operations, such as steam cleaning, can cause metal smearing in softer materials. This layer of metal smearing must be removed before inspection. Table 3.1 contaminants on the test object surface of contained in voids or discontinuities
  • 11. 11 Type of contaminants Interference effects Removal procedure or treatment Preservative, forming, machining or lubricating oils Most oils fluorescence under black-light; this fluorescence can obscure a true defect indication by a fluorescent penetrant or produce a false indication; oily surfaces also tend to impair the action of the liquid penetrant 1. Vapour degreasing 2. Hot tank alkaline cleaning 3. Steam cleaning 4. Solvent emulsion cleaning 5. Water emulsion cleaning 6. Solvent washing Carbon, varnish, or other tightly held soil Surface soils tend to adsorb or absorb penetrant, resulting in background colour or fluorescence; may also obstruct penetration into defects; impedes wetting action, bridges discontinuities 1. Solvent-type carbon remover 2. Alkaline type removers 3. Wire brushing (caution)* 4. Vapour or sand blasting* Note: agitation such as used in ultrasonic cleaning may be beneficial with above methods Scale, rust, oxides and corrosion products Surface soils tend to adsorb or a absorb penetrant, resulting in background colour or fluorescence; may also obstruct penetration into defects; impedes wetting action, bridges discontinuities 1. Alkaline or acid type removers 2. Wire brushing* 3. Vapour or sand blasting* 4. Electro cleaning Paint coatings Impede wetting; obscure or bridge surface discontinuity openings 1. Solvent-type carbon removers 2. Alkaline type paint removers 3. Abrasive removal procedures* 4. burning *mechanical processes that peen or smear surface material may act to close openings into discontinuities so that penetrant indications cannot be formed. Such abrasive cleaning methods are often prohibited, or require a subsequent acid etching treatment to remove the discontinuity to the part surfaces do that penetrant can enter. A primary requirement for operation for all penetrant processes is that the penetrant must enter the surface openings of discontinuities if it is to identify them by test indications. The inspector must also be able to distinguish indications of significant defects despite background colour of fluorescence. Conditions that can interfere with the entry and penetration of inspection penetrant into discontinuities or which might otherwise affect the process might be classed into three groups: 1. Contaminants on the test surfaces or within the voids and discontinuities open the surface.
  • 12. 12 2. Surface irregularities and texture variations such as roughness, scratches, or smeared metal resulting from forming operations or surface abrasion, as by shot blasting, sanding, or machining. 3. Crack closure stresses associated with fatigue cracks and under external compressive load Undesirable effects of surface contaminants on test objects Unless the test object surface to be inspected is free of soil, foreign material, paint oxides, and other surface contaminants that may cover discontinuities, contaminate the penetrant or perhaps later disguise the indications, reliable penetrant inspection cannot be expected. Obviously, the liquid penetrant test can tolerate no materials or surface conditions that cover the openings into discontinuities and prevent from entering existing defects. Vapour degreasing for removal of soluble contaminants on test objects One of the most common methods for preparing parts to penentrant inspection is vapour degreasing. This process is particularly suitable for removing soluble non-polar contaminants such as mineral oils and greases. Vapour degreasing is not effective for the removal of solid contaminants such as carbon, vanish, paints, scale, corrosion to vapour degreasing, if any of these solid contaminants are involved. Since vapour degreasing usually employs a chlorinated solvent, the aerospace and nuclear industries have become concerned about the effects of vapour degreasing on titanium, austenitic stainless steel and other chloride-sensitive alloys. Some specifications forbid use of the vapour degreasing method of cleaning, thereby eliminating possible effects of chlorine or chlorides resulting from the chlorinated solvents or their decomposition products. Air pollution has become another concern with vapour degreasing. Special equipment and modified processes have been developed to overcome this problem. Other methods for removal of oils and greases from test objects Oils and greases can be removed from test objects by pre-cleaning methods such as steam cleaning, hot alkaline cleaning, solvent washing, solvent emulsion cleaning or water-base emulsion cleaning. Hot alkaline cleaning can be corrosive to metals such as aluminium alloys and sensitized austenitic steels. Oil and grease residues are quite common and, since they inhibit surface action and wetting by the penetrants and also are usually fluorescent to some degree, it is particularly important to remove them completely from test object surfaces prior to processing parts for penetrant inspection. The fluorescence test (examining part surface under black light) can be used as a qualitative test for the presence of residual hydrocarbons. However, this fluorescence test will not reveal contamination by silicones or other saturated oils. The solvent cleaner usually supplied with the hand-wipe penetrant system for removal of excess penetrant may also be adequate for pre-cleaning oil and grease residues from test objects before the liquid penetrant is applied. The operator should make certain that sufficient
  • 13. 13 time has elapsed after use of solvent pre-cleaners for the cleaner to have evaporated completely form any discontinuities that may be present, as well as from the exposed surfaces, before applying liquid penetrant to test parts. Mechanical removal of scale, rust, corrosion products, and oxides Scale, rust, oxides, and other corrosion products must be removed from test parts prior to penetrant inspection. These solid surface contaminants tend to cover defects and may cause confusing indications by trapping and holding penetrant on the surface of the parts. The removal of Scale, rust, oxides should be accomplished by pre-cleaning methods that do not cover the surface openings of the defects that may be present in test parts. Grit blasting with soft grit or gentle hand brushing with clean wire brushes is not particularly objectionable when used on the test object materials with hardness of Rockwell C 40 or greater. Stainless steel brushes are suitable for use n iron base and nickel-base alloys. Generally, abrasive methods are used in surfaces that are file hard. However, such techniques must minimize plastic metal flow to avoid a covering defect at the surfaces. If it is suspected that discontinuity openings may have been closed, some method such as etching should be used to reopen the imperfection prior to testing. Pre-cleaning methods that are not recommended include harsh abrasive removal methods such as shot blasting, sand blasting carbon steel wire brushing, filling, or metal scarping. High-speed rotary brushes should be avoided since they can smear the surface of the metal over defects. These mechanical cleaning methods will cover up discontinuities by peening or smearing of metal on the test object surface, particularly on the soft metals and alloys such as aluminium, titanium, or stainless steels. However, use of abrasive methods of surface preparation is not always avoidable. Where it is found necessary to use abrasive treatments, a chemical etching treatment following abrasive pre-cleaning is required to reopen surface access to discontinuities for reliable inspection. Removal of high-temperature alloy oxides from test objects Unique alloys are employed in the hot section of aircraft jet engineers, rocket chambers, and some nuclear applications. Under the high-temperature operating conditions in which these alloys operate, complex oxide deposits are produced. When these oxides are encountered on the test objects, special removal procedures involving several stages are usually required high-temperature alkaline cleaning processes, fused salts, acid processing, electrolytic cleaning, alkaline oxidizing solutions, and combinations of these cleaning agents and techniques are commonly employed. Vapour honing or dry abrasive blasting with soft, fine particles are commonly required as the final step in the removal of tenacious high-temperature oxides which are integral with the metal surface. Oxide removal is mandatory if inspection of the surfaces by penetrants is to be successful. It is recommended that specialists in removal of these types of oxides be consulted for recommendations and assistance when problems are met. Effects of acid and chromate residues on test objects
  • 14. 14 Acid and chromate residues can absorb black light so that little or no near ultraviolet radiation is left to excite penetrant fluorescence. They can also have adverse effects upon the dyes in inspection penetrants. These chemicals decompose the dyes, thus causing loss of visibility of penetrant indications, and can also form residual products that deposit in the flaws and block penetrant entry. For this reason, it is desirable to rinse thoroughly test object surfaces that been exposed to acids or chromates prior to penetrant inspection. A mildly alkaline neutralizing rinse prior to final water rinsing may also desirable. To avoid any acid reactions, it is preferable to: 1. Conduct penetrant inspections of aluminium alloys prior to their anodizing or conversion coating 2. Conduct penetrant inspections of stainless steel prior to assonating them 3. Conduct penetrant inspections of magnesium alloys prior to applying protective coatings Removal of paint coatings from test surfaces Paint on test objects can obscure or bridge discontinuities in the underlying metal, and must be removed to obtain effective penetrant test indications. Paint removers of various types for both in place and dip tank application are available from manufactures specializing in paint removal. Abrasion methods or ignition are occasionally used for paint removal. Since paint- removal technology is somewhat complex, it is recommended that a reputable supplier of paint removers be consulted for assistance when problems are encountered. While some conventional paints are easily removed without unique procedures, recent advances in paint technology have resulted in finish systems removable only with special products, procedure, and techniques. Factors that influence paint removal include: 1. Surface preparation prior to painting 2. Type of paint primer 3. Type of paint 4. Number of coats of paint 5. Age of cure of the paint finish 6. Type of paint removers used 7. Nature of the substrate Care is required when pre-cleaning critical aircraft structures, since removal of protective coatings may cause premature failure due to corrosion resulting from exposure of the metallic surfaces. Removal of carbon deposits and varnish from test objects Carbon and varnish removal is akin to paint removal in that many of the procedures and products used for removal of paint are also used for removal of carbon and varnish. Solvent- type varnish removers are available for application by brush, spray, or dip tank. Dip tank carbon removers are available for operation of ambient ore elevated temperatures. Carbon may also be removes by alkaline carbon remover products, depending upon the conditions
  • 15. 15 and the nature of the carbonaceous deposits. Mechanical removal means are also employed for soils like carbon and varnish. Removal of water from test objects If the parts have been in contact with water, it is important that this be removed prior to penetrant inspection. Water must be removed not only from the surfaces of test parts but also from within any surface discontinuities that may be present. Otherwise, the water may associated with penetrant inspection equipment is an excellent mean for drying test parts before inspection. Surface water can also be removed with forced air or by simply allowing the surfaces to air dry. Air drying under ambient conditions may take an excessively long time. Auxiliary drying methods are usually used for this reason. If the drying process raises the part temperature above the maximum allowed by the examination procedure, the part must be cooled prior to conducting the penetrant examination. Moisture can drive from many sources, so it is necessary to be its formation or presence at all times. Condensation from high humidity or low temperature conditions may occur and not be denoted unless the operator is alert. During spot cleaning with a volatile solvent, for example, its rapid evaporation may cause cooling of test surfaces to the temperature at which condensation occurs in moist atmospheres. The effect of moisture on test object surfaces is to impede penetrating action when liquid penetrants are applied. Cleaning and preservation of test following PT Following completion of penetrant inspection (and a salvage or repair operation on test parts that contain defects that can be repeated) the acceptable test parts usually must be cleaned to remove the developer coating and all traces of the liquid penetrants or processing materials. Cleaning can be a critical operation on parts to be used in nuclear or liquid oxygen systems where residues of penetrant materials might prove detrimental. Steel and magnesium parts, from which all traces of oil have been removed, may require a new protective coating application to prevent rusting or corroding. If these residues are not removed, they can impair subsequent operations such as soldering, brazing, or welding, or interfere with the application of paint, electroplating, or other surface finishes. It should be noted that during evaporation of penetrant, solvents may be replaced by moisture from the atmosphere; developer powders will also absorb moisture. Either condition can lead to corrosion on some parts (Mg, Al, etc.) Post-inspection removal of penetrant residues from test parts Penetrant residues can be removed by hot tank cleaning procedures provided that these processing materials have not been decomposed by high-temperature baking or extended aging. If process material residues are tightly held within recesses, agitation during cleaning is beneficial and may even be mandatory. Ultrasonic agitation has been found to be particularly effective for penetrant residues that are especially difficult to remove. Cleaning methods
  • 16. 16 They are generally classified as chemical, mechanical, solvent, or therof. The cleaning methods and type of contaminants removed are discussed below: MECHANICAL METHODS Abrasive tumbling Removing light scales, burrs, welding flux, braze stop off, rust, casting mold and core material. It should not be used on soft metals such as aluminium, magnesium or titanium. Dry abrasive grit blasting Removes light or heavy scale, flux stop off, rust, casting mold or core material, sprayed, coating, and carbon deposits, and in general, any friable deposits. Wet abrasive grit blasting Same as dry except where deposits are light; better surface and control of dimensions are required. Wire brushing Removing light deposits of scale, flux, and stop off. This method is generally avoided as there is a chance of the metal chips to be removed may close the discontinuity. High-pressure waterand steam Ordinarily used with an alkaline cleaner or detergent. It removers typical machine shop soils such as cutting oils, polishing components, grease, chips and deposits from electrical discharge machining. Used when surface finish must be maintained. It is inexpensive. Ultrasonic cleaning Ordinarily used with detergent and water or with a solvent. Removes adherent shop soils from large quantities of small parts. Mechanical methods should be used with care, because they often mask flaws by smearing adjacent metal over them or by filling them with abrasive material. This is more likely to happen with soft metals than with hard metals. Hence, before a decision is made to use a specific method, it is good practice to test the method on known flaws to ensure that this will not mask the true flaws. CHEMICAL METHODS Alkaline cleaning Removes typical machine shop soils as cutting oils, polishing components, grease, chips and carbon deposits. Ordinarily used on large articles where methods in hand are too laborious.
  • 17. 17 Acid cleaning Typically known as “etching” uses acid to remove scales and smeared metal pieces due to matching operation. Concentrated solution for removing heavy scales; mild solutions for light scales; weak solution for removing lightly smeared metal is recommended and removing heavy scale. A chemical cleaning method should be carefully chosen to ensure that neither the braze nor the components of the assembly is attacked. SOLVENT CLEANING METHODS Vapour degreasing Removers typical shop soils, oil and grease. Usually employs chlorinated solvents, not suitable for titanium. Solvent wiping Same as vapour degreasing, except a hand operation. May employ non-chlorinated solvents. Used for localized low volume cleaning. Surface finish of the work piece must always be considered. When further processing is scheduled, such as matching or polishing, an abrasive cleaning method is frequently is good choice. Generally chemical cleaning methods have less degrading effects on the surface finish than mechanical methods. The choice of cleaning method is based on such factors as; 1. Type of contaminant to be removed, since one method does not remove all the contaminants equally well. 2. Effect of the cleaning method on the part 3. Practically of the cleaning method for the part, for example, a large part cannot be put into a small degreaser or ultrasonic cleaner. 4. Specific cleaning requirements of the purchaser.
  • 18. 18 CHAPTER 4 PROPERTIES OF PENETRANT PENETRANTS Penetrants are carefully formulated to produce the level of sensitivity desired by the inspector. The penetrant must possess a number of important characteristics: 1. spread easily over the surface of the material being inspected to provide complete and even coverage. 2. Be drawn into surface breaking defects by capillary action. 3. Remain in the defect but remove easily from the surface of the part. 4. Remain fluid so it can be drawn back to the surface of the part through the drying and developing steps. 5. Be highly visible or fluoresce brightly to produce easy to see indications. 6. Not be harmful to the material being tested or the inspector. Penetrant materials are not designed to perform the same. Penetrant manufactures have developed different formulations to address a variety of inspection applications. Some applications call for the detection of the smallest defects possible while in other applications, the rejectable defect size may be larger. The penetrants that are used to detect the smallest defect will also produce the largest amount of irrelevant indications. Standard specifications classify penetrant materials according to their physical characteristics and their performance. PHYSICAL PROPERTIES OF PENETRANT The above mentioned qualities of a penetrant are controlled by the physical properties of the penetrant. They are: Viscosity: viscosity is the property of fluid by virtue of which it offers resistance to relative motion between its different layers. The layer in contact with a fixed horizontal plane will be at rest due to adhesive forces between molecules of liquid and plane. Variations of viscosity 1. Effect of temperature is a factor, which changes the viscosity of a penetrant viscosity tends to decrease with an increase in temperature. 2. Effect of pressure is also a factor which causes considerable change in the viscosity. Viscosity increase with an increase in pressure. Viscosity has no actual bearing on the ability of a penetrant to “penetrate”, although it does affect the rate of preparation. Kinematic viscosity is generally expressed as a ratio of dynamic viscosity and specific mass. Viscosity is measured in square centimetre. One square centimetre per second equivalent to one “stoke”. Viscosity is measured in terms of centistokes (cst). The viscosity of the penetrant should not exceed 5cst. High viscous penetrants have slower rate of penetration; low viscous penetrants drain away too rapidly.
  • 19. 19 Capillarity: the ability of a liquid to rise or fall in narrow openings is due to capillary action. It is demonstrated by a simple experiment, which uses two tubes of varying cross-section. The tubes are then immersed into a container filled with water. It was observed that level of water in the thinner tube rises faster. This experiment proves that, a liquid with a low viscosity penetrates much faster into narrow openings. So cavities, which offer narrow openings, such as a tight crack or fatigue cracks of hairline type are best detected narrow opening. When repeating the experiment with a liquid such as mercury, the level of mercury falls down in the thinner tube. The height to which the liquid is raised is determined largely by surface tension and the wetting ability if the liquid. Also, lifting ability due to capillary action increases, as the diameter of thebore decreases. Capillary forces will be less in a closed tube than in an open tube, because of the air trapped in the former. This can be compare with a discontinuity, which has a closed end on one side. The air that is trapped inside will be dissolved by the penetrant and is diffused at the surface. Fluidity: the ability of a liquid to flow is termed as fluidity. The penetrant should have the ability to drain away from the component well, but without dragging the penetrant from the defects. Surface tension: the force acting per unit length of an imaginary line drawn on the surface on the liquid being normal to the surface is called surface tension. It is the property of a liquid to act like a stretched membrane. Surface tension plays an important role in the effectiveness of a penetrant. High surface tension liquids are usually are excellent solvents and will easily dissolve the dyes but however, low surface tension liquids provide the penetrating power and spreading properties necessary for a good penetrant. Wetting ability: the ability of a liquid to wet the surface is referred to as wetting ability. It is a measure of the area of contact with the surface. This property is dependent on contact angle and surface tension of the liquid. The lesser the contact angle, the higher is the wetting ability. Contact angle of penetrant should preferably be less than 50. One way to quantify a liquid’s surface wetting characteristics is to measure the contact angle of a drop of liquid placed on the surface of the subject object. The contact angle is the angle formed by the solid/liquid interface and the liquid/vapour interface measured from the side of the liquid (Fig 4.1). Liquids wet surfaces when the contact angle is less than 90 degrees. For a penetrant material to be effective, the contact angle should be as small as possible. In fact, the contact angle for most liquid penetrants is very close to zero degrees.
  • 20. 20 Volatility: penetrants should essentially be non-volatile liquids. A small amount of evaporation at the discontinuity could help to intensify dye brilliance and also prevent excessive spreading of indications. However, low volatility is desirable to minimize the losses due to evaporation of penetrants stored in open tanks. Flammability: penetrants should have high flash point as a matter of safety in use. Flashpoint is defined as the lowest temperature at which the liquid gives a flash. When small flame is passed across its surface, the liquid gets heated up and subsequently burns. Flash point of a penetrant should not be less than 1350F. Chemical activity: Chemical activity, we mean, the ability of the penetrant to cause corrosion on the metals which are tested. This is due to presence of halogens, elements which belong of a highly reactive group. Examples of such type of elements are chlorine, fluorine, bromine, and iodine. No penetrant is without the presence of halogens, and should be noted that these can cause corrosion on the metal surface, if not removed. This is the primary reason why post-cleaning operation is essential in penetrant testing. Hence penetrants with presence of halogens are usually restricted on austenitic steels, titanium, and other high-nickel alloys. Drying characteristics: the penetrant must resist drying out, and complete bleed out, during hot air drying of the component after the wash operation has been completed. Ideally, heat should aid the penetrant in promoting a return of penetrant to the component surface in order to produce a sharply defined indication. Density/specific gravity: specific gravity has no significant bearing on a penetrants performance. Most penetrant should have a specific gravity of less than 1. Liquid vehicle properties and penetrating ability of penetrants Unfortunately, there is neither a simple rule for formulating a highly penetrating inspection penetrant nor is there a fixed set of characteristics which, if provided, will ensure a final material that is completely satisfactory. Some properties that would seem absolutely necessary have little or no effect on the ability of the penetrant to enter surface discontinuities, although there may be other reasons for their control. Viscosity of liquid penetrants serves as a good illustration. It would seem logical to assume that a low viscosity, but this is not always true. Many highly viscous liquids are excellent penetrants, while there is numerous low- viscosity liquids that exhibit very little tendency to enter surface openings unless the openings are comparatively large. The chemical composition of the penetrant material also influences the penetrant’s ability to seep into cracks. The penetrating ability of a complete penetrant material is mainly a function of the properties of the liquid carrier or vehicle of the penetrant material. The functions of the liquid carrier or vehicle are to: 1. Hold the dye in solution or suspension
  • 21. 21 2. Distribute the inspection penetrant evenly and completely over the surface to be inspected. 3. Carry the inspection penetrant in to any discontinuities present on the test surface. Volatility of liquid penetrants In addition to inherent penetrating ability of the carrier liquid, numerous secondary qualities are necessary to permit utilization of its penetrating power. The material should have sufficient body to hold the dye throughout the time necessary for penetration to take place. Some penetrants exhibit a certain amount of volatility. It is reasoned that a small amount of evaporation at the discontinuity could help to intensify dye brilliance and also prevent excessive spreading of indications. At the same time, a liquid that is too highly volatile is undesirable the highly volatile penetrants will evaporate rapidly from processing tanks. This evaporation can change the performance characteristics of the penetrant material and release vapours that may be a nuisance or even a hazard. Wetting ability of liquid penetrants Wetting ability is another property that does not seem to correlate directly with ability to penetrant, but does not have an important effect on overall performance. A material that has good wetting properties will spread completely over the surface of the treated part in a smooth, even film despite the presence of a reasonable amount of surface contamination. On the other hand, a liquid of poor wetting characteristics will pull back on itself, leaving areas of the test surface completely devoid of penetrant. When this occurs, discontinuities that may be present in the uncovered areas will not be shown, since there is no indicating material to enter them. This is very important when the test surface is smooth (as with stainless steel forging) Characteristics of a good penetrant 1. Readily penetrate into fine openings 2. Ability to remain in relatively coarse openings 3. Can be applied and removed easily 4. Bleeds from discontinuities when developer is applied 5. Be inert w.r.t materials being tested and to the containers 6. Odourless 7. Exhibit stability under conditions of storage and use 8. Non-flammable 9. Non-toxic 10. Low cost 11. Have performance of colour, when exposed to heat and light
  • 22. 22 CHAPTER 5 PENETRANT TESTING PROCESS Penetrant Penetrant materials come in two basic types. These types are listed below: Type 1- fluorescent penetrants Type 2 – visible penetrants Type 2 penetrants are then classified based on the strength or detectability of the indication that is produced for a number of very small and tight fatigue cracks. The five sensitivity levels are shown below: Level ½ -ultra low sensitivity Level 1 - Low sensitivity Level 1 - Medium sensitivity Level 3 -High sensitivity Level 4 –ultra-high sensitivity Emulsifiers When removal of the penetrant from the defect due to over-washing of the part is a concern, a post emulsifiable penetrant system can be used. Post emulsifiable penetrants require a separate emulsifier to break the penetrant down and make it water washable. Most penetrant inspection specifications classify penetrant systems into four methods of excess penetrant removal. These are listed below: Method A: Water- Washable Method B: Post emulsifiable, Lipophilic Method C: Solvent Removable Method D: Post emulsifiable, Hydrophilic Types of emulsifiers 1. Hydrophilic emulsifiers 2. Lipophilic emulsifiers Hydrophilic emulsifiers are made of a non-ionic substances concentrate, which may be in the form of dry powder or concentrated liquid. They must be dissolved or diluted in water carefully as per manufacturer’s recommendations. Concentration may usually vary from 5 to
  • 23. 23 50 percent emulsifier in water. Hydrophilic or water based emulsifiers are dependent on detergent or dissolving action. So they need a force full water spray to strip away the excess surface penetrant. Lipophilic emulsifiers are oil-based. Their action is chiefly by diffusion of the surface penetrant. The diffusion rate varies depending on the viscosity of the emulsifier. When it is necessary to detect minute defects, high-sensitivity penetrants that are not water washable are usually employed. Such penetrants have an oil-base, and require an additional processing step. An emulsifier renders the excess penetrant soluble in water and hence, capable of being rinsed away. Any penetrant within the flaws is not affected, provided the process is careful controlled. With a viscosity of 100mm2/s react slowly, the time required by them being 2 or 4 minutes, whereas, the emulsifiers with viscosity of 30 to 50 mm2/s react relatively at a faster rate. The time required by them being up to 2 minutes. Emulsification time being as soon as the emulsifier is applied. The length of time that the emulsifier is allowed to remain on the work piece and in contact with the penetrant depends mainly on the type of emulsifier i.e., fast-acting or slow-acting, water-based or oil-based and the surface roughness of the component under inspection. Recommendations from the manufacturers can serve only as guidelines, but the optimum time for the specific work piece is to be determined experimentally. The period range from a few seconds to several minute typically 15 s to 4 min., although a maximum time of 5 min, is established by some specifications. Emulsification time is critical in determining the sensitivity of inspection. If the Emulsification is too short, all the excess penetrant will not be removed properly and hence may lead to misinterpretation of indications. If too long a time is used, penetrant with in the discontinuity will also become water washable and subsequently is rinsed off the surface along with excess penetrant. This could cause even a relevant indication to be missed. Advantages of post-emulsificationpenetrant systems 1. High sensitivity and very fine discontinuities 2. Highly preferable for wide and shallow discontinuities 3. Penetrant easily washed with water after emulsification. 4. Penetrant inside cavities is not over-washed. Disadvantagesofpost-emulsificationpenetrant systems 1. It is step process and requires additional time in making the penetrant water-washable. 2. Separable emulsifications are required additionally, which raises the cost of inspection. 3. It becomes a cumbersome operation to remove penetrants form keyways, threads, blind holes and rough surfaces.
  • 24. 24 Pre-washtechnique for penetrant removal with hydrophilic emulsifiers The Pre-wash or prior-wash technique for removal of excess surface penetrant from test arts is a variation of the post –emulsification technique utilizing hydrophilic emulsifiers. Like the post –emulsification technique, the Pre-wash technique requires us of a non-water-soluble liquid penetrant. The pre-wash technique uses to plain water rinses. The first rinse mechanically removes the bulk of the excess surface penetrant. After this first wash, only a thin film of penetrant held by molecular attraction usually remains on the test part surfaces. The emulsifier is applied following this prior wash. Since there is water carryover from the first wash, only the hydrophilic type of emulsifier is practical for this technique. The hydrophilic emulsifier used with agitation is usually diluted with two to three parts of water. After a brief dwell time in this dilute emulsifier, test parts are given a second water rinse to remove emulsified penetrant from part surfaces. Thereafter, the processing procedure is similar to that for the conventional post-emulsification technique. Since the prior water rinse removes the bulk of the surface penetrant, emulsifier contamination is minimized. Emulsifier diluted with three parts of water leaves only a thin surface film so emulsifier drag-out is reduced. The pre-wash hydrophilic emulsifier technique decreases emulsifier consumption and lowers emulsifier cost. The biggest advantage of this technique may be its improved control of pollution caused by penetrant process waste materials. The residual penetrant removed in the first water rinse is not water soluble. It separates from the rinse water since it is lighter than water. The penetrant waste floats and can ne skimmed off the surface of the water, which prevents discharge of oily waste into sewers and streams. In some cases, the penetrant materials collected in this manner can be recycled and reused. Procedure used in water-washable penetrant process To ensure that inspection is reliable, and remains sufficiently sensitive for the purpose intended, the water-washable penetrant inspection procedure includes the following operational steps: 1. Pre-clean and dry the test surfaces to be inspected. A contaminated surface will not provide reliable penetrant indications. In some cases, etching may be necessary to open up entrapment areas under smeared metal surfaces. 2. Apply penetrant to the dry test parts surface and allow sufficient time (termed “dwell time”) for the surface penetrant to enter the discontinuities to form penetrant entrapments. Penetrant should wet the entire test surface with a uniform liquid film. It should not “pull away” so as to leave bare free from liquid penetrant. 3. Following a suitable dwell time, remove the excess surface penetrant by warm water rinsing with a coarse spray applied at an angle. Rinsing should continue until no traces of residual penetrant are visible on test surfaces when viewed under suitable illumination. If wet aqueous developer it to be used, it should be applied to the wet part surfaces following water rinsing.
  • 25. 25 4. If dry or non-aqueous developers will be used later, dry the test arts thoroughly following removal of excess surface penetrant. If wet aqueous developer was used, dry the test parts as soon as the excess developer coating has drained off the test parts. Over drying may be desirable to dying time. In the drying step, it is necessary to guard against excessive exposure to high temperature. Excessive oven temperature can degrade the dyes in the penetrant and/or evaporate volatile constituents from its liquid vehicle. This can decrease test sensitivity or prevent formation of an indication on subsequent processing by deterioration of trapped penetrant. 5. If aqueous wet developer has not previously been applied to the wet parts, apply dry or non-aqueous developer to the dry test parts. Penetrant is drawn out of discontinuity entrapments to the part surface during the so called “development time”. This penetrant may spread into the developer coating to form enhanced indications. 6. Observe and interpret the penetrant indications of surface discontinuities under suitable illumination. Evaluate each test indication to determine if the indications constitute cause for rejection, rework, disposal, or other action. This materials evaluation must be considered to be an essential step in any inspection process. Solvent technique for hand-wipe penetrant removal The procedure is for the third method of removing penetrant by hand wiping or solvent removal. Materials used to remove excess surface penetrant may be referred to as “removers” or as “cleaners”, so either term may be encountered. The term “cleaning” refers to preparation of the surface prior to inspection and not to the removal of penetrant process residues following completion of the inspection process. The term “remover” is more appropriate to describe the solvents used for removal of excess surface penetrant during processing of the test parts in penetrant inspection. With the solvent removal process, the available removers are often used also for pre-cleaning and for post-cleaning of test objects to remove penetrant processing residues. However, the primary purpose of the solvent removers is removal of excess (non-water-soluble) liquid penetrant prior to application of developer. Removers are normally petroleum-base or chlorinated solvents, but may be any solvent combination. Often an emulsifier contains enough solvencies to function as a remover. Alternatively, a product may be formulated for the express purpose of functioning as either a remover or an emulsifier. Removers are subject to the same precautions in use as those described for use of penetrants and emulsifiers Procedures for hand-wipe solvent removal of surface penetrant Penetrant removers are utilized to remove excess surface penetrant following the penetrant applications. Since they function by solvent action, over-removal may be a problem if remover is used to excess. The recommended “hand wipe” removal procedure includes three steps: 1. Remove the bulk of the penetrant by draining
  • 26. 26 2. Wipe test object surfaces with a dry wiping instrument such as a dry rag or soft absorbent paper. 3. Remove the remaining penetrant residues by wiping with a wiping instrument containing just sufficient solvent to be effective. When fine, shallow discontinuities are under examination on smooth surfaces such as the cracked chrome test panels, dry wiping is sufficient. Se of any remover will result in over- removal of penetrant residues and resultant loss in sensitivity. Caution: the hand-wipe method is difficult to use on test parts with rough surfaces or on recesses such as threads because of the difficulty of wiping to the bottom of small, sharp recesses or cleaning deep grooves. In addition, the cleaning cloth or paper should only be moistened lightly with solvent for removal of surface penetrant residues. Never immerse the cloth in solvent nor saturate it with sprayed –on solvent when removing excess surface penetrant from test parts. The excess solvent would then diffuse into penetrant entrapments within discontinuities, and tend to remove part or all of the penetrant needed to form visible test indications. Cleaner/removers Various solvent compositions are used in cleaner/removers. Basically, they are either flammable and of lower toxicity, or non-flammable and of higher toxicity because of their chlorinated solvent content. Dry developers are inappropriate for use with visible penetrants; they provide no contrast for the test indications. Advantages of the solvent-removable systems 1. Portability 2. Good for spot checking 3. No water required 4. Good on anodized specimens 5. Excellent repeatability Disadvantages of the solvent-removable systems 1. May contain flammable materials. 2. Removal of excess penetrant is time consuming. 3. Materials cannot be stored in open tanks as they are volatile. 4. Difficult to use on rough surfaces such as cast magnesium. SELECTION OF PENETRANT TEST SYSTEMS FLUOROSCENT PENETRANT 1. Water-washable penetrant a. Inspecting large volumes of parts b. For detecting discontinuities that are not wider than their depth.
  • 27. 27 c. For material with rough surfaces. d. Excellent for inspection of threads and keyways 2. Post-emulsifiable penetrants a. Large volumes of parts b. Requirement of high sensitivity. c. Parts contaminated with acid or harmful chemicals, which will harm the materials. d. Parts which may have defects contaminated with in-service soils e. For detection of stress corrosion, inter-granular, and grinding cracks. VISIBLE DYE PENETRANTS 1. Water-washable penetrant a. When lowest sensitivity is required b. When large volumes of parts are to be inspected. 2. Post-emulsifiable penetrants a. more sensitivity is required b. Inspection of large volume of parts, when time is not a constraint. 3. Solvent removable penetrant a. Spot inspection b. Where water wash is not feasible because of part size, weight and surface condition. c. When inspecting small volumes of parts. The appropriate process to be used on any specific application is based on: 1. Extent of flaw sensitivity required 2. Surface finish of the component 3. Compatibility of the materials with the components 4. The size, shape and accessibility of the area to be inspected. 5. The ultimate use of component. The equipment available can be divided into three types as follows: 1. Portable kits for carrying out inspection of small areas; for use on site; these often are contained in pressurized aerosol cans. 2. Fixed installations are used for testing components on a continuous basis, with a series of processing stations in sequential order to form a flow line. Increasingly, these are automated component handling and timing. 3. Self-contained processing booths are used for testing components, which cannot be moved for testing. Dwell time or penetration time The period of time during which penetrate is permitted to remain on the specimen is a vital part of the test. Tis time is often referred to as penetration time or dwell time. Normally this time is dependent on the nature of discontinuities, which are of most importance.
  • 28. 28 Tight crack-like discontinuities may require in excess of 30 in, to give an adequate indication. However, gross discontinuities will produce indication within 3 to 5 min. the temperature of the penetrate and part can affect the dwell time. Warning the specimen to 700F and shortens dwell time. However, care should be taken not to overheat the specimen too much, as this may accelerate the evaporation of penetrate from the discontinuity. Table: Minimum dwell time Material Form Type of discontinuity Penetrant dwell time Developer dwell time Al, Mg, steel, bronze, Ti and high temp alloys Casting welds Cold shuts, porosity, lack of fusion, cracks (all forms) 5 7 Wrought materials extrusions, forgings plates. Laps, cracks (all forms) 10 7 Carbide tipped tools Plastic, glass, ceramics Note: temperature ranges from 500F to 1250F Dwell time are based on the assumption that penetrate will remain wet on the part surface. Additional penetrate also be applied if found insufficient. The penetrate manufacturer will suggest the required dwell time for the particular type of penetrate. DEVELOPER The most important basic function of a developer in penetrant inspection is to extract penetrant from an entrapment within a flaw or surface discontinuity below the test part surface and to transfer at least some of this penetrant to the surface to form a penetrant indication that can be seen by the inspector. The developer may also provide a mechanism whereby the effective thickness of the surface film of penetrant exuded from the penetrant entrapment is increased to levels above the threshold of visibility. Another developer function is to spread or disperse the penetrant at the part surface, thus increasing the apparent size of the indication exposed to the eye. The developer also provides an increase in contrast which enhances detection of an indication.
  • 29. 29 Under black light, the developer appears blue-black while the entrapped penetrant fluorescence yellowish green. Visible dye developers provide a white background for the red or orange penetrant indication. They also reduce light reflection from shiny surfaces of test parts, which can lessen eye fatigue. Developer forms The AMS 2644 and MIL-I-25135 classify Developers into six standard forms. These forms are listed below Form a – dry powder Form b – water soluble Form c – water suspendible Form d – Nonaqueous type 1- fluorescent (solvent based) Form e – Nonaqueous type 2- Visible dye (solvent based) Form f – special applications Actions of Developers in forming penetrant indications Developer action appears to be a combination of solvency effect, adsorption, and absorption (adsorption implies collection by adhesion to a surface. Absorption refers to assimilation of liquid in to the bulk of an absorbent material). The developer powder exerts a combination of adsorptive-absorptive effects on penetrant residue, drawing entrapped penetrant to the test part surface. As the penetrant disperses in the developer powder, it forms test indications that can be readily observed by the inspector. In the case of non-aqueous wet and film-type Developers, solvent action has been shown to play a part in promoting the withdrawal action and enhancing the penetrant test indications. Undesirable actions of improperly applied penetrant Developers Care is required to assure that excess surface penetrant has been removed from test object surfaces and that thin uniform developer coatings of excessive thickness can cover, obscure, or extinguish the fluorescent or visible colour flaw indications by the thick overlying layer of porous powder Developer. A normal effect of Developer layers of appropriate thickness is the lateral diffusion or “bleeding” of penetrant from flaw entrapments. This lateral migration of liquid penetrant through the Developer coating may cause small adjacent flaw indications to eventually become lost within the spreading indications from large flaw entrapments. For this reason, it is often desirable for test operations to examine the test parts soon after Developer application, and periodically thereafter throughout the recommended development time, to observe the initial appearance and growth of defect indications. Techniques for applying dry developer
  • 30. 30 The dry Developer is readily distinguishable from the powder used in water for “wet type Developers” by the very fluffy nature and low-bulk density of dry Developer. In normal use, the dry Developer is blown on to the surface of test parts from which excess penetrant has been removed and surfaces have been completely dried. A “flock-type” spray gun or an electrostatic spray gun can be used to apply this dry powder. Alternatively, fluidized bed systems create clouds of dry powder which are effective in coating dry test parts with a thin film of Developer. The powder cloud can be created when a small amount of dry Developer powder is agitated by means of an air blast from the bottom of the dry Developer tank. In other cases, test operators dip dry test parts into tank of fluffy dry Developer powder. With each application system, and especially when dipping parts into dry powder, excess Developer is removed either by blowing it off with air or by shaking the test objects. The fine adhering dry Developer particles tend to absorb residual entrapped penetrant and draw it from discontinuities. Penetrant indications usually appear within a few minutes after Developer application as entrapped penetrant bleeds back into contaminated with excess penetrant left on test parts. Visual examination of the Developer powder under black (near-ultraviolet) light will show fluorescent indications of this contamination. This simple check should be made periodically and contaminated Developer replaced with fresh clean Developer when needed. Advantages of dry Developer The major advantage of using dry Developer is the simplicity of handling it. It is easy to apply (even though assurance of coverage is absent). Dry powder Developer is in no way corrosive, and it gives off no hazardous vapours. It leaves no film behind to hinder subsequent processing or operations. Disadvantages of dry Developer An obvious disadvantage of dry Developer is their extreme dustiness which requires air cleaning equipment and/or the use of respirators. Because dry developers leave an invisible film, it is often impossible to determine if a test surface has been adequately covered without voids in the developer coating. A subtle, but extremely important disadvantage of dry powder developer stems from the fact that the test surface must be dried before developer application. Excessive drying at test piece temperatures over 60 0C (140 0F) for 10 min or longer can evaporate a significant portion of the entrapped residue is more viscous and may have shrunk to the point where it cannot contact the developer at all and so an indication cannot be developed. Solvent developers avoid this failure to form indications because the solvent reaches the diminished entrapment and leaches it to the surface. Aqueous developers do not encounter this problem because the heating does not take place until the developer is already in position. Types of aqueous wet developers
  • 31. 31 Two types of aqueous wet developers are in common use in penetrant inspection. The first consists of insoluble developer particles suspendible in water, while the second contains a developer that is actually soluble (or dilutable) in water. The suspended wet aqueous developer is mixed into water in a concentration recommended by its manufacturer. Frequent stirring or agitation may be needed to prevent the developer powder from settling out of its water suspension. The water-soluble or dilutable wet developers are prepared merely by diluting them with water in the proportions recommended by their manufacturers. These developers are applied to test parts in the same manner as the wet aqueous suspension developers just described. With soluble developers, agitation is not required to maintain uniform consistency after the developer has been initially mixed with water. Aqueous wet developers usually contain wetting agents and corrosion inhibitors to minimize attack on test objects and penetrant processing equipment. When applied by dipping or flowing, the thickness of the dried developer coating on test objects after evaporation of the water vehicle is determined by the concentration of developer in the water. With spray application of aqueous wet developer, coating thickness must be carefully controlled. If a heavy coating thickness tends to obscure or hide penetrant test indications. And so reduces the reliability of penetrant inspection. Techniques for applying aqueous wet developer Wet aqueous powder developer can be applied to test part surface that have previously been processed by penetrant application, dwell time, and removal of excess surface penetrant by water washing. The preferred method of application of wet developer is dry spraying it directly onto test parts. No provision is made for collecting overspray or dripping of excess developer for reuse, since these developer residues could be contaminated with penetrants or emulsifiers. Manufacturers do not recommend dipping test pieces aqueous developer solutions. Aqueous developers necessarily contain wetting agents and function much like dilute hydrophilic remover stations. Not only does the additional and unwanted re-removal occur, but the removed penetrant also contaminates the developer with its fluorescence. Flow-on application is also to be avoided for the same reason. Since the developer is in water suspension or solution, it is possible to apply it to test objects whose surface penetrant has been removed by water spraying without requiring intermediate drying of the test parts. Following the application of aqueous wet developer, test parts are normally dried in ovens operating at temperatures adequate to evaporate the water from the surface, to leave a uniform coating of dried developer. Care is required to assure that an excessive amount of wet developer is not applied since a high build-up of developer coating will obscure or hide flaw indications. Much less build-up occurs with soluble developers since only a limited amount of soluble developer can be dissolved in water. Techniques for drying of wet aqueous developer coatings
  • 32. 32 It is preferable to heat test part surface after the application of wet aqueous developers in order to promote drying into uniform coatings. Many users refer to apply the wet developer suspension by spraying it onto the test part surface resulting from the post emulsification or water-washable removal process. Following the developer application, the surface is oven dried to promote evaporation of water from the developer coating. As with drying operations using other developers, test piece temperature should not exceed 60 0C (140 0F). Indication dimming by heat is minimal, and the test pieces can be handled less cautiously. Advantages of using aqueous developers Aqueous developers give of no noxious and/or flammable vapours and no annoying or hazardous dusts, and thus require no use of elaborate safety equipment. Compared to solvent developers, harmless and inexpensive water is being driven off, not costly and hazardous solvents. Whereas dry developers do not produce visible coatings, aqueous developers have the advantage of making the extent of developer coverage visible. If there is a void in coverage, it is obvious. Disadvantages of using wet aqueous developers The wetting agent functions as a penetrant remover when aqueous developer is applied by dipping or flowing onto test parts. As a result, wet developers must be applied with some care to prevent developer loss and contamination. Spraying can lead to a non-uniform coating of developer, leaving some areas devoid and others with excessive coating which can hide indications. Being liquid, aqueous developers flow (like solvent developers) before being fixed by drying, and may fill up recesses with gross excess of developer. Avoidance of this requires care in application and positioning test pieces. A further disadvantage of those aqueous developers that contain insoluble pigments in suspension is that the dried developer is difficult and sometimes impossible to remove after the inspection. This interfaces with subsequent processing of test objects. Compared with solvent-based developers, aqueous developers suffer a disadvantage (shared with dry developers) in that there is no solvent action to assist informing indications, only capillary action. This makes aqueous (and dry) developers noticeably less sensitive that some solvent developers. Advantages of water-soluble wet developers A recent innovation in wet developers has been the introduction of a type that is water soluble rather than being suspendable. This feature eliminates the necessity of agitating the developer to keep undissolved solids in suspension while retaining the other advantages of the wet developer. Drying results in a uniform film which perform the developer function. The soluble wet aqueous developers eliminate the disadvantages of streaks and excessively heavy developer coatings. In addition, since the dried developer coating is water soluble, it is much easier to remove the developer coating during post-cleaning as compared with the insoluble water-suspended developer coating. Disadvantages of water-soluble wet developers
  • 33. 33 The water soluble wet developer also retains some of the disadvantages of the suspension type powder developer. It does not have much solvent action. Dip application may result in local accumulations or non-uniform developer film, thus impairing penetrant test sensitivity. It has also been found that some types of water-soluble developers may tend to shift light emitted by fluorescent penetrants towards the blue end of the visible spectrum, reducing the visibility of the fluorescent penetrants. However, recent improvements in water-soluble developers have improved visibility of fluorescent indications. Water-soluble developers (like all wet aqueous developers) are not preferred, although they can be used with caution with water-washable penetrants. Such usage tends to cause blurring of flaw indications since penetrant entrapments are subject to detergent action and removal by wetting agents in the developer system. Techniques for application of non-aqueous wet developer Another common developer type is so-called “non-aqueous” suspended in a volatile solvent. The volatile solvent tends to pull penetrant from indications by solvent action. It also accelerates drying so that a supplementary drying operation is not required. However, the test part surface must be completely dried before applying the non-aqueous developer. A thin film of the non-aqueous wet developer is desirable to give the ultimate in sensitivity. Electrostatic spray gun or a fine atomizing spray from a paint spray gun will provide this fine developer coverage. As with the suspension type wet developer, it is necessary to agitate the non-aqueous wet developer prior to use to ensure that developer particles fully suspended. Agitation before application is essential with non-aqueous wet developer s package in spray cans. The use of non-aqueous developer results in indications with high visibility and enables reliable detection of smaller flaws. Techniques for application of film-type developer The film-type developer, as the name implies, forms a plastic film over the penetrated area as it dries. It is normally spay applied, as with the non-aqueous wet type, and the solvent carrier acts to draw penetrant into the developer film. As the film dries, the exposed penetrant indications set in a pattern indicative of the discontinuities in the surface being inspected. This film provides a permanent record of the discontinuity pattern and can be peeled from the surface and retained for reference. Resolution of the film-type developer is of a high order, but its use is somewhat restricted to special applications because of the labour involved in stripping the film from test parts. This is more difficult than the ordinary tank-type removal methods used for other types of developer. Safety consideration for developers All of the developers produced as dry powders offer, to some extent, the possibility of personnel inhalation of developer dust. The extremely fine particle size of the dry developer makes it the most likely to be airborne in reasonably high concentrations. Preferably, this product should be applied in a well-ventilated area or within a hood equipped with an exhaust system to reduce inhalation hazard. Use of the non-aqueous wet developer also involves some
  • 34. 34 hazard because of inhalation of the solvent carriers in which the developer particles are suspended. The solvent carriers are normally either relatively flammable, relatively toxic, or both. Precautions for use of flammable or toxic solvents should be observed when using non- aqueous type developers. Sensitivity ranking of developers Sensitivity ranking (highest to lowest) Ranking Developer form Method of application 1 Non-aqueous wet solvent spray 2 Plastic film spray 3 Water-soluble spray 4 Water suspendible spray 5 Water-soluble immersion 6 Water suspendible immersion 7 dry Dust cloud (electrostatic) 8 dry Fluidized bed 9 dry Dust cloud (air agitation) 10 dry Fluidized bed Reference: ASNT non-destructive testing-handbook DRYINGOF JOBS Drying is effective as water traces on the surface can prevent proper absorption of penetrant and is necessary prior to applying non-aqueous developer or following the application of aqueous developer. Drying time will vary with the size, and number of parts under examination. Drying modes Parts can be dried using a hot-air re-circulating oven, a hot or cold air blast, or by exposure to ambient temperature, particularly when excess penetration is removed with a solvent. Drying is best done in a thermostatically controlled recirculating hot-air drier. Local heating or cooling of parts is permitted, provided, the temperature of the part remains in the range of 50- 100 0F for fluorescent methods, and from 50-125 0F for visible methods. Drying oven temperature should be carefully controlled and should not exceed 71 0C (160 0F). Drying time limits The parts are not allowed to remain in the drying oven any longer than is necessary to dry the surface. Normally, times over 30 min. In the drier may impair the sensitivity of the examination. Viewing conditions A minimum light intensity of 50-foot candles (500 lux) is necessary to ensure adequate sensitivity during the examination and evaluation of indications.
  • 35. 35 Fluorescent penetrants With fluorescent penetrants, the process is essentially the same as that of a colour contrast penetrant. The exception being that, the examination of fluorescent indication is performed using an ultraviolet light called a black light. The examination shall be performed as follows: 1. It shall be performed in a darkened area. 2. The examiner shall be in the darkened area for at least 1 min prior to performing the examination to enable his eyes to adapt to the darkness. When the inspector is in sudden darkness, the cornea of the eye tends to open up, enabling too much light coming to the eyes of the operator. This will not enable him to see the smallest indication properly, thereby reducing the sensitivity. 3. The examiner is also not allowed to wear glasses or lens which are photosensitive. This may minimize the reflection from the smallest indications, reducing the sensitivity. 4. The black light should be allowed to warm up from a minimum of 5 min. prior to the measurement of the intensity of the ultraviolet light emitted.’ 5. Contrast spectacles made with lenses of sodium glass, give an increased contrast with fluorescent penetrants and block the objectionable UV or black light. 6. The intensity of black light is measured with a light meter, a digital radiometer. A minimum of 1000 microwatts/cm2 is required on the surface of the part being inspected. 7. The black light intensity shall be measured at least once in every 8-hour shift, and whenever the workstation is changed. INDICATION The appearance of indication is a major factor, which allows the operator to interpret the indication. However, a thorough knowledge of various process and defect associated with a particular process, aids the interpreter in determining the exact nature of the indications. The types of discontinuities that they show characterize the indications. The size and concentration (number of indications in an area) determine the sensitivity. A tight crack, such as a fatigue or a stress-corrosion crack, can show a bluish-white indication by a fluorescent penetrant, whereas white crack indication using the same penetrant, will show a greenish-yellow indication. The reason for this being that a tight crack is too small for the colour forming dye to penetrant. Hence, the light, which is reflected, has a wavelength, which falls in the bluish-white range of the light spectrum. The type of developer can significantly influence the appearance of indications, as follows: 1. A dry developerwill provide a sharper, less spreading indication with better resolution of individual indications in areas of high concentration of indications. 2. Wet developer provides a broader indication, as the uniform coat of powder provides for more lateral spreading of the penetrant into the developer. A group of indications,
  • 36. 36 such as cluster porosity, can spread and merge into one single large indication, thereby reducing the resolution. 3. Solvent suspendible developers will provide sharp indications with good resolution, if applied uniformly. A heavier coating of solvent-suspendible developers will be used with the colour contrast penetrants that provide sharp indications, which will continue to bleed out and fade in colour w.r.t time. Variables that influence the persistence of indications 1. Pre-cleaning methods (traces of acids or alkalis on the surface can fade indications) 2. Type of penetrant and its dye system. 3. The processing procedure-over washing. 4. Concentration of emulsifier and dwell time. 5. Type of developer Visibility of penetrant test indications Probably the one factor most responsible for the effectiveness of a penetrant is its visibility, often referred to as brightness, contrast, or brilliance. Carefully conducted experiments with glass plates clamped together and viewed under monochromatic light have shown that penetrant materials of only “medium”or “low” performance can enter openings that are smaller in width. Penetrant was determined to have entered to a point where the plates were separated by only 130 m. Taking into consideration the extremely small amount of penetrant contained in a discontinuity of this size, and the fact that only a small portion of this penetrant can be bleed back t the surface to become visible. It is obvious that everything that will enhance visibility should be utilized if maximum penetrant test performance is to be obtained. Contrast of visible dye penetrant indications In the case of visible dye penetrants, increasing indication visibility means incorporation the largest possible quantities of dye in the penetrant vehicle and choosing the most intense dye colours with the highest contrast w.r.t the background against they will be viewed. In nearly
  • 37. 37 all cases, this contrast is heightened by forming and using the developer in such a manner that developer (1) Serves to ring penetrant out of the discontinuity and (2) Also covers the surface with a smooth, light-coloured coating which the indication stands out sharply. All of the visible dye penetrants presently in use make themselves perceptible to the eye in one of two ways-either be reflecting a considerably smaller amount of light than the background or by reflecting light of a different colour than the background (colour contrast). The incident light is neither all absorbed by the penetrant, nor does the background reflect all the light that strikes in. The actual contrast ratios are extremely difficult to measure but have been estimated at from 10:1 to 20:1; the maximum contrast theoretically obtainable. Contrast of fluorescent penetrant test indications In that case of fluorescent penetrant flaw indications, visual perceptibility is enhanced by light emission mechanisms within the penetrant indication, and conditions of viewing are quite different. Using brightness contrast, the bright yellow-green indication is seen against a nearly black or at least a very dark background. The indication itself is actually a source of light which, even though small, is quite intense. Contrast can be exceptionally high. Some estimates give it a value as high as 100:1 or even much greater, since it is the presence of light compared to obscene of light With fluorescent penetrants, the most effective way to increase visibility and improve resolution of fine discontinuities is to increase the fluorescent brilliance of the substantial of visible light, so that the background remains unseen. Visibility of fluorescent penetrant indications From the point of view of colour contrast, most fluorescent penetrants provide yellow or yellow-green indications against a black background. This has been proven by research into visibility of such objects as highway signs to be one of the most “seeable” combinations possible. The normal human eye has its highest sensitivity in fine source of light of high brightness. Under this condition are generally viewed in the substantial absence of visible light, so that the background remains unseen. Background fluorescent caused by rough or porous surfaces In some practical applications where the test object surface is porous or rough, fluorescent penetrant tends to be retained on the surface as well as in discontinuities. This condition reduces contrast between the background and indications and may impair discrimination. For this reason, a compromise between the removability of surface penetrant and intensity of fluorescent is necessary to reduce the background fluorescent to a practical limit. Physiological effect of black lights
  • 38. 38 Of interest to hygiene directors and safety engineers are the effects of black light on the operator. It has been rather conclusively demonstrated that black light in the wavelength range normally used for inspection purpose can cause no permanent damage to person exposed, so long as recommended filters are used on the black lights. Effect of black light radiation wavelengths The 365 nm (3650 A0) near-ultraviolet wavelength is well out of the range where physiological effect takes place. Such effects as damage to the eye, sunburn and destruction of tissue do not come into evidence until wavelengths are reduced to the neighbourhood of 320 nm. Here they become definitely injurious. Placement of light sources in penetrant inspection booth Consideration should be given to the disposition of lights with in an inspection booth and to the effect upon an operator of placement of light sources. While black light will not damage the eye permanently, some of the layers of the eyeball exhibit strong tendencies to fluorescent. If the inspections light are placed so that its rays fall directly or are reflected in to the eyes operators, this eyeball fluorescence can become extremely annoying and will impair inspector effectiveness to a very marked degree. Use of special filtering eyeglasses will increase operator perception and reduce fatigue. Yellow-tined eyeglasses filter out the black light before it reaches the eyes, yet they do not reduce the visibility of fluorescent indications. Human factors influencing detection of penetrant indications Since the human eye is the usual signal receptor in all visual tents and inspection techniques, the inspector’s visual limitations control the detecting ability (or “see-ability”) of penetrant test indications. Defects with dimensions as small as 25 µm (0.001 in.) have been found regularly in critical penetrant inspection. Use is sometimes made of magnifying glasses (3X to 10X magnification) in observation of smaller penetrant indications. However, penetrant operators and inspectors should have regular eye examinations to determine colour sensitivity, brightness contrast sensitivity, threshold of detection, and other visual factors influencing ability to discriminate between test indications and background conditions. Some theoretical considerations w.r.t the human eye’s response to penetrant indications have been proposed, but relatively little work has been reported on the correlation of visual acuity with reliability of seeing penetrant indications. RECORDING OF INDICATION Penetrant indications can obviously be photographed, or video recorded with CCTV camera. As with magnetic indications, with specialized method can be photographed to retain some identifying background. The dry indication can be lifted off the surface with a transparent adhesive tape or a replica can made of the surface with a process called Replica Transfer Coating (RTC). This is a resin a volatile solvent, a white pigment and a silicone depending
  • 39. 39 agent. RTC is applied instead of developer, by aerosol spray, and allowed to dry. After drying, the edges are trimmed with knifes, and the replica is placed off. POST CLEANING Some residues will remain on the work piece after the penetrant inspection is completed. These residues can result in the formation of voids during subsequent welding or stop-off brazing, in the contamination of surfaces or in unfavourable reactions in chemical processing operations. Postcleaning is particularly important where residual penetrant materials weight combine with other factors in service to produce corrosion. A suitable technique, such as a simple water spray, water rinse, machine wash, vapour degreasing solvent soaking, or ultrasonic cleaning may be employed. If it is recommended to remove the developer, it should be carried out as promptly as possible, preventing fixing of developer. LIMITATIONS OF PERFORMANCE OF PENETRANT SYSTEMS With properly processed specimens of solid, non-porous materials, detection of surface discontinuities by the penetrant inspection method is limited only by the experience, concentration, and visual acuity of the penetrant inspector and by the performance capabilities of the penetrant system being used. The interpretation of the observed test indications requires competent test operators who have been properly trained and qualified for the specific inspection tasks involved. Such inspectors and their supervisors should be certified to appropriate levels of capability. These personnel also be familiar with the materials to be tested, their prior fabrication and processing, and their intended uses and service conditions. CHAPTER 6 INTERPRETATION OF INDICATIONS Interpretation of penetrant indications
  • 40. 40 The term Interpretation and evaluation are often confused by testing personnel. Actually, the terms to two entirely different steps in the testing process. To interpret an indication means to decide what condition caused it. It may be a crack, porosity, lack of bond, or merely penetrant remaining on the surface due to some no relevant cause. Evaluation follows interpretation. If a discontinuity exists, its effect on the usefulness of the article requires evaluation. i.e., the article is either accepted as is reworked, or scrapped. The success and reliability of the Interpretation and evaluation of liquid penetrant test is not method by which a specimen is processed through a machine that separates the good article from the bad. Testing personnel are required to carefully process each specimen, interpret indications, evaluate the seriousness of discontinuities and determine disposition. Classification of indications 1. Relevant indications 2. Non-relevant indications 3. False indications Non-relevant indications Outside the realm of truly indications there is a category of non-relevant indications, which testing personnel can recognize. These are true indications in the sense that they are caused by surface discontinuities, but the discontinuities are there by design and are in way a true discontinuity to some feature of the assembly that accounts for their presence. Some feature of assembly such as articles that are press fitted, keyed, spilled, or riveted are cause for the indications. Non-relevant indicationsinclude those that appear on articles that are press-fitted, keyed, splined, riveted, or spot welded together and those appearing on castings as a result of loosely adherent scale or a rough surface due to burned in sand. Such Non-relevant indications, however, must be carefully examined since they may interfere with correct interpretation. Non-relevant indications are actual surface discontinuities that in most cases are there by design. Loose scales or a rough surface on a forging or a casting can also cause them. The operator normally identifies them, by looking at the design drawing or sketches. Loose scales are often identified when the operator, before the actual inspection of the work piece, carries out a usual visual inspection. Any indication believed to be No relevant, shall be termed as relevant, until it is confined by re-examination by the same or different NDT method Non-relevant indications are: 1. Weld inspector arc welds spherical or surface 2. Incomplete penetration filet welds open, full weld length 3. Surface expulsion resistance welds raised metal at weld edge 4. Scuff marks scam welds surface of seam welds 5. Press-fit interface press fits outlines press fits 6. Braze runoff brazed parts edge of excess braze