How to upgradeOntap Simulator
“It’s easy and it’s fun”
ashwinwriter@gmail.com
Nov, 2019
2.
Please forgive mygrammar and English!
It's real, it's fun and it's easy to upgrade NetApp Ontap Simulators!
In this article, I am going to patch my Ontap Simulator from 9.6 to 9.6P4.
Advisory:
1) First thing first, take a VMware level snapshot of the simulators (My simulators runs on VMware
workstation), I have two Node cluster so I took a snapshot individually on both simulators. This will
prevent you from building another simulator from scratch if in case it crashes and fails to bootup,
saves time and why would spend time fixing simulators…makes no sense to me!
2) Download the Ontap Production Image from the NetApp Support site under Downloads section,
go straight to this screen towards the bottom. Enter the version you want and go.
3) You will need an ftp or http server from where you can download the image on to the cluster
node. I found it very easy to use ‘free mongoose web browser’, its free to download and one button
install.
4) Make sure there is enough room in the root vols of the Node, or clean up some files there if need
be. This is required for 'system node image get' command, as it puts the image on the mroot.
5) We cannot use Automated ‘Cluster image update’ or validate commands, b’cos this is not a true
cluster as in the way true ‘HA’ works with Cluster Interconnect. Therefore, we will use the ‘system
node’ command to upload the image. Anyway, who cares about it (HA), a Simulator is a Simulator
which allows you to test the OS and Software features as bundled in the production image. This itself
is a great gift from NetApp.
Steps:
ONTAP96::> set -privilege advanced
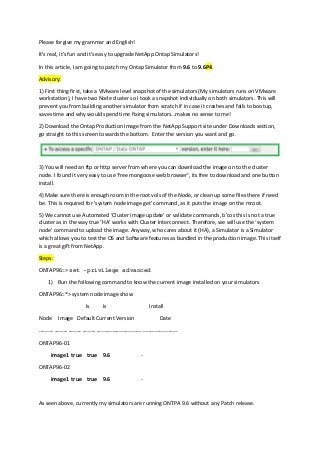
1) Run the following command to know the current image installed on your simulators
ONTAP96::*> system node image show
Is Is Install
Node Image Default Current Version Date
-------- ------- ------- ------- ------------------------- -------------------
ONTAP96-01
image1 true true 9.6 -
ONTAP96-02
image1 true true 9.6 -
As seen above, currently my simulators are running ONTPA 9.6 without any Patch release.
3.
2) Run thefollowing command to download and install the 9.6P4 image on to the individual
node from the web browser or ftp server you have locally provisioned (In my case I had it on
my makeshift web browser). Make sure you apply the switches ‘-replace-package true -
setdefault true . To be honest, replace-package is not needed, b’cos we have only one image
currently on the Node, however setdefault is needed.
[Nice to know: setdefault ensures that the image being loaded becomes the default boot image or
not; if not specified, the boot image will not change until modified]
This command downloads and installs the software image:
ONTAP96::*> system node image update -node ONTAP96-01 -package
http://192.168.0.10/96P4_q_nodar_image.tgz -replace-package true -
setdefault true
Software update started on node ONTAP96-01. Updating image2 with package https://protect-
eu.mimecast.com/s/YB8uCQ7mgi6rXEFPw2-K?domain=....
Downloading package. This may take up to 10 minutes.
2% downloaded
4% downloaded
99% downloaded
100 % downloaded
Download complete.
Listing package contents.
Decompressing package contents.
Invoking script (install phase). This may take up to 60 minutes.
Mode of operation is UPDATE
Current image is image1
Alternate image is image2
Versions are compatible
Available space on boot device is 1478 MB
Required space on boot device is 680 MB
Kernel binary matches install machine type
external keymanager check script has run successfully.
Getting ready to install image
4.
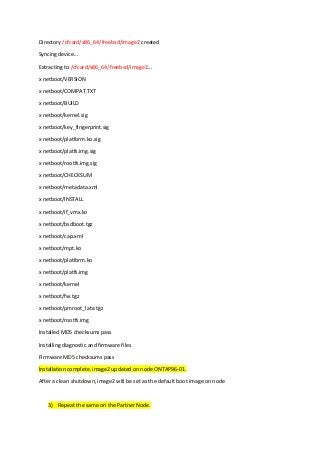
Directory /cfcard/x86_64/freebsd/image2 created
Syncingdevice...
Extracting to /cfcard/x86_64/freebsd/image2...
x netboot/VERSION
x netboot/COMPAT.TXT
x netboot/BUILD
x netboot/kernel.sig
x netboot/key_fingerprint.sig
x netboot/platform.ko.sig
x netboot/platfs.img.sig
x netboot/rootfs.img.sig
x netboot/CHECKSUM
x netboot/metadata.xml
x netboot/INSTALL
x netboot/if_vmx.ko
x netboot/bsdboot.tgz
x netboot/cap.xml
x netboot/mpt.ko
x netboot/platform.ko
x netboot/platfs.img
x netboot/kernel
x netboot/fw.tgz
x netboot/pmroot_late.tgz
x netboot/rootfs.img
Installed MD5 checksums pass
Installing diagnostic and firmware files
Firmware MD5 checksums pass
Installation complete. image2 updated on node ONTAP96-01.
After a clean shutdown, image2 will be set as the default boot image on node
3) Repeat the same on the Partner Node.
5.
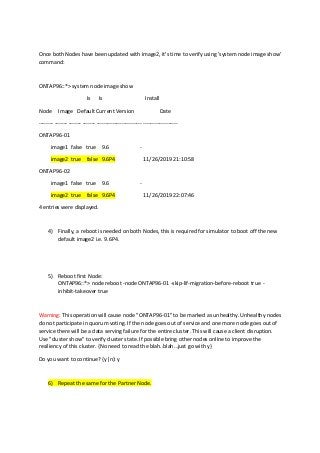
Once both Nodeshave been updated with image2, it's time to verify using 'system node image show'
command:
ONTAP96::*> system node image show
Is Is Install
Node Image Default Current Version Date
-------- ------- ------- ------- ------------------------- -------------------
ONTAP96-01
image1 false true 9.6 -
image2 true false 9.6P4 11/26/2019 21:10:58
ONTAP96-02
image1 false true 9.6 -
image2 true false 9.6P4 11/26/2019 22:07:46
4 entries were displayed.
4) Finally, a reboot is needed on both Nodes, this is required for simulator to boot off the new
default image2 i.e. 9.6P4.
5) Reboot first Node:
ONTAP96::*> node reboot -node ONTAP96-01 -skip-lif-migration-before-reboot true -
inhibit-takeover true
Warning: This operation will cause node "ONTAP96-01" to be marked as unhealthy. Unhealthy nodes
do not participate in quorum voting. If the node goes out of service and one more node goes out of
service there will be a data serving failure for the entire cluster. This will cause a client disruption.
Use "cluster show" to verify cluster state. If possible bring other nodes online to improve the
resiliency of this cluster. {No need to read the blah..blah…just go with y}
Do you want to continue? {y|n}: y
6) Repeat the same for the Partner Node.
6.
Once both Nodesare rebooted successfully (In case it does not come up for whatever reasons, we
have a fall-back option i.e vm snapshot to go back and start all over again), login to cluster as you
normally do via Cluster_mgmt LIF and check the version, it should now report '9.6P4'.
ONTAP96::> version
NetApp Release 9.6P4: Thu Nov 07 01:50:36 UTC 2019
ONTAP96::>
TIP: The packages we downloaded using ‘system node’ command can be seen under :
/mroot/etc/software on both nodes. [It’s under your root vol, hence make sure there is enough
space on root vol, delete snapshots and disable snap schedule on this vol, or expand if you could]
In case you are doing a Production Filer upgrade: Then of Couse the preferred method is using
‘ANDU’ cluster image update commands. However, the packages under ../software will not show up
when you do ‘cluster image package show-repository’ command. If you want it to show up then you
can copy the packages using:
ONTAP96::*> cluster image package get -url file:///mroot/etc/software/96P4_q_nodar_image.tgz
Package download completed.
Package processing completed.
Now, if you do ‘cluster image package show-repository’ command, it will show up.
ashwinwriter@gmail.com
Nov, 2019


![2) Run the following command to download and install the 9.6P4 image on to the individual
node from the web browser or ftp server you have locally provisioned (In my case I had it on
my makeshift web browser). Make sure you apply the switches ‘-replace-package true -
setdefault true . To be honest, replace-package is not needed, b’cos we have only one image
currently on the Node, however setdefault is needed.
[Nice to know: setdefault ensures that the image being loaded becomes the default boot image or
not; if not specified, the boot image will not change until modified]
This command downloads and installs the software image:
ONTAP96::*> system node image update -node ONTAP96-01 -package
http://192.168.0.10/96P4_q_nodar_image.tgz -replace-package true -
setdefault true
Software update started on node ONTAP96-01. Updating image2 with package https://protect-
eu.mimecast.com/s/YB8uCQ7mgi6rXEFPw2-K?domain=....
Downloading package. This may take up to 10 minutes.
2% downloaded
4% downloaded
99% downloaded
100 % downloaded
Download complete.
Listing package contents.
Decompressing package contents.
Invoking script (install phase). This may take up to 60 minutes.
Mode of operation is UPDATE
Current image is image1
Alternate image is image2
Versions are compatible
Available space on boot device is 1478 MB
Required space on boot device is 680 MB
Kernel binary matches install machine type
external keymanager check script has run successfully.
Getting ready to install image](https://image.slidesharecdn.com/howtoupgradeorpatchontapsimulator-191129125654/85/How-to-upgrade-ontap-simulator-3-320.jpg?cb=1575032305)
![Once both Nodes are rebooted successfully (In case it does not come up for whatever reasons, we
have a fall-back option i.e vm snapshot to go back and start all over again), login to cluster as you
normally do via Cluster_mgmt LIF and check the version, it should now report '9.6P4'.
ONTAP96::> version
NetApp Release 9.6P4: Thu Nov 07 01:50:36 UTC 2019
ONTAP96::>
TIP: The packages we downloaded using ‘system node’ command can be seen under :
/mroot/etc/software on both nodes. [It’s under your root vol, hence make sure there is enough
space on root vol, delete snapshots and disable snap schedule on this vol, or expand if you could]
In case you are doing a Production Filer upgrade: Then of Couse the preferred method is using
‘ANDU’ cluster image update commands. However, the packages under ../software will not show up
when you do ‘cluster image package show-repository’ command. If you want it to show up then you
can copy the packages using:
ONTAP96::*> cluster image package get -url file:///mroot/etc/software/96P4_q_nodar_image.tgz
Package download completed.
Package processing completed.
Now, if you do ‘cluster image package show-repository’ command, it will show up.
ashwinwriter@gmail.com
Nov, 2019](https://image.slidesharecdn.com/howtoupgradeorpatchontapsimulator-191129125654/85/How-to-upgrade-ontap-simulator-6-320.jpg?cb=1575032305)