Email server configuration on cisco packet tracer
•
0 likes•694 views

here we configured the mail server on cisco packet tracer

Recommended
Recommended
More Related Content
What's hot
What's hot (20)
Similar to Email server configuration on cisco packet tracer
Similar to Email server configuration on cisco packet tracer (20)
Recently uploaded
Recently uploaded (20)
Email server configuration on cisco packet tracer
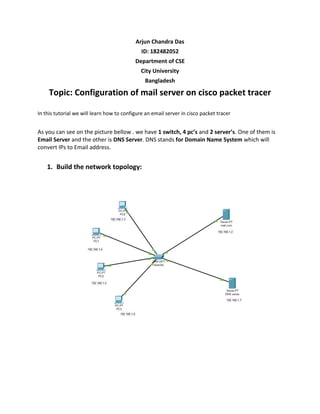
- 1. Arjun Chandra Das ID: 182482052 Department of CSE City University Bangladesh Topic: Configuration of mail server on cisco packet tracer In this tutorial we will learn how to configure an email server in cisco packet tracer As you can see on the picture bellow . we have 1 switch, 4 pc’s and 2 server’s. One of them is Email Server and the other is DNS Server. DNS stands for Domain Name System which will convert IPs to Email address. 1. Build the network topology:
- 2. 2. Configure IP addresses on the PC’s ,DNS Server and the Mail Server: Mail Server: IP Address: 192.168.1.2 Subnet mask: 255.255.255.0
- 3. PC0: IP Address: 192.168.1.3 Subnet mask: 255.255.255.0
- 4. PC1: IP Address: 192.168.1.4 Subnet mask: 255.255.255.0
- 5. PC2: IP Address: 192.168.1.5 Subnet mask: 255.255.255.0
- 6. PC3: IP Address: 192.168.1.6 Subnet mask: 255.255.255.0
- 7. DNS server: IP Address: 192.168.1.7 Subnet mask: 255.255.255.0 3. Now configure mail clients on the PCs and mail service on the generic server: Mail Clients: Click on PC0. Go to its Desktop tab, and click on Email. Configure the email client by filling in the user, server and login information. Be sure to Save.
- 8. PC0: Configure mail client on PC1 in a similar way we did for PC0.
- 9. PC1: Configure mail client on PC2 in a similar way we did for PC0.
- 10. PC2: Configure mail client on PC3 in a similar way we did for PC0.
- 11. PC3: Next, we’ll configure the email server. To do this, click on the server, then click Services tab, pick email server from the menu. Provide the Domain name of the server then click on Set to set it. In this example I’ve used the name ‘mail.com’ Add users and provide their passwords. I have four email clients(users) with usernames ‘client1’ and ‘client2’ ‘client3’ ‘client4’ with a common password ‘12345678’
- 12. After entering a username and password, click on Add(+) to add the user to the server. You can optionally remove a user by clicking on Remove (-). You can change a user’s password by clicking on change password. Now, notice that we set a domain name for the email server. For that reason, we should have a DNS server that will resolve this domain name (plus other domain names if there were) to an IP address.
- 13. So let’s configure a DNS server. Click DNS server, click Services tab, then pick DNS. Turn the service ON. Set name-address pairs and add them to the server. You can view the DNS entry below:
- 14. 4. Finally test the email service. Go to PC0 email client, compose an email and send its to PC1 email address (robel@mail.com). Try to see whether the email from PC0 is received on PC2. On the email client of PC2, click on Receive.
- 15. If everything is well set up, the email from PC0 will be well received on PC2. I hope you found the tutorial helpful. Leave your comments bellow. All the best.