SlideShare a Scribd company logo
1 of 103
INSTALLATION, OPERATION AND MAINTENANCE
GUIDELINE FOR TORQUE FLOW PUMP
SR CONTENTS
1 GENERAL
2 CONSTRUCTION FEATURES
3 CHECK FOR TRANSIT DAMAGE
4 STORAGE
5 DRAWING
6 INSTALLATION INSTRUCTION
7 OPERATION
8 TROUBLE SHOOTING
9 MAINTENANCE & TECHNICAL DATA
10 STUFFING BOX
11 MECHANICAL SEAL
12 OVERHAULING
13 SPARE PARTS
INSTALLATION, OPERATION AND MAINTENANCE
GUIDELINE FOR TORQUE FLOW PUMP
1. GENERAL
Torque flow pumps are design and manufactured to rigid Specification as per customers specific requirement of speed, capacity, pressure
and Temperature.
Torque flow pump have following features.
I. Unobstructed passage to discharge size of the pump
II. Handle large size of solids and long fibers
III. Low maintenances cost, no sealing rings on impeller, no small clearances to be maintained
IV. Vibration free running due to hydraulically balanced construction
V. Handles, abrasive slurries etc
VI. Low leakage
When pumps are properly installed and properly care taken during operation, maintenance and repair, pump will give long trouble free
satisfactory service.
INSTALLATION, OPERATION AND MAINTENANCE
GUIDELINE FOR TORQUE FLOW PUMP
2. CONSTRUCTIONAL FEATURES
CASING: Nickel chrome steel having a hardness of 500 to 500 BHN. Casing with slotted flanges throughout, is smooth and of extra heavy
section designed for UNOBSTRUCTED.
FLOW: Abrasive or solids-laden flow goes directly into vortex of liquid and out to the discharge. There are no close clearances casing and
Impeller (as in conventional pumps) to generate wear and nothing is between suction and discharge to jam, clog, break or bend. Flanges are
drilled as per DIN 2543, 2533, ND-16/ any other standards.
IMPELLER: Nickel Chrome steel having a hardness of 500 to 550 BHN. Impeller is fully recessed out of flow path and is not subjected to
wear by solids or abrasive particles churning in the flow when handling solids or slurries thus greatly improving Impeller life.
STUFFING BOX: Nickel Chrome steel having a hardness of 500 to 550 BHN. It accommodates Gland Packing to control leakage of liquid
being pumped.
SHAFT: Heavy duly shafts are designed for maximum operational heads and low deflection and vibration.
SHAFT SLEEVE: Shaft sleeve is keyed to shaft and gasket sealed to stop leakage under sleeve.
BEARINGS: Angular contact ball thrust bearings carry radial and thrust loads. Thrust bearings are back to back mounted, locked with nuts
and lock washers. Oil lubrication is standard. Constant level oiler maintains proper oil level. Bearings are well protected from dirt. Grease
lubrication can also be provided.
INSTALLATION, OPERATION AND MAINTENANCE
GUIDELINE FOR TORQUE FLOW PUMP
2. CONSTRUCTIONAL FEATURES
MATERIAL OF CONSTRUCTION
PARTS NAME ALL CAST IRON 02S FITTED CF 8 FITTED CF 8M FITTED
HIGH CHROME
FITTED
Volute Casing Cast Iron Cast Iron CF 8 CF 8M Hi-Chrome Steel
Impeller Cast Iron CF 8 CF 8 CF 8M Hi-Chrome Steel
Stuffing Box Cast Iron Cast Iron CF 8 CF 8M Hi-Chrome Steel
Shaft EN 8/SS 410 SS 410 SS 410 SS 316 SS 410
Sleeve SS 410 SS 410 SS 410 SS 316 SS 410
Bearing Housing Cast Iron Cast Iron Cast Iron Cast Iron Cast Iron
INSTALLATION, OPERATION AND MAINTENANCE
GUIDELINE FOR TORQUE FLOW PUMP
3. CHECK FOR TRANSIT DAMAGE
On receipt of pump visual check should be done, the main items to be checked are.
I. Broken or cracked equipment, including base, motor or pump feet and flanges.
II. Bent shaft.
III. Broken motor end cover, motor fan, bent eye bolt or conduit box.
IV. Missing Parts.
INSTALLATION, OPERATION AND MAINTENANCE
GUIDELINE FOR TORQUE FLOW PUMP
4. STORAGE
If pump is not to be installed and operated soon after arrival, store it in a clean dry place with slow changes in
ambient temperature. Protect the pump from moisture, dust, dirt and foreign bodies. During storage following
precautions to be taken.
I. Ensure that the bearings are packed with recommended grease to prevent moisture from entering around
shaft.
II. Ensure that suction and discharge opening of the pumps and other openings are covered with cardboard or
other material to prevent foreign objects entering the pump.
III. If pump is to be stored in open or where there is no other suitable covering, cover the unit with tarpaulin or
other suitable covering.
IV. Rotate the shaft usually every week to prevent corrosion of the bearing surfaces and the stuffing box/shaft
seal faces due to moisture.
V. If pump is to be stored for long time then before installing change the grease and gland packing.
INSTALLATION, OPERATION AND MAINTENANCE
GUIDELINE FOR TORQUE FLOW PUMP
5. PUMP ASSEMBLY WITH GLAND PACKING DRAWING - 1
INSTALLATION, OPERATION AND MAINTENANCE
GUIDELINE FOR TORQUE FLOW PUMP
5. PUMP PARTS NAME FROM DRAWING - 1
P.NO. PARTS NAME P.NO. PARTS NAME P.NO. PARTS NAME
01 BODY 26 GASKET (CASING - GLAND PLATE) 49 OIL LEVEL WINDOW
02 IMPELLER 26A GASKET (GLAND PLATE - SEAL PLATE) 50 OIL DRAIN PLUG
03 GLAND PLATE 28 GASKET 52 HEX. HD CAP SCREW
05 GLAND BUSH 31 GASKET 53 GRIP SPRING
06 SLEEVE 32 OIL SEAL 54 BREATHER
09 INNER BRG. COVER 33 BEARING 55 NAME PLATE
10 PUMP SHAFT 34 BEARING 56 RIVETS(NAME PLATE)
11 BEARING HOUSING 35 O RING 57 O RING
12 OUTER BRG. COVER 36 BRG. LOCK WASHER 58 GASKET (IMP. NUT - IMP.)
13 FOOT 37 BRG. LOCK NUT 182 SEAL PLATE
14 IMP. WASHER 38 OIL SEAL 183 MECHANICAL SEAL (TYPE-82)
15 BOLT FOR IMPELLER 44 HEX.HD.BOLT WITH NUTS & S.P. WASHER
17 SLINGER 45 PLUG/COOLING CONNECTION
18 IMPELLER KEY (BOTH END ROUND) 46 HEX.HD.BOLT WITH NUTS & S.P. WASHER
24 IMPELLER NUT 47 HEX. HD CAP SCREW
25 GASKET (IMP. WASHER - NUT) 48 DRAIN PLUG
INSTALLATION, OPERATION AND MAINTENANCE
GUIDELINE FOR TORQUE FLOW PUMP
5. PUMP ASSEMBLY WITH MECHANICAL SEAL DRAWING - 2
INSTALLATION, OPERATION AND MAINTENANCE
GUIDELINE FOR TORQUE FLOW PUMP
5. PUMP PARTS NAME FROM DRAWING - 2
P.NO. PARTS NAME P.NO. PARTS NAME P.NO. PARTS NAME
01 BODY 26 GASKET (CASING - GLAND PLATE) 49 OIL LEVEL WINDOW
02 IMPELLER 26A GASKET (GLAND PLATE - SEAL PLATE) 50 OIL DRAIN PLUG
03 GLAND PLATE 28 GASKET 52 HEX. HD CAP SCREW
05 GLAND BUSH 31 GASKET 53 GRIP SPRING
06 SLEEVE 32 OIL SEAL 54 BREATHER
09 INNER BRG. COVER 33 BEARING 55 NAME PLATE
10 PUMP SHAFT 34 BEARING 56 RIVETS(NAME PLATE)
11 BEARING HOUSING 35 O RING 57 O RING
12 OUTER BRG. COVER 36 BRG. LOCK WASHER 58 GASKET (IMP. NUT - IMP.)
13 FOOT 37 BRG. LOCK NUT 182 SEAL PLATE
14 IMP. WASHER 38 OIL SEAL 183 MECHANICAL SEAL (TYPE-82)
15 BOLT FOR IMPELLER 44 HEX.HD.BOLT WITH NUTS & S.P. WASHER
17 SLINGER 45 PLUG/COOLING CONNECTION
18 IMPELLER KEY (BOTH END ROUND) 46 HEX.HD.BOLT WITH NUTS & S.P. WASHER
24 IMPELLER NUT 47 HEX. HD CAP SCREW
25 GASKET (IMP. WASHER - NUT) 48 DRAIN PLUG
INSTALLATION, OPERATION AND MAINTENANCE
GUIDELINE FOR TORQUE FLOW PUMP
6. INSTALLATION INSTRUCTION
All installations should be performed by experienced personnel in placement, alignment and
connection of pumping equipment.
Before installing the pump clean the suction and discharge flanges.
Remove the protecting coating from the pump shaft.
If the pump has been in storage remove grease from the bearings and the bearing shaft then be
flushed with carbon tetrachloride or kerosene and re‐lubricated.
INSTALLATION, OPERATION AND MAINTENANCE
GUIDELINE FOR TORQUE FLOW PUMP
6. INSTALLATION INSTRUCTION
SR STEPS FOR INSTALLATION OF PUMP
6.1 LOCATION AND HANDLING
6.2 FOUNDATION
6.3 MOUNTING AND LEVLLING
6.4 ALIGNMENT OF COUPLING
6.5 GROUTING
6.6 PIPING
6.6.1 SUCTION PIPING
6.6.2 DISCHARGE PIPING
6.7 AUXILIARY PIPING CONNECTIONS AND GAUGES
6.7.1 CONNECTION OF COOLING WATER PIPING
6.7.2 MECHANICAL SEALS
6.8 FINAL COUPLING ALIGNMENT
6.9 ROTATION
INSTALLATION, OPERATION AND MAINTENANCE
GUIDELINE FOR TORQUE FLOW PUMP
6.1 LOCATION AND HANDLING
I. The pump should be installed as near to the fluid as possible so a short direct suction Pipe can be used to keep
suction losses to minimum.
II. It possible, locate the pump so that fluid will flow to the suction by gravity.
III. The discharge piping should be direct and with few elbows and fitting as possible.
IV. The total net positive suction head available (NPSHA) which includes the suction lift and pipe friction losses must be
greater than NPSHR by the pump.
V. The pump and drives (Motor) should be location in an area that will permit periodic inspection and maintenance.
VI. Head room and access room should be provided and all units should be installed in a dry location with adequate
drainage.
NOTE: Do not pick up the complete unit by the drive or pump shaft or eye bolts.
To lift pump a chain or suitable lifting device should be used and attached to each corner of the base.
INSTALLATION,
OPERATION AND
MAINTENANCE
GUIDELINE FOR TORQUE
FLOW PUMP
6.2 FOUNDATION
1. The foundation should be of sufficient
strength to absorb any vibration and to form
a permanent rigid support for the base
frame.
2. This is important to maintain alignment in
direct coupled unit.
3. A concrete reinforced solid leveled surface
base is recommended.
4. The foundation bolt of proper size with
sleeve should be embedded in concrete (FIG
3).
5. A pipe sleeves about two and one half
diameters larger than the bolt should be
used to allow movement for final adjustment
of the foundation bolt.
INSTALLATION,
OPERATION AND
MAINTENANCE
GUIDELINE FOR TORQUE
FLOW PUMP
6.3 MOUNTING AND LEVELLING
1. Lower the unit onto the foundation
and position the base frame so that
bolts are aligned with holes in the base.
2. The coupling halves should always be
disconnected and never reconnect
them until all the alignment operations
are completed.
3. Set the base frame on metal shims
or metal wedges placed directly under
the base frame carrying weight and
spaced close enough to give uniform
support and stability (FIG 4).
INSTALLATION,
OPERATION AND
MAINTENANCE
GUIDELINE FOR TORQUE
FLOW PUMP
6.3 MOUNTING AND LEVELLING
4. Adjust the metal shims or
wedges until shaft of the pump
and motor are leveled and are
aligned with each other, check
coupling faces, suction and
delivery flanges for horizontal and
vertical position by means of spirit
level.
5. Make sure all shims and wedges
are in firm contact with the base.
6. Tighten the foundation bolts
but not too firmly and recheck the
shaft for alignment before
grouting.
INSTALLATION, OPERATION AND MAINTENANCE
GUIDELINE FOR TORQUE FLOW PUMP
6.4 ALIGNMENT OF COUPLING
I. Before starting work on the pump, make sure that the power supply has been switched off
and that it can not be accidently switched on.
II. Disconnects coupling halves.
III. Set the required gap between coupling faces depending upon the coupling size.
IV. Carry out alignment of the motor by placing shims of different thickness under the motor, if
possible replace several thin shims with one thick shim.
INSTALLATION,
OPERATION AND
MAINTENANCE
GUIDELINE FOR TORQUE
FLOW PUMP
6.4 ALIGNMENT OF COUPLING
I. Angular: shaft with axes
concentric but not parallel.
A. To check for angular alignment
insert a pair of inside caliper
or a taper gauge at four points
at 90.C interval around the
coupling (See Fig 7).
B. Angular alignment show that
all points of the coupling are
within (+)or(-) 0.2 mm of each
other.
INSTALLATION,
OPERATION AND
MAINTENANCE
GUIDELINE FOR TORQUE
FLOW PUMP
6.4 ALIGNMENT OF COUPLING
II. Parallel: shaft with axes parallel but
not concentric.
A. To check parallel alignment place a
straight edge across both coupling
rims at the top, bottom and both
sided (See Fig 8).
B. After each adjustment recheck all
features all alignment ,parallel
alignment is correct when the
measurement show that all point
the coupling faces are within
(+)or(‐) 0.2 mm of each other.
INSTALLATION,
OPERATION AND
MAINTENANCE
GUIDELINE FOR TORQUE
FLOW PUMP
When the alignment is correct the foundation bolts should
be tightened evenly.
The unit should then be grouted to the foundation.
The foundation bolt should not be tightened until grout is
hardened, usually 48 hrs after pouring.
Grouting compensates for uneven foundation, distributes
weight of unit, minimizes vibrating and prevents shifting of
unit.
Use an approved non shrinking grout and pumping unit
should be grouted by experts.
6.5 GROUTING
 Unless other vise specified,
the base frame must be
completely filled with grout
and the leveling wedges
grouted in place. The product
warranty may be void if these
instructions are not followed.
INSTALLATION,
OPERATION AND
MAINTENANCE
GUIDELINE FOR TORQUE
FLOW PUMP
6.5 GROUTING
The mix required varies with the
type of unit to be grouted,
location and amount of grout,
grout unit as follows.
1. Build a form of thick plan around the
foundation to contain the grout.
2. Sock top of concrete foundation
thoroughly then surface water.
3. Fill the form with grout up to the top
edge of the base frame see (Fig 9).
4. While pouring tamp liberally in order to
fill all the cavities and preventing air
pockets.
INSTALLATION,
OPERATION AND
MAINTENANCE
GUIDELINE FOR TORQUE
FLOW PUMP
6.5 GROUTING
5. After the grout has thoroughly has dined
tighten the foundation bolts and connect the
piping.
6. Ensure that the piping does not exert any
strain on the pump flanges.
7. Check the alignment after piping is
connected and foundation bolts are
tightened.
8. If realignment is required, disconnect the
piping first then proceed with alignment.
9. Reconnect the piping after alignment has
been completed and recheck the alignment
before connecting the coupling (Fig 10).
INSTALLATION, OPERATION AND MAINTENANCE
GUIDELINE FOR TORQUE FLOW PUMP
6.6 PIPING
Caution-1 All piping connections must be made with the pipe in free supported state and without the need to apply
vertical or side pressure to obtain alignment of the piping with pump flange.
Caution -2 After all the piping is connected, the pump and driver alignment is re- checked.
All piping should be independently supported near the pump so that pipe strain will not be transmitted to the pump
casing.
The weight of the piping and contained liquid must be considered in support design.
The suction and discharge piping should be one or two sizes larger than pump flange sizes especially, where the piping is
of considerable length.
The size of suction and delivery pipe is increased to decrease the loss of head from friction and for the reason piping
should be arranged with a minimum bends as possible, as these should be made with a long radius wherever possible.
The pipe should be free from scales, welding slag etc and have to be mounted in such a way that they can be connected
to suction and delivery flanges without any stress on pump.
INSTALLATION,
OPERATION AND
MAINTENANCE
GUIDELINE FOR TORQUE
FLOW PUMP
6.6.1 SUCTION PIPE
I. The suction pipe must be air tight
and use flooded suction only.
6.6.2 DELIVERY PIPE
I. A check valve and sluice should be
installed in the discharge line, the
check valve is installed between
pump and sluice valve is to protect
the pump from excessive pressure
and prevents reverse rotation
through the pumping case of failure
of driving unit (FIG-7 & 8).
II. The sluice valves are used in primary
stating and when the pump is shut
down.
NOTE: The Pump must never be throttled by
the use of valve in the suction line.
INSTALLATION, OPERATION AND MAINTENANCE
GUIDELINE FOR TORQUE FLOW PUMP
6.7 AUXILIARY PIPING CONNECTIONS AND GAUGES
PUMP TAPPING CONNECTION CHART
CODE DESCRIPTION LOCATION OF CONNECTION
A Gauge Connection‐Discharge side On Pump discharge flange side
B Gauge suction side or vacuum equalizing connection On suction flange side
C Circulation line connection from casing On Pump discharge driving side
D Pump casing drain On Pumps casing bottom side to wards suction
E1 Stuffing box sealing inlet On casing cover bottom right
E2 Stuffing box sealing outlet On Casing cover top left
H Oil feeding plug On bearing housing top
K Oil level indicator On bearing housing left
M Bearing housing oil drain On bearing housing left
N Drip pan drain On lantern Bracket bottom right
F1 Mechanical seal flushing, cooling inlet On SEAL PLATE
F2 Mechanical seal flushing, cooling outlet On SEAL PLATE
INSTALLATION,
OPERATION AND
MAINTENANCE
GUIDELINE FOR TORQUE
FLOW PUMP
6.7 AUXILIARY PIPING
CONNECTIONS AND GAUGES
 In addition to primary
piping connection, pump
may require connection
to the water seal ring and
mechanical seal stuffing
box drain, discharge and
pressure gauge
connection all these
connected now be
installed (Fig-8A, 8B).
INSTALLATION, OPERATION AND MAINTENANCE
GUIDELINE FOR TORQUE FLOW PUMP
6.7.1 AUXILIARY PIPING CONNECTIONS AND GAUGES
Quench Gland:-
I. Most pumps which contain stuffing box packing have quench glands.
II. Quenching prevents heat transfer along the pump shaft to the bearings.
III. Quenching is also most important for smothering vapors and fumes given off at the stuffing box.
IV. This is particularly true on applications such as hot water.
V. The quenching liquid (usually water) must be from an outside source.
VI. It should be piped, with flexible pipe, into the tapped opening on top of the stuffing box gland.
VII. A shut-off valve should be installed.
INSTALLATION, OPERATION AND MAINTENANCE
GUIDELINE FOR TORQUE FLOW PUMP
6.7.1 AUXILIARY PIPING CONNECTIONS AND GAUGES
Bearings:-
I. Bearing cooling is available on some units.
II. When it is available, cooling water must be connected to the jacket when pumping hot
liquids.
III. Valves should be installed in the coolant supply lines to regulate the flow.
INSTALLATION, OPERATION AND MAINTENANCE
GUIDELINE FOR TORQUE FLOW PUMP
6.7.1 AUXILIARY PIPING CONNECTIONS AND GAUGES
Stuffing Boxes:-
I. Some units are equipped with cooling jackets around the stuffing box as standard.
II. It is optional on various other models.
III. Coolant lines are connected in the same manner as the bearing cooling lines.
INSTALLATION, OPERATION AND MAINTENANCE
GUIDELINE FOR TORQUE FLOW PUMP
6.7.1 AUXILIARY PIPING CONNECTIONS AND GAUGES
Casing Pedestals:-
I. On some models, water cooled pedestals are available. Connection of coolant lines is made in
the same manner as above.
INSTALLATION, OPERATION AND MAINTENANCE
GUIDELINE FOR TORQUE FLOW PUMP
6.7.2 MECHANICAL SEALS
Seal materials (carbon, ceramic, Teflon, etc.) are suitable for use at temperatures to 500ºF. (212º
to 250º F If seal has rubber parts).
However, for satisfactory operation, there must be a liquid film between the seal faces to
lubricate them.
If the liquid flashes to vapor, the faces will run dry and be damaged.
To prevent this, the liquid must be cool.
In general, this requires that the liquid be cooled so that the vapor pressure is well below the
stuffing box pressure.
INSTALLATION,
OPERATION AND
MAINTENANCE
GUIDELINE FOR TORQUE
FLOW PUMP
6.7.2 MECHANICAL SEALS
Some methods which may be
used to cool the seal are:
1. Dead Ended Seal Chamber:
I. No liquid is circulated
through the stuffing box.
II. The isolated or “dead
ended” liquid around the
seal is cooled by
circulating water in the
stuffing box jacket, if any.
INSTALLATION,
OPERATION AND
MAINTENANCE
GUIDELINE FOR TORQUE
FLOW PUMP
6.7.2 MECHANICAL SEALS
2. Cool Liquid Flushing (External Source):
I. A clean, cool compatible liquid is injected
from an outside source directly into the seal
chamber.
II. The flushing liquid must be at a pressure 20
to 40 PSI greater than the pressure in the
stuffing box.
III. One half to two GPM should be injected.
IV. A control valve and rotometer placed in the
inlet line permits accurate regulation.
V. Cooling water can be circulated through the
stuffing box water jacket (If any) in addition to
the external flush.
INSTALLATION,
OPERATION AND
MAINTENANCE
GUIDELINE FOR TORQUE
FLOW PUMP
6.7.2 MECHANICAL SEALS
3. Cool Liquid Flushing (Product Cooling):
I. In this arrangement, pumped liquid is
piped from the pump casing, cooled in
an external heat exchanger, then
injected into the seal chamber.
II. A control valve together with a
rotometer and /or a dial thermometer
should be installed in a line from the
exchanger to the seal chamber.
III. One-half to two GPM should be
circulated.
IV. Cooling water, one to three GPM,
should be circulated through the
stuffing box jacket, if any.
INSTALLATION,
OPERATION AND
MAINTENANCE
GUIDELINE FOR TORQUE
FLOW PUMP
6.8 FINAL COUPLING
ALIGNMENT
I. Angular: shaft with axes
concentric but not parallel.
A. To check for angular alignment
insert a pair of inside caliper
or a taper gauge at four points
at 90.C interval around the
coupling.
B. Angular alignment show that
all points of the coupling are
within +‐ 0.2 mm of each
other.
INSTALLATION,
OPERATION AND
MAINTENANCE
GUIDELINE FOR TORQUE
FLOW PUMP
6.8 FINAL COUPLING ALIGNMENT
II. Parallel: shaft with axes parallel but
not concentric.
A. To check parallel alignment place a
straight edge across both coupling
rims at the top, bottom and both
sided.
B. After each adjustment recheck all
features all alignment ,parallel
alignment is correct when the
measurement show that all point
the coupling faces are within +‐ 0.2
mm of each other.
INSTALLATION,
OPERATION AND
MAINTENANCE
GUIDELINE FOR TORQUE
FLOW PUMP
6.9 ROTATION
I. Before connection the
coupling halves, Pump start
the drives and verify
rotation is in proper
direction, the correct pump
rotation is indicated.
II. The Correct pump rotation
is indicated by directional
arrow on the pump casing.
INSTALLATION, OPERATION AND MAINTENANCE
GUIDELINE FOR TORQUE FLOW PUMP
7. OPERATION
7.1 START UP CHECKS
1 Before starting the, rotate the unit or assembly by hand to assure all moving parts are free.
2 The motor direction of rotation has been checked.
3 Before starting the pump, all the guards have been installed around all exposed rotation parts.
4 The coupling has been properly aligned.
5 Never run the pump dry as the close running fits within the pump are water lubricated, running dry may result in pump seizure.
6 The oil lubricated bearing unit has been filled with oil.
7 Before starting the pump, fill the casing and suction line with liquid. The pump may be primed with ejector or vacuum pump.
8 Before starting a mechanical seal pump, turn on the seal water, vent. The seal housing and confirm seal water is at sufficient pressure.
9 Before starting a stuffing box pump, adjust the packing gland so that there is sufficient leakage to lubricate the packing and assure
cooling of stuffing box.
INSTALLATION, OPERATION AND MAINTENANCE
GUIDELINE FOR TORQUE FLOW PUMP
7. OPERATION
7.2 STARTING
1 Check that suction valve is fully open and
discharge valve fully closed.
2 Start the pump; let the prime mover pick up
full speed.
3 Open the valve on delivery line slowly.
4 Regulate the required flow by adjusting the
delivery valve.
5 Open the cock for pressure gauge connection.
INSTALLATION, OPERATION AND MAINTENANCE
GUIDELINE FOR TORQUE FLOW PUMP
7. OPERATION
7.3 DURING RUNNING PUMP CHECKS
1 The pump is running smooth.
2 The flow of sealing liquid and cooling/heating water is uninterrupted.
3 The bearings are not getting heated up abnormally.
4 The glands are properly tightened to ensure sufficient leakage to dissipate and control the temperature of gland heat generated the
maximum permissible leakage is 60-80 drops per minutes.
5 Head and capacity developed by pump.
6 Power Consumption is within limit.
7 Ensure that there is no mechanical friction in the pump.
8 Check for proper indicators such as pressures, flows, temperature, vibration and noise.
9 Check the temperature and vibrations of bearing regularly. If one or the other increases, it may be a sign of improper lubrication or bearing
damage. Unusual noise from pump should also be investigated and their cause be rectified.
INSTALLATION, OPERATION AND MAINTENANCE
GUIDELINE FOR TORQUE FLOW PUMP
7. OPERATION
7.4 STOPPING THE UNIT
1 Close the discharge valve to prevent the pumped liquid
from flowing back.
2 Stop the driver/motor.
3 Closed the suction valve.
4 Closed the cooling and flushing valve.
5 If pump is not required to be operated for long time, drain
the casing completely. The bearing housing should be dried
internally and should be flushed with moisture free
protective or light oil or kerosene.
INSTALLATION, OPERATION AND MAINTENANCE
GUIDELINE FOR TORQUE FLOW PUMP
7. OPERATION
7.5 BEARING OPERATING TEMPERATURE
1 The pumps are designed to operate a wide ambient
temperature range. The bearing temperature, when
measured on the outside surface of the bearing housing
should normally be around 130⁰F (54⁰C) with ambient of
70⁰F (22⁰C) high speed operation may have higher bearing
temperature but these temperature should not exceed
190⁰F (87⁰C) It the temperature exceeds 190⁰F (87⁰C), the
pump should be stopped and cause to be investigated and
corrected.
2 In case of new bearing renew the oil after about 200 hours
and then about once a year. If bearing temp is always below
50⁰C and there is only small risk of contamination. If the
bearing temperature is up to 80⁰C and if there is damages
of contamination the oil should be renewed every six
months.
INSTALLATION, OPERATION AND MAINTENANCE
GUIDELINE FOR TORQUE FLOW PUMP
8. TROUBLE SHOOTING
PROBLEM
Pump does not
rotate
POSSIBLE CAUSE
Direction of
rotation wrong
RECOMMENDED
REMEDY
After confirming
wrong rotation,
reverse any two of
three leads in
three phase motor
INSTALLATION, OPERATION AND MAINTENANCE
GUIDELINE FOR TORQUE FLOW PUMP
8. TROUBLE SHOOTING
PROBLEM
No discharge or flow
with pump running
POSSIBLE CAUSE
Clogged suction
line or casing,
which may be due
to a fibrous
product of large
solids
RECOMMENDED
REMEDY
Clean the pump
casing
INSTALLATION, OPERATION AND MAINTENANCE
GUIDELINE FOR TORQUE FLOW PUMP
8. TROUBLE SHOOTING
PROBLEM
Hydraulic unbalance
POSSIBLE CAUSE
1. Damaged pump
shaft, impeller
2. Pump is used of very
high capacity and is run
by excessive throttling
of delivery valve
RECOMMENDED
REMEDY
1. Replace damaged
parts
2. Check for proper
impeller diameter on
curve and rectify
INSTALLATION, OPERATION AND MAINTENANCE
GUIDELINE FOR TORQUE FLOW PUMP
8. TROUBLE SHOOTING
PROBLEM
Excessive noise from
wet end
POSSIBLE CAUSE
Impeller rubbing
RECOMMENDED
REMEDY
1. Check and reset
impeller clearance
2. Check outboard
bearing assembly
for axial end play
INSTALLATION, OPERATION AND MAINTENANCE
GUIDELINE FOR TORQUE FLOW PUMP
8. TROUBLE SHOOTING
PROBLEM
Excessive noise from power end
running
POSSIBLE CAUSE
Bearing contamination appearing
on the race ways as scoring,
scratching or rusting caused by
adverse environment and entrance
of abrasive contaminants from
atmosphere
RECOMMENDED
REMEDY
1. Work wit clean tools
2. Remove all outside dirt from
housing
3. Handle with clean dry hands
4. Use clean solvent and flushing oil
5. Keep bearing wrapped in paper
while not in use
6. Check oil seal, all plugs and
replace as required
INSTALLATION, OPERATION AND MAINTENANCE
GUIDELINE FOR TORQUE FLOW PUMP
8. TROUBLE SHOOTING
PROBLEM
Excessive
noise from
power end
running
POSSIBLE CAUSE
Misalignment
of pump with
motor
RECOMMENDED
REMEDY
Check for
proper
alignment of
pump
INSTALLATION, OPERATION AND MAINTENANCE
GUIDELINE FOR TORQUE FLOW PUMP
8. TROUBLE SHOOTING
PROBLEM
Excessive noise from power
end running
POSSIBLE CAUSE
Brinelling of bearing
identified by indentation on
ball races usually caused by
incorrectly applied forces in
assembling the bearing or
by shock loading such as
hitting the bearing or drive
shaft with a hammer
RECOMMENDED
REMEDY
1. When mounting the
bearing on drive shaft use a
proper size ring only
2. Ensure when mounting a
bearing to apply the
mounting pressure slowly
and evenly
INSTALLATION, OPERATION AND MAINTENANCE
GUIDELINE FOR TORQUE FLOW PUMP
8. TROUBLE SHOOTING
PROBLEM
Excessive noise from
power end running
POSSIBLE CAUSE
False brinelling of bearing
identified again by either
axial or circumferential
indentations usually
caused by vibration of
balls between the races in
stationary bearing
RECOMMENDED
REMEDY
Correct source of vibration
where bearings are oil
lubricated
INSTALLATION, OPERATION AND MAINTENANCE
GUIDELINE FOR TORQUE FLOW PUMP
8. TROUBLE SHOOTING
PROBLEM
Excessive noise from
power end running
POSSIBLE CAUSE
Thrust overload on
bearing identified by
flaking ball path on one
side of the outer race or in
case of maximum capacity
bearing may appear as a
spelling of the race in the
vicinity of the loading slot
RECOMMENDED
REMEDY
Follow correct mounting
procedures for bearings
INSTALLATION, OPERATION AND MAINTENANCE
GUIDELINE FOR TORQUE FLOW PUMP
8. TROUBLE SHOOTING
PROBLEM
Excessive noise from power
end running
POSSIBLE CAUSE
1. Misalignment identified
by fracture of ball path on
the inner race and a
narrower cocked ball path
on the outer race
2. Misalignment is caused by
poor mounting practices or
defective drive shaft
RECOMMENDED
REMEDY
1. Handle parts carefully and
follow recommended
mounting procedures
2. Check all parts for poor fit
and alignment
INSTALLATION, OPERATION AND MAINTENANCE
GUIDELINE FOR TORQUE FLOW PUMP
8. TROUBLE SHOOTING
PROBLEM
Excessive noise from power end
running
POSSIBLE CAUSE
Bearing damaged by electric
arcing identified as electro
etching of both inner and outer
ring as a pitting or cratering
electrical charge emanating from
belt drives, electrical leakage or
short circuiting
RECOMMENDED
REMEDY
1. Check all wiring, insulation
and rotor windings to be sure
that they are sound and all
connections are properly made
2. Eliminate static charges on
belt drive pump by proper
grounding
3. Follow correct mounting
procedures for bearings
INSTALLATION, OPERATION AND MAINTENANCE
GUIDELINE FOR TORQUE FLOW PUMP
8. TROUBLE SHOOTING
PROBLEM
Excessive noise from power end
running
POSSIBLE CAUSE
Bearing damaged due to improper
lubrication identified by one of
more of following
1. Abnormal bearing
2. Temperature rise
3. A stiff cracked grease
appearance
4. A brown or bluish discolor attain
of the bearing races
RECOMMENDED
REMEDY
1. Ensure the lubricant is clean
2. Ensure proper amount of
lubricant is used
3. Ensure there is space adjacent to
the grease lubricated bearings
4. Ensure the proper grade of
lubricant is used
INSTALLATION, OPERATION AND MAINTENANCE
GUIDELINE FOR TORQUE FLOW PUMP
9. MAINTENANCE AND TECHNICAL DATA
CLEARANCE BETWEEN SLEEVE & BUSH
SLEEVE OD NORMAL CLEARANCE WORN OUT CLEARANCE FOR REPLACEMENT
20-30 0.18 0.30
30-38 0.20 0.35
34-43 0.20 0.35
43-50 0.23 0.45
50-55 0.25 0.50
55-65 0.28 0.55
65-100 0.31 0.60
100-150 0.38 0.75
INSTALLATION, OPERATION AND MAINTENANCE
GUIDELINE FOR TORQUE FLOW PUMP
9. MAINTENANCE AND TECHNICAL DATA
DAILY
CHECKS
1. An hourly record of suction and delivery pressure, discharge, input
power to pump drive should be maintained.
2. Bearing temperature, oil level, stuffing box leakage/ stuffing box
temperature, cooling water inlet and outlet temperature should be checked
and recorded this gives an idea of mechanical performance of the pump.
3. Noise and vibration is the first sign of the starting trouble like cavitation,
air lock, bearing failure, chocking of impeller of casing and such other
troubles. The pump performance should be checked for noise and
vibration.
INSTALLATION, OPERATION AND MAINTENANCE
GUIDELINE FOR TORQUE FLOW PUMP
9. MAINTENANCE AND TECHNICAL DATA
PERIODICAL
CHECKS
1.Temperature of bearing should be measured by a thermometer. Safe maximum temperature a bearing can attain
is 80ºC.
2. The lubricants of bearing should be checked. Lubricant might get contaminated with foreign material or get
blackened due to overheating in such a case bearing should be flushed and cleaned and changed with fresh
lubricant.
3. Check the stuffing box leakage, Normal leakage should be sufficient to dissipate heat generated in case the
packing are worn out, all packing rings should be replaced. Replacement of one or two rings or addition of rings
should never be done.
4. Alignment of pump unit should be checked. Due to operational vibration, atmospheric temperature or stress
induced by the weight of the piping, the alignment may get disturbed.
5. Sufficient quantities of suitable lubricant and stuffing box packing should be available in stock for daily and
emergency.
6. Measuring instrument should be calibrated periodically.
INSTALLATION, OPERATION AND MAINTENANCE
GUIDELINE FOR TORQUE FLOW PUMP
9. MAINTENANCE AND TECHNICAL DATA
ANNUAL
CHECKS
1. The Pump should be overhauled completely to check the clearance and replace worn out parts.
Clearance between impeller and casing ring shaft sleeve and gland/ throat bush lantern ring and
shaft sleeve etc are very important, The bearing should be cleaned and checked thoroughly and
lubricated. The stuffing box packing should be replaced and lantern ring should be correctly located.
2. The effects of liquid handled on pump components should be checked, if abnormal corrosion,
erosion is observed the component should be replaced with that of suitable material.
3. The auxiliary pipe line and functioning of the auxiliary system should be checked. The main pipe
line should be checked for sealing leakage etc.
4. Full running tests may be carried out to check whether there is any fault in the performance in
comparison with original performance.
5. Piping support should be checked so that pipe does not induce unwanted stress on the pump.
INSTALLATION, OPERATION AND MAINTENANCE
GUIDELINE FOR TORQUE FLOW PUMP
9. MAINTENANCE AND TECHNICAL DATA
SR ITEM ACTION REQUIRED FREQUENCY HOURS OF
OPERATION
1 Packing Box Inspect for excess leakage adjust and replace packing 150 Hours as necessary
2 Mechanical Seal Replace or clean 2000 Hours or Half Yearly
3 Pump Alignment Check for change in alignment Annually
4 Vibration Check for change in Vibration Annually
5 Bearing Lubricate Every 2000 Hours but at
least once a year
INSTALLATION, OPERATION AND MAINTENANCE
GUIDELINE FOR TORQUE FLOW PUMP
9. MAINTENANCE AND TECHNICAL DATA
Bearing Lubrication Oil
MANUFACTURER SPPEED 1450 RPM SPEED 2900 RPM
Indian Oil Servo System 81 Servo System 57
Hindustan Petroleum ENKLO 57 ENKLO 53
ESSO TERESSO-68 TERESSO-46
SHELL TELLUS-68 TELLUS-S 46
CASTROL HYS PIN AWS 68 HYS PIN AWS 68
MOBIL OIL DTE 26 DTE 24
TEXACO PROMAX REGAL R&O 68 REGAL R&O 46
INSTALLATION, OPERATION AND MAINTENANCE
GUIDELINE FOR TORQUE FLOW PUMP
9. MAINTENANCE AND TECHNICAL DATA
BEARING OIL CHANGE INTERVAL
BEARING HOUSING SURFACE TEMPARATURE OIL CHANGE INTERVAL
New Bearing 150-200 Hours
65⁰C 1 Year
90⁰C 6 Months
INSTALLATION, OPERATION AND MAINTENANCE
GUIDELINE FOR TORQUE FLOW PUMP
10. STUFFING BOX
GENERAL 1. Stuffing boxes are packed at the factory all packing is subjected to wear and should be given regular inspection
generally packing boxes in pumps should be checked for excessive leakage every150 hours of operation and gland
should be readjustment if necessary.
2. Adjustment is accomplished by lightly tightening gland nuts, and then loosening them so they can be adjusted
with figure pressure to allow a small flow of liquid to lubricate the packing 30-60 drops per minute If the flow of
liquid has increased and cannot be reduced by lightly tightening of the gland replace the packing and /or shaft
sleeve.
3. The stuffing box is fitted with lantern /water seal ring.
4. The sealing chamber should be connected to a source of clear, fresh water. The recommend water pressure is
1kg / cm 2 above the maximum discharge pressure.
5. If water is not available grease lubrication is acceptable.
NOTE: Do not tighten gland to stop all leakage, leakage is necessary to ensure cooling ,flushing and lubrication of
the packing and to prevent shaft sleeve damage.
INSTALLATION, OPERATION AND MAINTENANCE
GUIDELINE FOR TORQUE FLOW PUMP
10. STUFFING BOX
Packing Replacement Procedure:
1. Stop the pump.
2. Unbolt and remove gland.
3. Use a flexible packing tool with hook/ wood screw
attachment for removal of the packing and water seal
ring.
4. Clean packing box and shaft sleeve.
5. Inspect shaft sleeve for wear or rough finish and
replace if necessary. Sleeve should have smooth surface.
6. Install the packing box with new packing and lantern
ring in the following order 2 ring + 1 lantern ring + 3
rings packing + gland (FIG-10).
INSTALLATION, OPERATION AND MAINTENANCE
GUIDELINE FOR TORQUE FLOW PUMP
10. STUFFING BOX
Packing Replacement Procedure:
7. For renewing packing rings of suitable quality and
dimension. It should be at cut clean in an oblique
manner, the ends of the ring laid around the shaft
should slightly touch. If necessary, measure the ring
length on the shaft out Side the pump.
8. Before inserting the turns clean the gland space.
Apply light grease on gland packing and individual rings
are to be placed with joints staggered by 90⁰c and are to
be pushed backwards with the gland, consider the
sequence as mentioned above for lantern ring.
9. Slightly tighten by hand the gland nuts, during
operation carefully tighten nut. The glands need certain
time to set. A correctly maintained gland should leak 30
to 60 drops per minute.
INSTALLATION, OPERATION AND MAINTENANCE
GUIDELINE FOR TORQUE FLOW PUMP
10. STUFFING BOX
Packing Replacement Procedure:
10. After prolonged stand skill of the during which the gland
may set hardened, they have to be freed and turn shaft by hand.
11. Too heavily tightened gland would result in dry running,
heating up, burning of the packing material, and damage to the
shaft/shaft sleeve. In such case the shaft with sleeve and gland
with have to be replaced.
12. The gland can only be tightened it the shaft surface is
perfect (Ground or polished), the bearing are correct and sleeve
are concentric. Maximum eccentricity of about 0.075 mm to
0.125 mm depending on size and operating condition is
permissible.
13. Packing box arrangement and data is given in (Fig-10, 10A)
INSTALLATION, OPERATION AND MAINTENANCE
GUIDELINE FOR TORQUE FLOW PUMP
10. STUFFING BOX
Usual Causes of Packing Failure:
A. Packing has not been installed properly.
B. Packing used is not suitable for the
temperature and pressure involved or may be
subject to attack by the liquid being handled.
C. Inner rings are not properly seated so that
the outer rings are carrying the entire load.
D. Dist or foreign Material in the stuffing box are
causing repaid wear of shaft or shaft sleeve.
E. Lantern ring not in line with the tapped hole
sealing connection.
INSTALLATION, OPERATION AND MAINTENANCE
GUIDELINE FOR TORQUE FLOW PUMP
10. STUFFING BOX
TROUBLE
Not liquid delivered
Not enough pressure
CAUSE
Lack of Prime
Defective packing
CURE
1. Packing too loose or defective,
allowing air to leak into suction
2. Tighten or replace packing
and prime pump
As for preceding
INSTALLATION, OPERATION AND MAINTENANCE
GUIDELINE FOR TORQUE FLOW PUMP
10. STUFFING BOX
TROUBLE
Not enough liquid delivered
CAUSE
Air leaking into stuffing box
CURE
1. Check that there is some leakage
through stuffing box while
operating if no leakage after
reasonable gland adjustment new
packing may be needed
2. Lantern ring may be clogged or
displaced and may need centering
in line with sealing liquid
connection
INSTALLATION, OPERATION AND MAINTENANCE
GUIDELINE FOR TORQUE FLOW PUMP
10. STUFFING BOX
TROUBLE
Not enough liquid delivered
CAUSE
Air leaking into stuffing box
CURE
3. Sealing line may be
clogged
4. Shaft or shaft sleeve
below packing may be badly
scored and allowing air to be
sucked into pump
INSTALLATION, OPERATION AND MAINTENANCE
GUIDELINE FOR TORQUE FLOW PUMP
10. STUFFING BOX
TROUBLE
Not enough liquid
delivered
CAUSE
Defective packing
CURE
Replace packing
and check for
surface
smoothness of
shaft or shaft
sleeve
INSTALLATION, OPERATION AND MAINTENANCE
GUIDELINE FOR TORQUE FLOW PUMP
10. STUFFING BOX
TROUBLE
Pump works
for a while
and quits
CAUSE
Air leaking
into stuffing
box
CURE
See
preceding
INSTALLATION, OPERATION AND MAINTENANCE
GUIDELINE FOR TORQUE FLOW PUMP
10. STUFFING BOX
TROUBLE
Pump takes too much
power
CAUSE
Packing too tight
CURE
1. Release gland
pressure.
2. Retighten reasonably.
3.Keep leakage flowing
If none, check packing,
sleeve or shaft
INSTALLATION, OPERATION AND MAINTENANCE
GUIDELINE FOR TORQUE FLOW PUMP
10. STUFFING BOX
TROUBLE
Pump leaks excessively at stuffing
box
CAUSE
Defective packing
Wrong type of packing
Scored shaft or shaft sleeves
CURE
1. Replace worn packing
2. Replace packing damaged by lack of
lubrication
Replace packing not properly installed
or run-in
Put in lathe and machine true and
smooth or replace
INSTALLATION, OPERATION AND MAINTENANCE
GUIDELINE FOR TORQUE FLOW PUMP
10. STUFFING BOX
TROUBLE
Stuffing box overheating
CAUSE
Packing too tight
Packing not lubricated
Wrong grade of packing
CURE
Release gland pressure
Release gland pressure and replace
all packing if any burnt or damaged
Check with pump or packing
manufacturer for correct grade
INSTALLATION, OPERATION AND MAINTENANCE
GUIDELINE FOR TORQUE FLOW PUMP
10. STUFFING BOX
TROUBLE
Stuffing box
overheating
CAUSE
Insufficient cooling
water to jackets
Stuffing box
improperly packed
CURE
Check if supply line
valves opened or line
clogged
Repack
INSTALLATION, OPERATION AND MAINTENANCE
GUIDELINE FOR TORQUE FLOW PUMP
10. STUFFING BOX
TROUBLE
Packing wears too fast
CAUSE
Shaft or shaft sleeve worn or
scored
Insufficient or no lubrication
Improperly packed
CURE
Re-machine or replace
Repack and make sure packing
loose enough to allow some
leakage
Repack properly making sure all old
packing removed and box clean
INSTALLATION, OPERATION AND MAINTENANCE
GUIDELINE FOR TORQUE FLOW PUMP
11. MECHANICAL SEAL
11.1 MECHANICAL SEAL FUNCTION
When the mechanical seal is functioning satisfactorily without any leakage etc, preventive maintenance is not advised.
If leakage occurs a through check up is needed. Like other parts in equipment the mechanical seals are subject to wear
at the mating faces of the rotating and stationary ring.
The rate of wear will differ with the operation or condition and various other factors such as lubricating properties of
liquid being pumped, the presence of impurities in liquid and other operating condition.
Before assembly, check up the following points to ensure proper fitting and satisfactory operation of mechanical seal.
1. Shaft sleeve OD should be within +0.00mm or -0.05 mm for specified seal size.
2. Leading edge of shaft sleeve is chamfered.
3. Run out of the shaft at the seal face is within 0.05 mm.
INSTALLATION, OPERATION AND MAINTENANCE
GUIDELINE FOR TORQUE FLOW PUMP
11. MECHANICAL SEAL
11.2 MECHANICAL SEAL COOLING
If the following working conditions are maintained a Life of several years with a leakage free
operation can be obtained.
1. The friction heat generated has to be dissipated, this is done by flushing with the liquid or by
cooling the seal.
2. Mechanical damage to the running surfaces should be avoided.
3. Damage can be caused by the ingress of solids, especially Fine dust, by solidification of the fluid
between rings, precipitation of solid material by evaporation etc.
4. Avoid dry running , which would destroy the running surfaces very quickly dry run is due to
operation without fluid, evaporation of the fluid between the sliding ring.
INSTALLATION, OPERATION AND MAINTENANCE
GUIDELINE FOR TORQUE FLOW PUMP
11. MECHANICAL SEAL
11.2 MECHANICAL SEAL COOLING
For Smooth run of the shaft, concentric installation of
the seal /gland parts is essential.
Flushed fluids are different from the fluid being pumped.
It flushing are introduced from an external source ,
flushing should be done at minimum pressure of 0.7
kg/cm2 above pressure of liquid at stuffing box.
The flushing liquid quantity should be approx. 0.3 to 0.5
m3/hr flushing at the seal faces is necessary to provide
lubrication, heating or cooling of the seal faces.
pump should not be run without flushing at the seal face
unless recommended by seal manufacturer (Fig 10B).
INSTALLATION, OPERATION AND MAINTENANCE
GUIDELINE FOR TORQUE FLOW PUMP
11. MECHANICAL SEAL
11.3 MECHANICAL SEAL ASSEMBLY AND DISASSEMBLY PROCEDURE
1. Certain elastomers are attacked by oil if such parts are used, the shaft must not be lubricated with oil for mounting
the ring. It is recommended to grease the shaft with talcum powder or soapy water before installing them.
2. Edges and passages of shaft have to be very carefully rounded off to avoid damaging the lips of elastomers and O-
ring.
3. Protect sliding surfaces from dust (Especially oily dust) and filling from work benches and hands. Touch with only
clean hands, never leave sliding surfaces exposed. Put them only on clean cloth or paper; unpack mechanical seal
only at the time of installation.
4. Take care of exact spring tension during installation , very carefully check developed length.
5. Do not grind worn sliding surfaces each other Separately re machine/ grind surface and lap on a lapping machine
check plainness.
6. The surfaces on which elastomers (O-rings, wedge rings) are Resting have to be polished. The tolerance specified
have to be carefully observed
INSTALLATION, OPERATION AND MAINTENANCE
GUIDELINE FOR TORQUE FLOW PUMP
11. MECHANICAL SEAL
11.4 MECHANICAL SEAL INSTALLATION
Check surfaces at the face of the seal housing and at the bottom of the seal housing to insure that they are clean, flat and free of dirt and
burrs. The face surface must be smooth to form a good sealing surface for O-ring.
Check that shaft/shaft sleeve is smooth and free of burrs, nicks and sharp corners that could damage the O-ring or shaft packing. When
further clean up is required protect the seal remove burse, sharp Carnes by using a strip of emery paper /cloth file threads over the shaft
threads, file threads / around the key way with a smooth file, sharp edges must be removed.
Remove all chips and dust from the shaft area.
Check that all rotary unit parts of the seal fit over shaft. A pre check be made by removing the O-ring to the seal and then installing seal on
the shaft. Further shaft clean up will be necessary when seal will not pass all the way in seal housing.
Remove the seal after the pre check and reinstall the sleeve o ring.
Lubricate the shaft and sleeve ID with lubricant recommended by manufacturer. When no lubricant is recommended by mechanical seal
manufacture. Recommended Lubricant: 1. Light oil (SAE-10) 2. Silicone lubricant 3. Soapy water / liquid detergent. Oil based lubricant will
damage EPR/ EPDM Elastomer O-ring silicon and soapy water are safe for EPR/ EPDM elastomer O-rings.
INSTALLATION, OPERATION AND MAINTENANCE
GUIDELINE FOR TORQUE FLOW PUMP
11. MECHANICAL SEAL
11.4 MECHANICAL SEAL INSTALLATION
Install the O-ring between the seal housing and seal. Install seal cover over the shaft and slide into position against the face of the seal box.
Take care when passing the sleeve and O-rings over the key ways or threads to avoid damaging the O-ring.
Position seal gland on discharge head seal housing and secure with cap screens. Tighten cap screw gradually and uniformly.
Note:
Do not pump carbon members against the shaft as they may chip crack or break.
Do not over tighten cap screws on gland. This can distort seal seat and cause or external water source.
Install all seal piping as required prior to making connections of seal liquid pressurizing lines, make sure seal housing and all sealing liquid
lines are flushed free of dust, scale and other particles that would be abrasive to the sealing faces.
A. Impeller adjustment is required prior to installation.
B. Secure collar set screw, set proper spring compression.
INSTALLATION, OPERATION AND MAINTENANCE
GUIDELINE FOR TORQUE FLOW PUMP
11. MECHANICAL SEAL
11.5 MECHANICAL SEAL OPERATION
1. The seal should never run dry, even to check for
rotation, A Water source must be provided to cool
and lubricate faces during pump operation the
lubricating media or external water source.
2. If an external water source is used it must be clean
to within 100 micro and introduced to the seal
prior to each motor start.
NOTE: Some seal may swat at initial stage. This condition
should cease after a short period as the seal faces lap
together, operate and monitor the seal until leakage
subsides, in no case it should exceed 40 drops per
minutes.
ADEQUATE FLOW MUST BE PROVIDED TO MAINTAIN (15
FPS)/(5 MPS) MINIMUM VELOCITY BETWEEN THE
BUSHING AND SHAFT. REFER TO THE FOLLOWING TAB.
SHAFT OR SLEEVE DIA. MM FLOW RATE LPM
25 3-5
32 4-6
38 5-7
43 6-8
49 7-9
55 9-10
62 8-10
70 10-11
75 11-13
80 13-15
90 14-16
100 15-17
115 17-19
INSTALLATION, OPERATION AND MAINTENANCE
GUIDELINE FOR TORQUE FLOW PUMP
11. MECHANICAL SEAL
11.6 SEAL ROUTINE MAINTENANCE
1. Periodically (100 hours of operation / one weak) check seal
for leakage.
11.7 MECHANICAL SEAL REMOVAL
1. Stop the drive and lock out the power so that driver cannot
start accidently.
2. Disconnect piping to seal gland.
3. Release spring tension to retain proper position. Loosen the
collar set screw.
4. Loosen the cap screws securing the gland to the seal housing.
Remove seal assembly.
5. Insect all parts of the seal, if any parts show sigh of wear, the
complete seal should be replaced.
INSTALLATION, OPERATION AND MAINTENANCE
GUIDELINE FOR TORQUE FLOW PUMP
11. MECHANICAL SEAL
11.8 MECHANICAL SEAL FAILURE
Seal faces are worn or scored.
Gland is bolted up unevenly.
Stationary insert face is not perpendicular to
the axis of shaft.
The seal ring is binding.
Wobbling of the rotating seal ring.
INSTALLATION, OPERATION AND MAINTENANCE
GUIDELINE FOR TORQUE FLOW PUMP
11. MECHANICAL SEAL
11.8 MECHANICAL SEAL FAILURE
Cracked or broken stationary seal.
Shaft run out through stuffing box.
Foreign particles between sealing faces.
Loose set screws.
Loss of spring compression.
Mechanical seal is improperly installed.
INSTALLATION, OPERATION AND MAINTENANCE
GUIDELINE FOR TORQUE FLOW PUMP
12. PUMP OVERHAULING
12.1 PUMP DISMENTLE PROCEDURE
Isolate power supply to motor.
Shut off valve controlling flow to and from the pump.
Drain the liquid from the pump by removing the drain plug.
Remove all auxiliary, tubing & piping.
Drain the lubrication oil from the bearing housing and remove
constant level oil lubricator.
Match mark coupling halves.
Remove the support hold down bolts.
Adjust chain tension to support the weight of the back pullout
assembly for repair (Fig-11).
INSTALLATION, OPERATION AND MAINTENANCE
GUIDELINE FOR TORQUE FLOW PUMP
12. PUMP OVERHAULING
12.1 PUMP DISMENTLE PROCEDURE
Remove the hex nuts from the casing studs holding the bearing housing
(11) to pump casing ( 01).
Screw the jacking bolts provided in housing cover . Turn bolts evenly
through a quarter turn at both sides at a time.
Slightly pullout the driving unit till impellers (02) clears the pump casing
(01) (Fig-11A)
Place the rotating unit on table or clear place for further dismantling.
Remove casing gasket.
Unscrew impeller bolt (15) remove O-ring , gasket , impeller washer
(14,57,25).
Take out the impeller (02) from pump shaft (10) , Remove the O-ring
gasket (28) Between impeller and shaft sleeve (06) (Fig-11B).
INSTALLATION, OPERATION AND MAINTENANCE
GUIDELINE FOR TORQUE FLOW PUMP
12. PUMP OVERHAULING
12.1 PUMP DISMENTLE PROCEDURE
Removal of stuffing box with gland packing. For this
following steps should be taken.
1. Take the casing cover / gland plate (03) along with
throat bush /gland bush (05) gland packing (30),
lantern ring (07) and O ring will also come out
along with it. (Fig11C,D).
2. Remove gland packing rings (30) and lantern ring
(07).
3. Remove shaft sleeve (06) along with liquid
deflector (17).
4. Remove gland bush (05) 6. Remove Impeller key.
INSTALLATION, OPERATION AND MAINTENANCE
GUIDELINE FOR TORQUE FLOW PUMP
12. PUMP OVERHAULING
12.1 PUMP DISMENTLE PROCEDURE
Removal of stuffing box with mechanical seal. Follow the step given below.
1. Unscrew cover plate (04) gland plate (3) SEAL (170 ) and along with throat
bush / gland plate bush (05).
2. Remove throat bush (05).
3. Pull shaft sleeve under mechanical seal. Be careful while removing shaft
sleeve, it comes out with rotating parts of mechanical seal.
4. Remove mechanical seal from the shaft sleeve and keep in clean place.
5. Remove nut from casing cover studs.
6. Take out casing cover along with mechanical seal cover, O-ring for casing
cover will also come out along with it.
7. Unscrew the nuts of mechanical seal cover studs and remove mechanical seal
cover studs and remove mechanical seal cover from casing cover.
8. Remove defector / slingers.
INSTALLATION, OPERATION AND MAINTENANCE
GUIDELINE FOR TORQUE FLOW PUMP
12. PUMP OVERHAULING
12.1 PUMP DISMENTLE PROCEDURE
Remove the pump half coupling after unscrewing grub screw.
Note Coupling half should be removed with the help of suitable
puller device to avoid damage to bearing coupling half should not
be knocked off the shaft.
Take out the coupling key.
Fasten bearing housing unit firmly to vice (Fig-12) unscrew hex
screws of the bearing cover remove bearing cover.
Strike the pump shaft from pump side end of the shaft with soft
hammers, where the shaft with the bearing will come of the
bearing housing. (Fig-12).
Fasten the shaft with the bearing in rice and detach bearing nut
and lock washer. Detach the bearing from the shaft with an
extractor. (Fig-13).
INSTALLATION, OPERATION AND MAINTENANCE
GUIDELINE FOR TORQUE FLOW PUMP
12. PUMP OVERHAULING
12.2 PUMP REASSEMBLE PROCEDURE
Check the shaft with protection sleeve for concentricity, the
eccentricity between centers, maximum allowable concentricity
is 0.050mm.
Fasten the shaft in vice with impeller side end of shaft upward.
Soft sheets to be used for clamping in vice jaws to avoid
damage to shaft. Heat the cylindrical roller bearing to 95- 100.c
and push it onto the shaft remember to place the spacer ring of
the bearing on the shaft side. (Fig 14).
Let the bearing cool down. Then tap it lightly by the lines
against the shoulder using a sleeve punch, rotate the sleeve
punch between blows.
Turn the shaft so that coupling side is upwards, fasten it to
vice, use soft sheets for clamping.
INSTALLATION, OPERATION AND MAINTENANCE
GUIDELINE FOR TORQUE FLOW PUMP
12. PUMP OVERHAULING
12.2 PUMP REASSEMBLE PROCEDURE
Heat the ball bearings to approx. + 100.c and push them into the
shaft. Let the bearing cool down (Fig 15).
Place lock washer on shaft.
Tighten the bearing by means of the bearing lock nut tightly
against the shaft should use suitable hook wrench.
Bend the lock washer tooth onto the bearing nut slots.
Note: It is absolutely necessary that the bearing are placed
correctly.
Tighten bearing housing vertically to the vice with the coupling side
up words.
Tap the oil seal into bearing housing with a soft hammer ensure
that the water holes are in the oil seal will be on underneath.
INSTALLATION, OPERATION AND MAINTENANCE
GUIDELINE FOR TORQUE FLOW PUMP
12. PUMP OVERHAULING
12.2 PUMP REASSEMBLE PROCEDURE
Lower the shaft unit carefully into the bearing housing. Make
sure not to damage oil seal (Fig 16).
Tap the oil seal into the bearing cover with a soft hammer;
insure that the holes in the oil seal will end up underneath.
Grease o ring of the bearing cover lightly and stretch it into
the groove.
Set the bearing cover carefully into place make sure the water
holes in labyrinth ring will end up underneath. Secure to the
bearing housing with cap screws.
Tighten the cap screws of the bearing cover.
Place the deflectors with care onto the shaft. Grease the
rubber lip before installation.
INSTALLATION, OPERATION AND MAINTENANCE
GUIDELINE FOR TORQUE FLOW PUMP
12. PUMP OVERHAULING
12.3 PUMP SHAFT ASSEMBLE PROCEDURE
A. Gland Packing Fitting
1. Fix the adapter to bearing housing with hexagonal screws.
2. Place on the horizontal surface with the sealing cavity upwards.
3. Place the neck / gland bush to the bottom of sealing cavity.
4. Put the shaft wearing sleeve in an upright position in the middle of the
sealing cavity.
5. Insert the first two gland packing, the lantern ring, the other two/three
glands packing and the two piece stuffing box gland; tighten the
hexagonal nuts by hand.
6. Push the casing cover with gland packing parts onto the shaft. Check that
the shaft wearing sleeve is placed on the shaft shoulder.
7. Attach the casing cover to the adaptor with hexagonal head screws.
INSTALLATION, OPERATION AND MAINTENANCE
GUIDELINE FOR TORQUE FLOW PUMP
12. PUMP OVERHAULING
12.3 PUMP SHAFT ASSEMBLE PROCEDURE
B. MECHANICAL SEAL FITTING
1. Fix the adaptor into the bearing housing with hex head
screws.
2. Mount the mechanical seal parts into cover plate for seal
and onto the shaft wearing sleeve. Make sure that cylinder
pin is in proper position.
3. Place the gasket in the cover plate for seal on the casing
cover with the flange, tighten the hexagonal nuts.
4. Push the casing cover to gather with the incorporated parts
onto the shaft. Fix the screws.
5. Push the shaft wearing sleeve to gather with incorporated
parts onto the shaft against the shoulder.
INSTALLATION, OPERATION AND MAINTENANCE
GUIDELINE FOR TORQUE FLOW PUMP
12. PUMP OVERHAULING
12.4 PUMP UNIT ASSEMBLE PROCEDURE
1. Fix the adaptor plate to the bearing housing with hexagonal cap screws.
2. The shaft seal and casing cover are assembled as per drawing (FIG-1 &2 ).
3. Fit the O ring between impeller and shaft protection sleeve.
4. Fix casing cover to the adopter plate with the hexagonal screws.
5. Prevent the shaft from rotating from coupling and insert the impeller into
its place. The clearance between the impeller and casing cover is about
1.0mm.
6. Lock the impeller with socket head screw on to which the O-ring has been
fitted.
7. Tighten the socket head screw to value given below.(Fig-17B).
8. Fix the support foot of the bearing unit by means of the hexagon screw.
9. Heat the coupling flange to about 100.c.
INSTALLATION, OPERATION AND MAINTENANCE
GUIDELINE FOR TORQUE FLOW PUMP
12. PUMP OVERHAULING
12.5 INSTALLATION PROCEDURE OF BEARING
FRAME UNIT WITH IMPELLER
Loop a hoist sling under the bearing frame
unit for support.
Fit the gasket in casing cover.
Install bearing frame unit with in place and
lubricate hexagonal screw with militate
lubricant and tighten them slowly to valve
given below. Tighten the unit with casing studs
firmly and evenly.
SCREW SIZE RATED
TORQUE (NM)
MAXIMUM
VALUE OF
TORQUE (NM)
M-10 30 40
M-12 50 60
M-16 130 160
M-20 250 300
M-24 420 520
INSTALLATION, OPERATION AND MAINTENANCE
GUIDELINE FOR TORQUE FLOW PUMP
12. PUMP OVERHAULING
12.5 INSTALLATION PROCEDURE OF BEARING
FRAME UNIT WITH IMPELLER
Check free rotation of shaft.
Fix the support to the base plate with the
hexagonal screws.
Lubricate the bearing with grease or oil.
Install the coupling /spacer with coupling.
Install the auxiliary piping and accessories'
according to the drawing and seal manufactures
instruction.
INSTALLATION, OPERATION AND MAINTENANCE
GUIDELINE FOR TORQUE FLOW PUMP
13. SPARE PARTS
SR PART NUMBER DESRCIPTION MINIMUM QUANTITY
1 Bearing Housing 10%
2 Volute Casing/Gland Plate 10%
3 Wear Plate 1 To 30%
4 Casing Cover 10%
5 Pump Shaft 30%
6 Impeller 30%
7 Antifriction Bearing 50%
8 Antifriction Bearing Back To Back 50%
9 Bearing Housing 10%
10 Adaptor 10%
11 Bearing Cover 10%
12 Gasket-31/28/28/26A 200%
INSTALLATION, OPERATION AND MAINTENANCE
GUIDELINE FOR TORQUE FLOW PUMP
13. SPARE PARTS
SR PART NUMBER DESRCIPTION MINIMUM QUANTITY
13 O‐Ring-27,27A/29/35 200%
14 Oil Seal-32/38 100%
15 Mechanical Seal 100%
16 Neck Gland Bush 50%
17 Gland Packing 400%
18 Cover Plate For Seal 10%
19 Deflector 50%
20 Shaft Sleeve 100%
21 Washer (Impeller) 30%
22 Impeller Bolt 30%
23 Key 30%
24 Lantern Ring 30%

More Related Content

Recently uploaded

Call Girls Service Nagpur Tanvi Call 7001035870 Meet With Nagpur Escorts
Call Girls Service Nagpur Tanvi Call 7001035870 Meet With Nagpur EscortsCall Girls Service Nagpur Tanvi Call 7001035870 Meet With Nagpur Escorts
Call Girls Service Nagpur Tanvi Call 7001035870 Meet With Nagpur EscortsCall Girls in Nagpur High Profile
 
Call Girls in Nagpur Suman Call 7001035870 Meet With Nagpur Escorts
Call Girls in Nagpur Suman Call 7001035870 Meet With Nagpur EscortsCall Girls in Nagpur Suman Call 7001035870 Meet With Nagpur Escorts
Call Girls in Nagpur Suman Call 7001035870 Meet With Nagpur EscortsCall Girls in Nagpur High Profile
 
(ANVI) Koregaon Park Call Girls Just Call 7001035870 [ Cash on Delivery ] Pun...
(ANVI) Koregaon Park Call Girls Just Call 7001035870 [ Cash on Delivery ] Pun...(ANVI) Koregaon Park Call Girls Just Call 7001035870 [ Cash on Delivery ] Pun...
(ANVI) Koregaon Park Call Girls Just Call 7001035870 [ Cash on Delivery ] Pun...ranjana rawat
 
AKTU Computer Networks notes --- Unit 3.pdf
AKTU Computer Networks notes ---  Unit 3.pdfAKTU Computer Networks notes ---  Unit 3.pdf
AKTU Computer Networks notes --- Unit 3.pdfankushspencer015
 
University management System project report..pdf
University management System project report..pdfUniversity management System project report..pdf
University management System project report..pdfKamal Acharya
 
Introduction and different types of Ethernet.pptx
Introduction and different types of Ethernet.pptxIntroduction and different types of Ethernet.pptx
Introduction and different types of Ethernet.pptxupamatechverse
 
Booking open Available Pune Call Girls Pargaon 6297143586 Call Hot Indian Gi...
Booking open Available Pune Call Girls Pargaon  6297143586 Call Hot Indian Gi...Booking open Available Pune Call Girls Pargaon  6297143586 Call Hot Indian Gi...
Booking open Available Pune Call Girls Pargaon 6297143586 Call Hot Indian Gi...Call Girls in Nagpur High Profile
 
ONLINE FOOD ORDER SYSTEM PROJECT REPORT.pdf
ONLINE FOOD ORDER SYSTEM PROJECT REPORT.pdfONLINE FOOD ORDER SYSTEM PROJECT REPORT.pdf
ONLINE FOOD ORDER SYSTEM PROJECT REPORT.pdfKamal Acharya
 
Call for Papers - Educational Administration: Theory and Practice, E-ISSN: 21...
Call for Papers - Educational Administration: Theory and Practice, E-ISSN: 21...Call for Papers - Educational Administration: Theory and Practice, E-ISSN: 21...
Call for Papers - Educational Administration: Theory and Practice, E-ISSN: 21...Christo Ananth
 
(PRIYA) Rajgurunagar Call Girls Just Call 7001035870 [ Cash on Delivery ] Pun...
(PRIYA) Rajgurunagar Call Girls Just Call 7001035870 [ Cash on Delivery ] Pun...(PRIYA) Rajgurunagar Call Girls Just Call 7001035870 [ Cash on Delivery ] Pun...
(PRIYA) Rajgurunagar Call Girls Just Call 7001035870 [ Cash on Delivery ] Pun...ranjana rawat
 
Booking open Available Pune Call Girls Koregaon Park 6297143586 Call Hot Ind...
Booking open Available Pune Call Girls Koregaon Park  6297143586 Call Hot Ind...Booking open Available Pune Call Girls Koregaon Park  6297143586 Call Hot Ind...
Booking open Available Pune Call Girls Koregaon Park 6297143586 Call Hot Ind...Call Girls in Nagpur High Profile
 
MANUFACTURING PROCESS-II UNIT-1 THEORY OF METAL CUTTING
MANUFACTURING PROCESS-II UNIT-1 THEORY OF METAL CUTTINGMANUFACTURING PROCESS-II UNIT-1 THEORY OF METAL CUTTING
MANUFACTURING PROCESS-II UNIT-1 THEORY OF METAL CUTTINGSIVASHANKAR N
 
Introduction to IEEE STANDARDS and its different types.pptx
Introduction to IEEE STANDARDS and its different types.pptxIntroduction to IEEE STANDARDS and its different types.pptx
Introduction to IEEE STANDARDS and its different types.pptxupamatechverse
 
The Most Attractive Pune Call Girls Budhwar Peth 8250192130 Will You Miss Thi...
The Most Attractive Pune Call Girls Budhwar Peth 8250192130 Will You Miss Thi...The Most Attractive Pune Call Girls Budhwar Peth 8250192130 Will You Miss Thi...
The Most Attractive Pune Call Girls Budhwar Peth 8250192130 Will You Miss Thi...ranjana rawat
 
The Most Attractive Pune Call Girls Manchar 8250192130 Will You Miss This Cha...
The Most Attractive Pune Call Girls Manchar 8250192130 Will You Miss This Cha...The Most Attractive Pune Call Girls Manchar 8250192130 Will You Miss This Cha...
The Most Attractive Pune Call Girls Manchar 8250192130 Will You Miss This Cha...ranjana rawat
 
Russian Call Girls in Nagpur Grishma Call 7001035870 Meet With Nagpur Escorts
Russian Call Girls in Nagpur Grishma Call 7001035870 Meet With Nagpur EscortsRussian Call Girls in Nagpur Grishma Call 7001035870 Meet With Nagpur Escorts
Russian Call Girls in Nagpur Grishma Call 7001035870 Meet With Nagpur EscortsCall Girls in Nagpur High Profile
 
KubeKraft presentation @CloudNativeHooghly
KubeKraft presentation @CloudNativeHooghlyKubeKraft presentation @CloudNativeHooghly
KubeKraft presentation @CloudNativeHooghlysanyuktamishra911
 
result management system report for college project
result management system report for college projectresult management system report for college project
result management system report for college projectTonystark477637
 

Recently uploaded (20)

Call Girls Service Nagpur Tanvi Call 7001035870 Meet With Nagpur Escorts
Call Girls Service Nagpur Tanvi Call 7001035870 Meet With Nagpur EscortsCall Girls Service Nagpur Tanvi Call 7001035870 Meet With Nagpur Escorts
Call Girls Service Nagpur Tanvi Call 7001035870 Meet With Nagpur Escorts
 
Call Girls in Nagpur Suman Call 7001035870 Meet With Nagpur Escorts
Call Girls in Nagpur Suman Call 7001035870 Meet With Nagpur EscortsCall Girls in Nagpur Suman Call 7001035870 Meet With Nagpur Escorts
Call Girls in Nagpur Suman Call 7001035870 Meet With Nagpur Escorts
 
(ANVI) Koregaon Park Call Girls Just Call 7001035870 [ Cash on Delivery ] Pun...
(ANVI) Koregaon Park Call Girls Just Call 7001035870 [ Cash on Delivery ] Pun...(ANVI) Koregaon Park Call Girls Just Call 7001035870 [ Cash on Delivery ] Pun...
(ANVI) Koregaon Park Call Girls Just Call 7001035870 [ Cash on Delivery ] Pun...
 
AKTU Computer Networks notes --- Unit 3.pdf
AKTU Computer Networks notes ---  Unit 3.pdfAKTU Computer Networks notes ---  Unit 3.pdf
AKTU Computer Networks notes --- Unit 3.pdf
 
University management System project report..pdf
University management System project report..pdfUniversity management System project report..pdf
University management System project report..pdf
 
Introduction and different types of Ethernet.pptx
Introduction and different types of Ethernet.pptxIntroduction and different types of Ethernet.pptx
Introduction and different types of Ethernet.pptx
 
Booking open Available Pune Call Girls Pargaon 6297143586 Call Hot Indian Gi...
Booking open Available Pune Call Girls Pargaon  6297143586 Call Hot Indian Gi...Booking open Available Pune Call Girls Pargaon  6297143586 Call Hot Indian Gi...
Booking open Available Pune Call Girls Pargaon 6297143586 Call Hot Indian Gi...
 
ONLINE FOOD ORDER SYSTEM PROJECT REPORT.pdf
ONLINE FOOD ORDER SYSTEM PROJECT REPORT.pdfONLINE FOOD ORDER SYSTEM PROJECT REPORT.pdf
ONLINE FOOD ORDER SYSTEM PROJECT REPORT.pdf
 
(INDIRA) Call Girl Aurangabad Call Now 8617697112 Aurangabad Escorts 24x7
(INDIRA) Call Girl Aurangabad Call Now 8617697112 Aurangabad Escorts 24x7(INDIRA) Call Girl Aurangabad Call Now 8617697112 Aurangabad Escorts 24x7
(INDIRA) Call Girl Aurangabad Call Now 8617697112 Aurangabad Escorts 24x7
 
Call for Papers - Educational Administration: Theory and Practice, E-ISSN: 21...
Call for Papers - Educational Administration: Theory and Practice, E-ISSN: 21...Call for Papers - Educational Administration: Theory and Practice, E-ISSN: 21...
Call for Papers - Educational Administration: Theory and Practice, E-ISSN: 21...
 
(PRIYA) Rajgurunagar Call Girls Just Call 7001035870 [ Cash on Delivery ] Pun...
(PRIYA) Rajgurunagar Call Girls Just Call 7001035870 [ Cash on Delivery ] Pun...(PRIYA) Rajgurunagar Call Girls Just Call 7001035870 [ Cash on Delivery ] Pun...
(PRIYA) Rajgurunagar Call Girls Just Call 7001035870 [ Cash on Delivery ] Pun...
 
Booking open Available Pune Call Girls Koregaon Park 6297143586 Call Hot Ind...
Booking open Available Pune Call Girls Koregaon Park  6297143586 Call Hot Ind...Booking open Available Pune Call Girls Koregaon Park  6297143586 Call Hot Ind...
Booking open Available Pune Call Girls Koregaon Park 6297143586 Call Hot Ind...
 
MANUFACTURING PROCESS-II UNIT-1 THEORY OF METAL CUTTING
MANUFACTURING PROCESS-II UNIT-1 THEORY OF METAL CUTTINGMANUFACTURING PROCESS-II UNIT-1 THEORY OF METAL CUTTING
MANUFACTURING PROCESS-II UNIT-1 THEORY OF METAL CUTTING
 
Introduction to IEEE STANDARDS and its different types.pptx
Introduction to IEEE STANDARDS and its different types.pptxIntroduction to IEEE STANDARDS and its different types.pptx
Introduction to IEEE STANDARDS and its different types.pptx
 
Water Industry Process Automation & Control Monthly - April 2024
Water Industry Process Automation & Control Monthly - April 2024Water Industry Process Automation & Control Monthly - April 2024
Water Industry Process Automation & Control Monthly - April 2024
 
The Most Attractive Pune Call Girls Budhwar Peth 8250192130 Will You Miss Thi...
The Most Attractive Pune Call Girls Budhwar Peth 8250192130 Will You Miss Thi...The Most Attractive Pune Call Girls Budhwar Peth 8250192130 Will You Miss Thi...
The Most Attractive Pune Call Girls Budhwar Peth 8250192130 Will You Miss Thi...
 
The Most Attractive Pune Call Girls Manchar 8250192130 Will You Miss This Cha...
The Most Attractive Pune Call Girls Manchar 8250192130 Will You Miss This Cha...The Most Attractive Pune Call Girls Manchar 8250192130 Will You Miss This Cha...
The Most Attractive Pune Call Girls Manchar 8250192130 Will You Miss This Cha...
 
Russian Call Girls in Nagpur Grishma Call 7001035870 Meet With Nagpur Escorts
Russian Call Girls in Nagpur Grishma Call 7001035870 Meet With Nagpur EscortsRussian Call Girls in Nagpur Grishma Call 7001035870 Meet With Nagpur Escorts
Russian Call Girls in Nagpur Grishma Call 7001035870 Meet With Nagpur Escorts
 
KubeKraft presentation @CloudNativeHooghly
KubeKraft presentation @CloudNativeHooghlyKubeKraft presentation @CloudNativeHooghly
KubeKraft presentation @CloudNativeHooghly
 
result management system report for college project
result management system report for college projectresult management system report for college project
result management system report for college project
 

Featured

Everything You Need To Know About ChatGPT
Everything You Need To Know About ChatGPTEverything You Need To Know About ChatGPT
Everything You Need To Know About ChatGPTExpeed Software
 
Product Design Trends in 2024 | Teenage Engineerings
Product Design Trends in 2024 | Teenage EngineeringsProduct Design Trends in 2024 | Teenage Engineerings
Product Design Trends in 2024 | Teenage EngineeringsPixeldarts
 
How Race, Age and Gender Shape Attitudes Towards Mental Health
How Race, Age and Gender Shape Attitudes Towards Mental HealthHow Race, Age and Gender Shape Attitudes Towards Mental Health
How Race, Age and Gender Shape Attitudes Towards Mental HealthThinkNow
 
AI Trends in Creative Operations 2024 by Artwork Flow.pdf
AI Trends in Creative Operations 2024 by Artwork Flow.pdfAI Trends in Creative Operations 2024 by Artwork Flow.pdf
AI Trends in Creative Operations 2024 by Artwork Flow.pdfmarketingartwork
 
PEPSICO Presentation to CAGNY Conference Feb 2024
PEPSICO Presentation to CAGNY Conference Feb 2024PEPSICO Presentation to CAGNY Conference Feb 2024
PEPSICO Presentation to CAGNY Conference Feb 2024Neil Kimberley
 
Content Methodology: A Best Practices Report (Webinar)
Content Methodology: A Best Practices Report (Webinar)Content Methodology: A Best Practices Report (Webinar)
Content Methodology: A Best Practices Report (Webinar)contently
 
How to Prepare For a Successful Job Search for 2024
How to Prepare For a Successful Job Search for 2024How to Prepare For a Successful Job Search for 2024
How to Prepare For a Successful Job Search for 2024Albert Qian
 
Social Media Marketing Trends 2024 // The Global Indie Insights
Social Media Marketing Trends 2024 // The Global Indie InsightsSocial Media Marketing Trends 2024 // The Global Indie Insights
Social Media Marketing Trends 2024 // The Global Indie InsightsKurio // The Social Media Age(ncy)
 
Trends In Paid Search: Navigating The Digital Landscape In 2024
Trends In Paid Search: Navigating The Digital Landscape In 2024Trends In Paid Search: Navigating The Digital Landscape In 2024
Trends In Paid Search: Navigating The Digital Landscape In 2024Search Engine Journal
 
5 Public speaking tips from TED - Visualized summary
5 Public speaking tips from TED - Visualized summary5 Public speaking tips from TED - Visualized summary
5 Public speaking tips from TED - Visualized summarySpeakerHub
 
ChatGPT and the Future of Work - Clark Boyd
ChatGPT and the Future of Work - Clark Boyd ChatGPT and the Future of Work - Clark Boyd
ChatGPT and the Future of Work - Clark Boyd Clark Boyd
 
Getting into the tech field. what next
Getting into the tech field. what next Getting into the tech field. what next
Getting into the tech field. what next Tessa Mero
 
Google's Just Not That Into You: Understanding Core Updates & Search Intent
Google's Just Not That Into You: Understanding Core Updates & Search IntentGoogle's Just Not That Into You: Understanding Core Updates & Search Intent
Google's Just Not That Into You: Understanding Core Updates & Search IntentLily Ray
 
Time Management & Productivity - Best Practices
Time Management & Productivity -  Best PracticesTime Management & Productivity -  Best Practices
Time Management & Productivity - Best PracticesVit Horky
 
The six step guide to practical project management
The six step guide to practical project managementThe six step guide to practical project management
The six step guide to practical project managementMindGenius
 
Beginners Guide to TikTok for Search - Rachel Pearson - We are Tilt __ Bright...
Beginners Guide to TikTok for Search - Rachel Pearson - We are Tilt __ Bright...Beginners Guide to TikTok for Search - Rachel Pearson - We are Tilt __ Bright...
Beginners Guide to TikTok for Search - Rachel Pearson - We are Tilt __ Bright...RachelPearson36
 
Unlocking the Power of ChatGPT and AI in Testing - A Real-World Look, present...
Unlocking the Power of ChatGPT and AI in Testing - A Real-World Look, present...Unlocking the Power of ChatGPT and AI in Testing - A Real-World Look, present...
Unlocking the Power of ChatGPT and AI in Testing - A Real-World Look, present...Applitools
 

Featured (20)

Everything You Need To Know About ChatGPT
Everything You Need To Know About ChatGPTEverything You Need To Know About ChatGPT
Everything You Need To Know About ChatGPT
 
Product Design Trends in 2024 | Teenage Engineerings
Product Design Trends in 2024 | Teenage EngineeringsProduct Design Trends in 2024 | Teenage Engineerings
Product Design Trends in 2024 | Teenage Engineerings
 
How Race, Age and Gender Shape Attitudes Towards Mental Health
How Race, Age and Gender Shape Attitudes Towards Mental HealthHow Race, Age and Gender Shape Attitudes Towards Mental Health
How Race, Age and Gender Shape Attitudes Towards Mental Health
 
AI Trends in Creative Operations 2024 by Artwork Flow.pdf
AI Trends in Creative Operations 2024 by Artwork Flow.pdfAI Trends in Creative Operations 2024 by Artwork Flow.pdf
AI Trends in Creative Operations 2024 by Artwork Flow.pdf
 
Skeleton Culture Code
Skeleton Culture CodeSkeleton Culture Code
Skeleton Culture Code
 
PEPSICO Presentation to CAGNY Conference Feb 2024
PEPSICO Presentation to CAGNY Conference Feb 2024PEPSICO Presentation to CAGNY Conference Feb 2024
PEPSICO Presentation to CAGNY Conference Feb 2024
 
Content Methodology: A Best Practices Report (Webinar)
Content Methodology: A Best Practices Report (Webinar)Content Methodology: A Best Practices Report (Webinar)
Content Methodology: A Best Practices Report (Webinar)
 
How to Prepare For a Successful Job Search for 2024
How to Prepare For a Successful Job Search for 2024How to Prepare For a Successful Job Search for 2024
How to Prepare For a Successful Job Search for 2024
 
Social Media Marketing Trends 2024 // The Global Indie Insights
Social Media Marketing Trends 2024 // The Global Indie InsightsSocial Media Marketing Trends 2024 // The Global Indie Insights
Social Media Marketing Trends 2024 // The Global Indie Insights
 
Trends In Paid Search: Navigating The Digital Landscape In 2024
Trends In Paid Search: Navigating The Digital Landscape In 2024Trends In Paid Search: Navigating The Digital Landscape In 2024
Trends In Paid Search: Navigating The Digital Landscape In 2024
 
5 Public speaking tips from TED - Visualized summary
5 Public speaking tips from TED - Visualized summary5 Public speaking tips from TED - Visualized summary
5 Public speaking tips from TED - Visualized summary
 
ChatGPT and the Future of Work - Clark Boyd
ChatGPT and the Future of Work - Clark Boyd ChatGPT and the Future of Work - Clark Boyd
ChatGPT and the Future of Work - Clark Boyd
 
Getting into the tech field. what next
Getting into the tech field. what next Getting into the tech field. what next
Getting into the tech field. what next
 
Google's Just Not That Into You: Understanding Core Updates & Search Intent
Google's Just Not That Into You: Understanding Core Updates & Search IntentGoogle's Just Not That Into You: Understanding Core Updates & Search Intent
Google's Just Not That Into You: Understanding Core Updates & Search Intent
 
How to have difficult conversations
How to have difficult conversations How to have difficult conversations
How to have difficult conversations
 
Introduction to Data Science
Introduction to Data ScienceIntroduction to Data Science
Introduction to Data Science
 
Time Management & Productivity - Best Practices
Time Management & Productivity -  Best PracticesTime Management & Productivity -  Best Practices
Time Management & Productivity - Best Practices
 
The six step guide to practical project management
The six step guide to practical project managementThe six step guide to practical project management
The six step guide to practical project management
 
Beginners Guide to TikTok for Search - Rachel Pearson - We are Tilt __ Bright...
Beginners Guide to TikTok for Search - Rachel Pearson - We are Tilt __ Bright...Beginners Guide to TikTok for Search - Rachel Pearson - We are Tilt __ Bright...
Beginners Guide to TikTok for Search - Rachel Pearson - We are Tilt __ Bright...
 
Unlocking the Power of ChatGPT and AI in Testing - A Real-World Look, present...
Unlocking the Power of ChatGPT and AI in Testing - A Real-World Look, present...Unlocking the Power of ChatGPT and AI in Testing - A Real-World Look, present...
Unlocking the Power of ChatGPT and AI in Testing - A Real-World Look, present...
 

Pump_IOM_N1.pptx

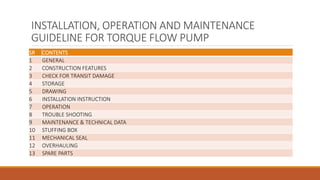
  • 1. INSTALLATION, OPERATION AND MAINTENANCE GUIDELINE FOR TORQUE FLOW PUMP SR CONTENTS 1 GENERAL 2 CONSTRUCTION FEATURES 3 CHECK FOR TRANSIT DAMAGE 4 STORAGE 5 DRAWING 6 INSTALLATION INSTRUCTION 7 OPERATION 8 TROUBLE SHOOTING 9 MAINTENANCE & TECHNICAL DATA 10 STUFFING BOX 11 MECHANICAL SEAL 12 OVERHAULING 13 SPARE PARTS
  • 2. INSTALLATION, OPERATION AND MAINTENANCE GUIDELINE FOR TORQUE FLOW PUMP 1. GENERAL Torque flow pumps are design and manufactured to rigid Specification as per customers specific requirement of speed, capacity, pressure and Temperature. Torque flow pump have following features. I. Unobstructed passage to discharge size of the pump II. Handle large size of solids and long fibers III. Low maintenances cost, no sealing rings on impeller, no small clearances to be maintained IV. Vibration free running due to hydraulically balanced construction V. Handles, abrasive slurries etc VI. Low leakage When pumps are properly installed and properly care taken during operation, maintenance and repair, pump will give long trouble free satisfactory service.
  • 3. INSTALLATION, OPERATION AND MAINTENANCE GUIDELINE FOR TORQUE FLOW PUMP 2. CONSTRUCTIONAL FEATURES CASING: Nickel chrome steel having a hardness of 500 to 500 BHN. Casing with slotted flanges throughout, is smooth and of extra heavy section designed for UNOBSTRUCTED. FLOW: Abrasive or solids-laden flow goes directly into vortex of liquid and out to the discharge. There are no close clearances casing and Impeller (as in conventional pumps) to generate wear and nothing is between suction and discharge to jam, clog, break or bend. Flanges are drilled as per DIN 2543, 2533, ND-16/ any other standards. IMPELLER: Nickel Chrome steel having a hardness of 500 to 550 BHN. Impeller is fully recessed out of flow path and is not subjected to wear by solids or abrasive particles churning in the flow when handling solids or slurries thus greatly improving Impeller life. STUFFING BOX: Nickel Chrome steel having a hardness of 500 to 550 BHN. It accommodates Gland Packing to control leakage of liquid being pumped. SHAFT: Heavy duly shafts are designed for maximum operational heads and low deflection and vibration. SHAFT SLEEVE: Shaft sleeve is keyed to shaft and gasket sealed to stop leakage under sleeve. BEARINGS: Angular contact ball thrust bearings carry radial and thrust loads. Thrust bearings are back to back mounted, locked with nuts and lock washers. Oil lubrication is standard. Constant level oiler maintains proper oil level. Bearings are well protected from dirt. Grease lubrication can also be provided.
  • 4. INSTALLATION, OPERATION AND MAINTENANCE GUIDELINE FOR TORQUE FLOW PUMP 2. CONSTRUCTIONAL FEATURES MATERIAL OF CONSTRUCTION PARTS NAME ALL CAST IRON 02S FITTED CF 8 FITTED CF 8M FITTED HIGH CHROME FITTED Volute Casing Cast Iron Cast Iron CF 8 CF 8M Hi-Chrome Steel Impeller Cast Iron CF 8 CF 8 CF 8M Hi-Chrome Steel Stuffing Box Cast Iron Cast Iron CF 8 CF 8M Hi-Chrome Steel Shaft EN 8/SS 410 SS 410 SS 410 SS 316 SS 410 Sleeve SS 410 SS 410 SS 410 SS 316 SS 410 Bearing Housing Cast Iron Cast Iron Cast Iron Cast Iron Cast Iron
  • 5. INSTALLATION, OPERATION AND MAINTENANCE GUIDELINE FOR TORQUE FLOW PUMP 3. CHECK FOR TRANSIT DAMAGE On receipt of pump visual check should be done, the main items to be checked are. I. Broken or cracked equipment, including base, motor or pump feet and flanges. II. Bent shaft. III. Broken motor end cover, motor fan, bent eye bolt or conduit box. IV. Missing Parts.
  • 6. INSTALLATION, OPERATION AND MAINTENANCE GUIDELINE FOR TORQUE FLOW PUMP 4. STORAGE If pump is not to be installed and operated soon after arrival, store it in a clean dry place with slow changes in ambient temperature. Protect the pump from moisture, dust, dirt and foreign bodies. During storage following precautions to be taken. I. Ensure that the bearings are packed with recommended grease to prevent moisture from entering around shaft. II. Ensure that suction and discharge opening of the pumps and other openings are covered with cardboard or other material to prevent foreign objects entering the pump. III. If pump is to be stored in open or where there is no other suitable covering, cover the unit with tarpaulin or other suitable covering. IV. Rotate the shaft usually every week to prevent corrosion of the bearing surfaces and the stuffing box/shaft seal faces due to moisture. V. If pump is to be stored for long time then before installing change the grease and gland packing.
  • 7. INSTALLATION, OPERATION AND MAINTENANCE GUIDELINE FOR TORQUE FLOW PUMP 5. PUMP ASSEMBLY WITH GLAND PACKING DRAWING - 1
  • 8. INSTALLATION, OPERATION AND MAINTENANCE GUIDELINE FOR TORQUE FLOW PUMP 5. PUMP PARTS NAME FROM DRAWING - 1 P.NO. PARTS NAME P.NO. PARTS NAME P.NO. PARTS NAME 01 BODY 26 GASKET (CASING - GLAND PLATE) 49 OIL LEVEL WINDOW 02 IMPELLER 26A GASKET (GLAND PLATE - SEAL PLATE) 50 OIL DRAIN PLUG 03 GLAND PLATE 28 GASKET 52 HEX. HD CAP SCREW 05 GLAND BUSH 31 GASKET 53 GRIP SPRING 06 SLEEVE 32 OIL SEAL 54 BREATHER 09 INNER BRG. COVER 33 BEARING 55 NAME PLATE 10 PUMP SHAFT 34 BEARING 56 RIVETS(NAME PLATE) 11 BEARING HOUSING 35 O RING 57 O RING 12 OUTER BRG. COVER 36 BRG. LOCK WASHER 58 GASKET (IMP. NUT - IMP.) 13 FOOT 37 BRG. LOCK NUT 182 SEAL PLATE 14 IMP. WASHER 38 OIL SEAL 183 MECHANICAL SEAL (TYPE-82) 15 BOLT FOR IMPELLER 44 HEX.HD.BOLT WITH NUTS & S.P. WASHER 17 SLINGER 45 PLUG/COOLING CONNECTION 18 IMPELLER KEY (BOTH END ROUND) 46 HEX.HD.BOLT WITH NUTS & S.P. WASHER 24 IMPELLER NUT 47 HEX. HD CAP SCREW 25 GASKET (IMP. WASHER - NUT) 48 DRAIN PLUG
  • 9. INSTALLATION, OPERATION AND MAINTENANCE GUIDELINE FOR TORQUE FLOW PUMP 5. PUMP ASSEMBLY WITH MECHANICAL SEAL DRAWING - 2
  • 10. INSTALLATION, OPERATION AND MAINTENANCE GUIDELINE FOR TORQUE FLOW PUMP 5. PUMP PARTS NAME FROM DRAWING - 2 P.NO. PARTS NAME P.NO. PARTS NAME P.NO. PARTS NAME 01 BODY 26 GASKET (CASING - GLAND PLATE) 49 OIL LEVEL WINDOW 02 IMPELLER 26A GASKET (GLAND PLATE - SEAL PLATE) 50 OIL DRAIN PLUG 03 GLAND PLATE 28 GASKET 52 HEX. HD CAP SCREW 05 GLAND BUSH 31 GASKET 53 GRIP SPRING 06 SLEEVE 32 OIL SEAL 54 BREATHER 09 INNER BRG. COVER 33 BEARING 55 NAME PLATE 10 PUMP SHAFT 34 BEARING 56 RIVETS(NAME PLATE) 11 BEARING HOUSING 35 O RING 57 O RING 12 OUTER BRG. COVER 36 BRG. LOCK WASHER 58 GASKET (IMP. NUT - IMP.) 13 FOOT 37 BRG. LOCK NUT 182 SEAL PLATE 14 IMP. WASHER 38 OIL SEAL 183 MECHANICAL SEAL (TYPE-82) 15 BOLT FOR IMPELLER 44 HEX.HD.BOLT WITH NUTS & S.P. WASHER 17 SLINGER 45 PLUG/COOLING CONNECTION 18 IMPELLER KEY (BOTH END ROUND) 46 HEX.HD.BOLT WITH NUTS & S.P. WASHER 24 IMPELLER NUT 47 HEX. HD CAP SCREW 25 GASKET (IMP. WASHER - NUT) 48 DRAIN PLUG
  • 11. INSTALLATION, OPERATION AND MAINTENANCE GUIDELINE FOR TORQUE FLOW PUMP 6. INSTALLATION INSTRUCTION All installations should be performed by experienced personnel in placement, alignment and connection of pumping equipment. Before installing the pump clean the suction and discharge flanges. Remove the protecting coating from the pump shaft. If the pump has been in storage remove grease from the bearings and the bearing shaft then be flushed with carbon tetrachloride or kerosene and re‐lubricated.
  • 12. INSTALLATION, OPERATION AND MAINTENANCE GUIDELINE FOR TORQUE FLOW PUMP 6. INSTALLATION INSTRUCTION SR STEPS FOR INSTALLATION OF PUMP 6.1 LOCATION AND HANDLING 6.2 FOUNDATION 6.3 MOUNTING AND LEVLLING 6.4 ALIGNMENT OF COUPLING 6.5 GROUTING 6.6 PIPING 6.6.1 SUCTION PIPING 6.6.2 DISCHARGE PIPING 6.7 AUXILIARY PIPING CONNECTIONS AND GAUGES 6.7.1 CONNECTION OF COOLING WATER PIPING 6.7.2 MECHANICAL SEALS 6.8 FINAL COUPLING ALIGNMENT 6.9 ROTATION
  • 13. INSTALLATION, OPERATION AND MAINTENANCE GUIDELINE FOR TORQUE FLOW PUMP 6.1 LOCATION AND HANDLING I. The pump should be installed as near to the fluid as possible so a short direct suction Pipe can be used to keep suction losses to minimum. II. It possible, locate the pump so that fluid will flow to the suction by gravity. III. The discharge piping should be direct and with few elbows and fitting as possible. IV. The total net positive suction head available (NPSHA) which includes the suction lift and pipe friction losses must be greater than NPSHR by the pump. V. The pump and drives (Motor) should be location in an area that will permit periodic inspection and maintenance. VI. Head room and access room should be provided and all units should be installed in a dry location with adequate drainage. NOTE: Do not pick up the complete unit by the drive or pump shaft or eye bolts. To lift pump a chain or suitable lifting device should be used and attached to each corner of the base.
  • 14. INSTALLATION, OPERATION AND MAINTENANCE GUIDELINE FOR TORQUE FLOW PUMP 6.2 FOUNDATION 1. The foundation should be of sufficient strength to absorb any vibration and to form a permanent rigid support for the base frame. 2. This is important to maintain alignment in direct coupled unit. 3. A concrete reinforced solid leveled surface base is recommended. 4. The foundation bolt of proper size with sleeve should be embedded in concrete (FIG 3). 5. A pipe sleeves about two and one half diameters larger than the bolt should be used to allow movement for final adjustment of the foundation bolt.
  • 15. INSTALLATION, OPERATION AND MAINTENANCE GUIDELINE FOR TORQUE FLOW PUMP 6.3 MOUNTING AND LEVELLING 1. Lower the unit onto the foundation and position the base frame so that bolts are aligned with holes in the base. 2. The coupling halves should always be disconnected and never reconnect them until all the alignment operations are completed. 3. Set the base frame on metal shims or metal wedges placed directly under the base frame carrying weight and spaced close enough to give uniform support and stability (FIG 4).
  • 16. INSTALLATION, OPERATION AND MAINTENANCE GUIDELINE FOR TORQUE FLOW PUMP 6.3 MOUNTING AND LEVELLING 4. Adjust the metal shims or wedges until shaft of the pump and motor are leveled and are aligned with each other, check coupling faces, suction and delivery flanges for horizontal and vertical position by means of spirit level. 5. Make sure all shims and wedges are in firm contact with the base. 6. Tighten the foundation bolts but not too firmly and recheck the shaft for alignment before grouting.
  • 17. INSTALLATION, OPERATION AND MAINTENANCE GUIDELINE FOR TORQUE FLOW PUMP 6.4 ALIGNMENT OF COUPLING I. Before starting work on the pump, make sure that the power supply has been switched off and that it can not be accidently switched on. II. Disconnects coupling halves. III. Set the required gap between coupling faces depending upon the coupling size. IV. Carry out alignment of the motor by placing shims of different thickness under the motor, if possible replace several thin shims with one thick shim.
  • 18. INSTALLATION, OPERATION AND MAINTENANCE GUIDELINE FOR TORQUE FLOW PUMP 6.4 ALIGNMENT OF COUPLING I. Angular: shaft with axes concentric but not parallel. A. To check for angular alignment insert a pair of inside caliper or a taper gauge at four points at 90.C interval around the coupling (See Fig 7). B. Angular alignment show that all points of the coupling are within (+)or(-) 0.2 mm of each other.
  • 19. INSTALLATION, OPERATION AND MAINTENANCE GUIDELINE FOR TORQUE FLOW PUMP 6.4 ALIGNMENT OF COUPLING II. Parallel: shaft with axes parallel but not concentric. A. To check parallel alignment place a straight edge across both coupling rims at the top, bottom and both sided (See Fig 8). B. After each adjustment recheck all features all alignment ,parallel alignment is correct when the measurement show that all point the coupling faces are within (+)or(‐) 0.2 mm of each other.
  • 20. INSTALLATION, OPERATION AND MAINTENANCE GUIDELINE FOR TORQUE FLOW PUMP When the alignment is correct the foundation bolts should be tightened evenly. The unit should then be grouted to the foundation. The foundation bolt should not be tightened until grout is hardened, usually 48 hrs after pouring. Grouting compensates for uneven foundation, distributes weight of unit, minimizes vibrating and prevents shifting of unit. Use an approved non shrinking grout and pumping unit should be grouted by experts. 6.5 GROUTING  Unless other vise specified, the base frame must be completely filled with grout and the leveling wedges grouted in place. The product warranty may be void if these instructions are not followed.
  • 21. INSTALLATION, OPERATION AND MAINTENANCE GUIDELINE FOR TORQUE FLOW PUMP 6.5 GROUTING The mix required varies with the type of unit to be grouted, location and amount of grout, grout unit as follows. 1. Build a form of thick plan around the foundation to contain the grout. 2. Sock top of concrete foundation thoroughly then surface water. 3. Fill the form with grout up to the top edge of the base frame see (Fig 9). 4. While pouring tamp liberally in order to fill all the cavities and preventing air pockets.
  • 22. INSTALLATION, OPERATION AND MAINTENANCE GUIDELINE FOR TORQUE FLOW PUMP 6.5 GROUTING 5. After the grout has thoroughly has dined tighten the foundation bolts and connect the piping. 6. Ensure that the piping does not exert any strain on the pump flanges. 7. Check the alignment after piping is connected and foundation bolts are tightened. 8. If realignment is required, disconnect the piping first then proceed with alignment. 9. Reconnect the piping after alignment has been completed and recheck the alignment before connecting the coupling (Fig 10).
  • 23. INSTALLATION, OPERATION AND MAINTENANCE GUIDELINE FOR TORQUE FLOW PUMP 6.6 PIPING Caution-1 All piping connections must be made with the pipe in free supported state and without the need to apply vertical or side pressure to obtain alignment of the piping with pump flange. Caution -2 After all the piping is connected, the pump and driver alignment is re- checked. All piping should be independently supported near the pump so that pipe strain will not be transmitted to the pump casing. The weight of the piping and contained liquid must be considered in support design. The suction and discharge piping should be one or two sizes larger than pump flange sizes especially, where the piping is of considerable length. The size of suction and delivery pipe is increased to decrease the loss of head from friction and for the reason piping should be arranged with a minimum bends as possible, as these should be made with a long radius wherever possible. The pipe should be free from scales, welding slag etc and have to be mounted in such a way that they can be connected to suction and delivery flanges without any stress on pump.
  • 24. INSTALLATION, OPERATION AND MAINTENANCE GUIDELINE FOR TORQUE FLOW PUMP 6.6.1 SUCTION PIPE I. The suction pipe must be air tight and use flooded suction only. 6.6.2 DELIVERY PIPE I. A check valve and sluice should be installed in the discharge line, the check valve is installed between pump and sluice valve is to protect the pump from excessive pressure and prevents reverse rotation through the pumping case of failure of driving unit (FIG-7 & 8). II. The sluice valves are used in primary stating and when the pump is shut down. NOTE: The Pump must never be throttled by the use of valve in the suction line.
  • 25. INSTALLATION, OPERATION AND MAINTENANCE GUIDELINE FOR TORQUE FLOW PUMP 6.6.1 SUCTION PIPE I. The suction pipe must be air tight and use flooded suction only. 6.6.2 DELIVERY PIPE I. A check valve and sluice should be installed in the discharge line, the check valve is installed between pump and sluice valve is to protect the pump from excessive pressure and prevents reverse rotation through the pumping case of failure of driving unit (FIG-7 & 8). II. The sluice valves are used in primary stating and when the pump is shut down. NOTE: The Pump must never be throttled by the use of valve in the suction line.
  • 26. INSTALLATION, OPERATION AND MAINTENANCE GUIDELINE FOR TORQUE FLOW PUMP 6.7 AUXILIARY PIPING CONNECTIONS AND GAUGES PUMP TAPPING CONNECTION CHART CODE DESCRIPTION LOCATION OF CONNECTION A Gauge Connection‐Discharge side On Pump discharge flange side B Gauge suction side or vacuum equalizing connection On suction flange side C Circulation line connection from casing On Pump discharge driving side D Pump casing drain On Pumps casing bottom side to wards suction E1 Stuffing box sealing inlet On casing cover bottom right E2 Stuffing box sealing outlet On Casing cover top left H Oil feeding plug On bearing housing top K Oil level indicator On bearing housing left M Bearing housing oil drain On bearing housing left N Drip pan drain On lantern Bracket bottom right F1 Mechanical seal flushing, cooling inlet On SEAL PLATE F2 Mechanical seal flushing, cooling outlet On SEAL PLATE
  • 27. INSTALLATION, OPERATION AND MAINTENANCE GUIDELINE FOR TORQUE FLOW PUMP 6.7 AUXILIARY PIPING CONNECTIONS AND GAUGES  In addition to primary piping connection, pump may require connection to the water seal ring and mechanical seal stuffing box drain, discharge and pressure gauge connection all these connected now be installed (Fig-8A, 8B).
  • 28. INSTALLATION, OPERATION AND MAINTENANCE GUIDELINE FOR TORQUE FLOW PUMP 6.7 AUXILIARY PIPING CONNECTIONS AND GAUGES  In addition to primary piping connection, pump may require connection to the water seal ring and mechanical seal stuffing box drain, discharge and pressure gauge connection all these connected now be installed (Fig-8A, 8B).
  • 29. INSTALLATION, OPERATION AND MAINTENANCE GUIDELINE FOR TORQUE FLOW PUMP 6.7.1 AUXILIARY PIPING CONNECTIONS AND GAUGES Quench Gland:- I. Most pumps which contain stuffing box packing have quench glands. II. Quenching prevents heat transfer along the pump shaft to the bearings. III. Quenching is also most important for smothering vapors and fumes given off at the stuffing box. IV. This is particularly true on applications such as hot water. V. The quenching liquid (usually water) must be from an outside source. VI. It should be piped, with flexible pipe, into the tapped opening on top of the stuffing box gland. VII. A shut-off valve should be installed.
  • 30. INSTALLATION, OPERATION AND MAINTENANCE GUIDELINE FOR TORQUE FLOW PUMP 6.7.1 AUXILIARY PIPING CONNECTIONS AND GAUGES Bearings:- I. Bearing cooling is available on some units. II. When it is available, cooling water must be connected to the jacket when pumping hot liquids. III. Valves should be installed in the coolant supply lines to regulate the flow.
  • 31. INSTALLATION, OPERATION AND MAINTENANCE GUIDELINE FOR TORQUE FLOW PUMP 6.7.1 AUXILIARY PIPING CONNECTIONS AND GAUGES Stuffing Boxes:- I. Some units are equipped with cooling jackets around the stuffing box as standard. II. It is optional on various other models. III. Coolant lines are connected in the same manner as the bearing cooling lines.
  • 32. INSTALLATION, OPERATION AND MAINTENANCE GUIDELINE FOR TORQUE FLOW PUMP 6.7.1 AUXILIARY PIPING CONNECTIONS AND GAUGES Casing Pedestals:- I. On some models, water cooled pedestals are available. Connection of coolant lines is made in the same manner as above.
  • 33. INSTALLATION, OPERATION AND MAINTENANCE GUIDELINE FOR TORQUE FLOW PUMP 6.7.2 MECHANICAL SEALS Seal materials (carbon, ceramic, Teflon, etc.) are suitable for use at temperatures to 500ºF. (212º to 250º F If seal has rubber parts). However, for satisfactory operation, there must be a liquid film between the seal faces to lubricate them. If the liquid flashes to vapor, the faces will run dry and be damaged. To prevent this, the liquid must be cool. In general, this requires that the liquid be cooled so that the vapor pressure is well below the stuffing box pressure.
  • 34. INSTALLATION, OPERATION AND MAINTENANCE GUIDELINE FOR TORQUE FLOW PUMP 6.7.2 MECHANICAL SEALS Some methods which may be used to cool the seal are: 1. Dead Ended Seal Chamber: I. No liquid is circulated through the stuffing box. II. The isolated or “dead ended” liquid around the seal is cooled by circulating water in the stuffing box jacket, if any.
  • 35. INSTALLATION, OPERATION AND MAINTENANCE GUIDELINE FOR TORQUE FLOW PUMP 6.7.2 MECHANICAL SEALS 2. Cool Liquid Flushing (External Source): I. A clean, cool compatible liquid is injected from an outside source directly into the seal chamber. II. The flushing liquid must be at a pressure 20 to 40 PSI greater than the pressure in the stuffing box. III. One half to two GPM should be injected. IV. A control valve and rotometer placed in the inlet line permits accurate regulation. V. Cooling water can be circulated through the stuffing box water jacket (If any) in addition to the external flush.
  • 36. INSTALLATION, OPERATION AND MAINTENANCE GUIDELINE FOR TORQUE FLOW PUMP 6.7.2 MECHANICAL SEALS 3. Cool Liquid Flushing (Product Cooling): I. In this arrangement, pumped liquid is piped from the pump casing, cooled in an external heat exchanger, then injected into the seal chamber. II. A control valve together with a rotometer and /or a dial thermometer should be installed in a line from the exchanger to the seal chamber. III. One-half to two GPM should be circulated. IV. Cooling water, one to three GPM, should be circulated through the stuffing box jacket, if any.
  • 37. INSTALLATION, OPERATION AND MAINTENANCE GUIDELINE FOR TORQUE FLOW PUMP 6.8 FINAL COUPLING ALIGNMENT I. Angular: shaft with axes concentric but not parallel. A. To check for angular alignment insert a pair of inside caliper or a taper gauge at four points at 90.C interval around the coupling. B. Angular alignment show that all points of the coupling are within +‐ 0.2 mm of each other.
  • 38. INSTALLATION, OPERATION AND MAINTENANCE GUIDELINE FOR TORQUE FLOW PUMP 6.8 FINAL COUPLING ALIGNMENT II. Parallel: shaft with axes parallel but not concentric. A. To check parallel alignment place a straight edge across both coupling rims at the top, bottom and both sided. B. After each adjustment recheck all features all alignment ,parallel alignment is correct when the measurement show that all point the coupling faces are within +‐ 0.2 mm of each other.
  • 39. INSTALLATION, OPERATION AND MAINTENANCE GUIDELINE FOR TORQUE FLOW PUMP 6.9 ROTATION I. Before connection the coupling halves, Pump start the drives and verify rotation is in proper direction, the correct pump rotation is indicated. II. The Correct pump rotation is indicated by directional arrow on the pump casing.
  • 40. INSTALLATION, OPERATION AND MAINTENANCE GUIDELINE FOR TORQUE FLOW PUMP 7. OPERATION 7.1 START UP CHECKS 1 Before starting the, rotate the unit or assembly by hand to assure all moving parts are free. 2 The motor direction of rotation has been checked. 3 Before starting the pump, all the guards have been installed around all exposed rotation parts. 4 The coupling has been properly aligned. 5 Never run the pump dry as the close running fits within the pump are water lubricated, running dry may result in pump seizure. 6 The oil lubricated bearing unit has been filled with oil. 7 Before starting the pump, fill the casing and suction line with liquid. The pump may be primed with ejector or vacuum pump. 8 Before starting a mechanical seal pump, turn on the seal water, vent. The seal housing and confirm seal water is at sufficient pressure. 9 Before starting a stuffing box pump, adjust the packing gland so that there is sufficient leakage to lubricate the packing and assure cooling of stuffing box.
  • 41. INSTALLATION, OPERATION AND MAINTENANCE GUIDELINE FOR TORQUE FLOW PUMP 7. OPERATION 7.2 STARTING 1 Check that suction valve is fully open and discharge valve fully closed. 2 Start the pump; let the prime mover pick up full speed. 3 Open the valve on delivery line slowly. 4 Regulate the required flow by adjusting the delivery valve. 5 Open the cock for pressure gauge connection.
  • 42. INSTALLATION, OPERATION AND MAINTENANCE GUIDELINE FOR TORQUE FLOW PUMP 7. OPERATION 7.3 DURING RUNNING PUMP CHECKS 1 The pump is running smooth. 2 The flow of sealing liquid and cooling/heating water is uninterrupted. 3 The bearings are not getting heated up abnormally. 4 The glands are properly tightened to ensure sufficient leakage to dissipate and control the temperature of gland heat generated the maximum permissible leakage is 60-80 drops per minutes. 5 Head and capacity developed by pump. 6 Power Consumption is within limit. 7 Ensure that there is no mechanical friction in the pump. 8 Check for proper indicators such as pressures, flows, temperature, vibration and noise. 9 Check the temperature and vibrations of bearing regularly. If one or the other increases, it may be a sign of improper lubrication or bearing damage. Unusual noise from pump should also be investigated and their cause be rectified.
  • 43. INSTALLATION, OPERATION AND MAINTENANCE GUIDELINE FOR TORQUE FLOW PUMP 7. OPERATION 7.4 STOPPING THE UNIT 1 Close the discharge valve to prevent the pumped liquid from flowing back. 2 Stop the driver/motor. 3 Closed the suction valve. 4 Closed the cooling and flushing valve. 5 If pump is not required to be operated for long time, drain the casing completely. The bearing housing should be dried internally and should be flushed with moisture free protective or light oil or kerosene.
  • 44. INSTALLATION, OPERATION AND MAINTENANCE GUIDELINE FOR TORQUE FLOW PUMP 7. OPERATION 7.5 BEARING OPERATING TEMPERATURE 1 The pumps are designed to operate a wide ambient temperature range. The bearing temperature, when measured on the outside surface of the bearing housing should normally be around 130⁰F (54⁰C) with ambient of 70⁰F (22⁰C) high speed operation may have higher bearing temperature but these temperature should not exceed 190⁰F (87⁰C) It the temperature exceeds 190⁰F (87⁰C), the pump should be stopped and cause to be investigated and corrected. 2 In case of new bearing renew the oil after about 200 hours and then about once a year. If bearing temp is always below 50⁰C and there is only small risk of contamination. If the bearing temperature is up to 80⁰C and if there is damages of contamination the oil should be renewed every six months.
  • 45. INSTALLATION, OPERATION AND MAINTENANCE GUIDELINE FOR TORQUE FLOW PUMP 8. TROUBLE SHOOTING PROBLEM Pump does not rotate POSSIBLE CAUSE Direction of rotation wrong RECOMMENDED REMEDY After confirming wrong rotation, reverse any two of three leads in three phase motor
  • 46. INSTALLATION, OPERATION AND MAINTENANCE GUIDELINE FOR TORQUE FLOW PUMP 8. TROUBLE SHOOTING PROBLEM No discharge or flow with pump running POSSIBLE CAUSE Clogged suction line or casing, which may be due to a fibrous product of large solids RECOMMENDED REMEDY Clean the pump casing
  • 47. INSTALLATION, OPERATION AND MAINTENANCE GUIDELINE FOR TORQUE FLOW PUMP 8. TROUBLE SHOOTING PROBLEM Hydraulic unbalance POSSIBLE CAUSE 1. Damaged pump shaft, impeller 2. Pump is used of very high capacity and is run by excessive throttling of delivery valve RECOMMENDED REMEDY 1. Replace damaged parts 2. Check for proper impeller diameter on curve and rectify
  • 48. INSTALLATION, OPERATION AND MAINTENANCE GUIDELINE FOR TORQUE FLOW PUMP 8. TROUBLE SHOOTING PROBLEM Excessive noise from wet end POSSIBLE CAUSE Impeller rubbing RECOMMENDED REMEDY 1. Check and reset impeller clearance 2. Check outboard bearing assembly for axial end play
  • 49. INSTALLATION, OPERATION AND MAINTENANCE GUIDELINE FOR TORQUE FLOW PUMP 8. TROUBLE SHOOTING PROBLEM Excessive noise from power end running POSSIBLE CAUSE Bearing contamination appearing on the race ways as scoring, scratching or rusting caused by adverse environment and entrance of abrasive contaminants from atmosphere RECOMMENDED REMEDY 1. Work wit clean tools 2. Remove all outside dirt from housing 3. Handle with clean dry hands 4. Use clean solvent and flushing oil 5. Keep bearing wrapped in paper while not in use 6. Check oil seal, all plugs and replace as required
  • 50. INSTALLATION, OPERATION AND MAINTENANCE GUIDELINE FOR TORQUE FLOW PUMP 8. TROUBLE SHOOTING PROBLEM Excessive noise from power end running POSSIBLE CAUSE Misalignment of pump with motor RECOMMENDED REMEDY Check for proper alignment of pump
  • 51. INSTALLATION, OPERATION AND MAINTENANCE GUIDELINE FOR TORQUE FLOW PUMP 8. TROUBLE SHOOTING PROBLEM Excessive noise from power end running POSSIBLE CAUSE Brinelling of bearing identified by indentation on ball races usually caused by incorrectly applied forces in assembling the bearing or by shock loading such as hitting the bearing or drive shaft with a hammer RECOMMENDED REMEDY 1. When mounting the bearing on drive shaft use a proper size ring only 2. Ensure when mounting a bearing to apply the mounting pressure slowly and evenly
  • 52. INSTALLATION, OPERATION AND MAINTENANCE GUIDELINE FOR TORQUE FLOW PUMP 8. TROUBLE SHOOTING PROBLEM Excessive noise from power end running POSSIBLE CAUSE False brinelling of bearing identified again by either axial or circumferential indentations usually caused by vibration of balls between the races in stationary bearing RECOMMENDED REMEDY Correct source of vibration where bearings are oil lubricated
  • 53. INSTALLATION, OPERATION AND MAINTENANCE GUIDELINE FOR TORQUE FLOW PUMP 8. TROUBLE SHOOTING PROBLEM Excessive noise from power end running POSSIBLE CAUSE Thrust overload on bearing identified by flaking ball path on one side of the outer race or in case of maximum capacity bearing may appear as a spelling of the race in the vicinity of the loading slot RECOMMENDED REMEDY Follow correct mounting procedures for bearings
  • 54. INSTALLATION, OPERATION AND MAINTENANCE GUIDELINE FOR TORQUE FLOW PUMP 8. TROUBLE SHOOTING PROBLEM Excessive noise from power end running POSSIBLE CAUSE 1. Misalignment identified by fracture of ball path on the inner race and a narrower cocked ball path on the outer race 2. Misalignment is caused by poor mounting practices or defective drive shaft RECOMMENDED REMEDY 1. Handle parts carefully and follow recommended mounting procedures 2. Check all parts for poor fit and alignment
  • 55. INSTALLATION, OPERATION AND MAINTENANCE GUIDELINE FOR TORQUE FLOW PUMP 8. TROUBLE SHOOTING PROBLEM Excessive noise from power end running POSSIBLE CAUSE Bearing damaged by electric arcing identified as electro etching of both inner and outer ring as a pitting or cratering electrical charge emanating from belt drives, electrical leakage or short circuiting RECOMMENDED REMEDY 1. Check all wiring, insulation and rotor windings to be sure that they are sound and all connections are properly made 2. Eliminate static charges on belt drive pump by proper grounding 3. Follow correct mounting procedures for bearings
  • 56. INSTALLATION, OPERATION AND MAINTENANCE GUIDELINE FOR TORQUE FLOW PUMP 8. TROUBLE SHOOTING PROBLEM Excessive noise from power end running POSSIBLE CAUSE Bearing damaged due to improper lubrication identified by one of more of following 1. Abnormal bearing 2. Temperature rise 3. A stiff cracked grease appearance 4. A brown or bluish discolor attain of the bearing races RECOMMENDED REMEDY 1. Ensure the lubricant is clean 2. Ensure proper amount of lubricant is used 3. Ensure there is space adjacent to the grease lubricated bearings 4. Ensure the proper grade of lubricant is used
  • 57. INSTALLATION, OPERATION AND MAINTENANCE GUIDELINE FOR TORQUE FLOW PUMP 9. MAINTENANCE AND TECHNICAL DATA CLEARANCE BETWEEN SLEEVE & BUSH SLEEVE OD NORMAL CLEARANCE WORN OUT CLEARANCE FOR REPLACEMENT 20-30 0.18 0.30 30-38 0.20 0.35 34-43 0.20 0.35 43-50 0.23 0.45 50-55 0.25 0.50 55-65 0.28 0.55 65-100 0.31 0.60 100-150 0.38 0.75
  • 58. INSTALLATION, OPERATION AND MAINTENANCE GUIDELINE FOR TORQUE FLOW PUMP 9. MAINTENANCE AND TECHNICAL DATA DAILY CHECKS 1. An hourly record of suction and delivery pressure, discharge, input power to pump drive should be maintained. 2. Bearing temperature, oil level, stuffing box leakage/ stuffing box temperature, cooling water inlet and outlet temperature should be checked and recorded this gives an idea of mechanical performance of the pump. 3. Noise and vibration is the first sign of the starting trouble like cavitation, air lock, bearing failure, chocking of impeller of casing and such other troubles. The pump performance should be checked for noise and vibration.
  • 59. INSTALLATION, OPERATION AND MAINTENANCE GUIDELINE FOR TORQUE FLOW PUMP 9. MAINTENANCE AND TECHNICAL DATA PERIODICAL CHECKS 1.Temperature of bearing should be measured by a thermometer. Safe maximum temperature a bearing can attain is 80ºC. 2. The lubricants of bearing should be checked. Lubricant might get contaminated with foreign material or get blackened due to overheating in such a case bearing should be flushed and cleaned and changed with fresh lubricant. 3. Check the stuffing box leakage, Normal leakage should be sufficient to dissipate heat generated in case the packing are worn out, all packing rings should be replaced. Replacement of one or two rings or addition of rings should never be done. 4. Alignment of pump unit should be checked. Due to operational vibration, atmospheric temperature or stress induced by the weight of the piping, the alignment may get disturbed. 5. Sufficient quantities of suitable lubricant and stuffing box packing should be available in stock for daily and emergency. 6. Measuring instrument should be calibrated periodically.
  • 60. INSTALLATION, OPERATION AND MAINTENANCE GUIDELINE FOR TORQUE FLOW PUMP 9. MAINTENANCE AND TECHNICAL DATA ANNUAL CHECKS 1. The Pump should be overhauled completely to check the clearance and replace worn out parts. Clearance between impeller and casing ring shaft sleeve and gland/ throat bush lantern ring and shaft sleeve etc are very important, The bearing should be cleaned and checked thoroughly and lubricated. The stuffing box packing should be replaced and lantern ring should be correctly located. 2. The effects of liquid handled on pump components should be checked, if abnormal corrosion, erosion is observed the component should be replaced with that of suitable material. 3. The auxiliary pipe line and functioning of the auxiliary system should be checked. The main pipe line should be checked for sealing leakage etc. 4. Full running tests may be carried out to check whether there is any fault in the performance in comparison with original performance. 5. Piping support should be checked so that pipe does not induce unwanted stress on the pump.
  • 61. INSTALLATION, OPERATION AND MAINTENANCE GUIDELINE FOR TORQUE FLOW PUMP 9. MAINTENANCE AND TECHNICAL DATA SR ITEM ACTION REQUIRED FREQUENCY HOURS OF OPERATION 1 Packing Box Inspect for excess leakage adjust and replace packing 150 Hours as necessary 2 Mechanical Seal Replace or clean 2000 Hours or Half Yearly 3 Pump Alignment Check for change in alignment Annually 4 Vibration Check for change in Vibration Annually 5 Bearing Lubricate Every 2000 Hours but at least once a year
  • 62. INSTALLATION, OPERATION AND MAINTENANCE GUIDELINE FOR TORQUE FLOW PUMP 9. MAINTENANCE AND TECHNICAL DATA Bearing Lubrication Oil MANUFACTURER SPPEED 1450 RPM SPEED 2900 RPM Indian Oil Servo System 81 Servo System 57 Hindustan Petroleum ENKLO 57 ENKLO 53 ESSO TERESSO-68 TERESSO-46 SHELL TELLUS-68 TELLUS-S 46 CASTROL HYS PIN AWS 68 HYS PIN AWS 68 MOBIL OIL DTE 26 DTE 24 TEXACO PROMAX REGAL R&O 68 REGAL R&O 46
  • 63. INSTALLATION, OPERATION AND MAINTENANCE GUIDELINE FOR TORQUE FLOW PUMP 9. MAINTENANCE AND TECHNICAL DATA BEARING OIL CHANGE INTERVAL BEARING HOUSING SURFACE TEMPARATURE OIL CHANGE INTERVAL New Bearing 150-200 Hours 65⁰C 1 Year 90⁰C 6 Months
  • 64. INSTALLATION, OPERATION AND MAINTENANCE GUIDELINE FOR TORQUE FLOW PUMP 10. STUFFING BOX GENERAL 1. Stuffing boxes are packed at the factory all packing is subjected to wear and should be given regular inspection generally packing boxes in pumps should be checked for excessive leakage every150 hours of operation and gland should be readjustment if necessary. 2. Adjustment is accomplished by lightly tightening gland nuts, and then loosening them so they can be adjusted with figure pressure to allow a small flow of liquid to lubricate the packing 30-60 drops per minute If the flow of liquid has increased and cannot be reduced by lightly tightening of the gland replace the packing and /or shaft sleeve. 3. The stuffing box is fitted with lantern /water seal ring. 4. The sealing chamber should be connected to a source of clear, fresh water. The recommend water pressure is 1kg / cm 2 above the maximum discharge pressure. 5. If water is not available grease lubrication is acceptable. NOTE: Do not tighten gland to stop all leakage, leakage is necessary to ensure cooling ,flushing and lubrication of the packing and to prevent shaft sleeve damage.
  • 65. INSTALLATION, OPERATION AND MAINTENANCE GUIDELINE FOR TORQUE FLOW PUMP 10. STUFFING BOX Packing Replacement Procedure: 1. Stop the pump. 2. Unbolt and remove gland. 3. Use a flexible packing tool with hook/ wood screw attachment for removal of the packing and water seal ring. 4. Clean packing box and shaft sleeve. 5. Inspect shaft sleeve for wear or rough finish and replace if necessary. Sleeve should have smooth surface. 6. Install the packing box with new packing and lantern ring in the following order 2 ring + 1 lantern ring + 3 rings packing + gland (FIG-10).
  • 66. INSTALLATION, OPERATION AND MAINTENANCE GUIDELINE FOR TORQUE FLOW PUMP 10. STUFFING BOX Packing Replacement Procedure: 7. For renewing packing rings of suitable quality and dimension. It should be at cut clean in an oblique manner, the ends of the ring laid around the shaft should slightly touch. If necessary, measure the ring length on the shaft out Side the pump. 8. Before inserting the turns clean the gland space. Apply light grease on gland packing and individual rings are to be placed with joints staggered by 90⁰c and are to be pushed backwards with the gland, consider the sequence as mentioned above for lantern ring. 9. Slightly tighten by hand the gland nuts, during operation carefully tighten nut. The glands need certain time to set. A correctly maintained gland should leak 30 to 60 drops per minute.
  • 67. INSTALLATION, OPERATION AND MAINTENANCE GUIDELINE FOR TORQUE FLOW PUMP 10. STUFFING BOX Packing Replacement Procedure: 10. After prolonged stand skill of the during which the gland may set hardened, they have to be freed and turn shaft by hand. 11. Too heavily tightened gland would result in dry running, heating up, burning of the packing material, and damage to the shaft/shaft sleeve. In such case the shaft with sleeve and gland with have to be replaced. 12. The gland can only be tightened it the shaft surface is perfect (Ground or polished), the bearing are correct and sleeve are concentric. Maximum eccentricity of about 0.075 mm to 0.125 mm depending on size and operating condition is permissible. 13. Packing box arrangement and data is given in (Fig-10, 10A)
  • 68. INSTALLATION, OPERATION AND MAINTENANCE GUIDELINE FOR TORQUE FLOW PUMP 10. STUFFING BOX Usual Causes of Packing Failure: A. Packing has not been installed properly. B. Packing used is not suitable for the temperature and pressure involved or may be subject to attack by the liquid being handled. C. Inner rings are not properly seated so that the outer rings are carrying the entire load. D. Dist or foreign Material in the stuffing box are causing repaid wear of shaft or shaft sleeve. E. Lantern ring not in line with the tapped hole sealing connection.
  • 69. INSTALLATION, OPERATION AND MAINTENANCE GUIDELINE FOR TORQUE FLOW PUMP 10. STUFFING BOX TROUBLE Not liquid delivered Not enough pressure CAUSE Lack of Prime Defective packing CURE 1. Packing too loose or defective, allowing air to leak into suction 2. Tighten or replace packing and prime pump As for preceding
  • 70. INSTALLATION, OPERATION AND MAINTENANCE GUIDELINE FOR TORQUE FLOW PUMP 10. STUFFING BOX TROUBLE Not enough liquid delivered CAUSE Air leaking into stuffing box CURE 1. Check that there is some leakage through stuffing box while operating if no leakage after reasonable gland adjustment new packing may be needed 2. Lantern ring may be clogged or displaced and may need centering in line with sealing liquid connection
  • 71. INSTALLATION, OPERATION AND MAINTENANCE GUIDELINE FOR TORQUE FLOW PUMP 10. STUFFING BOX TROUBLE Not enough liquid delivered CAUSE Air leaking into stuffing box CURE 3. Sealing line may be clogged 4. Shaft or shaft sleeve below packing may be badly scored and allowing air to be sucked into pump
  • 72. INSTALLATION, OPERATION AND MAINTENANCE GUIDELINE FOR TORQUE FLOW PUMP 10. STUFFING BOX TROUBLE Not enough liquid delivered CAUSE Defective packing CURE Replace packing and check for surface smoothness of shaft or shaft sleeve
  • 73. INSTALLATION, OPERATION AND MAINTENANCE GUIDELINE FOR TORQUE FLOW PUMP 10. STUFFING BOX TROUBLE Pump works for a while and quits CAUSE Air leaking into stuffing box CURE See preceding
  • 74. INSTALLATION, OPERATION AND MAINTENANCE GUIDELINE FOR TORQUE FLOW PUMP 10. STUFFING BOX TROUBLE Pump takes too much power CAUSE Packing too tight CURE 1. Release gland pressure. 2. Retighten reasonably. 3.Keep leakage flowing If none, check packing, sleeve or shaft
  • 75. INSTALLATION, OPERATION AND MAINTENANCE GUIDELINE FOR TORQUE FLOW PUMP 10. STUFFING BOX TROUBLE Pump leaks excessively at stuffing box CAUSE Defective packing Wrong type of packing Scored shaft or shaft sleeves CURE 1. Replace worn packing 2. Replace packing damaged by lack of lubrication Replace packing not properly installed or run-in Put in lathe and machine true and smooth or replace
  • 76. INSTALLATION, OPERATION AND MAINTENANCE GUIDELINE FOR TORQUE FLOW PUMP 10. STUFFING BOX TROUBLE Stuffing box overheating CAUSE Packing too tight Packing not lubricated Wrong grade of packing CURE Release gland pressure Release gland pressure and replace all packing if any burnt or damaged Check with pump or packing manufacturer for correct grade
  • 77. INSTALLATION, OPERATION AND MAINTENANCE GUIDELINE FOR TORQUE FLOW PUMP 10. STUFFING BOX TROUBLE Stuffing box overheating CAUSE Insufficient cooling water to jackets Stuffing box improperly packed CURE Check if supply line valves opened or line clogged Repack
  • 78. INSTALLATION, OPERATION AND MAINTENANCE GUIDELINE FOR TORQUE FLOW PUMP 10. STUFFING BOX TROUBLE Packing wears too fast CAUSE Shaft or shaft sleeve worn or scored Insufficient or no lubrication Improperly packed CURE Re-machine or replace Repack and make sure packing loose enough to allow some leakage Repack properly making sure all old packing removed and box clean
  • 79. INSTALLATION, OPERATION AND MAINTENANCE GUIDELINE FOR TORQUE FLOW PUMP 11. MECHANICAL SEAL 11.1 MECHANICAL SEAL FUNCTION When the mechanical seal is functioning satisfactorily without any leakage etc, preventive maintenance is not advised. If leakage occurs a through check up is needed. Like other parts in equipment the mechanical seals are subject to wear at the mating faces of the rotating and stationary ring. The rate of wear will differ with the operation or condition and various other factors such as lubricating properties of liquid being pumped, the presence of impurities in liquid and other operating condition. Before assembly, check up the following points to ensure proper fitting and satisfactory operation of mechanical seal. 1. Shaft sleeve OD should be within +0.00mm or -0.05 mm for specified seal size. 2. Leading edge of shaft sleeve is chamfered. 3. Run out of the shaft at the seal face is within 0.05 mm.
  • 80. INSTALLATION, OPERATION AND MAINTENANCE GUIDELINE FOR TORQUE FLOW PUMP 11. MECHANICAL SEAL 11.2 MECHANICAL SEAL COOLING If the following working conditions are maintained a Life of several years with a leakage free operation can be obtained. 1. The friction heat generated has to be dissipated, this is done by flushing with the liquid or by cooling the seal. 2. Mechanical damage to the running surfaces should be avoided. 3. Damage can be caused by the ingress of solids, especially Fine dust, by solidification of the fluid between rings, precipitation of solid material by evaporation etc. 4. Avoid dry running , which would destroy the running surfaces very quickly dry run is due to operation without fluid, evaporation of the fluid between the sliding ring.
  • 81. INSTALLATION, OPERATION AND MAINTENANCE GUIDELINE FOR TORQUE FLOW PUMP 11. MECHANICAL SEAL 11.2 MECHANICAL SEAL COOLING For Smooth run of the shaft, concentric installation of the seal /gland parts is essential. Flushed fluids are different from the fluid being pumped. It flushing are introduced from an external source , flushing should be done at minimum pressure of 0.7 kg/cm2 above pressure of liquid at stuffing box. The flushing liquid quantity should be approx. 0.3 to 0.5 m3/hr flushing at the seal faces is necessary to provide lubrication, heating or cooling of the seal faces. pump should not be run without flushing at the seal face unless recommended by seal manufacturer (Fig 10B).
  • 82. INSTALLATION, OPERATION AND MAINTENANCE GUIDELINE FOR TORQUE FLOW PUMP 11. MECHANICAL SEAL 11.3 MECHANICAL SEAL ASSEMBLY AND DISASSEMBLY PROCEDURE 1. Certain elastomers are attacked by oil if such parts are used, the shaft must not be lubricated with oil for mounting the ring. It is recommended to grease the shaft with talcum powder or soapy water before installing them. 2. Edges and passages of shaft have to be very carefully rounded off to avoid damaging the lips of elastomers and O- ring. 3. Protect sliding surfaces from dust (Especially oily dust) and filling from work benches and hands. Touch with only clean hands, never leave sliding surfaces exposed. Put them only on clean cloth or paper; unpack mechanical seal only at the time of installation. 4. Take care of exact spring tension during installation , very carefully check developed length. 5. Do not grind worn sliding surfaces each other Separately re machine/ grind surface and lap on a lapping machine check plainness. 6. The surfaces on which elastomers (O-rings, wedge rings) are Resting have to be polished. The tolerance specified have to be carefully observed
  • 83. INSTALLATION, OPERATION AND MAINTENANCE GUIDELINE FOR TORQUE FLOW PUMP 11. MECHANICAL SEAL 11.4 MECHANICAL SEAL INSTALLATION Check surfaces at the face of the seal housing and at the bottom of the seal housing to insure that they are clean, flat and free of dirt and burrs. The face surface must be smooth to form a good sealing surface for O-ring. Check that shaft/shaft sleeve is smooth and free of burrs, nicks and sharp corners that could damage the O-ring or shaft packing. When further clean up is required protect the seal remove burse, sharp Carnes by using a strip of emery paper /cloth file threads over the shaft threads, file threads / around the key way with a smooth file, sharp edges must be removed. Remove all chips and dust from the shaft area. Check that all rotary unit parts of the seal fit over shaft. A pre check be made by removing the O-ring to the seal and then installing seal on the shaft. Further shaft clean up will be necessary when seal will not pass all the way in seal housing. Remove the seal after the pre check and reinstall the sleeve o ring. Lubricate the shaft and sleeve ID with lubricant recommended by manufacturer. When no lubricant is recommended by mechanical seal manufacture. Recommended Lubricant: 1. Light oil (SAE-10) 2. Silicone lubricant 3. Soapy water / liquid detergent. Oil based lubricant will damage EPR/ EPDM Elastomer O-ring silicon and soapy water are safe for EPR/ EPDM elastomer O-rings.
  • 84. INSTALLATION, OPERATION AND MAINTENANCE GUIDELINE FOR TORQUE FLOW PUMP 11. MECHANICAL SEAL 11.4 MECHANICAL SEAL INSTALLATION Install the O-ring between the seal housing and seal. Install seal cover over the shaft and slide into position against the face of the seal box. Take care when passing the sleeve and O-rings over the key ways or threads to avoid damaging the O-ring. Position seal gland on discharge head seal housing and secure with cap screens. Tighten cap screw gradually and uniformly. Note: Do not pump carbon members against the shaft as they may chip crack or break. Do not over tighten cap screws on gland. This can distort seal seat and cause or external water source. Install all seal piping as required prior to making connections of seal liquid pressurizing lines, make sure seal housing and all sealing liquid lines are flushed free of dust, scale and other particles that would be abrasive to the sealing faces. A. Impeller adjustment is required prior to installation. B. Secure collar set screw, set proper spring compression.
  • 85. INSTALLATION, OPERATION AND MAINTENANCE GUIDELINE FOR TORQUE FLOW PUMP 11. MECHANICAL SEAL 11.5 MECHANICAL SEAL OPERATION 1. The seal should never run dry, even to check for rotation, A Water source must be provided to cool and lubricate faces during pump operation the lubricating media or external water source. 2. If an external water source is used it must be clean to within 100 micro and introduced to the seal prior to each motor start. NOTE: Some seal may swat at initial stage. This condition should cease after a short period as the seal faces lap together, operate and monitor the seal until leakage subsides, in no case it should exceed 40 drops per minutes. ADEQUATE FLOW MUST BE PROVIDED TO MAINTAIN (15 FPS)/(5 MPS) MINIMUM VELOCITY BETWEEN THE BUSHING AND SHAFT. REFER TO THE FOLLOWING TAB. SHAFT OR SLEEVE DIA. MM FLOW RATE LPM 25 3-5 32 4-6 38 5-7 43 6-8 49 7-9 55 9-10 62 8-10 70 10-11 75 11-13 80 13-15 90 14-16 100 15-17 115 17-19
  • 86. INSTALLATION, OPERATION AND MAINTENANCE GUIDELINE FOR TORQUE FLOW PUMP 11. MECHANICAL SEAL 11.6 SEAL ROUTINE MAINTENANCE 1. Periodically (100 hours of operation / one weak) check seal for leakage. 11.7 MECHANICAL SEAL REMOVAL 1. Stop the drive and lock out the power so that driver cannot start accidently. 2. Disconnect piping to seal gland. 3. Release spring tension to retain proper position. Loosen the collar set screw. 4. Loosen the cap screws securing the gland to the seal housing. Remove seal assembly. 5. Insect all parts of the seal, if any parts show sigh of wear, the complete seal should be replaced.
  • 87. INSTALLATION, OPERATION AND MAINTENANCE GUIDELINE FOR TORQUE FLOW PUMP 11. MECHANICAL SEAL 11.8 MECHANICAL SEAL FAILURE Seal faces are worn or scored. Gland is bolted up unevenly. Stationary insert face is not perpendicular to the axis of shaft. The seal ring is binding. Wobbling of the rotating seal ring.
  • 88. INSTALLATION, OPERATION AND MAINTENANCE GUIDELINE FOR TORQUE FLOW PUMP 11. MECHANICAL SEAL 11.8 MECHANICAL SEAL FAILURE Cracked or broken stationary seal. Shaft run out through stuffing box. Foreign particles between sealing faces. Loose set screws. Loss of spring compression. Mechanical seal is improperly installed.
  • 89. INSTALLATION, OPERATION AND MAINTENANCE GUIDELINE FOR TORQUE FLOW PUMP 12. PUMP OVERHAULING 12.1 PUMP DISMENTLE PROCEDURE Isolate power supply to motor. Shut off valve controlling flow to and from the pump. Drain the liquid from the pump by removing the drain plug. Remove all auxiliary, tubing & piping. Drain the lubrication oil from the bearing housing and remove constant level oil lubricator. Match mark coupling halves. Remove the support hold down bolts. Adjust chain tension to support the weight of the back pullout assembly for repair (Fig-11).
  • 90. INSTALLATION, OPERATION AND MAINTENANCE GUIDELINE FOR TORQUE FLOW PUMP 12. PUMP OVERHAULING 12.1 PUMP DISMENTLE PROCEDURE Remove the hex nuts from the casing studs holding the bearing housing (11) to pump casing ( 01). Screw the jacking bolts provided in housing cover . Turn bolts evenly through a quarter turn at both sides at a time. Slightly pullout the driving unit till impellers (02) clears the pump casing (01) (Fig-11A) Place the rotating unit on table or clear place for further dismantling. Remove casing gasket. Unscrew impeller bolt (15) remove O-ring , gasket , impeller washer (14,57,25). Take out the impeller (02) from pump shaft (10) , Remove the O-ring gasket (28) Between impeller and shaft sleeve (06) (Fig-11B).
  • 91. INSTALLATION, OPERATION AND MAINTENANCE GUIDELINE FOR TORQUE FLOW PUMP 12. PUMP OVERHAULING 12.1 PUMP DISMENTLE PROCEDURE Removal of stuffing box with gland packing. For this following steps should be taken. 1. Take the casing cover / gland plate (03) along with throat bush /gland bush (05) gland packing (30), lantern ring (07) and O ring will also come out along with it. (Fig11C,D). 2. Remove gland packing rings (30) and lantern ring (07). 3. Remove shaft sleeve (06) along with liquid deflector (17). 4. Remove gland bush (05) 6. Remove Impeller key.
  • 92. INSTALLATION, OPERATION AND MAINTENANCE GUIDELINE FOR TORQUE FLOW PUMP 12. PUMP OVERHAULING 12.1 PUMP DISMENTLE PROCEDURE Removal of stuffing box with mechanical seal. Follow the step given below. 1. Unscrew cover plate (04) gland plate (3) SEAL (170 ) and along with throat bush / gland plate bush (05). 2. Remove throat bush (05). 3. Pull shaft sleeve under mechanical seal. Be careful while removing shaft sleeve, it comes out with rotating parts of mechanical seal. 4. Remove mechanical seal from the shaft sleeve and keep in clean place. 5. Remove nut from casing cover studs. 6. Take out casing cover along with mechanical seal cover, O-ring for casing cover will also come out along with it. 7. Unscrew the nuts of mechanical seal cover studs and remove mechanical seal cover studs and remove mechanical seal cover from casing cover. 8. Remove defector / slingers.
  • 93. INSTALLATION, OPERATION AND MAINTENANCE GUIDELINE FOR TORQUE FLOW PUMP 12. PUMP OVERHAULING 12.1 PUMP DISMENTLE PROCEDURE Remove the pump half coupling after unscrewing grub screw. Note Coupling half should be removed with the help of suitable puller device to avoid damage to bearing coupling half should not be knocked off the shaft. Take out the coupling key. Fasten bearing housing unit firmly to vice (Fig-12) unscrew hex screws of the bearing cover remove bearing cover. Strike the pump shaft from pump side end of the shaft with soft hammers, where the shaft with the bearing will come of the bearing housing. (Fig-12). Fasten the shaft with the bearing in rice and detach bearing nut and lock washer. Detach the bearing from the shaft with an extractor. (Fig-13).
  • 94. INSTALLATION, OPERATION AND MAINTENANCE GUIDELINE FOR TORQUE FLOW PUMP 12. PUMP OVERHAULING 12.2 PUMP REASSEMBLE PROCEDURE Check the shaft with protection sleeve for concentricity, the eccentricity between centers, maximum allowable concentricity is 0.050mm. Fasten the shaft in vice with impeller side end of shaft upward. Soft sheets to be used for clamping in vice jaws to avoid damage to shaft. Heat the cylindrical roller bearing to 95- 100.c and push it onto the shaft remember to place the spacer ring of the bearing on the shaft side. (Fig 14). Let the bearing cool down. Then tap it lightly by the lines against the shoulder using a sleeve punch, rotate the sleeve punch between blows. Turn the shaft so that coupling side is upwards, fasten it to vice, use soft sheets for clamping.
  • 95. INSTALLATION, OPERATION AND MAINTENANCE GUIDELINE FOR TORQUE FLOW PUMP 12. PUMP OVERHAULING 12.2 PUMP REASSEMBLE PROCEDURE Heat the ball bearings to approx. + 100.c and push them into the shaft. Let the bearing cool down (Fig 15). Place lock washer on shaft. Tighten the bearing by means of the bearing lock nut tightly against the shaft should use suitable hook wrench. Bend the lock washer tooth onto the bearing nut slots. Note: It is absolutely necessary that the bearing are placed correctly. Tighten bearing housing vertically to the vice with the coupling side up words. Tap the oil seal into bearing housing with a soft hammer ensure that the water holes are in the oil seal will be on underneath.
  • 96. INSTALLATION, OPERATION AND MAINTENANCE GUIDELINE FOR TORQUE FLOW PUMP 12. PUMP OVERHAULING 12.2 PUMP REASSEMBLE PROCEDURE Lower the shaft unit carefully into the bearing housing. Make sure not to damage oil seal (Fig 16). Tap the oil seal into the bearing cover with a soft hammer; insure that the holes in the oil seal will end up underneath. Grease o ring of the bearing cover lightly and stretch it into the groove. Set the bearing cover carefully into place make sure the water holes in labyrinth ring will end up underneath. Secure to the bearing housing with cap screws. Tighten the cap screws of the bearing cover. Place the deflectors with care onto the shaft. Grease the rubber lip before installation.
  • 97. INSTALLATION, OPERATION AND MAINTENANCE GUIDELINE FOR TORQUE FLOW PUMP 12. PUMP OVERHAULING 12.3 PUMP SHAFT ASSEMBLE PROCEDURE A. Gland Packing Fitting 1. Fix the adapter to bearing housing with hexagonal screws. 2. Place on the horizontal surface with the sealing cavity upwards. 3. Place the neck / gland bush to the bottom of sealing cavity. 4. Put the shaft wearing sleeve in an upright position in the middle of the sealing cavity. 5. Insert the first two gland packing, the lantern ring, the other two/three glands packing and the two piece stuffing box gland; tighten the hexagonal nuts by hand. 6. Push the casing cover with gland packing parts onto the shaft. Check that the shaft wearing sleeve is placed on the shaft shoulder. 7. Attach the casing cover to the adaptor with hexagonal head screws.
  • 98. INSTALLATION, OPERATION AND MAINTENANCE GUIDELINE FOR TORQUE FLOW PUMP 12. PUMP OVERHAULING 12.3 PUMP SHAFT ASSEMBLE PROCEDURE B. MECHANICAL SEAL FITTING 1. Fix the adaptor into the bearing housing with hex head screws. 2. Mount the mechanical seal parts into cover plate for seal and onto the shaft wearing sleeve. Make sure that cylinder pin is in proper position. 3. Place the gasket in the cover plate for seal on the casing cover with the flange, tighten the hexagonal nuts. 4. Push the casing cover to gather with the incorporated parts onto the shaft. Fix the screws. 5. Push the shaft wearing sleeve to gather with incorporated parts onto the shaft against the shoulder.
  • 99. INSTALLATION, OPERATION AND MAINTENANCE GUIDELINE FOR TORQUE FLOW PUMP 12. PUMP OVERHAULING 12.4 PUMP UNIT ASSEMBLE PROCEDURE 1. Fix the adaptor plate to the bearing housing with hexagonal cap screws. 2. The shaft seal and casing cover are assembled as per drawing (FIG-1 &2 ). 3. Fit the O ring between impeller and shaft protection sleeve. 4. Fix casing cover to the adopter plate with the hexagonal screws. 5. Prevent the shaft from rotating from coupling and insert the impeller into its place. The clearance between the impeller and casing cover is about 1.0mm. 6. Lock the impeller with socket head screw on to which the O-ring has been fitted. 7. Tighten the socket head screw to value given below.(Fig-17B). 8. Fix the support foot of the bearing unit by means of the hexagon screw. 9. Heat the coupling flange to about 100.c.
  • 100. INSTALLATION, OPERATION AND MAINTENANCE GUIDELINE FOR TORQUE FLOW PUMP 12. PUMP OVERHAULING 12.5 INSTALLATION PROCEDURE OF BEARING FRAME UNIT WITH IMPELLER Loop a hoist sling under the bearing frame unit for support. Fit the gasket in casing cover. Install bearing frame unit with in place and lubricate hexagonal screw with militate lubricant and tighten them slowly to valve given below. Tighten the unit with casing studs firmly and evenly. SCREW SIZE RATED TORQUE (NM) MAXIMUM VALUE OF TORQUE (NM) M-10 30 40 M-12 50 60 M-16 130 160 M-20 250 300 M-24 420 520
  • 101. INSTALLATION, OPERATION AND MAINTENANCE GUIDELINE FOR TORQUE FLOW PUMP 12. PUMP OVERHAULING 12.5 INSTALLATION PROCEDURE OF BEARING FRAME UNIT WITH IMPELLER Check free rotation of shaft. Fix the support to the base plate with the hexagonal screws. Lubricate the bearing with grease or oil. Install the coupling /spacer with coupling. Install the auxiliary piping and accessories' according to the drawing and seal manufactures instruction.
  • 102. INSTALLATION, OPERATION AND MAINTENANCE GUIDELINE FOR TORQUE FLOW PUMP 13. SPARE PARTS SR PART NUMBER DESRCIPTION MINIMUM QUANTITY 1 Bearing Housing 10% 2 Volute Casing/Gland Plate 10% 3 Wear Plate 1 To 30% 4 Casing Cover 10% 5 Pump Shaft 30% 6 Impeller 30% 7 Antifriction Bearing 50% 8 Antifriction Bearing Back To Back 50% 9 Bearing Housing 10% 10 Adaptor 10% 11 Bearing Cover 10% 12 Gasket-31/28/28/26A 200%
  • 103. INSTALLATION, OPERATION AND MAINTENANCE GUIDELINE FOR TORQUE FLOW PUMP 13. SPARE PARTS SR PART NUMBER DESRCIPTION MINIMUM QUANTITY 13 O‐Ring-27,27A/29/35 200% 14 Oil Seal-32/38 100% 15 Mechanical Seal 100% 16 Neck Gland Bush 50% 17 Gland Packing 400% 18 Cover Plate For Seal 10% 19 Deflector 50% 20 Shaft Sleeve 100% 21 Washer (Impeller) 30% 22 Impeller Bolt 30% 23 Key 30% 24 Lantern Ring 30%