Functional cast bracing and various pop spica cast
•Download as PPTX, PDF•
18 likes•4,354 views

o

Recommended
More Related Content
What's hot
What's hot (20)
Similar to Functional cast bracing and various pop spica cast
Similar to Functional cast bracing and various pop spica cast (20)
Recently uploaded
Recently uploaded (20)
Functional cast bracing and various pop spica cast
- 1. VARIOUS POP SPICA CAST & FUNCTIONAL CAST BRACING PRESENTED BY –DR. AKASH KUMAR PRESENTED BY – DR. AKASH KUMAR
- 2. VARIOUS POP SPICA CASTS
- 3. SPICA CAST definition :- A cast of layers overlapping in a V pattern(resemble an ear of grain) , covering two body parts greatly different in size as the hip and waist , thumb and wrist , arm and trunk etc
- 4. INDICATIONS OF HIP SPICA CAST:- . Femur or pelvis fracture in younger children in order to avoid surgery. • May be used after surgery for femur and hip fractures to provide additional stability and comfort while the patient is healing • HIP spica are used frequently to correct developmental hip dysplasia in children • May be Used in Conservative management of Sliped captital femoral epiphysis • Used in conservative management of Perthes disease .
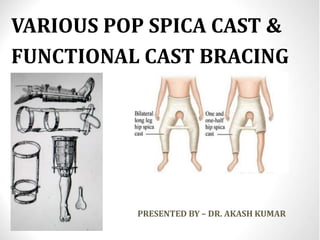
- 5. Extension of Cast Proximally:- Up to nipple and rest on rib cage. Distally:- On this basis of distal extension spica can be classified as:- 1. Single Hip Spica:- Involving only one leg and extend up to foot 2.One and Half spica:- Involving one leg up to foot and other leg up to knee 3.Double hip spica:- Involving Both leg up to foot HIP SPICA
- 6. TECHNIQUE ■ Place the anesthetized child on the spica frame. POSITION :- For DDH Abduct the hip to 40 to 45 degrees, and flex it to about 95 degrees . :-For fracture shaft of femur For Proximal 1/3rd fracture shaft of femur ( Flexion 45◦ , Abduction 30◦ , external rotation 20◦) at HIP Joint For Middle 1/3rd fracture shaft of femur ( Flexion 30◦ , Abduction 20◦ , external rotation 15◦ ) at HIP Joint For Distal 1/3rd fracture shaft of femur ( Flexion 20◦ , Abduction 20◦ , external rotation 15◦ ) at HIP Joint KNEE SHOULD BE IN 50-60 degree of flexion :- For Perthes disease applied cast in Abduction and in internal rotation at hip joint and and full extention at knee joint which help in ambulation of child . The amount of hip flexion and abduction required to keep the hip in the most stable position should be determined clinically and checked by Radiographs
- 7. ■ After the correct position of flexion and abduction for stability is determined, place a small towel in front of the abdomen. ■ Cover the pelvis and extremities with stockinette. Roll Webril from the level of the nipples down to the ankles . Pad around the bony points with standard felt. Apply the first pad over the proximal end of the spica, near the nipple line ■ Start a second piece of the same size felt at the level of the right groin, and carry it posteriorly across the gluteal fold, over the right iliac crest, in front of the abdomen, over the lateral aspect of the left thigh, and to the left inguinal area .
- 8. ■ Apply a third piece of felt over the knee and a fourth piece above the ankle over the distal leg. Place similar pieces of felt over the opposite knee and leg. ■ Apply the plaster in two sections—a proximal section from the nipple line to the knees and a distal section from the knees to the ankles ■ Apply a single layer of plaster roll from the nipple line to the level of the knees on both sides. Apply four or five plaster splints back to front from the nipple line to the back of the sacrum to reinforce the back of the cast. At the same time, apply a short, thick splint over the anterolateral aspect of the inguinal area ■ Apply another splint. Starting from the right inguinal area, carry it posteriorly across the gluteal region, the iliac crest, the front of the abdomen, and back the same way on the opposite thigh .This is a reinforcing splint that attaches the thigh to the upper segment.
- 9. ■ Apply another long splint from the level of the knee across the anterolateral aspect of the inguinal area and up the chest wall . This splint is one of the main anchors of the thigh to the body segment. ■ Follow this by a roll of plaster from the nipple line to the knees. This completes the proximal section of the spica. ■ Complete the cast from the knees down to the ankles. Do this by applying on both sides a single roll of plaster from the knee to the ankle level and reinforcing this by two splints over the medial and lateral aspects of the thigh, knee, and leg. ■ Follow this by another roll plaster
- 10. COMPLICATIONS:- :-Urinary retention :-Plaster cast syndrome :-Compartment syndrome :-Volkmann contracture :-Skin excoriation
- 11. THUMB SPICA INDICATION • Thumb spica cast may be used in treatment of fracture of scaphoid bone • Thumb spica cast may be used in the fracture of first metacarpal and fracture phalanx of Thumb • May be used in thumb in palm deformity which develop due to spasticity in the flexer pollicis longus tendon • Injury to ulnar collateral ligaments • Positioning of de quervain tenosynovitis
- 12. EXTENT • The IP joint of the thumb should be remains free • The distal palmar crease should remain free • The splint should end two fingers breadth from the elbow
- 13. Position of thumb • For Scaphoid fracture:- Slight radial deviation and 10 degree of flexion • For fracture base of first metacarpal :-Abduction and extension • De quervain’s tenosynovitis:-Abduction and extension , to relax the involed muscles . • Thumb in palm deformity :-Abduction and extention • Ulner collateral ligament injury:-Slight adduction and neutral flexion Position of wrist Wrist should be in 10-20 degree of extention.
- 14. SHOULDER SPICA It incorporates trunk with upper limb Position of limb:- Shoulder is abducted Elbow is 90 degree flexed , forearm is in mid prone position Extent of cast:- Above the waist , Involve ipsilateral shoulder , Restrict just proximal to wrist joint There is supporting bar between forearm and trunk
- 15. Indication of shoulder Spica • May be used after surgical procedure to provide additional stability • May be used in proximal humeral fracture • After shoulder arthodesis • may be used in after reduction of shoulder dislocation • Brachial palsy
- 16. FUNCTIONAL CAST BRACING BASIS OF TREATMENT “Continuing function while a fracture is uniting, encourages osteogenesis, promotes the healing of tissues & prevents the development of joint stiffness, thus accelerating rehabilitation.” It’s a closed method of treating fractures 1.LOSS OF ANTOMICAL REDUCTION 1.RAPID HEALING 2.EARLY RESTORATION OF FUNCTION 3.NO JOINT STIFFNESS 4.NO COPROMISATION OF APPEARANCE OF LIMB BY OPERATIVE SCAR
- 17. HISTORY 1.H.H Smith(1855)-Ambulant treatment of nonunion of proximal femur by waist band, ischial support and thigh lacer as well Knee and ankle hinges(union occur in seven patient treated) 2.Lucas championniere(1910)-early weight bearing for tibial fracture…’Life is motion’ 3.Gurd(1940)-immediate weight wearing with b/k cast for Fracture ankle and foot 4.Denhe(1950,Present era)-Used this method for fracture tibia in American troops-Thousand of cases were treated non union and persistent infection did not occur despite compound fracture in 30%. 5.Sarmiento(1963)-Bagan his systematic study of functional bracing with both basic and clinical research
- 18. Theoretical Basis • The fracture healing in FCB is mainly by External Bridging Callus formation. • If the fragments of a fracture are held rigidly the formation of external bridging callus is suppressed and union occur by the formation of medullary callus. • If some movements occur between the fragments , external bridging callus form • Its has greater mechanical advantage over Medullary callus as it is situated at a distance from the axis of potential movements • The intermittent loading of the # area, by muscle activity & weight bearing, promotes local blood flow & development of electrical fields which are beneficial for healing.
- 20. • The FCB allows movement at the joint & some movement at # site. • This transmits a measurable load which decreases as the # progresses to union. • The muscle compartments acts as a fluid mass surrounded by deep fascia. • Fluid is not compressible & fascia cannot be stretched beyond the confines of the cast. • Thus after a certain degree of displacement, pressure & load is transmitted without further deformation. • This causes the bony fragments to be held more firmly. • Rotation is resisted by components of the brace
- 24. When To Apply Not at the time of injury. Conventional cast which immobilize the joint above and below the fracture or traction may be used initially and then asses the patient clinically----- • • Minor movements at the # site should be painless. • Any deformity should disappear once deforming force is removed. • There should be reasonable resistance to telescoping. • Shortening should not exceed 6mm(1/4 inch)for tibia and 1.25cm(1/2 inch) for femur. • Compound fracture will not be ready as soon as close fracture (these fracture shorten excessively if weight bearing allowed before the soft tissues have healed).
- 25. Contraindication • • Lack of patients co-operation. • Patients with spastic disorders. • Deficient sensibility of the limb. • When the brace cannot be fitted closely & accurately. • Isolated tibial fractures. • Fracture in the proximal half of shaft of femur(relative) • Fracture of both bones of forearm if reduction has been difficult • Isolated fracture of radius with damage to inferior radio- ulnar joint • Isolated fracture of ulna with damage to superior radio ulnar joint
- 26. TYPES OF FCB AND MATERIAL USED PLASTER OF PARIS BANDAGES-May be used in functional bracing of fracture of lower limbs 1.PATELAR TENDON BEARING CAST BRACE - for fracture tibia 2.HIP-HINGE THIGH CAST BRACE-for fracture proximal 13rd shaft of femur 3.LONG LEG CAST BRACES –For fracture of distal 2/3rd shaft of femur and fracture tibia plateau (prefered in Obese patient with flabby thigh and without a waist. 4.KNEE HINGE CYLINDER CAST BRACE with WAIST BAND-For fracture distal 2/3rd shaft of femur and fracture tibia plateau ( prefered in who are not obese and have more muscular and cylindrical shape thigh ) THERMOPLASTIC CASTING MATERIALS-supplied in sheets such as ORTHOPLAST and HEXCELITE. It may be used in all above mentioned BRACES and braces of upper limb also e.g 5.FUNCTIONAL BRACING FOR THE FRACTURE HUMERUS
- 28. PREFABRICATED PLASTIC BRACES-Prefabricated plastic braces are available in a ranges of size e.g
- 29. FCB for Tibia fractures • Brace should be applied with in six weeks of fracture. • Make the patient sit on a couch with legs hanging over the edge. • Roll cast sock or stockinette onto the limb from the toes to above the knee. • Apply minimal cotton padding over the heel, tendocalcaneous, malleoli, tibial condyles & crest. • With the ankle at right angle, apply POP bandages from the toes to 2 inches above the ankle & mould it. • Apply further POP from toes to the tibial tuberosity & mould it over the medial proximal half of the soft tissue of the calf. • Flex knee to 40 degrees & rest the patients heel on your lap
- 30. • Apply further POP from the top of the cast to 2.5 cm above the proxmial pole of patella. • Firmly mould the plaster cast over the medial flare of the tibial & patellar tendon. • Apply pressure in the popliteal fossa & back of the calf with flat hand ,to produce a triangular cross-section in this area to help control rotations. • Trim the upper end of the cast, keeping the ears as long as possible on both sides of the knee. • Posteriorly the upper edge of the cast is level with the tibial tuberosity. • Inferiorly the toes must be free to flex & extend fully. • Fit a walking heel slightly anteriorly to the long axis of the tibia.
- 31. FCB for Femur fractures • Long leg cast braces are mainly used for distal half of the shaft of the femur. • Coz of the tendency of the proximal third of the femur to go into varus. • Meggitt et al designed a hip-hinge thigh-cast brace for the management of such #. • The thigh-cast extend distally to just above the knee. • Proximally – metal uniplanar hip hinge to a rigid pelvic band fitted to adjustable waist belt & shoulder strap. • Axis of the hinge-tip of greater trochanter in 20 degree of abduction at the hip. • The standard long leg cast brace should be used only for the management of # of distal half of the shaft of femur & tibial plateau And in obese patients.Other types: 1) Knee-hinge cylinder cast brace(who r not obese and muscular thigh) 2) Reducesd femoral cast brace.(b/k part is reduced to a band)
- 32. How to apply long leg cast brace • Full extension of the knee & sufficient callus to prevent shortening must be present. • Pain & marked mobility at the # site must be absent. • Most # can be braced within 4-6 weeks of injury. Materials – plaster / thermoplastic material Four stages- 1) General preparation. 2) Below knee cast. 3) Thigh cast. 4) Fitting of knee hinges
- 33. 1 . General preparation; • Make the patient sit on a couch on firm pad to ensure approximately 6 inches beneath the patients thigh • Roll the cast socks from the toes to the groin • Apply minimal cotton padding over the heel , tendocalcaneous, malleoli , tibialcrest ,condyles and Common peroneal nerve • With adhesive surface facing outwards apply a precut piece of orthopaedic felt over the tibial condyles • Apply a second precut piece of orthopaedic felt over the femoral condyles .
- 34. 2 . Below knee cast • With the ankle at right angle apply one 5 inch wide roll of orthoflex elastic plaster bandage from the base of the toes to within ¼ inch of the top of orthopaedic felt . • Cover the orthoflex with one 6 inch wide roll of zoroc resin plaster bandage . • Carefully mold the cast around the heel and ankle . 3. Thigh cast • Support the leg and exert slight traction on the limb maintaining the correct rotational position • Start rolling the plaster bandges laterally from the GT , Goes posterior , just below the ischial tuberosity and medially just below the groin area • Goes distally by half covering principle up to just above the both femoral condyle
- 35. A B C D E A. From ischial tuberosity to medial femoral condyle B. Groin to medial femoral condyle c. Tip of greater trochanter to lateral femoral condyle D. Circumference of thigh at level of femoral condyle plus 1 inch E. Circumference at mid thigh plus 1 inch F. Oblique circumference at groin plus 1 inch From orthoplastic material the shape of precut F
- 36. • Trim and smooth the upper edges of the cast • Apply a cold wet elasticized bandage over the cast • Mold the cast into quadrilateral shape by applying pressure with both hands . Allow it to set . • The quadrilateral shape helps to control rotations . • Firmly apply a 5inch roll of orthoflex elastic plaster bandage around the thigh from ¼ inch above the lower edge of orthopaedic felt to ½ inch below the top of cast brim . • Cover the orthoflex with one 6 inch wide roll of zoroc resin plaster bandage . • Mark the cast sock , the center of patella , the line of the joint , mid point of the limb on both medial and lateral aspect .
- 37. 4. Hinges • Types – polyethylene or metal • Metal hinges must be positioned accurately using a jig . • Temporarily lock the metal hinges in extention and then fit them to the jig to hold them parallel . • Hold them at a level of middle of patalla and about 2 cm behind the midpoint of the limb on each side • Shape the arms of the hinges , so that it rests snugly against the cast . • Check the orientation of the hinges . • Clamp the lower end of the hinges to the below knee cast Wile maintaining traction on the limb , push the thigh cast proximally and then clamp the upper end of the hinges to the thigh cast with jubilee clips . .
- 38. • Plaster the ends of the hinges in to the casts above and below the clips then remove the clips and complete the attachment of hinges • Remove the jig and locking screws • Check the axis of movements in knee flexion as tolerated by the patient . • Finish off the lower end of the brace in similar manner .
- 39. FUNCTIONAL BRACING FOR HUMERUS • Sarmiento and latta do not advise bracing for 10-15 day • It is essential that these these braces made from the material which is light and sufficiently flexible to enable it to be easily tightened and loosened around the upper arm • Thin sheets of thermoplastic material such as orthoplast are available in kit form with patterns
- 40. HOW TO APPLY • Give adequate analgesia to allow the injured arm to be moved a little • Sit the patient on a chair with injured arm supported by the other with elbow at right angle • Ask the patient to lean towards the injured side , to allow the upper arm to hang free of the side of chest • Apply a cast sock or double layer of stockinette over the upper Arm
- 41. Cut the sheet of orthoplast to conform to the outline on the upper arm or to the pattern , allowing a generous overlap A B A-Distance from 3 inches above the shoulder joint to inner crease of elbow B –Circumference of upper arm at the level of axilla plus 2 inches
- 42. • Heat the othoplast in a water bath at temperature of 72 to 77 degree for three minutes • Dab it dry , sprinkle talcum powder where the material will overlap to prevent it from self bonding then supple material around upper arm • Wrap a cold wet elasticated bandages over the orthoplast • When the orthoplast has hardened , remove the wet bandage • Attach velcro straps and check that patient can manipulate them • Tell the patients that brace must always be kept wrapped as firmly as possible around the limb ,consistent with comfort
- 43. Thanking you