PBL
•Download as PPTX, PDF•
1 like•66 views

Implant Dentistry Study Consortium teaches implant dentistry with Problem Based Learning formula that is applicable in any clinical scenario

Recommended
More Related Content
What's hot
What's hot (20)
Similar to PBL
Similar to PBL (20)
More from Oral Implantology Research Institute
More from Oral Implantology Research Institute (8)
Recently uploaded
Recently uploaded (20)
PBL
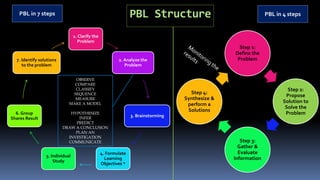
- 1. PBL Structure 1. Clarify the Problem 2. Analyze the Problem 3. Brainstorming 4. Formulate Learning Objectives * 5. Individual Study 6. Group Shares Result 7. Identify solutions to the problem PBL in 4 steps PBL in 7 steps Step 1: Define the Problem Step 2: Propose Solution to Solve the Problem Step 3: Gather & Evaluate Information Step 4: Synthesize & perform a Solutions OBSERVE COMPARE CLASSIFY SEQUENCE MEASURE MAKE A MODEL HYPOTHESIZE INFER PREDICT DRAW A CONCLUSION PLAN AN INVESTIGATION COMMUNICATE
- 2. PBL
- 4. What is PBL The learning that results from the process of working towards the understanding of a resolution of a problem (Barrows,Tamblyn, 1980)
- 5. OVERVIEW Problem-based learning began in the early 1970s at the medical school at McMaster University in Canada.
- 6. It is a constructivist approach to learning, that challenges participating doctors to learn through engagement in a real problem
- 7. OVERVIEW It is based on student-centered learning, and the teacher becomes a facilitator in the learning process. RALUCA MONICA COMĂNEANU et al.
- 8. preservation 2 fundamental dimensions with-in us Boundaries for safety Progress outside the boundary Longing to expand limitlessly
- 9. Step 1: Define the Problem Step 2: Propose Solution to Solve the Problem Step 3: Gather & Evaluate Information Step 4: Synthesize & Form Solutions 1st method PBL Structure
- 10. Step 1: Define the Problem Step 2: Propose Solution to Solve the Problem Step 3: Gather & Evaluate Information Step 4: Synthesize & Form Solutions PBL Structure Reverse torque by kit or implant carrier. Laser for 10 seconds each wall. Electrocautery on coagulation mode and keep it for fifteen seconds. Piezo surgery. Extraction forceps. Trephine the implant with a wider diameter. G L B Search
- 11. Time for a 10 °C increase ranged from 0.9 to over 60 s for the coronal thermocouple and from 18 to over 60 s for the apical thermocouple. Maximum temperature ranged from 5.9 to 70.9 °C coronally and from 1.4 to 23.4 °C apically. During laser irradiation of dental implants, a surface temperature increase beyond the “critical threshold” of 10 °C can be reached after only 18 s. Thermodynamic effects of laser irradiation of implants placed in bone: an in vitro study •Chris Leja Step 3: Gather & Evaluate Information
- 12. The 980-nm diode lasers groups produced a much more rapid temperature increase. In only 12 s, the continuous wave of 980 nm reached the 10°C temperature rise. From the present in vitro study it was concluded that the irradiation of implant surfaces with diode lasers may produce a temperature increase above the critical threshold (10°C ) after only 10 s. Temperature change during non-contact diode laser irradiation of implant surfaces •Alessandro Geminiani Step 3: Gather & Evaluate Information
- 13. Step 1: Define the Problem Step 2: Propose Solution to Solve the Problem Step 3: Gather & Evaluate Information Step 4: Synthesize & perform a Solutions PBL Structure
- 14. Step 1: Define the Problem Step 2: Propose Solution to Solve the Problem Step 3: Gather & Evaluate Information Step 4: Synthesize & Form Solutions PBL Structure Ultrasonic straight tip for 20 minutes without touching the wall of the implant internally.
- 15. HOW TO REMOVE BROKEN ABUTMENT SCREW? Google Usually, this is a relatively simple task. First, place a small (1/2 round bur) in a low-speed handpiece. Lightly touch the bur to the broken fragment on the periphery of the broken screw. Often, the screw fragment will be unscrewed by the rotation of the ½ round bur. Follow this process: Hold the handpiece firmly to avoid having the bur inadvertently jump into the implant body. Use an appropriate-sized mini flat-end screwdriver and reverse out the screw. Brånemark systems have a screwdriver like this, or you can purchase one at a local hardware store. 1.Scaler (Montana Jack): The sharp and pointed end is used to tease the remnant of the abutment screw in a counter-clockwise direction. A scaler is a great way to start the process, and many times it is all that is needed. Because of the way an abutment screw typically fractures, it is possible that the remaining portion may be jammed by a metal shard or an uneven edge stuck between the threads of the implant fixture. An ultrasonic scaler can then be used to vibrate the remaining piece of the abutment screw. One technique discussed in the literature includes working with a handpiece to add a couple of indents with a round bur to create a visible reference point as well as an “edge” to grab with the scaler. 2.A small round bur and handpiece: Dr. Gordon J. Christensen states that a ½ round bur in a handpiece rotating clockwise (looking down the shank of the bur to the terminal working end of the round bur) could contact the outer edge of the remaining abutment screw to create the counter-clockwise rotation to loosen the remaining fragment.2 A secondary alternative is to create a horizontal slot in the shank of what remains of the abutment screw to work with a small straight blade driver to remove the fragment. Working with a handpiece in a small area comes with a level of risk – for example, possibly damaging the internal features of the dental implant fixture. 3.Reverse-tapping rotary instruments: For use with a handpiece and sold as a kit, this instrument provides another method to mechanically remove the fractured abutment screw. Certainly, the individual kits vary in the method of retrieving the fractured remnant of the abutment screw and vary in the protection of the dental implant connection for the abutment – whether internal (conical, hexed or hybrid design) or external (typically a hexagon). One innovative technique reported by Yoon, et al., describes the modification of the internal aspect of an impression abutment for use as a method to center the reverse-tapping bur over the center of the shank of the abutment screw while acting to protect the internal retentive and anti-rotational features of the dental implant fixture.3 References 1.Kreissl ME, Gerds T, Muche R, Heydecke G, Strub JR. Technical complications of implant-supported fixed partial dentures in partially edentulous cases after an average observation period of 5 years. Clinical Oral Implants Research. 2007;18:720–726. 2.Christensen GJ. Clinical tip: How to easily remove broken abutment screws in dental implants. Dentistry IQ, Guide for Preferred Clients Jul./Aug. 2010, Vol. 15 Issue 4. 3.Yoon JH, Lee H, Kim MY. Safe removal of a broken abutment screw with customized drill guide and rotary instrument: A clinical report. Journal of Prosthodontics. 2016; 25(2):170-173;
- 16. Step 1: Define the Problem Step 2: Propose Solution to Solve the Problem Step 3: Gather & Evaluate Information Step 4: Synthesize & Form Solutions PBL Structure Anti-clockwise but never clockwise
- 17. Step 1: Define the Problem Step 2: Propose Solution to Solve the Problem Step 3: Gather & Evaluate Information Step 4: Synthesize & Form Solutions PBL Structure Lets hear the problems
- 18. Step 1: Define the Problem Step 2: Propose Solutions to to Solve the Problem Step 3: Gather & Evaluate Information Step 4: Synthesize & perform the Solution PBL Structure Monitoring the results Monitoring the results Clinical photos here
- 19. Step 1: Define the Problem Step 2: Propose Solutions to to Solve the Problem Step 3: Gather & Evaluate Information Step 4: Synthesize & perform the Solution PBL Structure Monitoring the results Monitoring the results 18 years old female patient with missing maxillary right central and lateral incisors.( 11, 12)The measurements are documented and attached in pic.No significant medical history of any systemic disease related to Dental Implant surgical procedure to be undertaken if any. ( ASA 1). HISTORY OF PRESENT PROBLEM.The patient has history of trauma in 2017 , due to road traffic accident ,and her front teeth were broken .Also there was mandibular fracture body / angle area left side( treated).The remaining roots at the edentulous region were extracted in pieces and was a painful procedure (patients own description) and since then patient was not wearing any artificial teeth .
- 20. Step 1: Define the Problem Step 2: Propose Solutions to to Solve the Problem Step 3: Gather & Evaluate Information Step 4: Synthesize & perform the Solution PBL Structure Monitoring the results Monitoring the results
- 24. Step 1: Define the Problem Step 2: Propose Solutions to to Solve the Problem Step 3: Gather & Evaluate Information Step 4: Synthesize & perform the Solution PBL Structure Monitoring the results Monitoring the results Monitoring the results
- 25. Step 1: Define the Problem Step 2: Propose Solutions to to Solve the Problem Step 3: Gather & Evaluate Information Step 4: Synthesize & perform the Solution PBL Structure Monitoring the results Monitoring the results Monitoring the results
- 26. Step 1: Define the Problem Step 2: Propose Solutions to to Solve the Problem Step 3: Gather & Evaluate Information Step 4: Synthesize & perform the Solution PBL Structure Monitoring the results Monitoring the results
- 27. Step 1: Define the Problem Step 2: Propose Solutions to to Solve the Problem Step 3: Gather & Evaluate Information Step 4: Synthesize & perform the Solution PBL Structure Monitoring the results Monitoring the results
- 28. Step 1: Define the Problem Step 2: Propose Solutions to to Solve the Problem Step 3: Gather & Evaluate Information Step 4: Synthesize & perform the Solution PBL Structure Monitoring the results Monitoring the results
- 29. Step 1: Define the Problem Step 2: Propose Solutions to to Solve the Problem Step 3: Gather & Evaluate Information Step 4: Synthesize & perform the Solution PBL Structure Monitoring the results Monitoring the results
- 30. Step 1: Define the Problem Step 2: Propose Solutions to to Solve the Problem Step 3: Gather & Evaluate Information Step 4: Synthesize & perform the Solution PBL Structure Monitoring the results Monitoring the results
- 31. Step 1: Define the Problem Step 2: Propose Solutions to to Solve the Problem Step 3: Gather & Evaluate Information Step 4: Synthesize & perform the Solution PBL Structure Monitoring the results Monitoring the results
- 32. Step 1: Define the Problem Step 2: Propose Solutions to to Solve the Problem Step 3: Gather & Evaluate Information Step 4: Synthesize & perform the Solution PBL Structure Monitoring the results Monitoring the results
- 33. Step 1: Define the Problem Step 2: Propose Solutions to to Solve the Problem Step 3: Gather & Evaluate Information Step 4: Synthesize & perform the Solution PBL Structure Monitoring the results Monitoring the results
- 34. PBL Structure in a group 1. Clarify the Problem 2. Analyse the Problem 3. Brainstorming 4. Formulate Learning Objectives 5. Individual Study 6. Group Shares Result 7. Identify solutions to the problem OBSERVE COMPARE CLASSIFY SEQUENCE MEASURE MAKE A MODEL HYPOTHESIZE INFER PREDICT DRAW A CONCLUSION PLAN AN INVESTIGATION COMMUNICATE 2ndt method
- 35. The Micro gap
- 36. The Micro gap
- 37. The Micro gap
- 38. The Micro gap
- 39. The Micro gap
- 40. A recent review of the literature reported that external hexagon implants had the greatest bacterial leakage, followed by internal trilobe, internal hexagon, and internal taper configurations. da Silva-Neto JP, Nobilo MA, Penatti MP, et al. Influence of methodologic aspects on the results on implantabutment interface microleakage tests: A critical review of in vitro studies. Int J Oral Maxillofac Implants. 2012;27:793–800. Implant-Abutment Contact Surfaces and Microgap Measurements of Different Implant Connections Under 3-Dimensional X-Ray Microtomography Scarano, Antonio; Valbonetti, Luca; Degidi, Marco; More Implant Dentistry. 25(5):656-662, October 2016.
- 41. 1. Surgical conditions Prophylactic antibiotics vs placebo ? 2. Different types/regimen of antibiotic therapy ? 3. Submerged versus non-submerged implants ? 4. Flapless versus conventional flapped surgery ? 5. Different insertion torques ? 6. Bone condensing versus bone drilling ? 7. Implants with vs. without piezoelectric surgery split crest. 8. Intra- or post-operative complications. 9. Nobelguide vs. Simplant surgical guide systems. 10. Fresh extraction sockets versus healed sites. 11. Immediate placement with/without periapical pathology. 12. Socket depth. 13. Ridge-expansion-with osteotome-only vs combined ridge split-and-osteotome procedure. 14. Surgeon’s surgical experience. Supervised vs. non supervised? 15. Old vs. new hydroxyapatite (HA-coated) implants. 16. Location conditions Maxilla versus mandible. 17. Bone quality. 18. Patient conditions and Male versus female. 19. Age of the patient. 20. Smokers versus non-smokers. Ethnicity. 21. Periodontally compromised vs non-compromised. 22. Bruxism. 23. Number of present teeth/edentulism status. 24. Oral hygiene. 25. Patients with versus without oral lichen planus. 26. Compromised medical status/systemic conditions. 27. Implant length. 28. Initial stability. 29. Threaded versus cylindrical implants. 30. Thread designs vs standard tapered implants. 31. Number of implants placed per patient. 32. Implant surface. 33. Tilted versus axially placed implants. 34. One-piece versus two-piece implants. 35. Wide versus double implants. 36. Occlusal versus non-occlusal loading. 37. Cemented versus screw-retained implant. 38. Type of prosthesis. 39. All-on-2 vs. on-4 implants mandibular prostheses. 40. Different crown-to-implant ratio.
- 42. 41. Splinted versus un-splinted implants. 42. Number of implants for overdentures. 43. Type of overdenture attachment. 44. Morse taper connection versus conventional abutments. 45. Immediate/early/delayed/late loading. 46. laser-welded Ti framework vs. cast gold-alloy framework. 47. Contamination with pre-fabricated stainless steel guide vs. no guide. 48. Control versus immediate orthodontic loading. 49. Internal sinus lift without graft material versus implants in native posterior maxilla. 50. Fresh extraction sites, healed sites, and with membranes placed over the extraction site. 51. Narrow versus wide edentulous maxilla crest. Individual study Create a Library J:AAA SouheilAAA Souheilold laptop filesAjman implant lecturesNine samples of dental implant failures.pptx#-1,1,51 reasons for Library
- 43. 1. Surgical conditionsProphylactic antibiotics versus placebo ? 2. Different types/regimen of antibiotic therapy ? 3. Submerged versus non-submerged implants ? 4. Flapless versus conventional flappedsurgery ? 5. Different insertion torques ? 6. Bone condensingversus bone drilling? 7. Implants inserted with versus without piezoelectric surgery split crest. 8. Intra- orpost-operative complications. 9. Nobelguide vs. Simplant surgical guide systems. 10. Fresh extraction sockets versus healed sites. 11. Immediate placement in sockets with versus withoutperiapical pathology. 12. Socket depth. 13. Ridge-expansion-withosteotome-only versus combined ridge split-and-osteotome procedure. 14. Surgeon’s surgical experience. Supervised vs. non supervised? 15. Old vs. new hydroxyapatite(HA-coated) implants. 16. Location conditions Maxilla versus mandible. 17. Bone quality. 18. Patient conditions and Male versus female. 19. Age of the patient. 20. Smokers versus non-smokers. Ethnicity. 21. Periodontally compromised versus non-compromised situations. 22. Bruxism. 23. Number of present teeth/edentulism status. 24. Oral hygiene. 25. Patients with versus without oral lichen planus. 26. Compromised medical status/systemic conditions. 27. Implant length. 28. Initial stability. 29. Threaded versus cylindrical implants. 30. Variable-thread designs versus standard tapered implants. 31. Number of implants placed per patient. 32. Implant surface. 33. Tilted versus axially placed implants. 34. One-piece versus two-piece implants. 35. Wide versus double implants. 36. Occlusal versus non-occlusal loading. 37. Cemented versus screw-retained implant. 38. Type of prosthesis. 39. All-on-2 versus all-on-4 implants mandibular cross-arch fixed prostheses. 40. Different crown-to-implant ratio. 41. Splinted versus un-splinted implants. 42. Number of implants for overdentures. 43. Type of overdenture attachment. 44. Morse taper connection versus conventional abutments. 45. Immediate/early/delayed/late loading. 46. laser-welded titanium frameworks vs. cast gold-alloy frameworks. 47. Contamination with pre-fabricated stainless steel guide vs. no guide. 48. Control versus immediate orthodontic loading. 49. Internal sinus lift without graft material versus implants in native posterior maxilla. 50. Fresh extraction sites, healed sites, and with membranes placed over the extraction site. 51. Narrow versus wide edentulous maxilla crest.
- 45. PBL Structure 1. Clarify the Problem 2. Analyze the Problem 3. Brainstorming 4. Formulate Learning Objectives * 5. Individual Study 6. Group Shares Result 7. Identify solutions to the problem PBL in 4 steps PBL in 7 steps Step 1: Define the Problem Step 2: Propose Solution to Solve the Problem Step 3: Gather & Evaluate Information Step 4: Synthesize & perform a Solutions OBSERVE COMPARE CLASSIFY SEQUENCE MEASURE MAKE A MODEL HYPOTHESIZE INFER PREDICT DRAW A CONCLUSION PLAN AN INVESTIGATION COMMUNICATE
- 47. Cervical bone Resorption The problem of
- 48. Topic of the problem: cervical bone Resorption 1. Surgical conditions Prophylactic antibiotics versus placebo ? 2. Different types/regimen of antibiotic therapy ? 3. Submerged versus non-submerged implants ? 4. Flapless versus conventional flapped surgery ? 5. Different insertion torques ? 6. Bone condensing versus bone drilling ? Does any of the following topics contribute to the problem? If yes go to the ICOI library if NO go to the next topic https://journals.lww.com/implantdent/pages/default.aspx
- 49. cervical bone Resorption 7. Implants inserted with vs. without piezoelectric surgery split crest. 8. Intra- or post-operative complications. 9. Nobelguide vs. Simplant surgical guide systems. 10. Fresh extraction sockets versus healed sites. 11. Immediate placement with vs. without periapical pathology. 12. Socket depth. Does any of the following topics contribute to the problem? If yes go to the library if NO go to the next topic
- 50. cervical bone Resorption 13. Ridge-expansion-with osteotome-only versus combined ridge split-and-osteotome procedure. 14. Surgeon’s surgical experience. Supervised vs. non supervised? 15. Old vs. new hydroxyapatite (HA-coated) implants. 16. Location conditions Maxilla versus mandible. 17. Bone quality. 18. Patient conditions and Male versus female. Does any of the following topics contribute to the problem? If yes go to the library if NO go to the next topic
- 51. cervical bone Resorption 19. Age of the patient. 20. Smokers versus non-smokers. Ethnicity. 21. Periodontally compromised versus non-compromised situations. 22. Bruxism. 23. Number of present teeth/edentulism status. 24. Oral hygiene. Does any of the following topics contribute to the problem? If yes go to the library if NO go to the next topic
- 52. cervical bone Resorption 25. Patients with versus without oral lichen planus. 26. Compromised medical status/systemic conditions. 27. Implant length. 28. Initial stability. 29. Threaded versus cylindrical implants. 30. Variable-thread designs versus standard tapered implants. Does any of the following topics contribute to the problem? If yes go to the library if NO go to the next topic
- 53. cervical bone Resorption 31. Number of implants placed per patient. 32. Implant surface. 33. Tilted versus axially placed implants. 34. One-piece versus two-piece implants. 35. Wide versus double implants. 36. Occlusal versus non-occlusal loading. Does any of the following topics contribute to the problem? If yes go to the library if NO go to the next topic
- 54. cervical bone Resorption 37. Cemented versus screw-retained implant. 38. Type of prosthesis. 39. All-on-2 versus all-on-4 implants mandibular cross-arch fixed prostheses. 40. Different crown-to-implant ratio. 41. Splinted versus un-splinted implants. 42. Number of implants for overdentures. Does any of the following topics contribute to the problem? If yes go to the library if NO go to the next topic
- 55. cervical bone Resorption 43. Type of overdenture attachment. 44. Morse taper connection versus conventional abutments. 45. Immediate/early/delayed/late loading. 46. laser-welded titanium framework vs. cast gold-alloy framework. 47. Contamination with pre-fabricated stainless steel guide vs. no guide. 48. Control versus immediate orthodontic loading. Does any of the following topics contribute to the problem? If yes go to the library if NO go to the next topic
- 56. cervical bone Resorption 49. Internal sinus lift without graft material versus implants in native posterior maxilla. 50. Fresh extraction sites, healed sites, and with membranes placed over the extraction site. 51. Narrow versus wide edentulous maxilla crest. Does any of the following topics contribute to the problem? If yes go to the library if NO go to the next topic
- 57. 1. Surgical conditionsProphylactic antibiotics versus placebo ? 2. Different types/regimen of antibiotic therapy ? 3. Submerged versus non-submerged implants ? 4. Flapless versus conventional flappedsurgery ? 5. Different insertion torques ? 6. Bone condensingversus bone drilling? 7. Implants inserted with versus without piezoelectric surgery split crest. 8. Intra- orpost-operative complications. 9. Nobelguide vs. Simplant surgical guide systems. 10. Fresh extraction sockets versus healed sites. 11. Immediate placement in sockets with versus withoutperiapical pathology. 12. Socket depth. 13. Ridge-expansion-withosteotome-only versus combined ridge split-and-osteotome procedure. 14. Surgeon’s surgical experience. Supervised vs. non supervised? 15. Old vs. new hydroxyapatite(HA-coated) implants. 16. Location conditions Maxilla versus mandible. 17. Bone quality. 18. Patient conditions and Male versus female. 19. Age of the patient. 20. Smokers versus non-smokers. Ethnicity. 21. Periodontally compromised versus non-compromised situations. 22. Bruxism. 23. Number of present teeth/edentulism status. 24. Oral hygiene. 25. Patients with versus without oral lichen planus. 26. Compromised medical status/systemic conditions. 27. Implant length. 28. Initial stability. 29. Threaded versus cylindrical implants. 30. Variable-thread designs versus standard tapered implants. 31. Number of implants placed per patient. 32. Implant surface. 33. Tilted versus axially placed implants. 34. One-piece versus two-piece implants. 35. Wide versus double implants. 36. Occlusal versus non-occlusal loading. 37. Cemented versus screw-retained implant. 38. Type of prosthesis. 39. All-on-2 versus all-on-4 implants mandibular cross-arch fixed prostheses. 40. Different crown-to-implant ratio. 41. Splinted versus un-splinted implants. 42. Number of implants for overdentures. 43. Type of overdenture attachment. 44. Morse taper connection versus conventional abutments. 45. Immediate/early/delayed/late loading. 46. laser-welded titanium frameworks vs. cast gold-alloy frameworks. 47. Contamination with pre-fabricated stainless steel guide vs. no guide. 48. Control versus immediate orthodontic loading. 49. Internal sinus lift without graft material versus implants in native posterior maxilla. 50. Fresh extraction sites, healed sites, and with membranes placed over the extraction site. 51. Narrow versus wide edentulous maxilla crest.
- 59. How PBL works Step 1: Define the Problem Facilitator present problem to participating doctors Your task today is to solve……
- 60. How PBL works • Clarify the facts of the case. • Define what the problem is. • Brainstorm ideas based on the prior knowledge. • Identify what is needed to learn to work on the problem. • What I do not know. Step 2: Propose solution to solve the problem Whatever solutions comes to your mind based on your experience Lets discuss about….
- 61. How PBL works Step 3: Gather and Evaluate Information Student engage on independent study Participating doctors will gather information from all sorts of media, text books, websites and Then Participating doctors will need to evaluate the findings review the Literature to discuss the problem in a small group
- 62. Step 4: Synthesize and perform a Solutions Participating doctors come back to group and share
- 63. How PBL works FINAL SOLUTION documented Participating doctors present their solution for the problem
- 64. Participating doctors present their solution for the problem FINAL SOLUTION
- 65. How PBL works Review and Monitoring the results Participating doctors review what they have learnt and compile final report How to improve this? What are the problems? Propose Inf0 Solution
- 66. Characteristics Problem drives the learning. Using tutorials students define their own learning issues. Learning is student-centered, and the teacher becomes a facilitator in the learning process. Emphasis on the process of students solving a most problems without supervision.
- 67. Purpose 1. Developed of high fidelity competency 2. Identification of self-analysis 3. Clear clinical decision-making 4. Problem solve in abnormal circumstances 5. Cultivating an ability 6. Adaptation to work effectively in a team
- 68. Negative Assumption PBL Resource Motivational Issues Dissent with andragogy* Legislate rules Variety of skills Reliant on smaller group Timetable and coordination *Hold or express opinions that are at variance with those commonly or officially held with the theory, methods, and activities involved in teaching adult learners Disagree with adult learning methods
- 69. Positive Assumption PBL Subject and topic relevance Synthesis of broad range Intrinsic and extrinsic motivation Individualized Learning Self Evaluation and Critical reflection Integration of Knowledge and practice Develop Learning Skills Solving Issue in real problem condition
- 70. Teaching methodology: What type of learning strategy is PBL? a) Pedagogy : the method and practice of teaching children, especially as an academic subject or theoretical concepts. b) Heutagogy : is the study of self-determined learning … It is also an attempt to challenge some ideas about teaching and learning that still prevail in teacher centered learning. c) Andragogy : The science of understanding (= theory) and supporting (= practice) lifelong and life-wide education of adults. Specific theoretical and practical approach, based on a humanistic conception of self-directed and autonomous learners and teachers as facilitators of learning.
Editor's Notes
- *You should have enough ways to solve your problems
- Constructivism: Learners create their own learning, active learning and construct knowledge themselves, learners discover the basic principles for themselves
- Constructivism: Learners create their own learning, active learning and construct knowledge themselves, learners discover the basic principles for themselves
- Constructivism: Learners create their own learning, active learning and construct knowledge themselves, learners discover the basic principles for themselves
- *You should have enough ways to solve your problems