Navi Mumbai Call Girls 🥰 8617370543 Service Offer VIP Hot Model
Making of.....contents page 1st draft
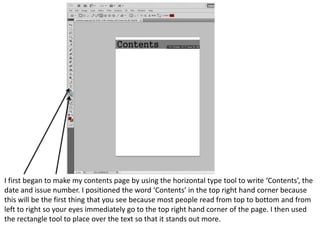
1. I first began to make my contents page by using the horizontal type tool to write ‘Contents’, the
date and issue number. I positioned the word ‘Contents’ in the top right hand corner because
this will be the first thing that you see because most people read from top to bottom and from
left to right so your eyes immediately go to the top right hand corner of the page. I then used
the rectangle tool to place over the text so that it stands out more.
2. Then I began to create my contents by using different headings such as ‘News’ and ‘Interviews’
to make it look like a realistic contents page. I gave each feature story a page number, in
chronological order under each sub-heading so that the reader can easily find where they want
to be. For each feature story I have given a little bit of information about the story underneath it
so that the reader has a slight idea of what the article is going to be about. I made this
information a bit smaller than the main text so that the main text/feature story stands out more.
I have also made the sub-headings bigger than the rest of the text so that it is clear that they are
sub-headings. I have also left a slight gap between the page number and the feature story to
make the text a lot clearer and easier to read.
3. I thought that the text looked quite boring because there was no colour used so I added red
rectangles, using the rectangle tool, to the sub-headings to match the mast head and to also
make them stand out more.
4. However I thought that the feature stories were not broken up easily up so I placed a thin red
line underneath each story, using the line tool, to highlight the story making it more
identifiable and it also adds more colour to my contents page. I then tried changing the page
numbers to red to make it brighter and bolder.
5. I then placed boxes, using the rectangle tool and the horizontal type tool, to show where I
want to images to go. The reason why I did this is because at that moment of time I hadn’t
taken my pictures so I left room so that I knew what room I could go in. I also used the
rectangle and horizontal type tools to write page numbers on the boxes so that when I get the
images on my page I won’t have to put much else on it.
6. I then added an advertisement to my contents page. I included text saying how you can
save money and included the front cover of this magazine, that I made, on it. I placed this
in the bottom right hand corner of my page because the content of the magazine is more
important and existing contents pages have an advertisement here. After this I proof read
my work for any spelling errors and corrected any that were found.
7. I took a lot of images of these two models and I decided that I liked this image best. To
improve this image I cropped (crop tool) and rotated (edit, transform, rotate) the image
to remove unwanted features and to make the camera angle straight because it was
taken on a slight angle. I then went on image, adjustments and levels to change the
lighting. I made the background lighter and the models darker to contrast with the genre
more.
8. I also changed the hair colour of the model on the right to make it darker because it was too
light before. I also added a bit of red to her top and gave them both red nails and lips to
match my colour scheme and to make them look more like rock stars. I did all of this using the
brush tool and colouring the part that I wanted to change and then changing the opacity so
that you it isn’t a block colour and so that you can still see her hair behind the colour. I used
the same method for the nails, lips and the clothes.
9. I edited this picture by changing going to image, adjustments, hue and saturation and
changed the colours. I changed the main colour to red because I think that it makes the
picture look more effective, plus it matches my colour scheme now. I have also cropped
my image down to remove the photographer at the bottom of the image using the crop
tool and also to make the image a square instead of a rectangle so that it would fit in with
the layout of my magazine more.
10. I cropped this image down using the
crop tool so that it could fit in the
space that I left for it on my contents
page and to get rid of any unwanted
features such as the seats at the
bottom and the ribbon on the right
hand side of the image. I then went to
image, adjustments and colour
balance to add slightly more red to the
image to contrast with my colour
scheme and to make it bolder. Despite
this I wanted the sky to look quite dark
as I thought that this would reflect the
genre that I am doing. So I placed an
image of a dark sky/
clouds on top of my
image. I then used the
pen tool to go around
everything except the
sky as I only want the sky
to get darker. I then
decreased the opacity of
the clouds so that you
can still see the original
background.
11. For my final image for my contents page I edited the image by making it square so that
fit in the layout of my page and I also made the image slightly darker as it was a bit too
bright before so I went on image, adjustments, hue and saturation and changed the
lightness so that it fit in with the rock genre more.