1. beginner/intermediate
wire/metal
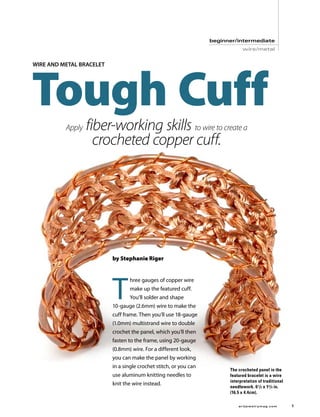
Tough Cuff
wire and metal bracelet
Apply fiber-working skills to wire to create a
crocheted copper cuff.
by Stephanie Riger
T
hree gauges of copper wire
make up the featured cuff.
You’ll solder and shape
10-gauge (2.6mm) wire to make the
cuff frame. Then you’ll use 18-gauge
(1.0mm) multistrand wire to double
crochet the panel, which you’ll then
fasten to the frame, using 20-gauge
(0.8mm) wire. For a different look,
you can make the panel by working
in a single crochet stitch, or you can
The crocheted panel in the
use aluminum knitting needles to featured bracelet is a wire
interpretation of traditional
knit the wire instead.
needlework. 6 1 /2 x 13 /4 in.
(16.5 x 4.4cm).
ar tjewelr ymag.com
2. 1 2 3
Figure 1 Figure 2 Figure 3
crochet
anatomy of a
hook Cuff frame Crocheted panel
a Anneal and form the wire for the Practice with yarn. Crocheting with
frame. Use wire cutters to cut a 14-in. wire is a bit challenging. If you haven’t
b [a] Hook: end used (35.6cm) piece of 10-gauge (2.6mm) crocheted before, see “Anatomy of a
to catch yarn or
wire and pull it copper wire. Place the wire on your Crochet Hook,” left. Practice making a
through other loops soldering surface and use a soft, bushy chain and stitching a few rows of
flame to anneal it. See Basic Tech- double crochet with 3-ply yarn before
[b] Throat: angled
c niques at artjewelrymag.com for infor- you try to make the crocheted wire
section behind the
hook that guides mation on annealing and soldering. panel in the featured bracelet. We’ve
yarn or wire onto Quench, pickle, and rinse the wire. provided double crochet instructions
the working area
File the wire ends smooth with a for right-handed crocheters. If you are
[c] Working area: #2-cut, flat hand file, and bend the left-handed, make a mirrored photo-
part of the hook wire into a large oval, making sure that copy of the illustrations.
where you work the
d the ends of the wire are flush with
stitches
each other. Make a chain. Make a slipknot in a
[d] Finger hold: 5½-yd. (5.0m) piece of 18-gauge
indentation for
holding the hook Solder the wire frame. Place the (1.0mm) copper wire, leaving a 3-in.
with your fingers wire on your soldering surface and (76mm) tail. Insert a size H (5mm)
flux the ends of the wire. Place a aluminum crochet hook in the knot
[e] Handle: end of
the hook used for pallion of medium solder where the [Figure 1]. Tighten the knot to make
leverage and held in wire ends touch, and use a soft, bushy a loop around the working area of
the palm of the flame to solder the join [1]. Quench, the hook. Bring the working wire over
hand
pickle, and rinse the oval frame. the working area of the hook. In
e For more crocheting traditional crochet, this is referred to
instructions, go to Shape the frame. Using a rawhide as “yarn over,” or YO. We’ll refer to this
the Crochet Guild of
America’s Web site, mallet and an anvil [2], shape the oval as “wire over,” or WO.
crochet.org. so that it is approximately 6 x 1¾ in. Slide the working wire to the throat
(15.2 x 4.4cm). of the hook, and then pull the hook
Use the rawhide mallet and a and working wire through the loop
bracelet mandrel to curve the oval [Figure 2], making a chain stitch.
ends toward each other [3]. Continue to WO and pull the wire
ar tjewelr ymag.com
3. Figure 4 Figure 5 Figure 6
Figure 7 Figure 8
Figure 9 Figure 10
4
through the loop [Figure 3] until you [Figure 5]. You will be left with three the next row of double crochet
have a total of 15 chain stitches or loops on the hook. stitches. Double crochet across the
until your chain is 6 in. (15.2cm) long. WO and pull the working wire chain as you did to stitch the first
You need a crocheted panel that is through the first two loops on the row. Work the last double crochet in
approximately 6 x 1¾ in. (15.2 x hook [Figure 6]. This leaves you with the back loop of the last chain stitch
4.4cm) to fit the cuff frame. two loops on the hook. WO and pull [Figure 10].
the working wire through the
Double crochet the first row. remaining two loops on the hook Measure the panel. Check the fit
I made my double crochet stitches [Figure 7]. This leaves you with one of the crocheted panel on the frame.
through only the back loop of each loop on the hook [Figure 8] and one If you stitched tightly, you may need
chain stitch to create a ridged complete double crochet stitch. WO to crochet another row. Although
pattern that gives the bracelet more and insert the hook into the back the wire does not stretch, you can
texture. If you prefer, you could use loop of the next chain stitch. use your hands to pull the panel to
a stitch of your choice, such as single Repeat the steps illustrated in loosen the stitches for some
crochet, or work your double crochet Figures 5–8 to complete the second additional width or length [4].
stitch through both loops of each double crochet stitch. Continue
chain stitch. to double crochet to the end of Tie off the end. At the end of the
WO and insert the hook into the the chain. last row of double crochet, leave a
back loop of the fourth chain stitch 3-in. (76mm) tail of working wire.
from the hook (do not count the Turning chain. Make three chain Cut the wire and pull the tail through
loop on the hook), keeping the new stitches and turn your work around the remaining loop to finish off the
loop on the hook [Figure 4]. WO and [Figure 9]. This is called “turning panel [Figure 11].
pull the working wire through the chain.” The three chain stitches
loop that is closest to the hook provide the proper row height for
ar tjewelr ymag.com
4. Process photos by Stephanie Riger.
materials
■ Copper wire:
■ 10-gauge (2.6mm), 14 in.
(35.6cm)
■ 18-gauge (1.0mm),
multistrand, 5½ yd.
(5.0m)
■ 20-gauge (0.8mm), 39 in.
(1m)
Figure 11
5 tools supplies
■
■
Wire cutters
Hand file: #2-cut flat
■ Soldering station: torch,
solder (medium), fire-
Assembly resistant surface (soldering
Secure the wrapping wire. Cut a 39-in. Stephanie Riger knitted pad, firebrick, or charcoal
(1m) piece of 20-gauge (0.8mm) copper her way through classes block), pickle pot with
pickle, flux, copper tongs
wire (this will be your working wire). Use in college and did
■ Rawhide mallet
400-grit sandpaper to smooth the wire macramé through
■ Anvil
ends. Beginning at one end of the frame, graduate school. She ■ Bracelet mandrel
tightly wrap the working wire around it began making jewelry ■ Yarn: 3 ply (optional)
three times. about eight years ago ■ Crochet hook: size H (5mm)
and quickly became aluminum
Attach the crocheted panel. Fit the addicted to wire crochet, which she teaches in ■ Knitting needles: aluminum
panel against the frame so that the tail on the San Francisco Bay area. Recently, Riger has (optional)
one end of the panel aligns with the three been doing more metalsmithing and wire ■ Sandpaper: 400 grit
wraps you just made on the frame. Fold wrapping. To see more of her work, visit her ■ Pliers: chainnose
the tail back against the panel. Holding the Web site, stephanieriger.com.
panel tightly against the frame, use the suppliers
■ 18-gauge (1.0mm)
working wire to wrap the tail and edge of
multistrand (“stranded”)
the panel around the frame [5].
copper wire (American
Continue to attach the panel to the Science Surplus,
frame, inserting the working wire through 888.724.7587, sciplus.com)
the loops of the crocheted stitches at the ■ 10-gauge (2.6mm) and 20-
edge of the panel. Be careful not to split gauge (0.8mm) copper wire
the crocheted stitches with the working (Rio Grande, 800.545.6566,
wire. When you reach the remaining tail, riogrande.com)
tuck it against the crocheted panel and ■ Crochet hook (local craft
wrap around it as you did the first tail. and fabric stores)
Finish off the wraps. When you have
worked all the way around the form,
tightly wrap the working wire around the
frame a few times. Cut off any excess wire,
file the end with 400-grit sandpaper, and
use chainnose pliers to press the end
against the frame.
The crocheted
panel is secured
to the sturdy cuff
frame with wraps
of 20-gauge (0.8mm)
copper wire.
ar tjewelr ymag.com
5. Make jewelry
that makes a
statement . . .
your statement
Looking for projects that use different
materials such as metalwork, wirework,
stone, glass, polymer, and enamel? Then
Art Jewelry is the magazine for you!
Discover the secrets you need to create
breathtaking pieces that express your own
distinctive style like never before! Whether
you want to learn a new technique, try a
Subscribe
different material, or get ideas for your
own jewelry projects, there’s something for
Today!
you in Art Jewelry!
Order online at
www.artjewelrymag.com/promo
Enter code: I4XZ1
or call 800-533-6644
Monday-Friday, 8:30 a.m. - 5:00 p.m. Central Time.
Outside the U.S. and Canada, call 262-796-8776, ext. 661.
05X1017
I4XZ1

![1 2 3
Figure 1 Figure 2 Figure 3
crochet
anatomy of a
hook Cuff frame Crocheted panel
a Anneal and form the wire for the Practice with yarn. Crocheting with
frame. Use wire cutters to cut a 14-in. wire is a bit challenging. If you haven’t
b [a] Hook: end used (35.6cm) piece of 10-gauge (2.6mm) crocheted before, see “Anatomy of a
to catch yarn or
wire and pull it copper wire. Place the wire on your Crochet Hook,” left. Practice making a
through other loops soldering surface and use a soft, bushy chain and stitching a few rows of
flame to anneal it. See Basic Tech- double crochet with 3-ply yarn before
[b] Throat: angled
c niques at artjewelrymag.com for infor- you try to make the crocheted wire
section behind the
hook that guides mation on annealing and soldering. panel in the featured bracelet. We’ve
yarn or wire onto Quench, pickle, and rinse the wire. provided double crochet instructions
the working area
File the wire ends smooth with a for right-handed crocheters. If you are
[c] Working area: #2-cut, flat hand file, and bend the left-handed, make a mirrored photo-
part of the hook wire into a large oval, making sure that copy of the illustrations.
where you work the
d the ends of the wire are flush with
stitches
each other. Make a chain. Make a slipknot in a
[d] Finger hold: 5½-yd. (5.0m) piece of 18-gauge
indentation for
holding the hook Solder the wire frame. Place the (1.0mm) copper wire, leaving a 3-in.
with your fingers wire on your soldering surface and (76mm) tail. Insert a size H (5mm)
flux the ends of the wire. Place a aluminum crochet hook in the knot
[e] Handle: end of
the hook used for pallion of medium solder where the [Figure 1]. Tighten the knot to make
leverage and held in wire ends touch, and use a soft, bushy a loop around the working area of
the palm of the flame to solder the join [1]. Quench, the hook. Bring the working wire over
hand
pickle, and rinse the oval frame. the working area of the hook. In
e For more crocheting traditional crochet, this is referred to
instructions, go to Shape the frame. Using a rawhide as “yarn over,” or YO. We’ll refer to this
the Crochet Guild of
America’s Web site, mallet and an anvil [2], shape the oval as “wire over,” or WO.
crochet.org. so that it is approximately 6 x 1¾ in. Slide the working wire to the throat
(15.2 x 4.4cm). of the hook, and then pull the hook
Use the rawhide mallet and a and working wire through the loop
bracelet mandrel to curve the oval [Figure 2], making a chain stitch.
ends toward each other [3]. Continue to WO and pull the wire
ar tjewelr ymag.com](data:image/gif;base64,R0lGODlhAQABAIAAAAAAAP///yH5BAEAAAAALAAAAAABAAEAAAIBRAA7)