ICT role in 21st century education and its challenges
Salesforce training guide
1. Entering Cases with Salesforce:
-General tips: Keep separate windows open, one with SA and one with SF
-Locate whether or not an individual has a Record in Salesforce, and check to see if they have a case
history
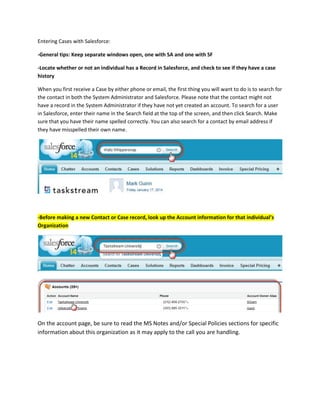
When you first receive a Case by either phone or email, the first thing you will want to do is to search for
the contact in both the System Administrator and Salesforce. Please note that the contact might not
have a record in the System Administrator if they have not yet created an account. To search for a user
in Salesforce, enter their name in the Search field at the top of the screen, and then click Search. Make
sure that you have their name spelled correctly. You can also search for a contact by email address if
they have misspelled their own name.
-Before making a new Contact or Case record, look up the Account information for that individual’s
Organization
On the account page, be sure to read the MS Notes and/or Special Policies sections for specific
information about this organization as it may apply to the call you are handling.
2. If the contact does not have an account in Salesforce, you will need to create a new one for them. To do
this, you first have to click on the Home tab in the upper left-hand corner of Salesforce, and then on
Create New on the left-hand side. From this menu, select Contact. In the next screen, enter the contact’s
preface, name, OA, Primary Role, Platform, Phone number, and email address.
-Create a new Case under the Contact’s name
Once you have either found the contact’s name or created it, it’s time to create a Case for their support
request. To do this, either click on the Cases link about the Contact Detail section or scroll down to the
Cases area and click New Case. The next screen you are directed to will prompt you to select a Case
Record Type from a drop-down menu.
3. -Select which category the case type generally falls in
LAT Student Support: For any student user cases
LAT Support- Faculty/ Non-Students: For nonstudent cases
AMS General Support: AMS cases
Invoice: Requests for invoices or price quotes
Username-Password: Requests that are ONLY for
login information. Please note that if the user asks for assistance with another aspect of the
website, that you should log this call as a different type
Bookstore Order: Requests for bookstore orders
Feature Request: Feature requests
Non-Taskstream: Support requests that don’t actually have to do with the Taskstream tools,
such as issues with their browser, content questions specific to their schools.
-Forphone cases, give the Case a subject that accurately reflects the content of the call. For E-mail
cases, use the subject of the e-mail unless it is too vague (e.g. “Help!”), in which case give it a more
fitting subject.
-Select how the Case was received
4. -Check the boxes next to each element addressed in the case
-In the Notes area, either paste the body of the e-mail (for E-mails), or give a description of the Case
(Phone) and your solution.
5. -Most e-mail support cases will require you to e-mail a Solution to the client. Search the Solutions
database for the right one, and send out an e-mail.
-Close the case if done, or mark as Working if you still have to do follow-up.