

Recommended
More Related Content
What's hot
What's hot (20)
Similar to Lavigne sept11 bsdmag
Similar to Lavigne sept11 bsdmag (20)
More from Dru Lavigne
Recently uploaded
Recently uploaded (20)
Lavigne sept11 bsdmag
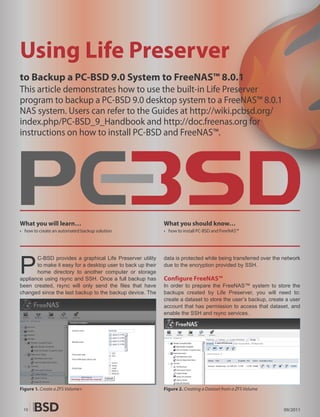
- 1. Using Life Preserver to Backup a PC-BSD 9.0 System to FreeNAS™ 8.0.1 This article demonstrates how to use the built-in Life Preserver program to backup a PC-BSD 9.0 desktop system to a FreeNAS™ 8.0.1 NAS system. Users can refer to the Guides at http://wiki.pcbsd.org/ index.php/PC-BSD_9_Handbook and http://doc.freenas.org for instructions on how to install PC-BSD and FreeNAS™. What you will learn… What you should know… • how to create an automated backup solution • how to install PC-BSD and FreeNAS™ P C-BSD provides a graphical Life Preserver utility data is protected while being transferred over the network to make it easy for a desktop user to back up their due to the encryption provided by SSH. home directory to another computer or storage appliance using rsync and SSH. Once a full backup has Configure FreeNAS™ been created, rsync will only send the files that have In order to prepare the FreeNAS™ system to store the changed since the last backup to the backup device. The backups created by Life Preserver, you will need to: create a dataset to store the user’s backup, create a user account that has permission to access that dataset, and enable the SSH and rsync services. Figure 1. Create a ZFS Volume+ Figure 2. Creating a Dataset from a ZFS Volume 10 09/2011
- 2. PC-BSD’s New Control Panel Figure 5. Viewing a Dataset’s Permissions stripe named backups. Once the volume is created, it will appear in Storage-> Volumes->View all Volumes, as seen in Figure 2. Click the icon Create ZFS Dataset to see the screen shown in Figure 3. In this example, a dataset named dru Figure 3. Creating a ZFS Dataset was created with a disk quota of 200GB. If your network contains multiple PC-BSD desktops or if several users Create a Dataset share the PC-BSD system, create a dataset for each user. In ZFS terminology, a dataset is a portion of a ZFS You can make as many datasets as you wish, assuming volume. Datasets allow you to create a storage area for that free disk space still exists on the ZFS volume. an individual user; datasets also allow you to configure If you choose to use quotas, be sure to give the dataset compression and a storage quota on a per dataset basis. sufficient space to store a full backup and the amount of Users will only see the data on their own dataset and are incremental backups that you will schedule (e.g. a week’s restricted to the disk space that you configure for the or a month’s worth of daily backups). dataset. Before you can create a dataset, you must first create a Create a User ZFS volume. In the FreeNAS™ 8.0.1 web administration Once you have created the dataset, create a user account interface, go to Storage->Volumes->Add Volume. As to associate with each dataset. To create a user account, seen in Figure 1, the available (unformatted) disks will be go to Account->Users->Add User. In the example shown listed. in Figure 4, a user account has been created for dru. In this example, the FreeNAS™ system has four 1TB drives. If I select to create a ZFS stripe using all four IMPORTANT drives, the resulting volume will have the maximum Change the Home Directory to the full pathname of the storage capacity (~3.6TB) but will not have any dataset for this user; in this example it is /mnt/backups/dru. redundancy (if one drive fails, the entire volume fails). If I If you are configuring backups for several users, create select to create a ZFS RAIDZ1, the resulting volume will a user account for each user, being sure to give each user provide redundancy (can survive the failure of one disk), their own dataset as their home directory. but will have reduced storage capacity (~2.8 TB) due to the parity information. I have chosen to create a ZFS Figure 4. Creating a User Account Figure 6. Enable the Rsync and SSH Services www.bsdmag.org 11
- 3. Figure 9. Testing the Connection to the FreeNAS™ System Figure 7. Input the IP Address and Username Configure Life Preserver In version 9.0 of PC-BSD, Life Preserver appears as Check Dataset Permissions an icon in the system tray. It can also be launched from You can verify that the dataset’s permissions are correct by Control Panel->Life Preserver. going to Storage->Volumes->View All Volumes and clicking The first time you run Life Preserver, the Life Preserver the Change Permissions icon (third from the left). In the Wizard will launch, indicating that you need to know the example shown in Figure 5, the user dru has permission IP address and username/password to connect to the to the dataset; this was automatically configured when the backup device. Click the Get Started button, then Next to dataset path was selected as the user’s home directory. see the screen shown in Figure 7. Input the IP address of Depending upon your needs, you may wish to remove the the FreeNAS™ system and the name of the user account read permissions for group and other; note that this will not that you created and associated with a dataset. affect the superuser’s ability to read the files in the backup. Click Next and select how often you would like the Do not change the type of ACL (keep it at Unix). backup to occur, as seen in Figure 8. The default is to not create an automatic backup, meaning that you will Configure SSH and Rsync perform the backup manually as needed. You can choose To enable the rsync and SSH services on FreeNAS™, go to instead automatically backup your home directory once to Services->Control Services. Click the red OFF button a day or once a week. next to Rsync. After a second or so, it will change to a blue After making your selection, click Next then Finish. The ON , indicating that the service has been enabled. Repeat Wizard will display a message indicating that it will test the for the SSH service. connection to the FreeNAS™ system. Click Finish again and input the word yes and then the user’s password when prompted, as seen in Figure 9. Once the connection is successful, the preserver (the configuration for the backup) will appear in the preservers list, as seen in Figure 10, with the following information: Figure 8. Select the Backup Schedule Figure 10. Daily Preserver with a Successful Backup 12 09/2011
- 4. Figure 11. Editing a Preserver’s Settings and Include List Backup Server Will indicate the user account and IP address of the backup server. Last Backup Wil indicate whether or not the last backup was successful. If you chose to automate backups, the first backup will happen immediately. Otherwise, a backup will not occur until you press the Start button. How long the first backup takes depends upon the size of your home directory and the speed of your network. Schedule Will indicate disabled, daily, or weekly. Status Running indicates that the backup is occurring now, otherwise will show as not running. If you right-click the preserver, you can choose to edit the settings, restore from a backup, or remove the configuration. Figure 12. List of Backups www.bsdmag.org
- 5. Using a Graphical File Manager to View Backups Since Life Preserver uses SSH to transfer the backups and restores, users can use SSH utilities such as ssh, scp, and sftp to view and copy the files in their dataset. If you prefer to use a graphical rather than a command- line utility, there are several options available. Depending upon which desktop you are logged into, you may or may not have a graphical utility that understands SSH. If you’re not sure, Krusader2 is available from AppCafe™ and provides a dual-pane file manager interface that understands sftp. To access the FreeNAS™ system using Krusader, type sftp:/102.168.2.7 into the address bar of one of the panes, replacing the IP address with the value for your Figure 13. Choosing Which File or Directory to Restore FreeNAS™ system. When the login prompt appears, input the username and password of your user. Figure 11 shows the screen if you select Edit, as well as Figure 14 shows a listing of the stored backups in the the screen if you also select Modify Include List. life-preserver directory of the left pane and the user’s By default, Life Preserver makes a backup of the user’s home directory on their PC-BSD system in the right pane. home directory and stores the last 7 backups. If you wish If you expand either a backup or current (a shortcut to to exclude files from your home directory or include files the latest backup), you can navigate to usr/home/$USER and outside of your home directory, use the buttons to Modify view the contents of your user’s home directory. You can Exclude List or Modify Include List. then highlight the files/directories that you wish to restore, right-click on the selection, click Copy, and the selection Restoring Files will be copied to the home directory on the PC-BSD If you choose the option Restore From, you will be system. presented with a list of the stored backups. In the example shown in Figure 12, the preserver is scheduled to backup Summary daily and a backup exists for August 17 (back-2011-08- This article demonstrated how easy it is to backup a 17T09_11_08) and August 16 (back-2011-08-16T17_07_15). If user’s home directory to a FreeNAS™ system using PC- I highlight the backup for August 17 and click Select BSD’s built-in Life Preserver utility. It also demonstrated Backup, I’ll see the screen in Figure 13. In this example, how to use the graphical Krusader utility to view backups I’ve chosen to restore my Documents directory. and perform file and directory restores. When doing a restore, give the full path to the file or directory. The full path will always begin with /usr/home/ $USERNAME/ where you replace $USERNAME with the name of your user. DRU LAVIGNE Dru Lavigne is author of BSD Hacks, The Best of FreeBSD Basics, and The De�nitive Guide to PC-BSD. As Director of Community Development for the PC-BSD Project, she leads the documentation team, assists new users, helps to �nd and �x bugs, and reaches out to the community to discover their needs. She is the former Managing Editor of the Open Source Business Resource, a free monthly publication covering open source and the commercialization of open source assets. She is founder and current Chair of the BSD Certi�cation Group Inc., a non-pro�t organization with a mission to create the standard for certifying BSD system administrators, and Figure 14. Using Krusader to Browse Backups serves on the Board of the FreeBSD Foundation. 14 09/2011