SlideShare a Scribd company logo
1 of 28
Download to read offline
RED HAT ENTERPRISE VIRTUALIZATION SIZING GUIDE


             A Principled Technologies sizing guide commissioned by Red Hat, Inc.
TABLE OF CONTENTS
Table of contents ..................................................................................... 2
Executive summary .................................................................................. 3
What will it take to support your users? ................................................... 3
Using Login VSI to learn about a server’s capacity ..................................... 4
Investigating the numbers ........................................................................ 6
        Processor requirements .....................................................................6
        Memory requirements .......................................................................7
        Disk requirements...............................................................................8
        Networking requirements ..................................................................9
Summing it all up ................................................................................... 11
Appendix A – How Login VSI works ......................................................... 12
Appendix B – Installing and testing Red Hat Enterprise Virtualization ...... 13
        Installing RHEV Hypervisor .............................................................. 13
        Installing RHEV Manager ................................................................. 13
        Installing the RHEV Windows 7 x86 guest ....................................... 15
        Setting up the Login VSI test bed ..................................................... 16
        Running the Login VSI benchmark ................................................... 21
Appendix C – Guest optimization settings ............................................... 22
        General OS optimizations ................................................................ 22
        General OS environment optimizations .......................................... 23
        Filesystem optimizations ................................................................. 23
        Power optimizations ........................................................................ 24
        Notifications optimizations.............................................................. 24
        Internet Explorer optimizations....................................................... 25
        Common application optimizations................................................. 25
        Network optimizations .................................................................... 25
Appendix D – Detailed server configuration ............................................ 26
About Principled Technologies ............................................................... 28
EXECUTIVE SUMMARY
                                        You’re looking to deploy a virtualized Windows 7 desktop infrastructure on Red
                                Hat Enterprise Virtualization (RHEV), but you’re not sure what hardware and networking
                                resources you’ll need to comfortably support your users—both today and as you grow.
                                To help you determine the resources you’ll need for your VDI environment—in terms of
                                RAM, processors, IOPS, and network bandwidth—Red Hat commissioned Principled
                                Technologies to develop guidelines based on tests we performed in our labs.
                                        This guide presents these guidelines, along with the test results on which they
                                are based. By understanding the resources that each of your users’ guests will likely
                                require, you can make informed decisions as you set up your VDI environment.

WHAT WILL IT TAKE TO SUPPORT YOUR USERS?
                                        Red Hat Enterprise Virtualization provides a robust and highly scalable platform
                                to host, manage, and remotely deliver thousands of virtualized desktops across
                                hundreds of hosts, resulting in greater hardware efficiency, simplified management,
                                improved data security, and lower overall infrastructure costs. However, minimal data is
                                currently available on properly sizing a RHEV for Desktops infrastructure and what an
                                organization would need to support any given number of users. Principled Technologies
                                conducted tests based on a Dell™ PowerEdge™ R710 server running Red Hat Enterprise
                                Virtualization for Desktops 3.0 with the SPICE protocol and the Login Consultants Virtual
                                Session Indexer 3.0 (Login VSI) benchmark. Our tests simulated the experience of two
                                types of users—typical office workers and power users who perform more system-
                                intensive tasks—both using Windows 7 guests.
                                        We set up each office user guest with a single vCPU and 2 GB of vRAM. The
                                office user set uses the Login VSI medium workload, performing tasks that reflect those
                                of a typical office user over the course of a workday: reading and writing email
                                messages, working with spreadsheets, writing documents, etc.
                                        We configured each power user guest with two vCPUs and 4 GB of vRAM. The
                                power user group uses the Login VSI heavy workload, with tasks similar to those of the
                                office user, but utilizing a greater number of active windows, faster typing speed, and
                                higher overall productivity.


Red Hat Enterprise Virtualization sizing guide                                   A Principled Technologies sizing guide 3
Based on our testing, we developed the sizing guidelines in Figure 1.

                                                                              Office worker           Power user
                                 Number of guests per physical core                        9.6                      7.0
                                 RAM (GB) per guest                                      1.88                      2.54
                                 Disk activity (IOPS) per guest                            8.6                     10.7
                                 Network traffic in Megabits per
                                                                                           1.5                      1.3
                                 second per guest
                                 Figure 1. Sizing requirements for two types of users.


USING LOGIN VSI TO LEARN ABOUT A SERVER’S CAPACITY
                                        To determine our server’s virtual desktop capacity, we used the Login
                                Consultants Virtual Session Indexer 3.5 Release 1 benchmark. Login VSI consists of
                                several workloads that perform a range of tasks to simulate different kinds of users. The
                                results show the maximum number of virtual desktops a server can support for a
                                maximum response time on a particular set of tasks. (For more detailed discussion of
                                how Login VSI works, see Appendix A.) In addition to the performance scores from the
                                Login VSI benchmark, we measured server and client network bandwidth, and server
                                CPU utilization, memory usage, and disk activity.
                                        After all desktops are idle, Login VSI incrementally logs users into virtual desktop
                                sessions and begins workloads on each. Login VSI measures the aggregate time it takes
                                to complete seven typical office operations from each session, and reports it as
                                “response time”. As the number of guests running increases, response time also
                                increases. After a certain point, a long response translates to unacceptably slow
                                performance for end users.
                                        Figure 2 shows the average Login VSI response time for all active sessions we
                                recorded during our office worker test. We ran 110 users and the server was able to
                                support this load without reaching what Login VSI considers an unacceptable response
                                time. Figure 2 also shows the approximate user counts where the processor utilization
                                was at 40% and 80%. Generally, 40% utilization is very comfortable, but once a server
                                hits 80%, it is getting close to saturation and leaves little room for growth or changing
                                user needs.


Red Hat Enterprise Virtualization sizing guide                                      A Principled Technologies sizing guide 4
Login VSI response time - Office worker
                                                                     6


                                          Response time in seconds
                                                                     5

                                                                     4
                                                                                   40% CPU                            80% CPU
                                                                     3

                                                                     2

                                                                     1

                                                                     0
                                                                         0   10    20        30    40   50     60    70    80   90    100    110
                                                                                                  Number of guests running

                                 Figure 2: Response time, in seconds, at various guest counts in the office worker scenario.
                                 Lower numbers are better.
                                               Figure 3 shows the Login VSI response time as more power user guests are
                                launched during the benchmark. The server was able to support 80 power users without
                                reaching what Login VSI considers unacceptably high response time. Figure 3 also shows
                                the approximate user counts where the processor utilization was at 40% (comfortable)
                                and 80% (approaching saturation).


                                                                             Login VSI response time - Power user
                                                                     5
                                       Response time in seconds


                                                                     4
                                                                                                                       80% CPU
                                                                     3
                                                                                        40% CPU
                                                                     2

                                                                     1

                                                                     0
                                                                         0    10        20      30      40      50     60        70     80
                                                                                              Number of guests running

                                 Figure 3: Response time, in seconds, at various guests counts in the power user
                                 scenario. Lower numbers are better.


Red Hat Enterprise Virtualization sizing guide                                                                 A Principled Technologies sizing guide 5
INVESTIGATING THE NUMBERS
                                             We ran 110 desktops in our office user testing and 80 desktops in our power
                                user testing. While we did not reach the unacceptably high response time, we did
                                closely approach it. The charts below are from our maximum guest runs, showing the
                                ramp-up in Login VSI from 0 guests running the benchmark to all guests running it. The
                                number of guests running is based off of the delay between guest starts, allowing us to
                                calculate the number of guests running at that time. The per-guest calculations we
                                present in this section are based on dividing the maximum utilization shown in the
                                charts by the number of guests we ran.

                                Processor requirements
                                             The amount of processing power your server delivers has a direct bearing on the
                                number of guests it can support. As Figure 4 shows, CPU utilization steadily rises as the
                                maximum number of desktops approaches. CPU utilization is a somewhat nebulous stat
                                to calculate, but based on the Login VSI data, a good rule of thumb is that you can fit
                                about 9.6 guests per physical core in your computer.


                                                       CPU utilization - Office worker
                                             100

                                             80

                                             60
                                     CPU %


                                             40

                                             20

                                               0
                                                   0   10   20    30    40   50    60       70   80   90   100 110
                                                                       Number of guests running


                                 Figure 4: CPU utilization in the office worker scenario.
                                             Similar to the office worker, CPU utilization increases as each power user logs in.
                                Based on the Login VSI data, a good rule of thumb for the power user is to allocate
                                approximately 7.0 guests per physical core. (See Figure 5.)


Red Hat Enterprise Virtualization sizing guide                                          A Principled Technologies sizing guide 6
CPU utilization - Power user
                                                      100

                                                       80

                                                       60


                                     CPU %
                                                       40

                                                       20

                                                        0
                                                            0       10        20         30     40        50       60        70   80
                                                                                        Number of guests running


                                 Figure 5: CPU utilization in the power user scenario.


                                Memory requirements
                                                      As with processing power, more RAM translates to more guests supported. As
                                Figure 6 shows, memory usage increases gradually over time. In our testing, we found
                                that each guest required an average of 1.88 GB of RAM.


                                                                     RAM used - Office worker
                                                      250.0

                                                      200.0
                                     RAM used in GB


                                                      150.0

                                                      100.0

                                                       50.0

                                                        0.0
                                                                0   10   20        30    40    50    60    70   80      90    100 110
                                                                                        Number of guests running


                                 Figure 6: RAM utilization in the office worker scenario.


Red Hat Enterprise Virtualization sizing guide                                                        A Principled Technologies sizing guide 7
Power users, understandably, require more memory per guest than office
                                workers, but not as much as one might think. Like Figure 6, Figure 7 shows a gradual
                                increase in RAM utilization over time. Our testing indicated that a power user with 4 GB
                                of RAM only uses 2.54 GB of RAM running RHEV.


                                                                           RAM used - Power user
                                                        200
                                     RAM used in GB
                                                        150

                                                        100

                                                        50

                                                          0
                                                                  0    10        20         30      40        50      60        70      80
                                                                                           Number of guests running


                                 Figure 7: RAM utilization in the power user scenario.

                                Disk requirements
                                                        Every active guest increases the load on the server’s disks. Figure 8 shows how
                                the disk usage tends to have small spikes in IOPS, with a gradual overall increase as
                                guests log on. Overall, the disk requirements are not strenuous, averaging out to about
                                8.6 IOPS per guest.


                                                                      Disk Activity - Office worker
                                                        1000

                                                        800
                                     Activity in IOPS


                                                        600

                                                        400

                                                        200

                                                              0
                                                                  0   10    20        30     40   50     60     70   80    90        100 110
                                                                                           Number of guests running


                                 Figure 8: Disk activity in the office worker scenario.


Red Hat Enterprise Virtualization sizing guide                                                                A Principled Technologies sizing guide 8
Not surprisingly, the power user requires more disk overhead, and has larger
                                spikes in activity than the office worker. With that in mind, the power user requires
                                approximately 10.7 IOPS per guest.


                                                                    Disk activity - Power user
                                                        1000


                                     Activity in IOPS   800

                                                        600

                                                        400

                                                        200

                                                           0
                                                               0    10      20      30     40      50      60      70     80
                                                                                  Number of guests running


                                 Figure 9: Disk activity in the power user scenario.


                                Networking requirements
                                                        It is important to ensure that the VDI infrastructure has sufficient network
                                bandwidth to allow for optimum viewing. As Figure 10 shows, RHEV’s remote desktop
                                protocol SPICE (Simple Protocol for Independent Computing Environments) uses very
                                little network traffic. Each office user used 1.5 Mbit/second of network traffic in SPICE,
                                using just over one-tenth of a percent of a single 1Gb network port’s capability.


Red Hat Enterprise Virtualization sizing guide                                                   A Principled Technologies sizing guide 9
Network traffic - Office worker
                                                       180
                                                       160
                                                       140


                                     Traffic in Mbps
                                                       120
                                                       100
                                                        80
                                                        60
                                                        40
                                                        20
                                                         0
                                                             0   10     20    30    40   50        60   70   80    90    100 110
                                                                                   Number of guests running


                                 Figure 10: Network traffic in the office worker scenario.
                                                       The power user requires a similar amount of network traffic, clocking in at 1.3
                                Mbit/sec. Network traffic is unlikely to be a limiting factor.


                                                                  Network traffic - Power user
                                                       120

                                                       100
                                     Traffic in Mbps


                                                       80

                                                       60

                                                       40

                                                       20

                                                         0
                                                             0     10        20     30        40        50    60        70   80
                                                                                   Number of guests running


                                 Figure 11: Network traffic in the power user scenario.


Red Hat Enterprise Virtualization sizing guide                                                      A Principled Technologies sizing guide 10
SUMMING IT ALL UP
                                        Red Hat Enterprise Virtualization is a powerful platform, and having solid data
                                on the requirements of guests is extremely useful for planning a virtual desktop
                                infrastructure. Using this data, you can properly plan your server configuration with
                                confidence, knowing that the hardware and networking resources you select for your
                                data center can support the number and type of users you require.


Red Hat Enterprise Virtualization sizing guide                                  A Principled Technologies sizing guide 11
APPENDIX A – HOW LOGIN VSI WORKS
                                After all desktops are idle, Login VSI incrementally logs users into virtual desktop
                        sessions and begins workloads on each. Login VSI measures the total response times of seven
                        typical office operations from each session and calculates the VSI Index by taking the average
                        response times and dropping the highest and lowest 2 percent. The average response time of
                        the first 15 sessions determines a baseline; the Dynamic VSImax is baseline x 125% +3000ms.
                                The Login VSI response time is not latency; it is the total time to execute 7 operations
                        that occur during the 15 minute workload. The seven operations are as follows:


                                   Copying a new document from the document pool in the home drive
                                   Starting Microsoft Word
                                   Starting the File Open dialogue
                                   Starting the Search and Replace dialogue
                                   Starting the Print dialogue
                                   Starting Notepad
                                   Compressing the document into a ZIP file with 7-zip command line

                                As more sessions begin to consume system resources, response times degrade and the
                        VSI index increases until it is above the Dynamic VSImax. When this condition is met, the
                        benchmark records a Login VSImax, which is the maximum number of sessions that the platform
                        can support.


Red Hat Enterprise Virtualization sizing guide                                   A Principled Technologies sizing guide 12
APPENDIX B – INSTALLING AND TESTING RED HAT ENTERPRISE
VIRTUALIZATION
         Figure 12 illustrates the test bed we used to run the Login VSI testing.


     Figure 12: Our test bed.


Installing RHEV Hypervisor
         We performed the following steps to install RHEV Hypervisor on our system under test. For further information,
refer to the RHEV install documentation located on the RHEV-Hypervisor disk.
         Boot to the Red Hat Enterprise Virtualization Hypervisor standalone installation disk.
    1.   Allow the installation to automatically boot to begin the installation process.
    2.   Once the installer loads, select Install Hypervisor.
    3.   Select the proper disk to install RHEV on, and click Continue.
    4.   Select the disk again, and click Continue.
    5.   Enter and confirm a new password, and click Install.
    6.   Once the installation is completed, click Reboot.
Installing RHEV Manager
         We performed the following steps to install RHEV Manager, starting from a basic RHEL 6.2 installation. The
following steps require an active Internet connection and a subscription to Red Hat Network’s service.
    1. Log in to the RHEV Manager as root.
    2. Disable selinux by modifying the /etc/selinux/config file and changing the SELINUX line to
       SELINUX=disabled.
    3. Sync to local time source.
    4. Set up /etc/hosts

Red Hat Enterprise Virtualization sizing guide                                      A Principled Technologies sizing guide 13
5. Type rhn_register to begin the registration on the RHN, and accept defaults, making sure to select your
      appropriate region.
   6. Add channels for RHEV by typing the following commands:
      rhn-channel --add --channel=rhel-x86_64-server-6-rhevm-3
         rhn-channel --add --channel=jbappplatform-5-x86_64-server-6-rpm
         rhn-channel --add --channel=rhel-x86_64-server-supplementary-6
   7. Turn off RHEL firewalls by typing the following commands:
      service iptables save
         service iptables stop
         chkconfig iptables off
         service ip6tables save
         service ip6tables stop
         chkconfig ip6tables off
   8. Update RHEL by typing yum upgrade
   9.    Start the RHEV-M install process by typing rhevm-setup
   10.   Accept the default HTTP port by pressing Enter.
   11.   Accept the default HTTPS port by pressing Enter.
   12.   Enter a password for the admin@internal username (we used Password1).
   13.   Enter a password for the internal database (we used Password1).
   14.   Choose your default storage type (we chose iSCSI).
   15.   Allow the installer to configure an NFS share on the local server to be used as an ISO Domain.
   16.   Choose a mount path for the ISO Domain share.
   17.   Choose a display name for the ISO Domain.
   18.   Allow the installer to automatically configure the firewalls.
Connecting to RHEV-M
   1. Connect to RHEV-M by typing the fully qualified domain name of the RHEV-M server in a Web browser.
   2. At the login screen, type admin as the username, and enter the password you created earlier in the password
      field.
   3. You start at the Hosts tab. Select New to add a new host.
   4. Type the name, IP address, and root password into the appropriate fields, and click OK to add the host. This may
      take a few minutes to complete.
   5. Change to the Clusters tab, select the default cluster, then move to the Logical Networks sub-tab, and select Add
      Network.
   6. Add your test network and your network for iSCSI traffic.
   7. Return to the Hosts tab, select your host, and move to the Network Interfaces sub-tab.
   8. In the Network Interfaces sub-tab, assign the logical networks to the appropriate ports by selecting a network
      interface, selecting Add / Edit, and assigning the appropriate logical network you created earlier.


Red Hat Enterprise Virtualization sizing guide                                   A Principled Technologies sizing guide 14
9. Change to the Storage tab and select New Domain. Add the ISO domain that was created automatically during
       the RHEV-M install.
   10. Still in the Storage tab, add your remaining data domains.
Installing the RHEV Windows 7 x86 guest
   1. Log into the RHEV Manager.
   2. In the Hosts tab, select New Desktop.
   3. In the New Desktop Virtual Machine window, name your guest, make it based on the Blank template, select 2
       GB of RAM, select Windows 7 as the operating system, and click OK.
   4. A New Virtual Machine – Guide Me window will appear. Click Configure Network Interfaces.
   5. In the New Network Interface window, name your NIC, select your guest network, select the Red Hat VirtIO
       type, and click OK.
   6. Back at the New Virtual Machine – Guide Me window, select Configure Virtual Disks.
   7. In the New Virtual Disk window, make your disk 16 GB and leave defaults, and click OK.
   8. Back at the New Virtual Machine – Guide Me window, click Configure Later.
   9. Attach the Windows 7 install CD to the guest and start it.
   10. When the installation prompts you, press any key to begin setup.
   11. Enter your language preferences, and click Next.
   12. Click Install.
   13. Accept the license terms, and click Next.
   14. Select Custom, and select the drive that will contain the OS.
   15. Click Install, and the setup begins.
   16. Type user for the username and change the computer name, and click Next.
   17. Enter a password, and click Next.
   18. For system protection, select Use recommended settings, and click Next.
   19. Enter your time zone, and click Next.
   20. Select the Work Network setting, and click Next.
   21. Use Windows Update to patch the Windows 7 installation.
   22. Join the vdi.com domain, and reboot.
Installing Microsoft Office 2007 Professional on the Windows 7 guest
   1.   From the Office 2007 media, run Setup.
   2.   Enter the product key for Office 2007, and click Continue.
   3.   Accept the licensing agreement.
   4.   Select default installs.
   5.   Click Install.
   6.   Download and run Office 2007 Service Pack 2.
   7.   Reboot the system.


Red Hat Enterprise Virtualization sizing guide                            A Principled Technologies sizing guide 15
Setting up the Login VSI test bed
          We created the remaining Login VSI testbed using launcher guests on VMware vSphere 5 using the following
steps. We refer to the vSphere server as the infrastructure server.
Setting up a guest to host Microsoft Windows Active Directory® server (DC1)
    1.    Connect to the infrastructure server via the VMware vSphere client.
    2.    Log in as root to the infrastructure server.
    3.    In the vSphere client, connect to the vCenter™ Server, and browse to the ESXi host.
    4.    Click the Virtual Machines tab.
    5.    Right-click, and choose New Virtual Machine.
    6.    Choose Custom, and click Next.
    7.    Assign the name DC1 to the virtual machine, and click Next.
    8.    Select infrastructure for the host, and click Next.
    9.    Select your storage, and click Next.
    10.   Choose Virtual Machine Version 8, and click Next.
    11.   Choose Windows, choose Microsoft Windows Server 2008 R2 (64-bit), and click Next.
    12.   For CPUs, select one virtual processor socket, and two cores per virtual socket, and click Next.
    13.   Choose 4 GB RAM, and click Next.
    14.   Click 1 for the number of NICs, select VMXNET3, connect to the VDI-NET network, and click Next.
    15.   Leave the default virtual storage controller, and click Next.
    16.   Choose to create a new virtual disk, and click Next.
    17.   Make the OS virtual disk size 40 GB, choose thick-provisioned lazy zeroed, specify the OS datastore on the
          storage, and click Next.
    18.   Keep the default virtual device node (0:0), and click Next.
    19.   Click Finish.
    20.   Right-click the guest, and choose Edit Settings.
    21.   On the Hardware tab, click Add…
    22.   Click Hard Disk, and click Next.
    23.   Click Create a new virtual disk, and click Next.
    24.   Specify 15 GB for the virtual disk size, choose thin provisioning, and specify your storage.
    25.   Choose SCSI (0:1) for the device node, and click Next.
    26.   On the Hardware tab, click Add…
    27.   Click Create a new virtual disk, and click Next.
    28.   Specify 50 GB for the virtual disk size, choose thin provisioning, and specify your storage.
    29.   Choose SCSI (0:2) for the device node, and click Next.
    30.   Click Finish, and click OK.
    31.   Click the Resources tab, and click Memory.
    32.   Select reserve all guest memory, and click OK.


Red Hat Enterprise Virtualization sizing guide                                   A Principled Technologies sizing guide 16
33. Start the guest.
   34. Connect the guest’s virtual CD-ROM to the Microsoft Windows Server 2008 R2 installation disk.
Installing the Microsoft Windows Server 2008 R2 operating system on the guest
   1.    Choose the language, time and currency, and keyboard input. Click Next.
   2.    Click Install Now.
   3.    Choose Windows Server 2008 R2 Enterprise (Full Installation), and click Next.
   4.    Accept the license terms, and click Next.
   5.    Click Custom.
   6.    Click the Disk, and click Drive options (advanced).
   7.    Click NewApplyFormat, and click Next.
   8.    After the installation completes, click OK to set the Administrator password.
   9.    Enter the administrator password twice, and click OK.
   10.   Connect the machine to the Internet, and install all available Windows updates. Restart as necessary.
   11.   Enable remote desktop access.
   12.   Change the hostname to DC1 and reboot when prompted.
   13.   Run diskmgmt.msc.
   14. Select the 15 GB secondary volume, name it profiles, format it NTFS, and assign it drive letter E.
   15. Select the 50 GB secondary volume, name it share, format it NTFS, and assign it drive letter F.
   16. Set up networking for the data network:
           a. Click StartControl Panel, right-click Network Connections, and choose Open.
           b. Right-click the guest traffic NIC, and choose Properties.
           c. Uncheck TCP/IP (v6).
           d. Select TCP/IP (v4), and choose Properties.
           e. Set the IP address as 172.0.0.10/255.255.252.0.
   17. Install VMware Tools. For more information, see
       http://kb.vmware.com/selfservice/microsites/search.do?language=en_US&cmd=displayKC&externalId=340
   18. Reboot the server.
Installing Active Directory and DNS services on DC1
   1. Click StartRun, type dcpromo and click OK.
   2. At the Active Directory Domain Services Installation Wizard welcome screen, check the Use advanced mode
      installation option, and click Next.
   3. In the Choose a Deployment Configuration dialog box, select Create a new domain in a new forest, and click
      Next.
   4.    At the FQDN page, type vdi.com and click Next.
   5.    At the NetBIOS name prompt, leave the name vdi, and click Next.
   6.    At the Forest Functionality level, select Windows Server 2008 R2, and click Next.
   7.    At the additional Domain Controller Options, leave DNS server selected, and click Next.
   8.    At the System Folder Location screen, change to E: leave the default options, and click Next.

Red Hat Enterprise Virtualization sizing guide                                   A Principled Technologies sizing guide 17
9.    Assign a Directory Services Restore Mode Administrator account password, and click Next.
    10.   At the Summary screen, review your selections, and click Next.
    11.   Once Active Directory Domain Services finishes installing, click Finish, and restart the system.
    12.   Run dnsmgmt.msc.
    13.   Create a reverse lookup zone for DC1.
    14.   Create static entries for infrastructure and SUT.
    15.   Open Windows Explorer, and create a file called e:profiles
    16.   Assign permissions of read/write to the vdieveryone group.
Configuring the Windows time service on DC1
To ensure reliable time, we pointed our Active Directory server to a physical NTP server.
    1. Open a command prompt.
    2. Type the following:
       w32tm /config /syncfromflags:manual /manualpeerlist:"<ip address of a NTP
       server>"
       W32tm /config /reliable:yes
       W32tm /config /update
       W32tm /resync
       Net stop w32time
       Net start w32time
Setting up DHCP services on DC1
    1. Click StartAdministrative ToolsServer ManagerAdd Roles.
    2. Select DHCP Server, and click Next.
    3. At the Introduction to DHCP Server screen, click Next.
    4. At the Specify IPv4 DNS Settings screen, type vdi.com for the parent domain.
    5. Type the preferred DNS server IPv4 address, and click Next.
    6. At the Specify IPv4 WINS Server Settings screen, select WINS is not required for applications on the network, and
       click Next.
    7. At the Add or Edit DHCP Scopes screen, click Add.
    8. At the Add Scope screen, enter the Name DHCP Scope name.
    9. In the next box, set the following values, and click OK.
             Start IP address = 172.0.0.101
             End IP address = 172.0.3.200
           Subnet mask = 255.255.252.0
    10.   Check the Activate This Scope box.
    11.   At the Add or Edit DHCP Scopes screen, click Next.
    12.   Click the Enable DHCP v6 Stateless Mode radio button, and click Next.
    13.   Leave the default IPv6 DNS Settings, and click Next.
    14.   At the Authorize DHCP server dialog box, select Use current credentials.

Red Hat Enterprise Virtualization sizing guide                                     A Principled Technologies sizing guide 18
15. At the Confirm Installation Selections screen, click Next. If the installation is set up correctly, a screen displays
       saying that DHCP server install succeeded.
   16. Click Close.
   17.   Click StartRun and type DHCPmgmt.msc
   18.   Click DHCPdc1.vdi.comIPv4Server Options.
   19.   Right-click Server Options, and select Configure options for DNS
   20.   Add 172.0.0.10 as the DNS server, and 172.0.0.1 for router, Click OK.

Setting up the Login VSI share and Active Directory users
         For Login VSI to work correctly, you must create a CIFS share, Active directory OU, and Active directory. For
more information on Login VSI, see http://www.loginvsi.com/en/admin-guide/installation.html.
   1.    Open Windows Explorer, and create a file called f:share.
   2.    Assign permissions of read/write to the VDI/everyone group.
   3.    Right-click the f:share folder, and select Properties.
   4.    Click the Sharing tab, and click Share…
   5.    Add everyone to the Read/Write group, and click Share.
   6.    From the Login VSI media, run the Login VSI AD Setup.
   7.    Keep the defaults, and click Start.
Creating roaming profiles for users
   1.    Open Active Directory users and computers.
   2.    Browse to vdi.comLogin_VSIUsersTarget.
   3.    Select all Login VSI users, and right-click Properties.
   4.    Click the Profiles tab.
   5.    Check the Profile path box, and type dc1profiles%username%
   6.    Click OK.
Installing and optimizing the launcher guests
Installing Windows 7 (64-bit) on the guest
   1.    Log into the appropriate vCenter.
   2.    In the vSphere client, connect to the vCenter Server, and browse to the ESXi host named infrastructure.
   3.    Click the Virtual Machines tab.
   4.    Right-click, and choose New Virtual Machine.
   5.    Choose Custom, and click Next.
   6.    Assign the name Launcher to the virtual machine, and click Next.
   7.    Select LUN1, and click Next.
   8.    Choose Virtual Machine Version 8, and click Next.
   9.    Choose Windows, choose Microsoft Windows 7 (64-bit), and click Next.
   10.   Choose two virtual processors, and click Next.


Red Hat Enterprise Virtualization sizing guide                                     A Principled Technologies sizing guide 19
11. Choose 4 GB RAM, and click Next.
   12. Click 1 for the number of NICs, select E1000 and VDI-NET, and click Next.
   13. Leave the default virtual storage controller, and click Next.
   14. Choose to create a new virtual disk, and click Next.
   15. Make the OS virtual disk size 20 GB, choose thick-provisioned lazy zeroed, and click Next.
   16. Keep the default virtual device node (0:0), and click Next.
   17. Click Finish.
   18. Click Finish, and click OK.
   19. Click the Resources tab, and click Memory.
   20. Connect the VM virtual CD-ROM to the Microsoft Windows 7 x64 installation disk.
   21. Start the VM.
   22. When the installation prompts you, press any key to begin setup.
   23. Enter your language preferences, and click Next.
   24. Click Install.
   25. Accept the license terms, and click Next.
   26. Select Custom, and select the drive that will contain the OS.
   27. Click Install, and the setup begins.
   28. Type user for the username and change the computer name, and click Next.
   29. Enter a password, and click Next.
   30. For system protection, select Use recommended settings, and click Next.
   31. Enter your time zone, and click Next.
   32. Select the Work Network setting, and click Next.
   33. Use Windows Update to patch the Windows 7 installation.
   34. Install VMware Tools. For more information, see
       http://kb.vmware.com/selfservice/microsites/search.do?language=en_US&cmd=displayKC&externalId=340
   35. Reboot.
   36. Join the vdi.com domain, and reboot.
Disabling Windows Firewall
         The domain GPO automatically disables the Windows Firewall.
Installing the Login VSI Target software
   1. Log in as vdiadministrator.
   2. Browse to dc1sharevsi_installsetuptarget setupsetup.exe.
   3. In the target setup wizard, type dc1share
   4. Wait for the install to complete.


Red Hat Enterprise Virtualization sizing guide                          A Principled Technologies sizing guide 20
Cloning the launcher
       We created a template from the VM named launcher and deployed six Launchers using the sysprep functionality
built into vCenter. For more information on how to clone virtual machines in VMware vCenter, please read
http://www.vmware.com/support/pubs/vsphere-esxi-vcenter-server-pubs.html.

Running the Login VSI benchmark
       We used 20 launchers configured in parallel to run two configurations: a medium workload of 110 user sessions
and a heavy workload of 80 user sessions. For more information on how to run a Login VSI test, see
http://www.loginvsi.com/en/admin-guide/performing-tests.


Red Hat Enterprise Virtualization sizing guide                                A Principled Technologies sizing guide 21
APPENDIX C – GUEST OPTIMIZATION SETTINGS
       Below, we summarize the settings we used in our Windows 7 guest for performance considerations.

General OS optimizations
               Set Screensaver to "None"
               Set sound scheme to "None"
               Disable Windows Error Reporting
               Disable the following services (if they are not already disabled):
                    o Wireless Zero Configuration
                    o WLAN AutoConfig
                    o WWAN AutoConfig
                    o Telephony
                    o SSDP Discovery Service
                    o Remote Registry
                    o Security Center
                    o Shell Hardware Extension
                    o Task Scheduler
                    o Themes
                    o Help and Support
                    o Machine Debug Manager
                    o Network Location Awareness
                    o IPSec services
                    o Background Intelligent Transfer Service
                    o Desktop Windows Manager Session Manager
                    o Function Discovery Resource Publication
                    o HomeGroup listener
                    o HomeGroup provider
                    o Windows Defender
                    o Windows Media Player Sharing Service
                    o Windows Media Center Receiver Service
                    o Windows Media Center Scheduler Service
                    o BitLocker
                    o Encryption Service
                    o Block Level Backup Engine Service
                    o IP Helper
                    o Microsoft iSCSI Initiator Service
                    o Microsoft Software Shadow Copy Provider


Red Hat Enterprise Virtualization sizing guide                                       A Principled Technologies sizing guide 22
o    Secure Socket Tunneling Protocol Service
                    o    UPnP Host Service
                    o    Volume Shadow Copy Service
                    o    Windows Backup
                    o    Windows Firewall
               Optimize the Registry
                   o RegScrub.exe – Registry Cleaner
                   o NTRegOpt.exe – Registry Optimizer, removing white space in registry
               Run disk cleanup
               Defrag the HDD
               Delete all event logs
               Make the User profile the Default Profile
General OS environment optimizations
               Set Pagefile to a static size of 16 MB
               Change the default Windows Theme to “Basic”
               Adjust visual effects for “Best Performance”
               Enable ClearType Fonts
               Turn off Windows Security Center
               Turn off Automatic Computer Maintenance
               Disable “Allow users to browse for troubleshooters”
               Disable “Allow troubleshooting to begin immediately when started”
               Increase Service Startup Timeout
                [HKEY_LOCAL_MACHINESYSTEMCurrentControlSetControl]
                "ServicesPipeTimeout"=dword:0002bf20
               Hide Hard Error Messages
                [HKEY_LOCAL_MACHINESYSTEMCurrentControlSetControlWindows]
                "ErrorMode"=dword:00000002
               Disable CIFS Change Notifications
                [HKEY_LOCAL_MACHINESOFTWAREMicrosoftWindowsCurrentVersionPoliciesExplorer]
                "NoRemoteRecursiveEvents"=dword:00000001
Filesystem optimizations
               Disable NTFS "Last Accessed" option
                "fsutil behavior set disablelastaccess 1" (and reboot)
               Disable Windows Prefetcher
                Edit"[HKEY_LOCAL_MACHINESYSTEMCurrentControlSetControlSession ManagerMemory
                ManagementPrefetchParametersEnablePrefetcher]"


Red Hat Enterprise Virtualization sizing guide                              A Principled Technologies sizing guide 23
set value to "0" (Disable)
               Disable System Restore
                Right-click My Computer > Properties > System Restore tab and select "Turn off System Restore"
               Disable Indexing
                Double-click My Computer, Right click on C: > Properties > Click General tab and clear "Allow Indexing
                Service to Index"
               Disable Offline Files
                [HKEY_LOCAL_MACHINESOFTWAREMicrosoftWindowsCurrentVersionNetCache]
                "Enabled"=dword:00000000
               Disable scheduled or background Defrag
                [HKEY_LOCAL_MACHINESOFTWAREMicrosoftDfrgBootOptimizeFunction]
                "Enable"="N"
               Disable Windows Search
               Disable Windows Disk Optimizer
               Reduce Menu Show Delay
                [HKEY_CURRENT_USERControl PanelDesktop]
                "MenuShowDelay"="150"
               Disable all Visual Effects except "Use common tasks in folders" and "Use visual styles on windows and
                buttons"
               Boot Animation
                bcdedit /set bootux disabled
               Remove unused Windows components
                   o Windows Media Center
                   o DVD Maker
Power optimizations
               Disable hibernation and suspend
               Change power settings to “High Performance” and disable sleep timer
               Set HDD’s to “Never” turn off
               Disable the Logon Screen Saver
                HKEY_USERS.DEFAULTControl PanelDesktop
                Edit ScreenSaverActive and change value to 0
Notifications optimizations
               Disable logging of informational Printing events
                Open Printers and Faxes, Click File Server Properties > Advanced and clear "Log spooler informational
                events" (V)
               Disable Success Logging (login attempts, etc.)
                Only do this if security policy allows it


Red Hat Enterprise Virtualization sizing guide                                 A Principled Technologies sizing guide 24
    Disable Toolbar Notifications
               Disable Balloon Tips
               Shrink Event Logs and enable circular logging (registry keys)
               Disable Desktop Cleanup Wizard
Internet Explorer optimizations
               Disable “Use Suggested Sites”
               Set home page to Intranet site, or blank
               Shrink the IE Temp File size
Common application optimizations
               Install Adobe Flash Player (turning off automatic updates)
               Turn Java Updater off
               Remove MS OneNote tray service (if installed)
               Turn off Outlook Cached Mode (if installed)
Network optimizations
               Disable NetBIOS over TCP/IP
               Disable IPv6
               Add any necessary DNS suffixes
               Disable Automatic Searching of Network Printers and Shares


Red Hat Enterprise Virtualization sizing guide                                  A Principled Technologies sizing guide 25
APPENDIX D – DETAILED SERVER CONFIGURATION
System                                                             Dell PowerEdge R710
Power supplies
Total number                                     2
Vendor and model number                          Dell A570P-00
Wattage of each (W)                              570
Cooling fans
Total number                                     5
Dimensions (h x w) of each                       2.5” x 2.5”
Volts                                            12
Amps                                             1.60
General
Number of processor packages                     2
Number of cores per processor                    6
Number of hardware threads per core              2
System power management policy                   Balanced
CPU
Vendor                                           Intel®
Name                                             Xeon®
Model number                                     X5670
Stepping                                         B1
Socket type                                      LGA1366
Core frequency (GHz)                             2.30
Bus frequency                                    6.40 GT/s
L1 cache                                         32 KB + 32 KB (per core)
L2 cache                                         256 KB (per core)
L3 cache                                         12 MB
Platform
Vendor and model number                          Dell PowerEdge R710
Motherboard model number                         0N047H
BIOS name and version                            Dell 1.0.14
BIOS settings                                    Defaults
Memory modules
Total RAM in system (GB)                         256
Vendor and model number                          Samsung M393B2G70BH0-YH9
Type                                             PC3L-10600R
Speed (MHz)                                      1333
Speed running in the system (MHz)                1333
Timing/Latency(tCL-tRCD-tRP-tRASmin)             9-9-9-36
Size (GB)                                        16
Number of RAM module(s)                          16
Chip organization                                Double-sided


Red Hat Enterprise Virtualization sizing guide                     A Principled Technologies sizing guide 26
System                                                             Dell PowerEdge R710
Rank                                             Dual
Operating system
Name                                             RHEV Hypervisor 6.2
Build number                                     201
File system                                      ext4
Kernel                                           2.6.32 - 220.4.2.el6.x86_64
Language                                         English
Internal hard drive
Vendor and model number                          Dell MHZ2160BK G2
Number of disks in system                        2
Size (GB)                                        160
RPM                                              7.2K
Type                                             SATA
Ethernet adapters
Vendor and model number                          Broadcom® NetXtreme® II gigE 5709C Quad-Port Ethernet
Type                                             Integrated
Figure 13. Detailed test server configuration.


Red Hat Enterprise Virtualization sizing guide                     A Principled Technologies sizing guide 27
ABOUT PRINCIPLED TECHNOLOGIES
                                                                  We provide industry-leading technology assessment and fact-based
                                                                  marketing services. We bring to every assignment extensive experience
                                                                  with and expertise in all aspects of technology testing and analysis, from
                                                                  researching new technologies, to developing new methodologies, to
                                                                  testing with existing and new tools.
                                                                  When the assessment is complete, we know how to present the results
                                                                  to a broad range of target audiences. We provide our clients with the
                                                                  materials they need, from market-focused data to use in their own
Principled Technologies, Inc.                                     collateral to custom sales aids, such as test reports, performance
1007 Slater Road, Suite 300                                       assessments, and white papers. Every document reflects the results of
Durham, NC, 27703                                                 our trusted independent analysis.
www.principledtechnologies.com
                                                                  We provide customized services that focus on our clients’ individual
                                                                  requirements. Whether the technology involves hardware, software,
                                                                  Web sites, or services, we offer the experience, expertise, and tools to
                                                                  help our clients assess how it will fare against its competition, its
                                                                  performance, its market readiness, and its quality and reliability.
                                                                  Our founders, Mark L. Van Name and Bill Catchings, have worked
                                                                  together in technology assessment for over 20 years. As journalists,
                                                                  they published over a thousand articles on a wide array of technology
                                                                  subjects. They created and led the Ziff-Davis Benchmark Operation,
                                                                  which developed such industry-standard benchmarks as Ziff Davis
                                                                  Media’s Winstone and WebBench. They founded and led eTesting Labs,
                                                                  and after the acquisition of that company by Lionbridge Technologies
                                                                  were the head and CTO of VeriTest.


        Principled Technologies is a registered trademark of Principled Technologies, Inc.
        All other product names are the trademarks of their respective owners.


        Disclaimer of Warranties; Limitation of Liability:
        PRINCIPLED TECHNOLOGIES, INC. HAS MADE REASONABLE EFFORTS TO ENSURE THE ACCURACY AND VALIDITY OF ITS TESTING, HOWEVER,
        PRINCIPLED TECHNOLOGIES, INC. SPECIFICALLY DISCLAIMS ANY WARRANTY, EXPRESSED OR IMPLIED, RELATING TO THE TEST RESULTS AND
        ANALYSIS, THEIR ACCURACY, COMPLETENESS OR QUALITY, INCLUDING ANY IMPLIED WARRANTY OF FITNESS FOR ANY PARTICULAR PURPOSE. ALL
        PERSONS OR ENTITIES RELYING ON THE RESULTS OF ANY TESTING DO SO AT THEIR OWN RISK, AND AGREE THAT PRINCIPLED TECHNOLOGIES, INC.,
        ITS EMPLOYEES AND ITS SUBCONTRACTORS SHALL HAVE NO LIABILITY WHATSOEVER FROM ANY CLAIM OF LOSS OR DAMAGE ON ACCOUNT OF
        ANY ALLEGED ERROR OR DEFECT IN ANY TESTING PROCEDURE OR RESULT.


        IN NO EVENT SHALL PRINCIPLED TECHNOLOGIES, INC. BE LIABLE FOR INDIRECT, SPECIAL, INCIDENTAL, OR CONSEQUENTIAL DAMAGES IN
        CONNECTION WITH ITS TESTING, EVEN IF ADVISED OF THE POSSIBILITY OF SUCH DAMAGES. IN NO EVENT SHALL PRINCIPLED TECHNOLOGIES, INC.’S
        LIABILITY, INCLUDING FOR DIRECT DAMAGES, EXCEED THE AMOUNTS PAID IN CONNECTION WITH PRINCIPLED TECHNOLOGIES, INC.’S TESTING.
        CUSTOMER’S SOLE AND EXCLUSIVE REMEDIES ARE AS SET FORTH HEREIN.


 Red Hat Enterprise Virtualization sizing guide                                                  A Principled Technologies sizing guide 28

More Related Content

What's hot

VMworld 2014: Virtualization 101
VMworld 2014: Virtualization 101VMworld 2014: Virtualization 101
VMworld 2014: Virtualization 101VMworld
 
Performance tuningtoolkitintroduction
Performance tuningtoolkitintroductionPerformance tuningtoolkitintroduction
Performance tuningtoolkitintroductionRohit Kelapure
 
Virtual desktop infrastructure
Virtual desktop infrastructureVirtual desktop infrastructure
Virtual desktop infrastructureKavaskar Ganesan
 
E g innovations overview
E g innovations overviewE g innovations overview
E g innovations overviewNuno Alves
 
System Center 2012 - January Licensing Update
System Center 2012 - January Licensing UpdateSystem Center 2012 - January Licensing Update
System Center 2012 - January Licensing UpdateSoftchoice Corporation
 
VDI performance and price comparison: AMD-based Open Compute 3.0 server vs. H...
VDI performance and price comparison: AMD-based Open Compute 3.0 server vs. H...VDI performance and price comparison: AMD-based Open Compute 3.0 server vs. H...
VDI performance and price comparison: AMD-based Open Compute 3.0 server vs. H...Principled Technologies
 
Web sphere application server performance tuning workshop
Web sphere application server performance tuning workshopWeb sphere application server performance tuning workshop
Web sphere application server performance tuning workshopRohit Kelapure
 
virtualization tutorial at ACM bangalore Compute 2009
virtualization tutorial at ACM bangalore Compute 2009virtualization tutorial at ACM bangalore Compute 2009
virtualization tutorial at ACM bangalore Compute 2009ACMBangalore
 
Flexibility In The Remote Branch Office VMware Mini Forum Calgary
Flexibility In The Remote Branch Office VMware Mini Forum CalgaryFlexibility In The Remote Branch Office VMware Mini Forum Calgary
Flexibility In The Remote Branch Office VMware Mini Forum CalgaryJames Charter
 
Remote office server performance: Dell PowerEdge R720 server with Samsung SSD...
Remote office server performance: Dell PowerEdge R720 server with Samsung SSD...Remote office server performance: Dell PowerEdge R720 server with Samsung SSD...
Remote office server performance: Dell PowerEdge R720 server with Samsung SSD...Principled Technologies
 
grid-vgpu-app-guide-esri-v01
grid-vgpu-app-guide-esri-v01grid-vgpu-app-guide-esri-v01
grid-vgpu-app-guide-esri-v01Jason Kyungho Lee
 
Linux on System z Optimizing Resource Utilization for Linux under z/VM – Part II
Linux on System z Optimizing Resource Utilization for Linux under z/VM – Part IILinux on System z Optimizing Resource Utilization for Linux under z/VM – Part II
Linux on System z Optimizing Resource Utilization for Linux under z/VM – Part IIIBM India Smarter Computing
 
Alternative Architecture Overview 44956 A
Alternative Architecture Overview 44956 AAlternative Architecture Overview 44956 A
Alternative Architecture Overview 44956 AJames Price
 
What is new in xd 5.6 and fp1 061212
What is new in xd 5.6 and fp1 061212What is new in xd 5.6 and fp1 061212
What is new in xd 5.6 and fp1 061212Nuno Alves
 
Amd V Nested Paging
Amd V Nested PagingAmd V Nested Paging
Amd V Nested Pagingjworth
 
Extending sap solutions to the mobile enterprise with ibm mobile first platfo...
Extending sap solutions to the mobile enterprise with ibm mobile first platfo...Extending sap solutions to the mobile enterprise with ibm mobile first platfo...
Extending sap solutions to the mobile enterprise with ibm mobile first platfo...bupbechanhgmail
 
Windows Server 2012 - Dynamische opslag met Storage Pools
Windows Server 2012 - Dynamische opslag met Storage PoolsWindows Server 2012 - Dynamische opslag met Storage Pools
Windows Server 2012 - Dynamische opslag met Storage PoolsCompuTrain. De IT opleider.
 

What's hot (20)

Streamline it & save with virtualization
Streamline it & save with virtualizationStreamline it & save with virtualization
Streamline it & save with virtualization
 
VMworld 2014: Virtualization 101
VMworld 2014: Virtualization 101VMworld 2014: Virtualization 101
VMworld 2014: Virtualization 101
 
Performance tuningtoolkitintroduction
Performance tuningtoolkitintroductionPerformance tuningtoolkitintroduction
Performance tuningtoolkitintroduction
 
Virtual desktop infrastructure
Virtual desktop infrastructureVirtual desktop infrastructure
Virtual desktop infrastructure
 
E g innovations overview
E g innovations overviewE g innovations overview
E g innovations overview
 
System Center 2012 - January Licensing Update
System Center 2012 - January Licensing UpdateSystem Center 2012 - January Licensing Update
System Center 2012 - January Licensing Update
 
VDI performance and price comparison: AMD-based Open Compute 3.0 server vs. H...
VDI performance and price comparison: AMD-based Open Compute 3.0 server vs. H...VDI performance and price comparison: AMD-based Open Compute 3.0 server vs. H...
VDI performance and price comparison: AMD-based Open Compute 3.0 server vs. H...
 
Web sphere application server performance tuning workshop
Web sphere application server performance tuning workshopWeb sphere application server performance tuning workshop
Web sphere application server performance tuning workshop
 
virtualization tutorial at ACM bangalore Compute 2009
virtualization tutorial at ACM bangalore Compute 2009virtualization tutorial at ACM bangalore Compute 2009
virtualization tutorial at ACM bangalore Compute 2009
 
Flexibility In The Remote Branch Office VMware Mini Forum Calgary
Flexibility In The Remote Branch Office VMware Mini Forum CalgaryFlexibility In The Remote Branch Office VMware Mini Forum Calgary
Flexibility In The Remote Branch Office VMware Mini Forum Calgary
 
Remote office server performance: Dell PowerEdge R720 server with Samsung SSD...
Remote office server performance: Dell PowerEdge R720 server with Samsung SSD...Remote office server performance: Dell PowerEdge R720 server with Samsung SSD...
Remote office server performance: Dell PowerEdge R720 server with Samsung SSD...
 
grid-vgpu-app-guide-esri-v01
grid-vgpu-app-guide-esri-v01grid-vgpu-app-guide-esri-v01
grid-vgpu-app-guide-esri-v01
 
From the fire hose series an insider’s guide to desktop virtualization
From the fire hose series an insider’s guide to desktop virtualization From the fire hose series an insider’s guide to desktop virtualization
From the fire hose series an insider’s guide to desktop virtualization
 
Linux on System z Optimizing Resource Utilization for Linux under z/VM – Part II
Linux on System z Optimizing Resource Utilization for Linux under z/VM – Part IILinux on System z Optimizing Resource Utilization for Linux under z/VM – Part II
Linux on System z Optimizing Resource Utilization for Linux under z/VM – Part II
 
Alternative Architecture Overview 44956 A
Alternative Architecture Overview 44956 AAlternative Architecture Overview 44956 A
Alternative Architecture Overview 44956 A
 
Kubisys White Paper
Kubisys   White PaperKubisys   White Paper
Kubisys White Paper
 
What is new in xd 5.6 and fp1 061212
What is new in xd 5.6 and fp1 061212What is new in xd 5.6 and fp1 061212
What is new in xd 5.6 and fp1 061212
 
Amd V Nested Paging
Amd V Nested PagingAmd V Nested Paging
Amd V Nested Paging
 
Extending sap solutions to the mobile enterprise with ibm mobile first platfo...
Extending sap solutions to the mobile enterprise with ibm mobile first platfo...Extending sap solutions to the mobile enterprise with ibm mobile first platfo...
Extending sap solutions to the mobile enterprise with ibm mobile first platfo...
 
Windows Server 2012 - Dynamische opslag met Storage Pools
Windows Server 2012 - Dynamische opslag met Storage PoolsWindows Server 2012 - Dynamische opslag met Storage Pools
Windows Server 2012 - Dynamische opslag met Storage Pools
 

Viewers also liked

Question 1 & 2 evaluation new
Question 1 & 2 evaluation newQuestion 1 & 2 evaluation new
Question 1 & 2 evaluation newtsharwn
 
Virtualization performance: VMware vSphere 5 vs. Red Hat Enterprise Virtualiz...
Virtualization performance: VMware vSphere 5 vs. Red Hat Enterprise Virtualiz...Virtualization performance: VMware vSphere 5 vs. Red Hat Enterprise Virtualiz...
Virtualization performance: VMware vSphere 5 vs. Red Hat Enterprise Virtualiz...Principled Technologies
 
Red hat enterprise_virtualization_load
Red hat enterprise_virtualization_loadRed hat enterprise_virtualization_load
Red hat enterprise_virtualization_loadsilviucojocaru
 
Comparison of Open Source Virtualization Technology
Comparison of Open Source Virtualization TechnologyComparison of Open Source Virtualization Technology
Comparison of Open Source Virtualization TechnologyBenoit des Ligneris
 
Technical update KVM and Red Hat Enterprise Virtualization (RHEV) by syedmshaaf
Technical update KVM and Red Hat Enterprise Virtualization (RHEV) by syedmshaafTechnical update KVM and Red Hat Enterprise Virtualization (RHEV) by syedmshaaf
Technical update KVM and Red Hat Enterprise Virtualization (RHEV) by syedmshaafSyed Shaaf
 
Virtualization with KVM (Kernel-based Virtual Machine)
Virtualization with KVM (Kernel-based Virtual Machine)Virtualization with KVM (Kernel-based Virtual Machine)
Virtualization with KVM (Kernel-based Virtual Machine)Novell
 
Introduction to Red Hat
Introduction to Red HatIntroduction to Red Hat
Introduction to Red HatAlbert Wong
 
Red Hat Virtualization Where Performance Takes Off!
Red Hat Virtualization Where Performance Takes Off!Red Hat Virtualization Where Performance Takes Off!
Red Hat Virtualization Where Performance Takes Off!andreas kuncoro
 

Viewers also liked (9)

Question 1 & 2 evaluation new
Question 1 & 2 evaluation newQuestion 1 & 2 evaluation new
Question 1 & 2 evaluation new
 
Virtualization performance: VMware vSphere 5 vs. Red Hat Enterprise Virtualiz...
Virtualization performance: VMware vSphere 5 vs. Red Hat Enterprise Virtualiz...Virtualization performance: VMware vSphere 5 vs. Red Hat Enterprise Virtualiz...
Virtualization performance: VMware vSphere 5 vs. Red Hat Enterprise Virtualiz...
 
Red hat enterprise_virtualization_load
Red hat enterprise_virtualization_loadRed hat enterprise_virtualization_load
Red hat enterprise_virtualization_load
 
Comparison of Open Source Virtualization Technology
Comparison of Open Source Virtualization TechnologyComparison of Open Source Virtualization Technology
Comparison of Open Source Virtualization Technology
 
RHEV 3.0
RHEV 3.0RHEV 3.0
RHEV 3.0
 
Technical update KVM and Red Hat Enterprise Virtualization (RHEV) by syedmshaaf
Technical update KVM and Red Hat Enterprise Virtualization (RHEV) by syedmshaafTechnical update KVM and Red Hat Enterprise Virtualization (RHEV) by syedmshaaf
Technical update KVM and Red Hat Enterprise Virtualization (RHEV) by syedmshaaf
 
Virtualization with KVM (Kernel-based Virtual Machine)
Virtualization with KVM (Kernel-based Virtual Machine)Virtualization with KVM (Kernel-based Virtual Machine)
Virtualization with KVM (Kernel-based Virtual Machine)
 
Introduction to Red Hat
Introduction to Red HatIntroduction to Red Hat
Introduction to Red Hat
 
Red Hat Virtualization Where Performance Takes Off!
Red Hat Virtualization Where Performance Takes Off!Red Hat Virtualization Where Performance Takes Off!
Red Hat Virtualization Where Performance Takes Off!
 

Similar to Red Hat Enterprise Virtualization sizing guide

Dell PowerEdge R720 with Samsung SSDs and Windows Server 2012: Supporting vir...
Dell PowerEdge R720 with Samsung SSDs and Windows Server 2012: Supporting vir...Dell PowerEdge R720 with Samsung SSDs and Windows Server 2012: Supporting vir...
Dell PowerEdge R720 with Samsung SSDs and Windows Server 2012: Supporting vir...Principled Technologies
 
Login vsi datasheet new
Login vsi datasheet newLogin vsi datasheet new
Login vsi datasheet newMichael Wang
 
Dell PowerEdge R660xs: Maximize VDI density while delivering a strong user ex...
Dell PowerEdge R660xs: Maximize VDI density while delivering a strong user ex...Dell PowerEdge R660xs: Maximize VDI density while delivering a strong user ex...
Dell PowerEdge R660xs: Maximize VDI density while delivering a strong user ex...Principled Technologies
 
Achieving maximum performance in microsoft vdi environments - Jeff Stokes
Achieving maximum performance in microsoft vdi environments - Jeff StokesAchieving maximum performance in microsoft vdi environments - Jeff Stokes
Achieving maximum performance in microsoft vdi environments - Jeff StokesJeff Stokes
 
TechInsight - Real World Implementation of VDI
TechInsight - Real World Implementation of VDITechInsight - Real World Implementation of VDI
TechInsight - Real World Implementation of VDILai Yoong Seng
 
Virtual desktop scalability and performance with VMware View 5.2 and Virident...
Virtual desktop scalability and performance with VMware View 5.2 and Virident...Virtual desktop scalability and performance with VMware View 5.2 and Virident...
Virtual desktop scalability and performance with VMware View 5.2 and Virident...Principled Technologies
 
WebSphere Technical University: Top WebSphere Problem Determination Features
WebSphere Technical University: Top WebSphere Problem Determination FeaturesWebSphere Technical University: Top WebSphere Problem Determination Features
WebSphere Technical University: Top WebSphere Problem Determination FeaturesChris Bailey
 
How to Get the Fastest Possible Citrix Logon Times?
How to Get the Fastest Possible Citrix Logon Times?How to Get the Fastest Possible Citrix Logon Times?
How to Get the Fastest Possible Citrix Logon Times?eG Innovations
 
How to Get the​ Fastest Possible ​Citrix Logon Times​? Optimization Tips for ...
How to Get the​ Fastest Possible ​Citrix Logon Times​? Optimization Tips for ...How to Get the​ Fastest Possible ​Citrix Logon Times​? Optimization Tips for ...
How to Get the​ Fastest Possible ​Citrix Logon Times​? Optimization Tips for ...eG Innovations
 
Meet the BYOD, ‘Computing Anywhere’ Challenge—Planning and License Management...
Meet the BYOD, ‘Computing Anywhere’ Challenge—Planning and License Management...Meet the BYOD, ‘Computing Anywhere’ Challenge—Planning and License Management...
Meet the BYOD, ‘Computing Anywhere’ Challenge—Planning and License Management...Flexera
 
V mware view™ poc jumpstart service
V mware view™ poc jumpstart serviceV mware view™ poc jumpstart service
V mware view™ poc jumpstart servicesolarisyougood
 
eG Enterprise Citrix XenDesktop Monitor Product Tour
eG Enterprise Citrix XenDesktop Monitor Product ToureG Enterprise Citrix XenDesktop Monitor Product Tour
eG Enterprise Citrix XenDesktop Monitor Product ToureG Innovations
 
Get ready for tomorrow, today!
Get ready for tomorrow, today!Get ready for tomorrow, today!
Get ready for tomorrow, today!Harold Wong
 
Red prairie visualstudio2010_cs
Red prairie visualstudio2010_csRed prairie visualstudio2010_cs
Red prairie visualstudio2010_csrohit_sharma1977
 
The Success Guide V4
The Success Guide V4The Success Guide V4
The Success Guide V4Brett Loveday
 
Creating Virtual Infrastructure
Creating Virtual InfrastructureCreating Virtual Infrastructure
Creating Virtual InfrastructureJake Weston
 
Business Case Of Desktop Virtualization
Business Case Of Desktop Virtualization Business Case Of Desktop Virtualization
Business Case Of Desktop Virtualization Md Yousup Faruqu
 

Similar to Red Hat Enterprise Virtualization sizing guide (20)

Dell PowerEdge R720 with Samsung SSDs and Windows Server 2012: Supporting vir...
Dell PowerEdge R720 with Samsung SSDs and Windows Server 2012: Supporting vir...Dell PowerEdge R720 with Samsung SSDs and Windows Server 2012: Supporting vir...
Dell PowerEdge R720 with Samsung SSDs and Windows Server 2012: Supporting vir...
 
Login vsi datasheet new
Login vsi datasheet newLogin vsi datasheet new
Login vsi datasheet new
 
Dell PowerEdge R660xs: Maximize VDI density while delivering a strong user ex...
Dell PowerEdge R660xs: Maximize VDI density while delivering a strong user ex...Dell PowerEdge R660xs: Maximize VDI density while delivering a strong user ex...
Dell PowerEdge R660xs: Maximize VDI density while delivering a strong user ex...
 
Implementing hyperv
Implementing hypervImplementing hyperv
Implementing hyperv
 
Achieving maximum performance in microsoft vdi environments - Jeff Stokes
Achieving maximum performance in microsoft vdi environments - Jeff StokesAchieving maximum performance in microsoft vdi environments - Jeff Stokes
Achieving maximum performance in microsoft vdi environments - Jeff Stokes
 
TechInsight - Real World Implementation of VDI
TechInsight - Real World Implementation of VDITechInsight - Real World Implementation of VDI
TechInsight - Real World Implementation of VDI
 
Virtual desktop scalability and performance with VMware View 5.2 and Virident...
Virtual desktop scalability and performance with VMware View 5.2 and Virident...Virtual desktop scalability and performance with VMware View 5.2 and Virident...
Virtual desktop scalability and performance with VMware View 5.2 and Virident...
 
WebSphere Technical University: Top WebSphere Problem Determination Features
WebSphere Technical University: Top WebSphere Problem Determination FeaturesWebSphere Technical University: Top WebSphere Problem Determination Features
WebSphere Technical University: Top WebSphere Problem Determination Features
 
How to Get the Fastest Possible Citrix Logon Times?
How to Get the Fastest Possible Citrix Logon Times?How to Get the Fastest Possible Citrix Logon Times?
How to Get the Fastest Possible Citrix Logon Times?
 
Essay On It 260 Quiz 1-5
Essay On It 260 Quiz 1-5Essay On It 260 Quiz 1-5
Essay On It 260 Quiz 1-5
 
How to Get the​ Fastest Possible ​Citrix Logon Times​? Optimization Tips for ...
How to Get the​ Fastest Possible ​Citrix Logon Times​? Optimization Tips for ...How to Get the​ Fastest Possible ​Citrix Logon Times​? Optimization Tips for ...
How to Get the​ Fastest Possible ​Citrix Logon Times​? Optimization Tips for ...
 
Meet the BYOD, ‘Computing Anywhere’ Challenge—Planning and License Management...
Meet the BYOD, ‘Computing Anywhere’ Challenge—Planning and License Management...Meet the BYOD, ‘Computing Anywhere’ Challenge—Planning and License Management...
Meet the BYOD, ‘Computing Anywhere’ Challenge—Planning and License Management...
 
V mware view™ poc jumpstart service
V mware view™ poc jumpstart serviceV mware view™ poc jumpstart service
V mware view™ poc jumpstart service
 
eG Enterprise Citrix XenDesktop Monitor Product Tour
eG Enterprise Citrix XenDesktop Monitor Product ToureG Enterprise Citrix XenDesktop Monitor Product Tour
eG Enterprise Citrix XenDesktop Monitor Product Tour
 
Get ready for tomorrow, today!
Get ready for tomorrow, today!Get ready for tomorrow, today!
Get ready for tomorrow, today!
 
Red prairie visualstudio2010_cs
Red prairie visualstudio2010_csRed prairie visualstudio2010_cs
Red prairie visualstudio2010_cs
 
Designing virtual infrastructure
Designing virtual infrastructureDesigning virtual infrastructure
Designing virtual infrastructure
 
The Success Guide V4
The Success Guide V4The Success Guide V4
The Success Guide V4
 
Creating Virtual Infrastructure
Creating Virtual InfrastructureCreating Virtual Infrastructure
Creating Virtual Infrastructure
 
Business Case Of Desktop Virtualization
Business Case Of Desktop Virtualization Business Case Of Desktop Virtualization
Business Case Of Desktop Virtualization
 

More from Principled Technologies

A comparison of security features in Dell, HP, and Lenovo PC systems
A comparison of security features in Dell, HP, and Lenovo PC systemsA comparison of security features in Dell, HP, and Lenovo PC systems
A comparison of security features in Dell, HP, and Lenovo PC systemsPrincipled Technologies
 
Increase security, sustainability, and efficiency with robust Dell server man...
Increase security, sustainability, and efficiency with robust Dell server man...Increase security, sustainability, and efficiency with robust Dell server man...
Increase security, sustainability, and efficiency with robust Dell server man...Principled Technologies
 
Scale up your storage with higher-performing Dell APEX Block Storage for AWS ...
Scale up your storage with higher-performing Dell APEX Block Storage for AWS ...Scale up your storage with higher-performing Dell APEX Block Storage for AWS ...
Scale up your storage with higher-performing Dell APEX Block Storage for AWS ...Principled Technologies
 
Scale up your storage with higher-performing Dell APEX Block Storage for AWS
Scale up your storage with higher-performing Dell APEX Block Storage for AWSScale up your storage with higher-performing Dell APEX Block Storage for AWS
Scale up your storage with higher-performing Dell APEX Block Storage for AWSPrincipled Technologies
 
Get in and stay in the productivity zone with the HP Z2 G9 Tower Workstation
Get in and stay in the productivity zone with the HP Z2 G9 Tower WorkstationGet in and stay in the productivity zone with the HP Z2 G9 Tower Workstation
Get in and stay in the productivity zone with the HP Z2 G9 Tower WorkstationPrincipled Technologies
 
Open up new possibilities with higher transactional database performance from...
Open up new possibilities with higher transactional database performance from...Open up new possibilities with higher transactional database performance from...
Open up new possibilities with higher transactional database performance from...Principled Technologies
 
Improving database performance and value with an easy migration to Azure Data...
Improving database performance and value with an easy migration to Azure Data...Improving database performance and value with an easy migration to Azure Data...
Improving database performance and value with an easy migration to Azure Data...Principled Technologies
 
Realize better value and performance migrating from Azure Database for Postgr...
Realize better value and performance migrating from Azure Database for Postgr...Realize better value and performance migrating from Azure Database for Postgr...
Realize better value and performance migrating from Azure Database for Postgr...Principled Technologies
 
Set up students and teachers to excel now and in the future with Intel proces...
Set up students and teachers to excel now and in the future with Intel proces...Set up students and teachers to excel now and in the future with Intel proces...
Set up students and teachers to excel now and in the future with Intel proces...Principled Technologies
 
Finding the path to AI success with the Dell AI portfolio - Summary
Finding the path to AI success with the Dell AI portfolio - SummaryFinding the path to AI success with the Dell AI portfolio - Summary
Finding the path to AI success with the Dell AI portfolio - SummaryPrincipled Technologies
 
Finding the path to AI success with the Dell AI portfolio
Finding the path to AI success with the Dell AI portfolioFinding the path to AI success with the Dell AI portfolio
Finding the path to AI success with the Dell AI portfolioPrincipled Technologies
 
Achieve strong performance and value on Azure SQL Database Hyperscale
Achieve strong performance and value on Azure SQL Database HyperscaleAchieve strong performance and value on Azure SQL Database Hyperscale
Achieve strong performance and value on Azure SQL Database HyperscalePrincipled Technologies
 
Improve backup and recovery outcomes by combining Dell APEX Data Storage Serv...
Improve backup and recovery outcomes by combining Dell APEX Data Storage Serv...Improve backup and recovery outcomes by combining Dell APEX Data Storage Serv...
Improve backup and recovery outcomes by combining Dell APEX Data Storage Serv...Principled Technologies
 
Utilizing Azure Cosmos DB for intelligent AI‑powered applications
Utilizing Azure Cosmos DB for intelligent AI‑powered applicationsUtilizing Azure Cosmos DB for intelligent AI‑powered applications
Utilizing Azure Cosmos DB for intelligent AI‑powered applicationsPrincipled Technologies
 
Build an Azure OpenAI application using your own enterprise data
Build an Azure OpenAI application using your own enterprise dataBuild an Azure OpenAI application using your own enterprise data
Build an Azure OpenAI application using your own enterprise dataPrincipled Technologies
 
Dell Chromebooks: Durable, easy to deploy, and easy to service
Dell Chromebooks: Durable, easy to deploy, and easy to serviceDell Chromebooks: Durable, easy to deploy, and easy to service
Dell Chromebooks: Durable, easy to deploy, and easy to servicePrincipled Technologies
 
Back up and restore data faster with a Dell PowerProtect Data Manager Applian...
Back up and restore data faster with a Dell PowerProtect Data Manager Applian...Back up and restore data faster with a Dell PowerProtect Data Manager Applian...
Back up and restore data faster with a Dell PowerProtect Data Manager Applian...Principled Technologies
 

More from Principled Technologies (20)

A comparison of security features in Dell, HP, and Lenovo PC systems
A comparison of security features in Dell, HP, and Lenovo PC systemsA comparison of security features in Dell, HP, and Lenovo PC systems
A comparison of security features in Dell, HP, and Lenovo PC systems
 
Increase security, sustainability, and efficiency with robust Dell server man...
Increase security, sustainability, and efficiency with robust Dell server man...Increase security, sustainability, and efficiency with robust Dell server man...
Increase security, sustainability, and efficiency with robust Dell server man...
 
Increase security, sustainability, and efficiency with robust Dell server man...
Increase security, sustainability, and efficiency with robust Dell server man...Increase security, sustainability, and efficiency with robust Dell server man...
Increase security, sustainability, and efficiency with robust Dell server man...
 
Scale up your storage with higher-performing Dell APEX Block Storage for AWS ...
Scale up your storage with higher-performing Dell APEX Block Storage for AWS ...Scale up your storage with higher-performing Dell APEX Block Storage for AWS ...
Scale up your storage with higher-performing Dell APEX Block Storage for AWS ...
 
Scale up your storage with higher-performing Dell APEX Block Storage for AWS
Scale up your storage with higher-performing Dell APEX Block Storage for AWSScale up your storage with higher-performing Dell APEX Block Storage for AWS
Scale up your storage with higher-performing Dell APEX Block Storage for AWS
 
Get in and stay in the productivity zone with the HP Z2 G9 Tower Workstation
Get in and stay in the productivity zone with the HP Z2 G9 Tower WorkstationGet in and stay in the productivity zone with the HP Z2 G9 Tower Workstation
Get in and stay in the productivity zone with the HP Z2 G9 Tower Workstation
 
Open up new possibilities with higher transactional database performance from...
Open up new possibilities with higher transactional database performance from...Open up new possibilities with higher transactional database performance from...
Open up new possibilities with higher transactional database performance from...
 
Improving database performance and value with an easy migration to Azure Data...
Improving database performance and value with an easy migration to Azure Data...Improving database performance and value with an easy migration to Azure Data...
Improving database performance and value with an easy migration to Azure Data...
 
Realize better value and performance migrating from Azure Database for Postgr...
Realize better value and performance migrating from Azure Database for Postgr...Realize better value and performance migrating from Azure Database for Postgr...
Realize better value and performance migrating from Azure Database for Postgr...
 
Realize better value and performance migrating from Azure Database for Postgr...
Realize better value and performance migrating from Azure Database for Postgr...Realize better value and performance migrating from Azure Database for Postgr...
Realize better value and performance migrating from Azure Database for Postgr...
 
Set up students and teachers to excel now and in the future with Intel proces...
Set up students and teachers to excel now and in the future with Intel proces...Set up students and teachers to excel now and in the future with Intel proces...
Set up students and teachers to excel now and in the future with Intel proces...
 
Finding the path to AI success with the Dell AI portfolio - Summary
Finding the path to AI success with the Dell AI portfolio - SummaryFinding the path to AI success with the Dell AI portfolio - Summary
Finding the path to AI success with the Dell AI portfolio - Summary
 
Finding the path to AI success with the Dell AI portfolio
Finding the path to AI success with the Dell AI portfolioFinding the path to AI success with the Dell AI portfolio
Finding the path to AI success with the Dell AI portfolio
 
Achieve strong performance and value on Azure SQL Database Hyperscale
Achieve strong performance and value on Azure SQL Database HyperscaleAchieve strong performance and value on Azure SQL Database Hyperscale
Achieve strong performance and value on Azure SQL Database Hyperscale
 
Improve backup and recovery outcomes by combining Dell APEX Data Storage Serv...
Improve backup and recovery outcomes by combining Dell APEX Data Storage Serv...Improve backup and recovery outcomes by combining Dell APEX Data Storage Serv...
Improve backup and recovery outcomes by combining Dell APEX Data Storage Serv...
 
Improve backup and recovery outcomes by combining Dell APEX Data Storage Serv...
Improve backup and recovery outcomes by combining Dell APEX Data Storage Serv...Improve backup and recovery outcomes by combining Dell APEX Data Storage Serv...
Improve backup and recovery outcomes by combining Dell APEX Data Storage Serv...
 
Utilizing Azure Cosmos DB for intelligent AI‑powered applications
Utilizing Azure Cosmos DB for intelligent AI‑powered applicationsUtilizing Azure Cosmos DB for intelligent AI‑powered applications
Utilizing Azure Cosmos DB for intelligent AI‑powered applications
 
Build an Azure OpenAI application using your own enterprise data
Build an Azure OpenAI application using your own enterprise dataBuild an Azure OpenAI application using your own enterprise data
Build an Azure OpenAI application using your own enterprise data
 
Dell Chromebooks: Durable, easy to deploy, and easy to service
Dell Chromebooks: Durable, easy to deploy, and easy to serviceDell Chromebooks: Durable, easy to deploy, and easy to service
Dell Chromebooks: Durable, easy to deploy, and easy to service
 
Back up and restore data faster with a Dell PowerProtect Data Manager Applian...
Back up and restore data faster with a Dell PowerProtect Data Manager Applian...Back up and restore data faster with a Dell PowerProtect Data Manager Applian...
Back up and restore data faster with a Dell PowerProtect Data Manager Applian...
 

Red Hat Enterprise Virtualization sizing guide

  • 1. RED HAT ENTERPRISE VIRTUALIZATION SIZING GUIDE A Principled Technologies sizing guide commissioned by Red Hat, Inc.
  • 2. TABLE OF CONTENTS Table of contents ..................................................................................... 2 Executive summary .................................................................................. 3 What will it take to support your users? ................................................... 3 Using Login VSI to learn about a server’s capacity ..................................... 4 Investigating the numbers ........................................................................ 6 Processor requirements .....................................................................6 Memory requirements .......................................................................7 Disk requirements...............................................................................8 Networking requirements ..................................................................9 Summing it all up ................................................................................... 11 Appendix A – How Login VSI works ......................................................... 12 Appendix B – Installing and testing Red Hat Enterprise Virtualization ...... 13 Installing RHEV Hypervisor .............................................................. 13 Installing RHEV Manager ................................................................. 13 Installing the RHEV Windows 7 x86 guest ....................................... 15 Setting up the Login VSI test bed ..................................................... 16 Running the Login VSI benchmark ................................................... 21 Appendix C – Guest optimization settings ............................................... 22 General OS optimizations ................................................................ 22 General OS environment optimizations .......................................... 23 Filesystem optimizations ................................................................. 23 Power optimizations ........................................................................ 24 Notifications optimizations.............................................................. 24 Internet Explorer optimizations....................................................... 25 Common application optimizations................................................. 25 Network optimizations .................................................................... 25 Appendix D – Detailed server configuration ............................................ 26 About Principled Technologies ............................................................... 28
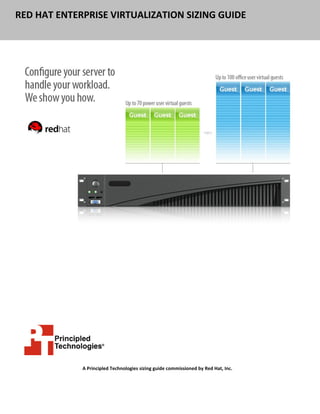
  • 3. EXECUTIVE SUMMARY You’re looking to deploy a virtualized Windows 7 desktop infrastructure on Red Hat Enterprise Virtualization (RHEV), but you’re not sure what hardware and networking resources you’ll need to comfortably support your users—both today and as you grow. To help you determine the resources you’ll need for your VDI environment—in terms of RAM, processors, IOPS, and network bandwidth—Red Hat commissioned Principled Technologies to develop guidelines based on tests we performed in our labs. This guide presents these guidelines, along with the test results on which they are based. By understanding the resources that each of your users’ guests will likely require, you can make informed decisions as you set up your VDI environment. WHAT WILL IT TAKE TO SUPPORT YOUR USERS? Red Hat Enterprise Virtualization provides a robust and highly scalable platform to host, manage, and remotely deliver thousands of virtualized desktops across hundreds of hosts, resulting in greater hardware efficiency, simplified management, improved data security, and lower overall infrastructure costs. However, minimal data is currently available on properly sizing a RHEV for Desktops infrastructure and what an organization would need to support any given number of users. Principled Technologies conducted tests based on a Dell™ PowerEdge™ R710 server running Red Hat Enterprise Virtualization for Desktops 3.0 with the SPICE protocol and the Login Consultants Virtual Session Indexer 3.0 (Login VSI) benchmark. Our tests simulated the experience of two types of users—typical office workers and power users who perform more system- intensive tasks—both using Windows 7 guests. We set up each office user guest with a single vCPU and 2 GB of vRAM. The office user set uses the Login VSI medium workload, performing tasks that reflect those of a typical office user over the course of a workday: reading and writing email messages, working with spreadsheets, writing documents, etc. We configured each power user guest with two vCPUs and 4 GB of vRAM. The power user group uses the Login VSI heavy workload, with tasks similar to those of the office user, but utilizing a greater number of active windows, faster typing speed, and higher overall productivity. Red Hat Enterprise Virtualization sizing guide A Principled Technologies sizing guide 3
  • 4. Based on our testing, we developed the sizing guidelines in Figure 1. Office worker Power user Number of guests per physical core 9.6 7.0 RAM (GB) per guest 1.88 2.54 Disk activity (IOPS) per guest 8.6 10.7 Network traffic in Megabits per 1.5 1.3 second per guest Figure 1. Sizing requirements for two types of users. USING LOGIN VSI TO LEARN ABOUT A SERVER’S CAPACITY To determine our server’s virtual desktop capacity, we used the Login Consultants Virtual Session Indexer 3.5 Release 1 benchmark. Login VSI consists of several workloads that perform a range of tasks to simulate different kinds of users. The results show the maximum number of virtual desktops a server can support for a maximum response time on a particular set of tasks. (For more detailed discussion of how Login VSI works, see Appendix A.) In addition to the performance scores from the Login VSI benchmark, we measured server and client network bandwidth, and server CPU utilization, memory usage, and disk activity. After all desktops are idle, Login VSI incrementally logs users into virtual desktop sessions and begins workloads on each. Login VSI measures the aggregate time it takes to complete seven typical office operations from each session, and reports it as “response time”. As the number of guests running increases, response time also increases. After a certain point, a long response translates to unacceptably slow performance for end users. Figure 2 shows the average Login VSI response time for all active sessions we recorded during our office worker test. We ran 110 users and the server was able to support this load without reaching what Login VSI considers an unacceptable response time. Figure 2 also shows the approximate user counts where the processor utilization was at 40% and 80%. Generally, 40% utilization is very comfortable, but once a server hits 80%, it is getting close to saturation and leaves little room for growth or changing user needs. Red Hat Enterprise Virtualization sizing guide A Principled Technologies sizing guide 4
  • 5. Login VSI response time - Office worker 6 Response time in seconds 5 4 40% CPU 80% CPU 3 2 1 0 0 10 20 30 40 50 60 70 80 90 100 110 Number of guests running Figure 2: Response time, in seconds, at various guest counts in the office worker scenario. Lower numbers are better. Figure 3 shows the Login VSI response time as more power user guests are launched during the benchmark. The server was able to support 80 power users without reaching what Login VSI considers unacceptably high response time. Figure 3 also shows the approximate user counts where the processor utilization was at 40% (comfortable) and 80% (approaching saturation). Login VSI response time - Power user 5 Response time in seconds 4 80% CPU 3 40% CPU 2 1 0 0 10 20 30 40 50 60 70 80 Number of guests running Figure 3: Response time, in seconds, at various guests counts in the power user scenario. Lower numbers are better. Red Hat Enterprise Virtualization sizing guide A Principled Technologies sizing guide 5
  • 6. INVESTIGATING THE NUMBERS We ran 110 desktops in our office user testing and 80 desktops in our power user testing. While we did not reach the unacceptably high response time, we did closely approach it. The charts below are from our maximum guest runs, showing the ramp-up in Login VSI from 0 guests running the benchmark to all guests running it. The number of guests running is based off of the delay between guest starts, allowing us to calculate the number of guests running at that time. The per-guest calculations we present in this section are based on dividing the maximum utilization shown in the charts by the number of guests we ran. Processor requirements The amount of processing power your server delivers has a direct bearing on the number of guests it can support. As Figure 4 shows, CPU utilization steadily rises as the maximum number of desktops approaches. CPU utilization is a somewhat nebulous stat to calculate, but based on the Login VSI data, a good rule of thumb is that you can fit about 9.6 guests per physical core in your computer. CPU utilization - Office worker 100 80 60 CPU % 40 20 0 0 10 20 30 40 50 60 70 80 90 100 110 Number of guests running Figure 4: CPU utilization in the office worker scenario. Similar to the office worker, CPU utilization increases as each power user logs in. Based on the Login VSI data, a good rule of thumb for the power user is to allocate approximately 7.0 guests per physical core. (See Figure 5.) Red Hat Enterprise Virtualization sizing guide A Principled Technologies sizing guide 6
  • 7. CPU utilization - Power user 100 80 60 CPU % 40 20 0 0 10 20 30 40 50 60 70 80 Number of guests running Figure 5: CPU utilization in the power user scenario. Memory requirements As with processing power, more RAM translates to more guests supported. As Figure 6 shows, memory usage increases gradually over time. In our testing, we found that each guest required an average of 1.88 GB of RAM. RAM used - Office worker 250.0 200.0 RAM used in GB 150.0 100.0 50.0 0.0 0 10 20 30 40 50 60 70 80 90 100 110 Number of guests running Figure 6: RAM utilization in the office worker scenario. Red Hat Enterprise Virtualization sizing guide A Principled Technologies sizing guide 7
  • 8. Power users, understandably, require more memory per guest than office workers, but not as much as one might think. Like Figure 6, Figure 7 shows a gradual increase in RAM utilization over time. Our testing indicated that a power user with 4 GB of RAM only uses 2.54 GB of RAM running RHEV. RAM used - Power user 200 RAM used in GB 150 100 50 0 0 10 20 30 40 50 60 70 80 Number of guests running Figure 7: RAM utilization in the power user scenario. Disk requirements Every active guest increases the load on the server’s disks. Figure 8 shows how the disk usage tends to have small spikes in IOPS, with a gradual overall increase as guests log on. Overall, the disk requirements are not strenuous, averaging out to about 8.6 IOPS per guest. Disk Activity - Office worker 1000 800 Activity in IOPS 600 400 200 0 0 10 20 30 40 50 60 70 80 90 100 110 Number of guests running Figure 8: Disk activity in the office worker scenario. Red Hat Enterprise Virtualization sizing guide A Principled Technologies sizing guide 8
  • 9. Not surprisingly, the power user requires more disk overhead, and has larger spikes in activity than the office worker. With that in mind, the power user requires approximately 10.7 IOPS per guest. Disk activity - Power user 1000 Activity in IOPS 800 600 400 200 0 0 10 20 30 40 50 60 70 80 Number of guests running Figure 9: Disk activity in the power user scenario. Networking requirements It is important to ensure that the VDI infrastructure has sufficient network bandwidth to allow for optimum viewing. As Figure 10 shows, RHEV’s remote desktop protocol SPICE (Simple Protocol for Independent Computing Environments) uses very little network traffic. Each office user used 1.5 Mbit/second of network traffic in SPICE, using just over one-tenth of a percent of a single 1Gb network port’s capability. Red Hat Enterprise Virtualization sizing guide A Principled Technologies sizing guide 9
  • 10. Network traffic - Office worker 180 160 140 Traffic in Mbps 120 100 80 60 40 20 0 0 10 20 30 40 50 60 70 80 90 100 110 Number of guests running Figure 10: Network traffic in the office worker scenario. The power user requires a similar amount of network traffic, clocking in at 1.3 Mbit/sec. Network traffic is unlikely to be a limiting factor. Network traffic - Power user 120 100 Traffic in Mbps 80 60 40 20 0 0 10 20 30 40 50 60 70 80 Number of guests running Figure 11: Network traffic in the power user scenario. Red Hat Enterprise Virtualization sizing guide A Principled Technologies sizing guide 10
  • 11. SUMMING IT ALL UP Red Hat Enterprise Virtualization is a powerful platform, and having solid data on the requirements of guests is extremely useful for planning a virtual desktop infrastructure. Using this data, you can properly plan your server configuration with confidence, knowing that the hardware and networking resources you select for your data center can support the number and type of users you require. Red Hat Enterprise Virtualization sizing guide A Principled Technologies sizing guide 11
  • 12. APPENDIX A – HOW LOGIN VSI WORKS After all desktops are idle, Login VSI incrementally logs users into virtual desktop sessions and begins workloads on each. Login VSI measures the total response times of seven typical office operations from each session and calculates the VSI Index by taking the average response times and dropping the highest and lowest 2 percent. The average response time of the first 15 sessions determines a baseline; the Dynamic VSImax is baseline x 125% +3000ms. The Login VSI response time is not latency; it is the total time to execute 7 operations that occur during the 15 minute workload. The seven operations are as follows:  Copying a new document from the document pool in the home drive  Starting Microsoft Word  Starting the File Open dialogue  Starting the Search and Replace dialogue  Starting the Print dialogue  Starting Notepad  Compressing the document into a ZIP file with 7-zip command line As more sessions begin to consume system resources, response times degrade and the VSI index increases until it is above the Dynamic VSImax. When this condition is met, the benchmark records a Login VSImax, which is the maximum number of sessions that the platform can support. Red Hat Enterprise Virtualization sizing guide A Principled Technologies sizing guide 12
  • 13. APPENDIX B – INSTALLING AND TESTING RED HAT ENTERPRISE VIRTUALIZATION Figure 12 illustrates the test bed we used to run the Login VSI testing. Figure 12: Our test bed. Installing RHEV Hypervisor We performed the following steps to install RHEV Hypervisor on our system under test. For further information, refer to the RHEV install documentation located on the RHEV-Hypervisor disk. Boot to the Red Hat Enterprise Virtualization Hypervisor standalone installation disk. 1. Allow the installation to automatically boot to begin the installation process. 2. Once the installer loads, select Install Hypervisor. 3. Select the proper disk to install RHEV on, and click Continue. 4. Select the disk again, and click Continue. 5. Enter and confirm a new password, and click Install. 6. Once the installation is completed, click Reboot. Installing RHEV Manager We performed the following steps to install RHEV Manager, starting from a basic RHEL 6.2 installation. The following steps require an active Internet connection and a subscription to Red Hat Network’s service. 1. Log in to the RHEV Manager as root. 2. Disable selinux by modifying the /etc/selinux/config file and changing the SELINUX line to SELINUX=disabled. 3. Sync to local time source. 4. Set up /etc/hosts Red Hat Enterprise Virtualization sizing guide A Principled Technologies sizing guide 13
  • 14. 5. Type rhn_register to begin the registration on the RHN, and accept defaults, making sure to select your appropriate region. 6. Add channels for RHEV by typing the following commands: rhn-channel --add --channel=rhel-x86_64-server-6-rhevm-3 rhn-channel --add --channel=jbappplatform-5-x86_64-server-6-rpm rhn-channel --add --channel=rhel-x86_64-server-supplementary-6 7. Turn off RHEL firewalls by typing the following commands: service iptables save service iptables stop chkconfig iptables off service ip6tables save service ip6tables stop chkconfig ip6tables off 8. Update RHEL by typing yum upgrade 9. Start the RHEV-M install process by typing rhevm-setup 10. Accept the default HTTP port by pressing Enter. 11. Accept the default HTTPS port by pressing Enter. 12. Enter a password for the admin@internal username (we used Password1). 13. Enter a password for the internal database (we used Password1). 14. Choose your default storage type (we chose iSCSI). 15. Allow the installer to configure an NFS share on the local server to be used as an ISO Domain. 16. Choose a mount path for the ISO Domain share. 17. Choose a display name for the ISO Domain. 18. Allow the installer to automatically configure the firewalls. Connecting to RHEV-M 1. Connect to RHEV-M by typing the fully qualified domain name of the RHEV-M server in a Web browser. 2. At the login screen, type admin as the username, and enter the password you created earlier in the password field. 3. You start at the Hosts tab. Select New to add a new host. 4. Type the name, IP address, and root password into the appropriate fields, and click OK to add the host. This may take a few minutes to complete. 5. Change to the Clusters tab, select the default cluster, then move to the Logical Networks sub-tab, and select Add Network. 6. Add your test network and your network for iSCSI traffic. 7. Return to the Hosts tab, select your host, and move to the Network Interfaces sub-tab. 8. In the Network Interfaces sub-tab, assign the logical networks to the appropriate ports by selecting a network interface, selecting Add / Edit, and assigning the appropriate logical network you created earlier. Red Hat Enterprise Virtualization sizing guide A Principled Technologies sizing guide 14
  • 15. 9. Change to the Storage tab and select New Domain. Add the ISO domain that was created automatically during the RHEV-M install. 10. Still in the Storage tab, add your remaining data domains. Installing the RHEV Windows 7 x86 guest 1. Log into the RHEV Manager. 2. In the Hosts tab, select New Desktop. 3. In the New Desktop Virtual Machine window, name your guest, make it based on the Blank template, select 2 GB of RAM, select Windows 7 as the operating system, and click OK. 4. A New Virtual Machine – Guide Me window will appear. Click Configure Network Interfaces. 5. In the New Network Interface window, name your NIC, select your guest network, select the Red Hat VirtIO type, and click OK. 6. Back at the New Virtual Machine – Guide Me window, select Configure Virtual Disks. 7. In the New Virtual Disk window, make your disk 16 GB and leave defaults, and click OK. 8. Back at the New Virtual Machine – Guide Me window, click Configure Later. 9. Attach the Windows 7 install CD to the guest and start it. 10. When the installation prompts you, press any key to begin setup. 11. Enter your language preferences, and click Next. 12. Click Install. 13. Accept the license terms, and click Next. 14. Select Custom, and select the drive that will contain the OS. 15. Click Install, and the setup begins. 16. Type user for the username and change the computer name, and click Next. 17. Enter a password, and click Next. 18. For system protection, select Use recommended settings, and click Next. 19. Enter your time zone, and click Next. 20. Select the Work Network setting, and click Next. 21. Use Windows Update to patch the Windows 7 installation. 22. Join the vdi.com domain, and reboot. Installing Microsoft Office 2007 Professional on the Windows 7 guest 1. From the Office 2007 media, run Setup. 2. Enter the product key for Office 2007, and click Continue. 3. Accept the licensing agreement. 4. Select default installs. 5. Click Install. 6. Download and run Office 2007 Service Pack 2. 7. Reboot the system. Red Hat Enterprise Virtualization sizing guide A Principled Technologies sizing guide 15
  • 16. Setting up the Login VSI test bed We created the remaining Login VSI testbed using launcher guests on VMware vSphere 5 using the following steps. We refer to the vSphere server as the infrastructure server. Setting up a guest to host Microsoft Windows Active Directory® server (DC1) 1. Connect to the infrastructure server via the VMware vSphere client. 2. Log in as root to the infrastructure server. 3. In the vSphere client, connect to the vCenter™ Server, and browse to the ESXi host. 4. Click the Virtual Machines tab. 5. Right-click, and choose New Virtual Machine. 6. Choose Custom, and click Next. 7. Assign the name DC1 to the virtual machine, and click Next. 8. Select infrastructure for the host, and click Next. 9. Select your storage, and click Next. 10. Choose Virtual Machine Version 8, and click Next. 11. Choose Windows, choose Microsoft Windows Server 2008 R2 (64-bit), and click Next. 12. For CPUs, select one virtual processor socket, and two cores per virtual socket, and click Next. 13. Choose 4 GB RAM, and click Next. 14. Click 1 for the number of NICs, select VMXNET3, connect to the VDI-NET network, and click Next. 15. Leave the default virtual storage controller, and click Next. 16. Choose to create a new virtual disk, and click Next. 17. Make the OS virtual disk size 40 GB, choose thick-provisioned lazy zeroed, specify the OS datastore on the storage, and click Next. 18. Keep the default virtual device node (0:0), and click Next. 19. Click Finish. 20. Right-click the guest, and choose Edit Settings. 21. On the Hardware tab, click Add… 22. Click Hard Disk, and click Next. 23. Click Create a new virtual disk, and click Next. 24. Specify 15 GB for the virtual disk size, choose thin provisioning, and specify your storage. 25. Choose SCSI (0:1) for the device node, and click Next. 26. On the Hardware tab, click Add… 27. Click Create a new virtual disk, and click Next. 28. Specify 50 GB for the virtual disk size, choose thin provisioning, and specify your storage. 29. Choose SCSI (0:2) for the device node, and click Next. 30. Click Finish, and click OK. 31. Click the Resources tab, and click Memory. 32. Select reserve all guest memory, and click OK. Red Hat Enterprise Virtualization sizing guide A Principled Technologies sizing guide 16
  • 17. 33. Start the guest. 34. Connect the guest’s virtual CD-ROM to the Microsoft Windows Server 2008 R2 installation disk. Installing the Microsoft Windows Server 2008 R2 operating system on the guest 1. Choose the language, time and currency, and keyboard input. Click Next. 2. Click Install Now. 3. Choose Windows Server 2008 R2 Enterprise (Full Installation), and click Next. 4. Accept the license terms, and click Next. 5. Click Custom. 6. Click the Disk, and click Drive options (advanced). 7. Click NewApplyFormat, and click Next. 8. After the installation completes, click OK to set the Administrator password. 9. Enter the administrator password twice, and click OK. 10. Connect the machine to the Internet, and install all available Windows updates. Restart as necessary. 11. Enable remote desktop access. 12. Change the hostname to DC1 and reboot when prompted. 13. Run diskmgmt.msc. 14. Select the 15 GB secondary volume, name it profiles, format it NTFS, and assign it drive letter E. 15. Select the 50 GB secondary volume, name it share, format it NTFS, and assign it drive letter F. 16. Set up networking for the data network: a. Click StartControl Panel, right-click Network Connections, and choose Open. b. Right-click the guest traffic NIC, and choose Properties. c. Uncheck TCP/IP (v6). d. Select TCP/IP (v4), and choose Properties. e. Set the IP address as 172.0.0.10/255.255.252.0. 17. Install VMware Tools. For more information, see http://kb.vmware.com/selfservice/microsites/search.do?language=en_US&cmd=displayKC&externalId=340 18. Reboot the server. Installing Active Directory and DNS services on DC1 1. Click StartRun, type dcpromo and click OK. 2. At the Active Directory Domain Services Installation Wizard welcome screen, check the Use advanced mode installation option, and click Next. 3. In the Choose a Deployment Configuration dialog box, select Create a new domain in a new forest, and click Next. 4. At the FQDN page, type vdi.com and click Next. 5. At the NetBIOS name prompt, leave the name vdi, and click Next. 6. At the Forest Functionality level, select Windows Server 2008 R2, and click Next. 7. At the additional Domain Controller Options, leave DNS server selected, and click Next. 8. At the System Folder Location screen, change to E: leave the default options, and click Next. Red Hat Enterprise Virtualization sizing guide A Principled Technologies sizing guide 17
  • 18. 9. Assign a Directory Services Restore Mode Administrator account password, and click Next. 10. At the Summary screen, review your selections, and click Next. 11. Once Active Directory Domain Services finishes installing, click Finish, and restart the system. 12. Run dnsmgmt.msc. 13. Create a reverse lookup zone for DC1. 14. Create static entries for infrastructure and SUT. 15. Open Windows Explorer, and create a file called e:profiles 16. Assign permissions of read/write to the vdieveryone group. Configuring the Windows time service on DC1 To ensure reliable time, we pointed our Active Directory server to a physical NTP server. 1. Open a command prompt. 2. Type the following: w32tm /config /syncfromflags:manual /manualpeerlist:"<ip address of a NTP server>" W32tm /config /reliable:yes W32tm /config /update W32tm /resync Net stop w32time Net start w32time Setting up DHCP services on DC1 1. Click StartAdministrative ToolsServer ManagerAdd Roles. 2. Select DHCP Server, and click Next. 3. At the Introduction to DHCP Server screen, click Next. 4. At the Specify IPv4 DNS Settings screen, type vdi.com for the parent domain. 5. Type the preferred DNS server IPv4 address, and click Next. 6. At the Specify IPv4 WINS Server Settings screen, select WINS is not required for applications on the network, and click Next. 7. At the Add or Edit DHCP Scopes screen, click Add. 8. At the Add Scope screen, enter the Name DHCP Scope name. 9. In the next box, set the following values, and click OK.  Start IP address = 172.0.0.101  End IP address = 172.0.3.200  Subnet mask = 255.255.252.0 10. Check the Activate This Scope box. 11. At the Add or Edit DHCP Scopes screen, click Next. 12. Click the Enable DHCP v6 Stateless Mode radio button, and click Next. 13. Leave the default IPv6 DNS Settings, and click Next. 14. At the Authorize DHCP server dialog box, select Use current credentials. Red Hat Enterprise Virtualization sizing guide A Principled Technologies sizing guide 18
  • 19. 15. At the Confirm Installation Selections screen, click Next. If the installation is set up correctly, a screen displays saying that DHCP server install succeeded. 16. Click Close. 17. Click StartRun and type DHCPmgmt.msc 18. Click DHCPdc1.vdi.comIPv4Server Options. 19. Right-click Server Options, and select Configure options for DNS 20. Add 172.0.0.10 as the DNS server, and 172.0.0.1 for router, Click OK. Setting up the Login VSI share and Active Directory users For Login VSI to work correctly, you must create a CIFS share, Active directory OU, and Active directory. For more information on Login VSI, see http://www.loginvsi.com/en/admin-guide/installation.html. 1. Open Windows Explorer, and create a file called f:share. 2. Assign permissions of read/write to the VDI/everyone group. 3. Right-click the f:share folder, and select Properties. 4. Click the Sharing tab, and click Share… 5. Add everyone to the Read/Write group, and click Share. 6. From the Login VSI media, run the Login VSI AD Setup. 7. Keep the defaults, and click Start. Creating roaming profiles for users 1. Open Active Directory users and computers. 2. Browse to vdi.comLogin_VSIUsersTarget. 3. Select all Login VSI users, and right-click Properties. 4. Click the Profiles tab. 5. Check the Profile path box, and type dc1profiles%username% 6. Click OK. Installing and optimizing the launcher guests Installing Windows 7 (64-bit) on the guest 1. Log into the appropriate vCenter. 2. In the vSphere client, connect to the vCenter Server, and browse to the ESXi host named infrastructure. 3. Click the Virtual Machines tab. 4. Right-click, and choose New Virtual Machine. 5. Choose Custom, and click Next. 6. Assign the name Launcher to the virtual machine, and click Next. 7. Select LUN1, and click Next. 8. Choose Virtual Machine Version 8, and click Next. 9. Choose Windows, choose Microsoft Windows 7 (64-bit), and click Next. 10. Choose two virtual processors, and click Next. Red Hat Enterprise Virtualization sizing guide A Principled Technologies sizing guide 19
  • 20. 11. Choose 4 GB RAM, and click Next. 12. Click 1 for the number of NICs, select E1000 and VDI-NET, and click Next. 13. Leave the default virtual storage controller, and click Next. 14. Choose to create a new virtual disk, and click Next. 15. Make the OS virtual disk size 20 GB, choose thick-provisioned lazy zeroed, and click Next. 16. Keep the default virtual device node (0:0), and click Next. 17. Click Finish. 18. Click Finish, and click OK. 19. Click the Resources tab, and click Memory. 20. Connect the VM virtual CD-ROM to the Microsoft Windows 7 x64 installation disk. 21. Start the VM. 22. When the installation prompts you, press any key to begin setup. 23. Enter your language preferences, and click Next. 24. Click Install. 25. Accept the license terms, and click Next. 26. Select Custom, and select the drive that will contain the OS. 27. Click Install, and the setup begins. 28. Type user for the username and change the computer name, and click Next. 29. Enter a password, and click Next. 30. For system protection, select Use recommended settings, and click Next. 31. Enter your time zone, and click Next. 32. Select the Work Network setting, and click Next. 33. Use Windows Update to patch the Windows 7 installation. 34. Install VMware Tools. For more information, see http://kb.vmware.com/selfservice/microsites/search.do?language=en_US&cmd=displayKC&externalId=340 35. Reboot. 36. Join the vdi.com domain, and reboot. Disabling Windows Firewall The domain GPO automatically disables the Windows Firewall. Installing the Login VSI Target software 1. Log in as vdiadministrator. 2. Browse to dc1sharevsi_installsetuptarget setupsetup.exe. 3. In the target setup wizard, type dc1share 4. Wait for the install to complete. Red Hat Enterprise Virtualization sizing guide A Principled Technologies sizing guide 20
  • 21. Cloning the launcher We created a template from the VM named launcher and deployed six Launchers using the sysprep functionality built into vCenter. For more information on how to clone virtual machines in VMware vCenter, please read http://www.vmware.com/support/pubs/vsphere-esxi-vcenter-server-pubs.html. Running the Login VSI benchmark We used 20 launchers configured in parallel to run two configurations: a medium workload of 110 user sessions and a heavy workload of 80 user sessions. For more information on how to run a Login VSI test, see http://www.loginvsi.com/en/admin-guide/performing-tests. Red Hat Enterprise Virtualization sizing guide A Principled Technologies sizing guide 21
  • 22. APPENDIX C – GUEST OPTIMIZATION SETTINGS Below, we summarize the settings we used in our Windows 7 guest for performance considerations. General OS optimizations  Set Screensaver to "None"  Set sound scheme to "None"  Disable Windows Error Reporting  Disable the following services (if they are not already disabled): o Wireless Zero Configuration o WLAN AutoConfig o WWAN AutoConfig o Telephony o SSDP Discovery Service o Remote Registry o Security Center o Shell Hardware Extension o Task Scheduler o Themes o Help and Support o Machine Debug Manager o Network Location Awareness o IPSec services o Background Intelligent Transfer Service o Desktop Windows Manager Session Manager o Function Discovery Resource Publication o HomeGroup listener o HomeGroup provider o Windows Defender o Windows Media Player Sharing Service o Windows Media Center Receiver Service o Windows Media Center Scheduler Service o BitLocker o Encryption Service o Block Level Backup Engine Service o IP Helper o Microsoft iSCSI Initiator Service o Microsoft Software Shadow Copy Provider Red Hat Enterprise Virtualization sizing guide A Principled Technologies sizing guide 22
  • 23. o Secure Socket Tunneling Protocol Service o UPnP Host Service o Volume Shadow Copy Service o Windows Backup o Windows Firewall  Optimize the Registry o RegScrub.exe – Registry Cleaner o NTRegOpt.exe – Registry Optimizer, removing white space in registry  Run disk cleanup  Defrag the HDD  Delete all event logs  Make the User profile the Default Profile General OS environment optimizations  Set Pagefile to a static size of 16 MB  Change the default Windows Theme to “Basic”  Adjust visual effects for “Best Performance”  Enable ClearType Fonts  Turn off Windows Security Center  Turn off Automatic Computer Maintenance  Disable “Allow users to browse for troubleshooters”  Disable “Allow troubleshooting to begin immediately when started”  Increase Service Startup Timeout [HKEY_LOCAL_MACHINESYSTEMCurrentControlSetControl] "ServicesPipeTimeout"=dword:0002bf20  Hide Hard Error Messages [HKEY_LOCAL_MACHINESYSTEMCurrentControlSetControlWindows] "ErrorMode"=dword:00000002  Disable CIFS Change Notifications [HKEY_LOCAL_MACHINESOFTWAREMicrosoftWindowsCurrentVersionPoliciesExplorer] "NoRemoteRecursiveEvents"=dword:00000001 Filesystem optimizations  Disable NTFS "Last Accessed" option "fsutil behavior set disablelastaccess 1" (and reboot)  Disable Windows Prefetcher Edit"[HKEY_LOCAL_MACHINESYSTEMCurrentControlSetControlSession ManagerMemory ManagementPrefetchParametersEnablePrefetcher]" Red Hat Enterprise Virtualization sizing guide A Principled Technologies sizing guide 23
  • 24. set value to "0" (Disable)  Disable System Restore Right-click My Computer > Properties > System Restore tab and select "Turn off System Restore"  Disable Indexing Double-click My Computer, Right click on C: > Properties > Click General tab and clear "Allow Indexing Service to Index"  Disable Offline Files [HKEY_LOCAL_MACHINESOFTWAREMicrosoftWindowsCurrentVersionNetCache] "Enabled"=dword:00000000  Disable scheduled or background Defrag [HKEY_LOCAL_MACHINESOFTWAREMicrosoftDfrgBootOptimizeFunction] "Enable"="N"  Disable Windows Search  Disable Windows Disk Optimizer  Reduce Menu Show Delay [HKEY_CURRENT_USERControl PanelDesktop] "MenuShowDelay"="150"  Disable all Visual Effects except "Use common tasks in folders" and "Use visual styles on windows and buttons"  Boot Animation bcdedit /set bootux disabled  Remove unused Windows components o Windows Media Center o DVD Maker Power optimizations  Disable hibernation and suspend  Change power settings to “High Performance” and disable sleep timer  Set HDD’s to “Never” turn off  Disable the Logon Screen Saver HKEY_USERS.DEFAULTControl PanelDesktop Edit ScreenSaverActive and change value to 0 Notifications optimizations  Disable logging of informational Printing events Open Printers and Faxes, Click File Server Properties > Advanced and clear "Log spooler informational events" (V)  Disable Success Logging (login attempts, etc.) Only do this if security policy allows it Red Hat Enterprise Virtualization sizing guide A Principled Technologies sizing guide 24
  • 25. Disable Toolbar Notifications  Disable Balloon Tips  Shrink Event Logs and enable circular logging (registry keys)  Disable Desktop Cleanup Wizard Internet Explorer optimizations  Disable “Use Suggested Sites”  Set home page to Intranet site, or blank  Shrink the IE Temp File size Common application optimizations  Install Adobe Flash Player (turning off automatic updates)  Turn Java Updater off  Remove MS OneNote tray service (if installed)  Turn off Outlook Cached Mode (if installed) Network optimizations  Disable NetBIOS over TCP/IP  Disable IPv6  Add any necessary DNS suffixes  Disable Automatic Searching of Network Printers and Shares Red Hat Enterprise Virtualization sizing guide A Principled Technologies sizing guide 25
  • 26. APPENDIX D – DETAILED SERVER CONFIGURATION System Dell PowerEdge R710 Power supplies Total number 2 Vendor and model number Dell A570P-00 Wattage of each (W) 570 Cooling fans Total number 5 Dimensions (h x w) of each 2.5” x 2.5” Volts 12 Amps 1.60 General Number of processor packages 2 Number of cores per processor 6 Number of hardware threads per core 2 System power management policy Balanced CPU Vendor Intel® Name Xeon® Model number X5670 Stepping B1 Socket type LGA1366 Core frequency (GHz) 2.30 Bus frequency 6.40 GT/s L1 cache 32 KB + 32 KB (per core) L2 cache 256 KB (per core) L3 cache 12 MB Platform Vendor and model number Dell PowerEdge R710 Motherboard model number 0N047H BIOS name and version Dell 1.0.14 BIOS settings Defaults Memory modules Total RAM in system (GB) 256 Vendor and model number Samsung M393B2G70BH0-YH9 Type PC3L-10600R Speed (MHz) 1333 Speed running in the system (MHz) 1333 Timing/Latency(tCL-tRCD-tRP-tRASmin) 9-9-9-36 Size (GB) 16 Number of RAM module(s) 16 Chip organization Double-sided Red Hat Enterprise Virtualization sizing guide A Principled Technologies sizing guide 26
  • 27. System Dell PowerEdge R710 Rank Dual Operating system Name RHEV Hypervisor 6.2 Build number 201 File system ext4 Kernel 2.6.32 - 220.4.2.el6.x86_64 Language English Internal hard drive Vendor and model number Dell MHZ2160BK G2 Number of disks in system 2 Size (GB) 160 RPM 7.2K Type SATA Ethernet adapters Vendor and model number Broadcom® NetXtreme® II gigE 5709C Quad-Port Ethernet Type Integrated Figure 13. Detailed test server configuration. Red Hat Enterprise Virtualization sizing guide A Principled Technologies sizing guide 27
  • 28. ABOUT PRINCIPLED TECHNOLOGIES We provide industry-leading technology assessment and fact-based marketing services. We bring to every assignment extensive experience with and expertise in all aspects of technology testing and analysis, from researching new technologies, to developing new methodologies, to testing with existing and new tools. When the assessment is complete, we know how to present the results to a broad range of target audiences. We provide our clients with the materials they need, from market-focused data to use in their own Principled Technologies, Inc. collateral to custom sales aids, such as test reports, performance 1007 Slater Road, Suite 300 assessments, and white papers. Every document reflects the results of Durham, NC, 27703 our trusted independent analysis. www.principledtechnologies.com We provide customized services that focus on our clients’ individual requirements. Whether the technology involves hardware, software, Web sites, or services, we offer the experience, expertise, and tools to help our clients assess how it will fare against its competition, its performance, its market readiness, and its quality and reliability. Our founders, Mark L. Van Name and Bill Catchings, have worked together in technology assessment for over 20 years. As journalists, they published over a thousand articles on a wide array of technology subjects. They created and led the Ziff-Davis Benchmark Operation, which developed such industry-standard benchmarks as Ziff Davis Media’s Winstone and WebBench. They founded and led eTesting Labs, and after the acquisition of that company by Lionbridge Technologies were the head and CTO of VeriTest. Principled Technologies is a registered trademark of Principled Technologies, Inc. All other product names are the trademarks of their respective owners. Disclaimer of Warranties; Limitation of Liability: PRINCIPLED TECHNOLOGIES, INC. HAS MADE REASONABLE EFFORTS TO ENSURE THE ACCURACY AND VALIDITY OF ITS TESTING, HOWEVER, PRINCIPLED TECHNOLOGIES, INC. SPECIFICALLY DISCLAIMS ANY WARRANTY, EXPRESSED OR IMPLIED, RELATING TO THE TEST RESULTS AND ANALYSIS, THEIR ACCURACY, COMPLETENESS OR QUALITY, INCLUDING ANY IMPLIED WARRANTY OF FITNESS FOR ANY PARTICULAR PURPOSE. ALL PERSONS OR ENTITIES RELYING ON THE RESULTS OF ANY TESTING DO SO AT THEIR OWN RISK, AND AGREE THAT PRINCIPLED TECHNOLOGIES, INC., ITS EMPLOYEES AND ITS SUBCONTRACTORS SHALL HAVE NO LIABILITY WHATSOEVER FROM ANY CLAIM OF LOSS OR DAMAGE ON ACCOUNT OF ANY ALLEGED ERROR OR DEFECT IN ANY TESTING PROCEDURE OR RESULT. IN NO EVENT SHALL PRINCIPLED TECHNOLOGIES, INC. BE LIABLE FOR INDIRECT, SPECIAL, INCIDENTAL, OR CONSEQUENTIAL DAMAGES IN CONNECTION WITH ITS TESTING, EVEN IF ADVISED OF THE POSSIBILITY OF SUCH DAMAGES. IN NO EVENT SHALL PRINCIPLED TECHNOLOGIES, INC.’S LIABILITY, INCLUDING FOR DIRECT DAMAGES, EXCEED THE AMOUNTS PAID IN CONNECTION WITH PRINCIPLED TECHNOLOGIES, INC.’S TESTING. CUSTOMER’S SOLE AND EXCLUSIVE REMEDIES ARE AS SET FORTH HEREIN. Red Hat Enterprise Virtualization sizing guide A Principled Technologies sizing guide 28