
Recommended
Recommended
More Related Content
What's hot
What's hot (8)
Similar to Hyundai hl770 7 wheel loader service repair manual
Similar to Hyundai hl770 7 wheel loader service repair manual (13)
More from ufjjsejfkskemme
More from ufjjsejfkskemme (20)
Recently uploaded
Recently uploaded (20)
Hyundai hl770 7 wheel loader service repair manual
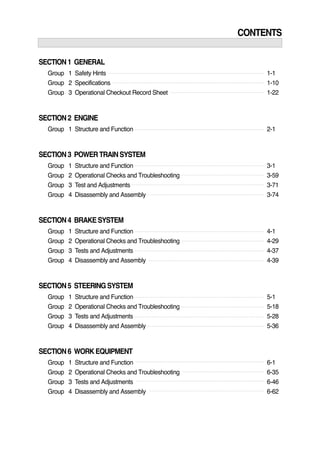
- 1. CONTENTS SECTION 1 GENERAL Group 1 Safety Hints 1-1 Group 2 Specifications 1-10 Group 3 Operational Checkout Record Sheet 1-22 SECTION 2 ENGINE Group 1 Structure and Function 2-1 SECTION 3 POWER TRAIN SYSTEM Group 1 Structure and Function 3-1 Group 2 Operational Checks and Troubleshooting 3-59 Group 3 Test and Adjustments 3-71 Group 4 Disassembly and Assembly 3-74 SECTION 4 BRAKE SYSTEM Group 1 Structure and Function 4-1 Group 2 Operational Checks and Troubleshooting 4-29 Group 3 Tests and Adjustments 4-37 Group 4 Disassembly and Assembly 4-39 SECTION 5 STEERING SYSTEM Group 1 Structure and Function 5-1 Group 2 Operational Checks and Troubleshooting 5-18 Group 3 Tests and Adjustments 5-28 Group 4 Disassembly and Assembly 5-36 SECTION 6 WORK EQUIPMENT Group 1 Structure and Function 6-1 Group 2 Operational Checks and Troubleshooting 6-35 Group 3 Tests and Adjustments 6-46 Group 4 Disassembly and Assembly 6-62
- 2. 6-58 1.MAINPUMP STRUCTURE1) 35 1 27 16 21 17 21 20 22 3934 26 19 8 P2 CARTRIDGE P1 CARTRIDGE 1 End cap 2 Bushing 16 Internal snap ring 17 Ball bearing 19 Splined shaft 20 Shaft seal 21 Internal snap ring 22 Mounting cap 26 Section seal 27 Center housing 34 Section seal 35 Cap screw 39 Cap screw GROUP 4 DISASSEMBLY AND ASSEMBLY 7707WE28
- 3. 6-59 STRUCTURE(2/2) 3 4 5 2 30 6 7 36 29 31 32 33 15 14 13 23 24 11 12 25 10 11 9 28 37 38 P2 CARTRIDGE P1 CARTRIDGE 2 Section seal 3 Section seal 4 Back up ring 5 Pressure port plate 6 Camring 7 Rear port plate 9 Rear port plate 10 Camring 11 Dowel pin 12 Vane holdout pin 13 Back up ring 14 Section seal 15 Section seal 23 Pressure port plate 24 Rotor assembly 25 Vane 28 Lock pin 29 Lock pin 30 Rotor assembly 31 Vane holdout pin 32 Vane 33 Dowel pin 36 Screw 37 Screw 38 Lock washer 7707WE29
- 4. 6-60 GENERAL INSTRUCTION Preliminary Any servicing work done on main pump is to be done in a clean environment to prevent potential contamination by foreign particles. Appropriate tools and equipment are required in order to insure proper disassembly and reassembly in suitable conditions. In case of repetitive service, a specific working bench is recommended. To prevent oil leakage and body tilting during assembly, housing bolts are to be tightened as per the following pattern ! (1) ※ ※ ※ 2) Vane Rotor Pin 1 2 3 4 1 2 7 5 3 6 4 Rotor : Side surfaces and vane slots should be free of scratches. Side feeds, vane slots and holdout pin orifices should be free of any contamination. Serration(driving splines) should not be deformed by the shaft. ③③ Parts Parts must be kept clean at all time. If cleaning is needed, solvent is to be used. It is needed to check and oil the inner parts before assembly. In case of replacement of parts with mulitiple numbers, such as vanes and holdout pins, all the parts are to be changed. Vanes The faces and edges should be free of scratch from contamination. Vanes should move smoothly in the rotor slots, without excessive clearance. Edges may be stoned with a fine lndia stone to remove burrs. Vane holdout pins : Holdout pins should have no matting marks. (2) ※ ※ ①① ②② 7803AWE05 7803AWE50 7803AWE51
- 5. 6-61 Camring : No scratches or vane shock marks(waves) should be seen. Visual axial waves on new camring are from grinding process and therefore normal. ④④ Port plates : Faces should not be scratched. No cavitation/aeration/fretting corrosion marks should be seen. When there, the bronze bushing should be clean, with no abnormal wear sign. Bi-directional cartridges use same port plates for CW and CCW rotation. Unit-directional cartridges require different port plates. ⑤⑤ Seals : All oil seals must be cleaned, with no wear or cutting mark. When servicing a pump from field operation, it is highly recommended to change all seals. All seals are to be greased lightly before assembly. Use seal driver tool to install shaft seal, and protective cone to install shaft assembly. Backup rings(1) on pressure plates are to be replaced, anytime a cartridge is taken out of a pump. Backup rings are to be installed as follow, behind the square seal : ⑥⑥ ・ ・ ・ Back up ring Seal Shaft : Key-way should be clean and not worn on the sides by excessive torque. No fretting corrosion due to poor coupling should be visible. On spline shaft, splines should not be deformed. No axial scratch should be on the sealing area(1). The shaft seal lip contact line may be visible, but should not be a groove. Bronze-bushing contact area(2) should be clean and cylindrical, without scratch marks. ⑦⑦ ・ ・ 7803ASE06 7803ASE08 7803ASE07
- 6. 6-62 2 1 3 4 Ball bearing(3) should turn freely and snap ring(4) should be in place. Some shaft assemblies have 2 snap rings, before and after the ball bearing. Never insert a snap ring from shaft seal side, to avoid scratching the sealing surface. Use protective cone to install shaft assembly. If not available, make sure not to damaged the shaft seal lips. Pre start check and priming. Before operating the pump again, the following points are to be checked : Pump rotation is as per electric motor or engine. All fittings are properly connected and tight. No oil-leak and/or air intake being allowed. If any, valve on suction line is to be fully opened. When electric motor or engine is started up, the pump should prime immediately. However, depending on installation and amount of air in the discharge lines, priming may take a few seconds. In case priming does not occur within 15 seconds, equipment should be switched off at once. Then : Manually fill the pump housing with fluid. Bleed off air that may be trapped in the pump. Check air bleed-off valves. Start rotation in a jogging manner until a prime is picked up. ・ ※ ※ (3) ① ② ③ ・ ・ ・ ・ ・ ・ ・ ・ 7803ASE10
- 7. 6-63 DISASSEMBLY Install the pump on the table. Two bolts will help to unscrew the 4 pump bolts. Unscrew the bolts. (1) ※ (2) Remove the end cap (P2 cartridge will come with it). Cartridge : Be careful as some items could fall if the retaining cartridge bolts are totally loose or broken. The seal(34) usually stays in the rear cap. 34 3) (3) ※ ※ 7707WE31 7707WE32
- 8. 6-64 Disassemble the P2 cartridge/end cap with an extractor. If you want to continue the pump disasse- mbly(P1 & shaft), go to page 6-65. If you want to reassemble the P2 cartrid- ge, go to page 6-66. (4) ※ ※ 7707WE33 Put two screws in the housing and flip the pump (housing + P1 assy). (5) 7707WE34 Remove the bolts.(6) 7707WE35
- 9. 6-65 Remove the front cap. P1 cartridge will come with the front cap / shaft assembly. (7) ※ 7707WE36 Disassemble the P1 cartridge / front cap with an extractor. (8) 7707WE37 Remove the retaining ring Extract the shaft / bearing assembly. Take a protection cone to prevent seal damage. If you don’t, change the shaft seal. If not new, the shaft seal should be replaced. If the shaft Ø is bigger than the shaft seal Ø, please contact HYUNDAI. A B A : B : ※ ※ ※ 7707WE38
- 10. 6-66 The pump is now disassembled.(9) Housing End cap Cartridge P2 Cartridge P1 Retaining ring Shaft assy Front cap Shaft seal 7707WE39 ASSEMBLY Fit the cartridge P1 into the housing.(1) 4) 7707WE40 Check if the dowel pin is in its position in the housing by trying to rotate the cartridge. If the cartridge does rotate, the dowel pin is not in the hole. Take the cartridge out and try again. (2) ※ 7707WE41
- 11. 6-67 Protective cone on the shaft assembly. Shaft assembly + protective cone into the front cap. Slightly rotate the shaft to avoid the shaft seal lip(s) to be deteriorated. Retaining ring into the front cap. To avoid damaging the shaft seal do not forget to put a protective cone on the shaft. Push on the external bearing cage. C B A A : B : C: 7707WE42 Assemble the front cap assy on the housing & cartridge assy. Position the shaft / front cap assy only if the cartridge is well positioned, dowel pin in the housing dowel pin hole. Put some grease on the seals to prevent them from moving. (3) 7707WE43
- 12. 6-68 Always check if the shaft rotates freely. If not, disassemble and go back to the previous step. Check the porting configuration. Tighten the 4 bolts. Step by step to avoid damaging the seals. Always check if the shaft rotates freely. If not, disassemble and go back to the previous step. 19.1Kgf m(138lbf ft). . 6.9Kgf m(50lbf ft). . ① ② ③ ④ 7707WE44 4 3 2 1 Fit the cartridge(P2) into the housing. Check if the dowel pin is in its position in the housing by trying to rotate the cartridge. If the cartridge does rotate, the dowel pin is not in the hole. Take the cartridge out and try again. (4) (5) ※ 7707WE45
- 13. 6-69 Assemble the end cap on the housing assy. Position the shaft / front cap assy only if the cartridge is well positioned, dowel pin in the housing dowel pin hole. Put some grease on the seals to prevent them from moving. Always check if the shaft rotates freely. If not, disassemble and go back to the previous step. (6) ※ ※ ※ 7707WE46 Final assembly Always check if the shaft rotates freely. If not, disassemble and go back to the previous step. Check the porting configuration. Tighten the 4 or 7 bolts. Step by step to avoid damaging the seals. ・Tightening torque Mounting cap : 19.1kgf・m(138lbf・ft) End cap : 6.9kgf・m(50lbf・ft) Always check if the shaft rotates freely. If not, disassemble and go back to the previous step. (7) 7707WE47 ① ② ③ ④ ⑤ 4 3 2 1 4 2 5 1 6 3 7
- 14. 6-70 2.MAINCONTROLVALVE STRUCTURE1) 7 17 14 10 13 16 9 1710 11 77 12 6 5 2 1 3 2 5 12 6 4 15 8 4.2kgf m(30.4lbf ft). . Spool to be assembled with identification groove at the B port end Spool to be assembled with identification groove at the B port end 7707WE50 1 Housing group 2 Main relief valve assembly 3 Double acting spool(Bucket) 4 Double acting spool(Boom) 5 Bucket spool centering 6 Boom spool centering 7 Combined overload & anti-cavitation assembly 8 Back pressure valve 9 Check valve assembly 10 Pilot valve assembly 11 Pilot operated float check block assembly 12 Adaptor & check valve 13 Shuttle valve assembly 14 Anti-cavitation check valve assembly 15 1/4˝ BSPP plug 16 Check valve assembly 17 Pilot valve assembly
- 15. 6-71 DISASSEMBLY AND ASSEMBLY Ensure that the machine is in a safe condition with no suspended loads or trapped pressure within the system before removing any pipework or component. Servicing must only be carried out by trained personel. MAIN RELIFE VALVE(Item 2) 2) ※ (1) 8 1 3 5 7 9 4 6 2 15.5kgf m(112lbf ft). . 15.5kgf m(112lbf ft). . Main stage assy Pilot assy 14 11 13 15 17 12 10 14 16 7707WE51 1 Adjusting screw 2 Plug cap 3 Cap 4 Seat 5 Poppet 6 Plunger 7 Sleeve 8 Lock nut 9 Spring 10 Spring 11 Detent ring 12 Detent ring 13 O-ring 14 O-ring 15 O-ring 16 O-ring 17 Orifice wire Removal Unscrew both the pilot assembly and the plug from both ends of the relief valve. The main stage assembly must be driven or pressed out in the direction of the pilot assembly using a soft drift. Refitting Lubricate sleeve and assemble by pressing into housing until detent ring(12) locates on housing. Fit the pilot assembly and end cap. Adjusting The main relief valve must be adjusted to the required setting when the machine is recommissioned. Adjustment is made by first unscrewing the adjuster(1) until there is no load on the pilot spring(10). Select a machine service to its end stop. Screw in the adjuster until the correct pressure setting is measured at the valve inlet, account must be taken for the effect of back pressure on the measured setting. ①① ② ③③
- 16. 8 1 2 3 6 10 5 6 9 7 16 4 12 9 15 17 9.7kgf m(70.2lb ft). . 9.7kgf m(70.2lb ft). . 3.1kgf m(22.4lb ft). . 3.1kgf m(22.4lb ft). . 6-72 DOUBLE ACTING SPOOL(Item 3, 4) Control spools are not replaceable as they are individually sized to suit the housing. When removing and refitting spools ensure that they are refitted into the correct bore and correctly orientated as shown by the identification groove location on the valve assembly drawing. 4 3 2 1 2 3 4 Bucket spool Boom spool (2) 7707WE52 1 Spool 3 Spring 2 Plunger 4 O-ring BUCKET SPOOL CENTERING(Item 5)(3) 7707WE53 1 Cover 2 Cap screw 3 Washer 4 Spool cap 5 Spring 6 Spring retainer 7 Seal retainer 8 Cap screw 9 O-ring 10 Shim(0.020,0.010,0.005,0.002inch) 12 Spool cap 15 Cover 16 O-ring 17 Cap screw Remove 4 retaining screws(8) from the spring centring end. Remove the cover(1) and withdraw the spring pack and spool from the valve. Hold the spool in a suitable soft clamp being careful not to damage the spool surface or bend the spool. Remove the spool caps from the spool. The replacement assembly is supplied with the spring set to the correct load. Refit the spool caps to the specified torque using Loctite 542 or similar medium strength oil tolerant thread locking product.
- 17. 6-73 8 1 16 15 17 2 3 6 10,11,13 5 6 9 7 18 4 12 9 16 14 19 17 15 9.7kgf m(70.2lbf ft). . 9.7kgf m(70.2lbf ft). . 3.1kgf m(22.4lbf ft). . BOOM SPOOL CENTERING(Item 6)(4) 7707WE54 1 Cover 2 Cap screw 3 Washer 4 Spool cap 5 Spring 6 Spring retainer 7 Seal retainer 8 Cap screw 9 O-ring 10 Shim(0.020inch, 2EA) 11 Shim(0.005inch, 2EA) 12 Spool cap 13 Shim(0.005inch, 1EA) 14 Cover 15 O-ring 16 Plug 17 Back up ring 18 O-ring 19 Cap screw Remove 4 retaining screws(8) from the spring centering end. Remove the cover(1) and withdraw the spring pack and spool from the valve. Hold the spool in a suitable soft clamp being careful not to damage the spool surface or bend the spool. Remove the spool caps from the spool. The replacement assembly is supplied with the spring set to the correct load. Refit the spool caps to the specified torque using loctite 542 or similar medium strength oil tolerant thread locking product.
- 18. 6-74 5 12 6 9 15 10 3 14 13 10 2 4 8 11 1 7 3.1kgf m(22.4lbf ft). . 8.7kgf m(62.9lbf ft). . 9.7kgf m(70.2lbf ft). . COMBINED OVERLOAD AND ANTI-CAVITATION(Item 7)(5) 7707WE55 1 Adjusting screw 2 Pilot housing 3 A/C housing 4 Pilot poppet 5 Main plunger 6 Pilot pin 7 Thin nut 8 Pilot spring 9 Spring 10 O-ring 11 O-ring 12 Composite piston seal 13 Composite piston seal 14 A/C check and main housing 15 Return spring BACK PRESSURE VALVE(Item 8) This assembly is retained by screws(5) when replacing the check valve(2) ensure that it is free to slide in the housing before refitting the blanking plate. 1 2 4 3 5 0.51kgf m(3.7lbf ft). . (6) 7707WE56 1 Blanking plate 4 O-ring 2 Check valve 5 Socket screw 3 Spring This is a non servicable item and a replacement unit factory set to the correct setting should be fitted. Inspect seat in valve housing for damage before refitting.
- 19. 6-75 CHECK VALVE ASSEMBLY(Item 9, 16) This is a non servicable item and a replacement unit should be fitted. Ensure that orifice in check valve(1) is clear when refitting. Inspect seat in float check block for damage before refitting. 7 1 6 5 4 8 2 7.6kgf m(55lbf ft). . (7) 7707WE57 1 Float check valve 6 Spring 2 Housing 7 Composite piston seal 4 O-ring 8 O-ring 5 Back up ring 15 12 11 10 7 9 6 8 5 4 17 16 1 3 2 PILOT VALVE ASSEMBLY(Item 10)(8) 7707WE58 1 Socket set screw 2 Lock nut 3 Spring body 4 Spring 5 Spring retainer 6 Back up ring 7 Back up ring 8 O-ring 9 O-ring 10 O-ring 11 O-ring 12 Logic seat and spool 15 Plug 16 O-ring 17 Spring guide The replacement of this item requires that the float check block is first removed from the valve. This is a non servicable item and a replacement unit should be fitted. The logic spool is individually sized to the housing bore in item 12. Replacement assemblies are supplied factory set.
- 20. 6-76 Remove the three retaining screws(2) and lift the block from the main housing. Do not slide the block accross the face as this may damage the sealing face and seals. 2 3 1 3 78 3 54 6 87 3 (9) 7707WE59 1 Float check block 5 O-ring 2 Cap head screw 6 Plug 3 Plug 7 O-ring 4 O-ring 8 Plug PILOT OPERATED FLOAT CHECK BLOCK ASSEMBLY(Item 11) 1 3 4 2 (10) 7707WE60 1 Adapter 2 Socket set screw 3 Check valve 4 O-ring ADAPTER+ORIFICE SCREW+CHECK VALVE(Item 12) SHUTTLE VALVE ASSEMBLY(Item 13) This is non servicable item and a replacement unit should be fitted. Inspect seat in float check block for damage before refitting. 1 3 2 0.51kgf m(3.7lbf ft). . (10) 7707WE61 1 Seat 2 Metric ball 3 O-ring
- 21. 6-77 A/C CHECK VALVE ASSEMBLY(Item 14) This is a non servicable item and a replacement unit should be fitted. Inspect seat in float check block for damage before refitting. 1 5 3 2 4 (12) 7707WE62 1 Body 4 Piston seal 2 Check valve 5 O-ring 3 Spring 16 16 3 1 2 14 15 4 5 86 9 7 10 11 12 13 4.6kgf m(33.2lbf ft) 0.51kgf m(3.7lbf ft). . . . PILOT VALVE ASSEMBLY(Item 17)(13) 7707WE63 1 Socket set screw 2 Hexagon nut 3 Spring body 4 Spring 5 Spring retainer 6 Back up ring 7 Back up ring 8 O-ring 9 O-ring 10 O-ring 11 O-ring 12 Logic seat and spool 13 Plug 14 O-ring 15 Spring guide 16 Plug The replacement of this item requires that the float check block is first removed from the valve. This is a non servicable item and a replacement unit should be fitted. The logic spool is individually sized to the housing bore in item 12. Replacement assemblies are supplied factory set.
- 22. 6-78 3. REMOTE CONTROL VALVE STRUCTURE1) 14 23 14 23 4 2 4,3,1 4,3,1 2 1 3 1 4 5 12-1 10 14 15 22 23 20 21 25 26 30 33 40 42 40 32 30 2 3-1 3-2 3-3 Locite 262 11-1 11-2 11-3 11-4 11-5 11-6 12-2 12-3 12-4 20-1 7707WE64 1 Handle 2 Push button 3-1 Locking pin 3-2 Bent lever 3-3 Nut 4 Rubber boot 5 Locking nut 10 Cardan bracket 11-1 Self-locking nut 11-2 Washer 11-3 Washer 11-4 Cardan 11-5 Armature 11-6 Spring ring 12-1 Counter nut 12-2 Spring ring 12-3 Switch plate screw 12-4 Press screw 14 Shims(0.1, 0.2, 0.5mm) 15 Cardan 20 Flange 21 Solenoid 22 Intermediary plunger kit 23 Intermediary plunger guide 25 Electric bracket 26 Bushing 30 Plunger kit 32 Regulation unit 33 Regulation unit 40 Return spring 42 Prefeeling point kit
- 23. 6-79 DISASSEMBLY AND ASSEMBLY PUSH BUTTEN The remote control valve does not need to be removed from the machine to perfom this operation. Remove worn pushbutton using a small screwdriver. The installation of new elements is performed without any special tools; the parts are simply pressed into place. RUBBER BOOT Remove the remote control valve from the machine or free the valve by unscrewing the 4 screws fixing the plate in order to release the electrical cable. ・Assembly Torque : 1.02kgf・m(7.4lbf・ft) Hold the remote control valve using a vice or a vice-grip wrench(clamp onto the body). The pilot unit does not need to be removed from the machine to release the cable. However, it is recommended to lift the control unit by undoing the 4 fixing screws on the arm rest. It is unnecessary to remove the units with no electrical functions. Lift and turn the boot inside out. Remove the grommet(7) from its emplacement to free the cable. Loosen the handle mounting nut(3-3) using a 19mm open-end wrench. ・Assembly : torque 4.08kgf・m(29.5lbf・ft) Unscrew and remove the handle(1). ・Assembly - Add loctite 262 onto the lever thread - Torque : 4.08kgf・m(29.5lbf・ft) Replace the faulty rubber boot(4) with a new one. Replace the handle(1) following the disassembly instructions in reverse order. HANDLE Clamp the threaded section of the lever(3-2) in a vice fitted with V-shaped vice clamp. Remove the pin(3-1) using a 5mm pin driver. Replace the lever(3-2) onto the new handle(1) and secure it with the pin(3-1) using a 5mm pin driver. Respect the position of the curved lever to ensure that the handle is correctly oriented as indicated by the machine’s technical specifications. Replace the nut(3-3) on the threaded section and replace the boot(4). 2) (1) (2) (3) ① ※ ※ ② ③ ④ ⑤ ⑥ ⑦ ① ② ③ ※ ④
- 24. 6-80 DETENT CARDAN BRACKET KIT Remove the 2 grommets(20-1) from the flange (20). Place centering sleeves V & W to avoid damaging the cardan knuckles while loosening the nuts. Unscrew the locking nut(5) using a 23mm open-end wrench. ・Assembly : Torque 4.08±0.4kgf・m (29.5±2.9lbf・ft) Unscrew the self-locking nut(11-1) using a 13mm open-end wrench. ・Assembly - Torque 1.02kgf・m(7.4lbf・ft) - Place centering sleeves(V-W) to avoid damaging the cardan knuckles while screwing the nuts. Remove : - Friction washer(11-2) - Friction washer(11-3) - Cardan/armature assembly (11-4 ~ 11-6) (4) ※ ※ ※ ① ② Before loosening the nuts V W V W 7707WE65 NON-DETENT PLUNGER KIT Unscrew the self-locking nut(12-1) using a 13mm open-end wrench. ・Reassembly : - Torque 1.02kgf・m(7.4lbf・ft) - Place centering sleeves(V-W) to avoid damaging the cardan knuckles while screwing the nuts. Undo the snap ring(12-2) using a flat-end screwdriver. Remove the screw assembly(12-3, 12-4) CARDAN Remove the centering sleeves V & W. Remove the cardan bracket(10) and the shims(14). Unscrew the cardan(15) using a 17mm open-end wrench. ・Reassembly : - Ungrease the cardan threads - Add loctite 262 onto the cardan threads(both end) - Torque 4.08kgf・m(29.5lbf・ft) SOLENOID AND CONNECTOR It is advised to mount the connector onto the solenoid cable once the remote control valve is assembled. Remove the flange(20) and the electrical bracket(25), Remove the protecting bushes(26) from the electrical bracket(25). Undo the solenoid(21) from the electric bracket(25). Replace the solenoid. Clean the polar face using a piece of cloth and pay attention not to hit them. Assembly : Place the solenoid cable in its emplacement on the electric bracket before fitting the protection bushes. ① ② ③ (5) ① ② ③ (6) ※ ① ② ③ ④ ※ ⑤ (7)
- 25. Thank you very much for your reading. Please Click Here. Then Get COMPLETE MANUAL. NO WAITING NOTE: If there is no response to click on the link above, please download the PDF document first and then click on it.
- 26. 6-81 INTERMEDIARY PLUNGER KIT Undo the intermediary plunger guide(23). Remove and replace the intermediary plunger kit assembly(22). GUIDE / PLUNGER AND REGULATION UNIT Beware of the plungers that might jump out due to the spring return. Remove : - Guide/plunger assembly(30). - Regulation unit(32/33). - Return spring(40). - Pre-feeling point kit(42). The remote control valve is now totally disassembled. Assemble in reverse order following the torque specification. ① ② (8) ※ ① ② (9)
- 27. SECTION 7 ELECTRICAL SYSTEM Group 1 Component Location 7-1 Group 2 Electrical Circuit 7-3 Group 3 Monitoring System 7-23 Group 4 Electrical Component Specification 7-35 Group 5 Connectors 7-44 Group 6 Troubleshooting 7-61