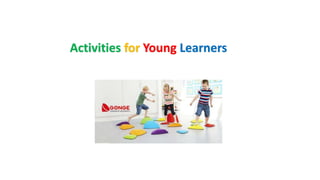
2. Stepping stones
Learners get involved both physically and intellectually.
Can be played in pairs or with groups of learners.
(The others can stand aside and cheer, but the whole team should agree on answers to be
given.)
You need one or two sets of cards (pictures and words) and a coin to toss.
The goal is to cross the finish line first.
Match the picture cards (the ‘stepping stones’) on the floor to the displayed
word cards.
3. Procedure
Select all the picture cards and display them on the floor, like stepping stones.
It is important that the stepping stones are displayed in such a way on the floor that
they clearly look like a path, but also give the learners the opportunity to choose
between 2 or 3 cards to step on.
The more cards you use, the easier it will be to do this – paths can separate into two
routes and join back together again.
4. Decide and show the learners where the start and finish lines are. The
word cards are displayed face up on the board or on a table.
All the learners must be able to see and reach them so they can all be
involved in the process of choosing the correct card.
Each team names a learner to walk through the path - these two
learners represent their team, but they don’t work on their own. Then
decide which team goes first.
A coin is tossed in each turn to decide whether the team moves 1 or 2
steps forward- it replaces the dice and adds some extra challenge to the
race.
The words ‘heads’ and ‘tails’ will have to be taught previously.
5. The first player moves and steps on a picture card. The team will have to pick the
matching word, in order to make a pair. Ideally, the team will say the word and
point at the card.
If they say or choose the wrong word, they have to go back to the stepping
stone where they were before their turn. Teams play alternately until one crosses
the finish line and wins the game.
For an extra challenge, a time limit can be set: 30 seconds to choose the correct
word card, for example.
This game can also be adapted to fit different needs and levels: instead of
making pairs of words, consider asking the learners to produce a sentence with
the word they step on. Or you could replace the word cards on the board by
sentences with gaps, so learners have to choose the correct sentence for their
‘stone’.
11. Activities For Pre-A1 Starters
Let them draw four things they learnt in their lesson.
Then help them cut the squares into small cards and demonstrate asking and
answering questions about them.
They then go on to ask and answer their partner questions such as
‘What’s this?’,
‘What color is it?’
‘Is it old/new?’,
‘Have you got a..?’ in pairs.
This provides vocabulary consolidation and revision and gets them ready for part 3
of the speaking test.
12. The same cards could also be used in a ‘commands’ game:
‘Put the [card] on the table’, ‘…under the window’, ‘…between the pencil case and
the ruler’.
This gets students to revise prepositions of place and familiarizes them with the task
in part 2 of the speaking test.
Be clear about where they can put things so the class stays in control, but allow a
little freedom and fun.
When they are familiar with the task, you can use the same cards with posters, or
even their course books to replicate the test procedure.
13. Store the cards in envelopes or vocabulary boxes.
That way, you always have a filler ready if you have extra lesson
time or need to get students to change focus.
The same cards can be used for memory or snap.
14. For A1 Movers
The four boxes are also helpful at A1 Movers level.
Students can draw their own odd-one-out tasks, like those used in Speaking part 3,
using the vocabulary studied in class. (A great revision activities and fillers)
They can then work in pairs or teams to guess the odd item.
As they become more confident, the same boxes can be used to draw and tell each
other stories giving them practice for Speaking part 2. They can also write short
sentences about the pictures.
15. For A2 Flyers
You could introduce a story using an initial picture and then get your
students to draw the rest using the four boxes.
Students then tell each other their version, and they compare and notice
differences. They could choose and write the story they liked best to
follow up.
16. Thank You for Your Attention !!
Let’s explore fun activities more and more !