Downloaded 17 times


![12Ath Floor, Ladeco Building, 266 Doi Can, Ba Dinh, Hanoi, Vietnam. +84 43-5149-883, info@smartosc.com
The report is by default sorted with the latest reports first. It is possible to filter and sort the list for user,
amount, and date/time.
Figure 22Cash Drawer - Transfer money function
Note that currently the reports does not contain amounts returned in Refunds.
Make manual cash transaction
1. Click on the icon “Cash Transfer” to see list of transfers and current balance
2. Input amount and select if transaction is taking money IN or OUT of cash drawer
3. Add note for transaction if needed
4. Select [Transfer]
>>Transfer line will be added to list (Error will be displayed if OUT amount is higher than Current
balance)
The ‘Current Balance’ count is intended to be used for setting the beginning balance, and for making the
end-of-day balancing of the cash drawer by the POS user.
The list display the latest 20 cash transactions and can be filtered for each column.
Opening cash drawer functionality
The button for money transfer can be configured in settings to open a cash drawer through a receipt
printer (standard receipt printer and cash drawer setup). The feature is working by printing a receipt line.
Since the function works by printing a receipt line it is advised to adjust your browser to automatically skip
the print dialogue box. This can for example in Chrome be done by using Silent printing (see Configuring
Your POS system).](https://image.slidesharecdn.com/xposuserguidev33-150114012738-conversion-gate01/85/Xpos-userguide-v33-28-320.jpg)


![12Ath Floor, Ladeco Building, 266 Doi Can, Ba Dinh, Hanoi, Vietnam. +84 43-5149-883, info@smartosc.com
4. Go to Prices
5. Un-tick box [Website] Use default value
6. Change value for field Price and select ‘Save’
Figure 28 Select X-POS website for Products
Price will now display different in selected website
Create customer group to discount a product or set tax class
1. Go to Customers >> Customer Groups to Add new customer group
2. Click on [Add new Customer Group] button at the top right page
Figure 409 Select X-POS website for Products
3. Go to Catalog >> Manage Products
4. Choose product to set discount for customer type
5. Choose Prices tab at the left menu after that click on [Add Group Price] button
Figure 30 Select X-POS website for Products
6. Set group price](https://image.slidesharecdn.com/xposuserguidev33-150114012738-conversion-gate01/85/Xpos-userguide-v33-47-320.jpg)


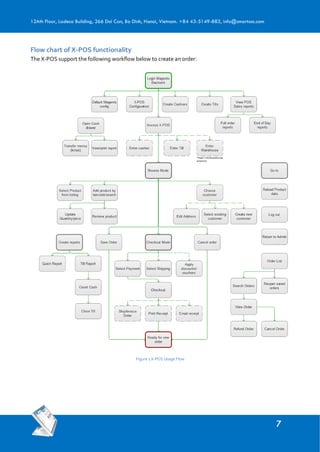
This document provides an overview of the features and functionality of the X-POS point of sale system including browsing and creating orders, payment options, reporting, and offline functionality. It also outlines how to configure the related Magento backend for X-POS including setting up payment methods, user permissions, cashiers, categories, websites, pricing, and taxes.


![Lect 1 Number systems and base conversions. [Autosaved].pptx](https://cdn.slidesharecdn.com/ss_thumbnails/lect1numbersystemsandbaseconversions-260111134109-67c2d865-thumbnail.jpg?width=640&height=640&fit=bounds)


