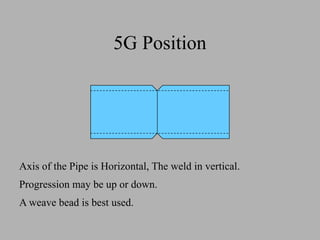
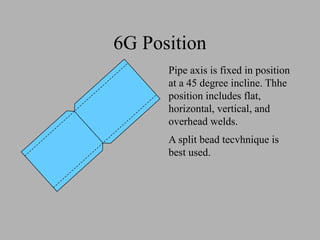
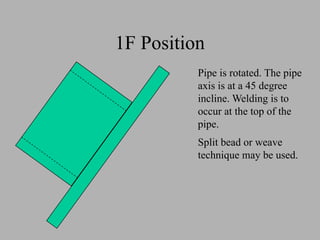
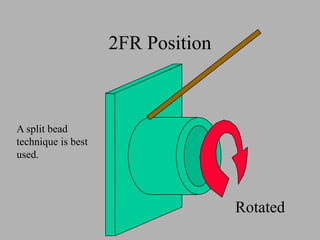
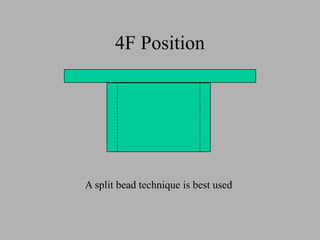
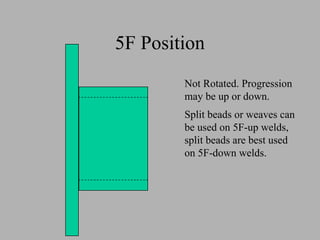
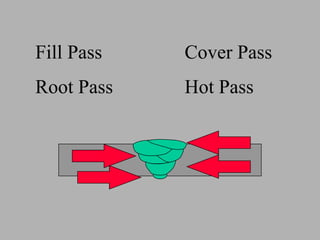
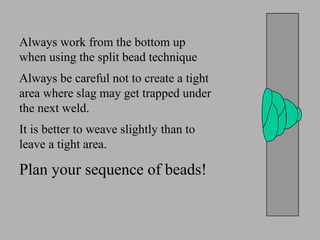
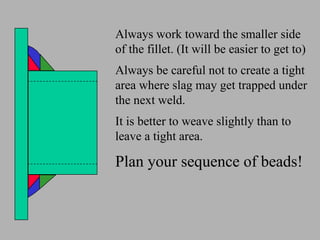
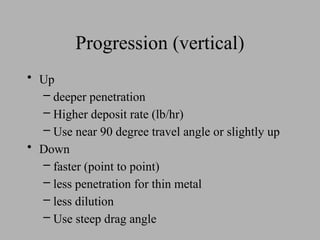
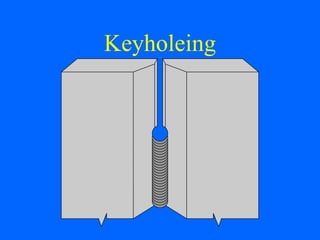
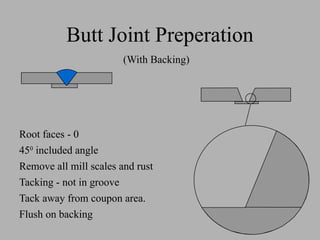
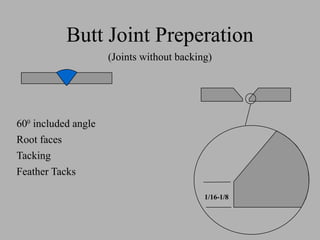
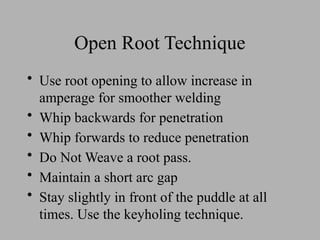
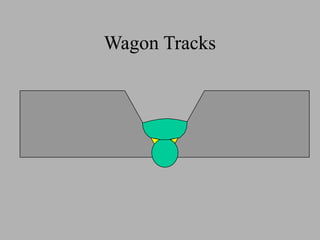
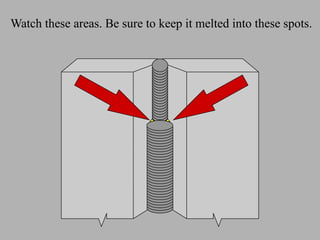
SMAW
Pipe Welding
Techniques
Positions
• 1G
• 2G
• 5G
• 6G
• 1F
• 2F
• 2FR
• 4F
• 5F
1G Position
Pipe rotated, Electrode is always at the top
Either a split bead or weave technique may be used
2G Position
Pipe Axis Vertical, Weld is
Horizontal, Pipe is considered in a
“fixed” position.
Always use a split bead technique
Always work from the bottom up.
5G Position
Axis of the Pipe is Horizontal, The weld in vertical.
Progression may be up or down.
A weave bead is best used.
6G Position
Pipe axis is fixed in position
at a 45 degree incline. Thhe
position includes flat,
horizontal, vertical, and
overhead welds.
A split bead tecvhnique is
best used.
1F Position
Pipe is rotated. The pipe
axis is at a 45 degree
incline. Welding is to
occur at the top of the
pipe.
Split bead or weave
technique may be used.
2F Position
Fixed Position
Best to use a split
bead technique
2FR Position
Rotated
A split bead
technique is best
used.
4F Position
A split bead technique is best used
5F Position
Not Rotated. Progression
may be up or down.
Split beads or weaves can
be used on 5F-up welds,
split beads are best used
on 5F-down welds.
Root Pass Hot Pass
Fill Pass Cover Pass
Always work from the bottom up
when using the split bead technique
Always be careful not to create a tight
area where slag may get trapped under
the next weld.
It is better to weave slightly than to
leave a tight area.
Plan your sequence of beads!
Always work toward the smaller side
of the fillet. (It will be easier to get to)
Always be careful not to create a tight
area where slag may get trapped under
the next weld.
It is better to weave slightly than to
leave a tight area.
Plan your sequence of beads!
Techniques
• Stringer (push, drag, or whip), or Weave
Progression (vertical)
• Up
– deeper penetration
– Higher deposit rate (lb/hr)
– Use near 90 degree travel angle or slightly up
• Down
– faster (point to point)
– less penetration for thin metal
– less dilution
– Use steep drag angle
Travel Speed
• Stay on the leading edge of the puddle
Dimensions
• Reinforcement Height
– ASME flush - 1/16
– AWS flush 1/8
• Reinforcement Width
– 1/16” past bevel edge
• Smooth transition at weld toe (45o
max)
Keyholeing
Backing
• Metallic
– backing ring
– consumable inserts
Welding grooves with Inserts
• Keep the root opening wide
• Make the root pass in one bead
• Avoid tight areas at the weld toes
Welding a PJP groove
• Works great for limiting restrictions inside
pipes
• make up for loss of wall on reinforcement
Root Openings
• Small will allow more amperage which will
in turn make welding smoother and easier,
as well as easier arc starts.
• Larger root openings will allow more
penetration.
Root Faces
• Larger root faces will allow more amperage
which will in turn make welding smoother
and easier, as well as easier arc starts.
• Smaller root faces will allow more
penetration.
Tacking, Tack Grinding
• 3/4” long
• feather both ends
• clean and flatten tops
• start on top, burn through before end
• run completely onto tack before stopping
• interpass grind lumps off before next pass
• stagger all starts and stops betoeen passes
• stagger all starts and stops between beads in
a single pass
• Don’t overgrind tacks.
Root faces - 0
450
included angle
Remove all mill scales and rust
Tacking - not in groove
Tack away from coupon area.
Flush on backing
Butt Joint Preperation
(With Backing)
600
included angle
Root faces
Tacking
Feather Tacks
Butt Joint Preperation
1/16-1/8
(Joints without backing)
Open Root Technique
• Use root opening to allow increase in
amperage for smoother welding
• Whip backwards for penetration
• Whip forwards to reduce penetration
• Do Not Weave a root pass.
• Maintain a short arc gap
• Stay slightly in front of the puddle at all
times. Use the keyholing technique.
Restarts
• Stagger all starts and stops or use runon, runoff tabs
• Feather all restarts & start on top, or start in front and
remelt
• Don’t restart in a coupon area.
• Also stagger all beads on a single pass.
• Use a longer arc length when starting a weld.
Compare interpass grinding
techniques vs. no interpass
grinding.
Craters
• Fill craters by welding into the previous
weld start
• Use a short arc length to control heat.
Wagon Tracks
Watch these areas. Be sure to keep it melted into these spots.
Electrode Angles
• Up Progression -
always point toward
center of Pipe
• Down Progression -
use a steep drag angle
Arc Length
• Longer arc lengths = increased puddle heat, flatter welds,
deeper penetration
• Shorter arc lengths = less puddle heat, flatter welds, less
penetration
• Use arc length to control puddle size, penetration, and burn
through.
• Normal arc length is 1/16” - 1/8”
• Use a slightly longer arc length during a start or restart.
Helpful Tips
• Clean your Welding Hood lens
• Drape the cable over your shoulder or knee
• Get Comfortable
• Watch the puddle, not the arc
• Concentrate on steady travel speed and arc length

WELDING TECHNIQUES.pptx WELDING TECHNIQUES.pptx

  • 1.
  • 2.
    Positions • 1G • 2G •5G • 6G • 1F • 2F • 2FR • 4F • 5F
  • 3.
    1G Position Pipe rotated,Electrode is always at the top Either a split bead or weave technique may be used
  • 4.
    2G Position Pipe AxisVertical, Weld is Horizontal, Pipe is considered in a “fixed” position. Always use a split bead technique Always work from the bottom up.
  • 5.
    5G Position Axis ofthe Pipe is Horizontal, The weld in vertical. Progression may be up or down. A weave bead is best used.
  • 6.
    6G Position Pipe axisis fixed in position at a 45 degree incline. Thhe position includes flat, horizontal, vertical, and overhead welds. A split bead tecvhnique is best used.
  • 7.
    1F Position Pipe isrotated. The pipe axis is at a 45 degree incline. Welding is to occur at the top of the pipe. Split bead or weave technique may be used.
  • 8.
    2F Position Fixed Position Bestto use a split bead technique
  • 9.
    2FR Position Rotated A splitbead technique is best used.
  • 10.
    4F Position A splitbead technique is best used
  • 11.
    5F Position Not Rotated.Progression may be up or down. Split beads or weaves can be used on 5F-up welds, split beads are best used on 5F-down welds.
  • 12.
    Root Pass HotPass Fill Pass Cover Pass
  • 13.
    Always work fromthe bottom up when using the split bead technique Always be careful not to create a tight area where slag may get trapped under the next weld. It is better to weave slightly than to leave a tight area. Plan your sequence of beads!
  • 14.
    Always work towardthe smaller side of the fillet. (It will be easier to get to) Always be careful not to create a tight area where slag may get trapped under the next weld. It is better to weave slightly than to leave a tight area. Plan your sequence of beads!
  • 15.
    Techniques • Stringer (push,drag, or whip), or Weave
  • 16.
    Progression (vertical) • Up –deeper penetration – Higher deposit rate (lb/hr) – Use near 90 degree travel angle or slightly up • Down – faster (point to point) – less penetration for thin metal – less dilution – Use steep drag angle
  • 17.
    Travel Speed • Stayon the leading edge of the puddle
  • 18.
    Dimensions • Reinforcement Height –ASME flush - 1/16 – AWS flush 1/8 • Reinforcement Width – 1/16” past bevel edge • Smooth transition at weld toe (45o max)
  • 19.
  • 20.
    Backing • Metallic – backingring – consumable inserts
  • 21.
    Welding grooves withInserts • Keep the root opening wide • Make the root pass in one bead • Avoid tight areas at the weld toes
  • 22.
    Welding a PJPgroove • Works great for limiting restrictions inside pipes • make up for loss of wall on reinforcement
  • 23.
    Root Openings • Smallwill allow more amperage which will in turn make welding smoother and easier, as well as easier arc starts. • Larger root openings will allow more penetration.
  • 24.
    Root Faces • Largerroot faces will allow more amperage which will in turn make welding smoother and easier, as well as easier arc starts. • Smaller root faces will allow more penetration.
  • 25.
    Tacking, Tack Grinding •3/4” long • feather both ends • clean and flatten tops • start on top, burn through before end • run completely onto tack before stopping • interpass grind lumps off before next pass • stagger all starts and stops betoeen passes • stagger all starts and stops between beads in a single pass • Don’t overgrind tacks.
  • 26.
    Root faces -0 450 included angle Remove all mill scales and rust Tacking - not in groove Tack away from coupon area. Flush on backing Butt Joint Preperation (With Backing)
  • 27.
    600 included angle Root faces Tacking FeatherTacks Butt Joint Preperation 1/16-1/8 (Joints without backing)
  • 28.
    Open Root Technique •Use root opening to allow increase in amperage for smoother welding • Whip backwards for penetration • Whip forwards to reduce penetration • Do Not Weave a root pass. • Maintain a short arc gap • Stay slightly in front of the puddle at all times. Use the keyholing technique.
  • 29.
    Restarts • Stagger allstarts and stops or use runon, runoff tabs • Feather all restarts & start on top, or start in front and remelt • Don’t restart in a coupon area. • Also stagger all beads on a single pass. • Use a longer arc length when starting a weld. Compare interpass grinding techniques vs. no interpass grinding.
  • 30.
    Craters • Fill cratersby welding into the previous weld start • Use a short arc length to control heat.
  • 31.
  • 32.
    Watch these areas.Be sure to keep it melted into these spots.
  • 33.
    Electrode Angles • UpProgression - always point toward center of Pipe • Down Progression - use a steep drag angle
  • 34.
    Arc Length • Longerarc lengths = increased puddle heat, flatter welds, deeper penetration • Shorter arc lengths = less puddle heat, flatter welds, less penetration • Use arc length to control puddle size, penetration, and burn through. • Normal arc length is 1/16” - 1/8” • Use a slightly longer arc length during a start or restart.
  • 35.
    Helpful Tips • Cleanyour Welding Hood lens • Drape the cable over your shoulder or knee • Get Comfortable • Watch the puddle, not the arc • Concentrate on steady travel speed and arc length

Editor's Notes

  • #2 Basic review of position designation codes. These codes will be taught in detail later.
  • #3 Split bead or weave technique may be used because gravity will not act to pull the puddle to one side in this position Emphasize the REASONS for choosing one technique over another Recommend progressing from one side to the other on the split bead technique. Otherwise, you increase the likelihood of undercutting in previous beads and of getting a humpy contour.
  • #4 Using a wide weave will lead to the bead sagging toward the bottom, increasing the likelihood of overlap at the bottom, and undercut at the top. Working from the bottom up gives you a shelf to work from which decreases the likelihood of entrapments Recommend using a weave technique to avoid a narrow tight area at the upper side of a pass, especially the hot pass. Explain that this tight area must be avoided. You will not often “burn it out”. You will almost always create a massive slag inclusion. Cleaning before welding will not solve it either, because new slag will go into it from flux on the electrode as you weld.
  • #5 The weave technique is best used in vertical, F and OH doesn’t matter much. Therefore, 5G-up will best be accomplished using the weave. There is a limit on how wide you will be allowed to weave. It will depend on the code requirements, electrode side, and electrode type. Down vertical could use either, I prefer the split bead to increase travel speed stay ahead of the molten slag.
  • #6 I tend to use a split bead technique on 6G. However, if the groove is narrow, I will sometimes use a weave bead to avoid that narrow tight area at the top toe of the weld.
  • #7 We tend to forget that pipe can have fillet welds too.
  • #8 This weld is no different than a 2F fillet weld on plate.
  • #12 Hot pass - one or two beads. But keep it open. If we did end up with a tight area, it would be best to open up the area with a grinder and repair it before moving to the next pass.
  • #15 Remember, there is a reason for a particular travel or longitudinal angle. There is also a reason for a whip or a stringer technique as well as a wide weave or a split bead technique. Think ahead and use the most advantageous technique.Welding is not magic, it is careful study and forethought.
  • #17 Review the effects for fast and slow travel on: penetration contour width
  • #19 Explain How to do this technique reasons for this technique effects of root opening and root face on heat sink why to never whip completely into the molten puddle that keyhole size determines root reinforcement width
  • #20 Describe them Why we use them Why we don’t use them show examples