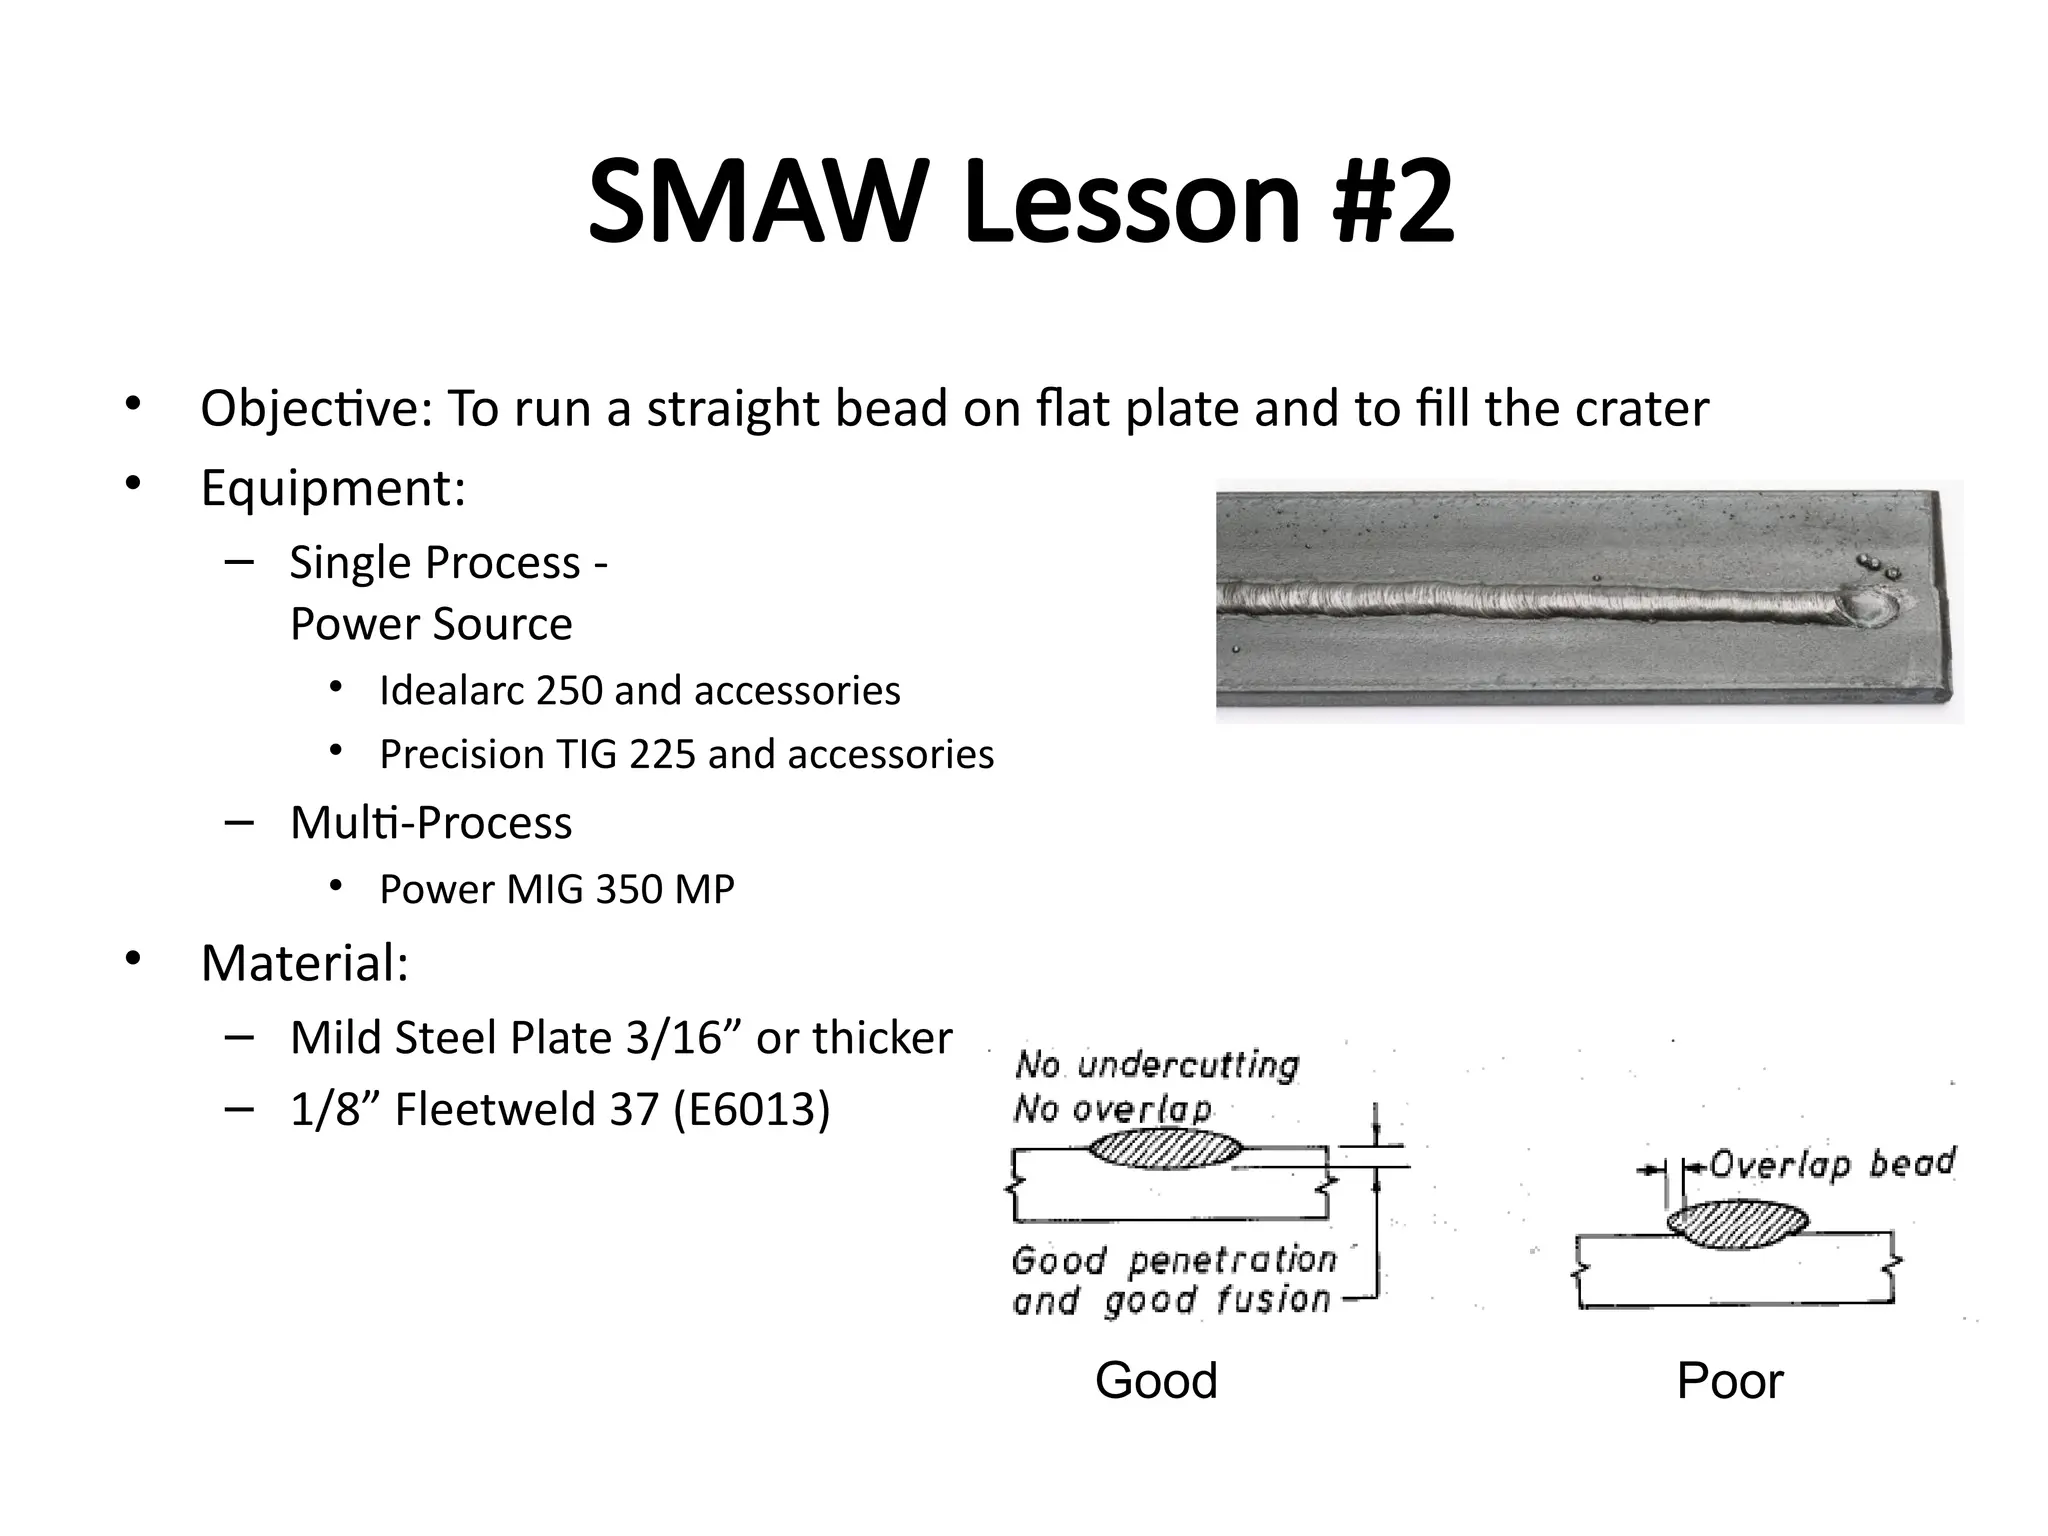
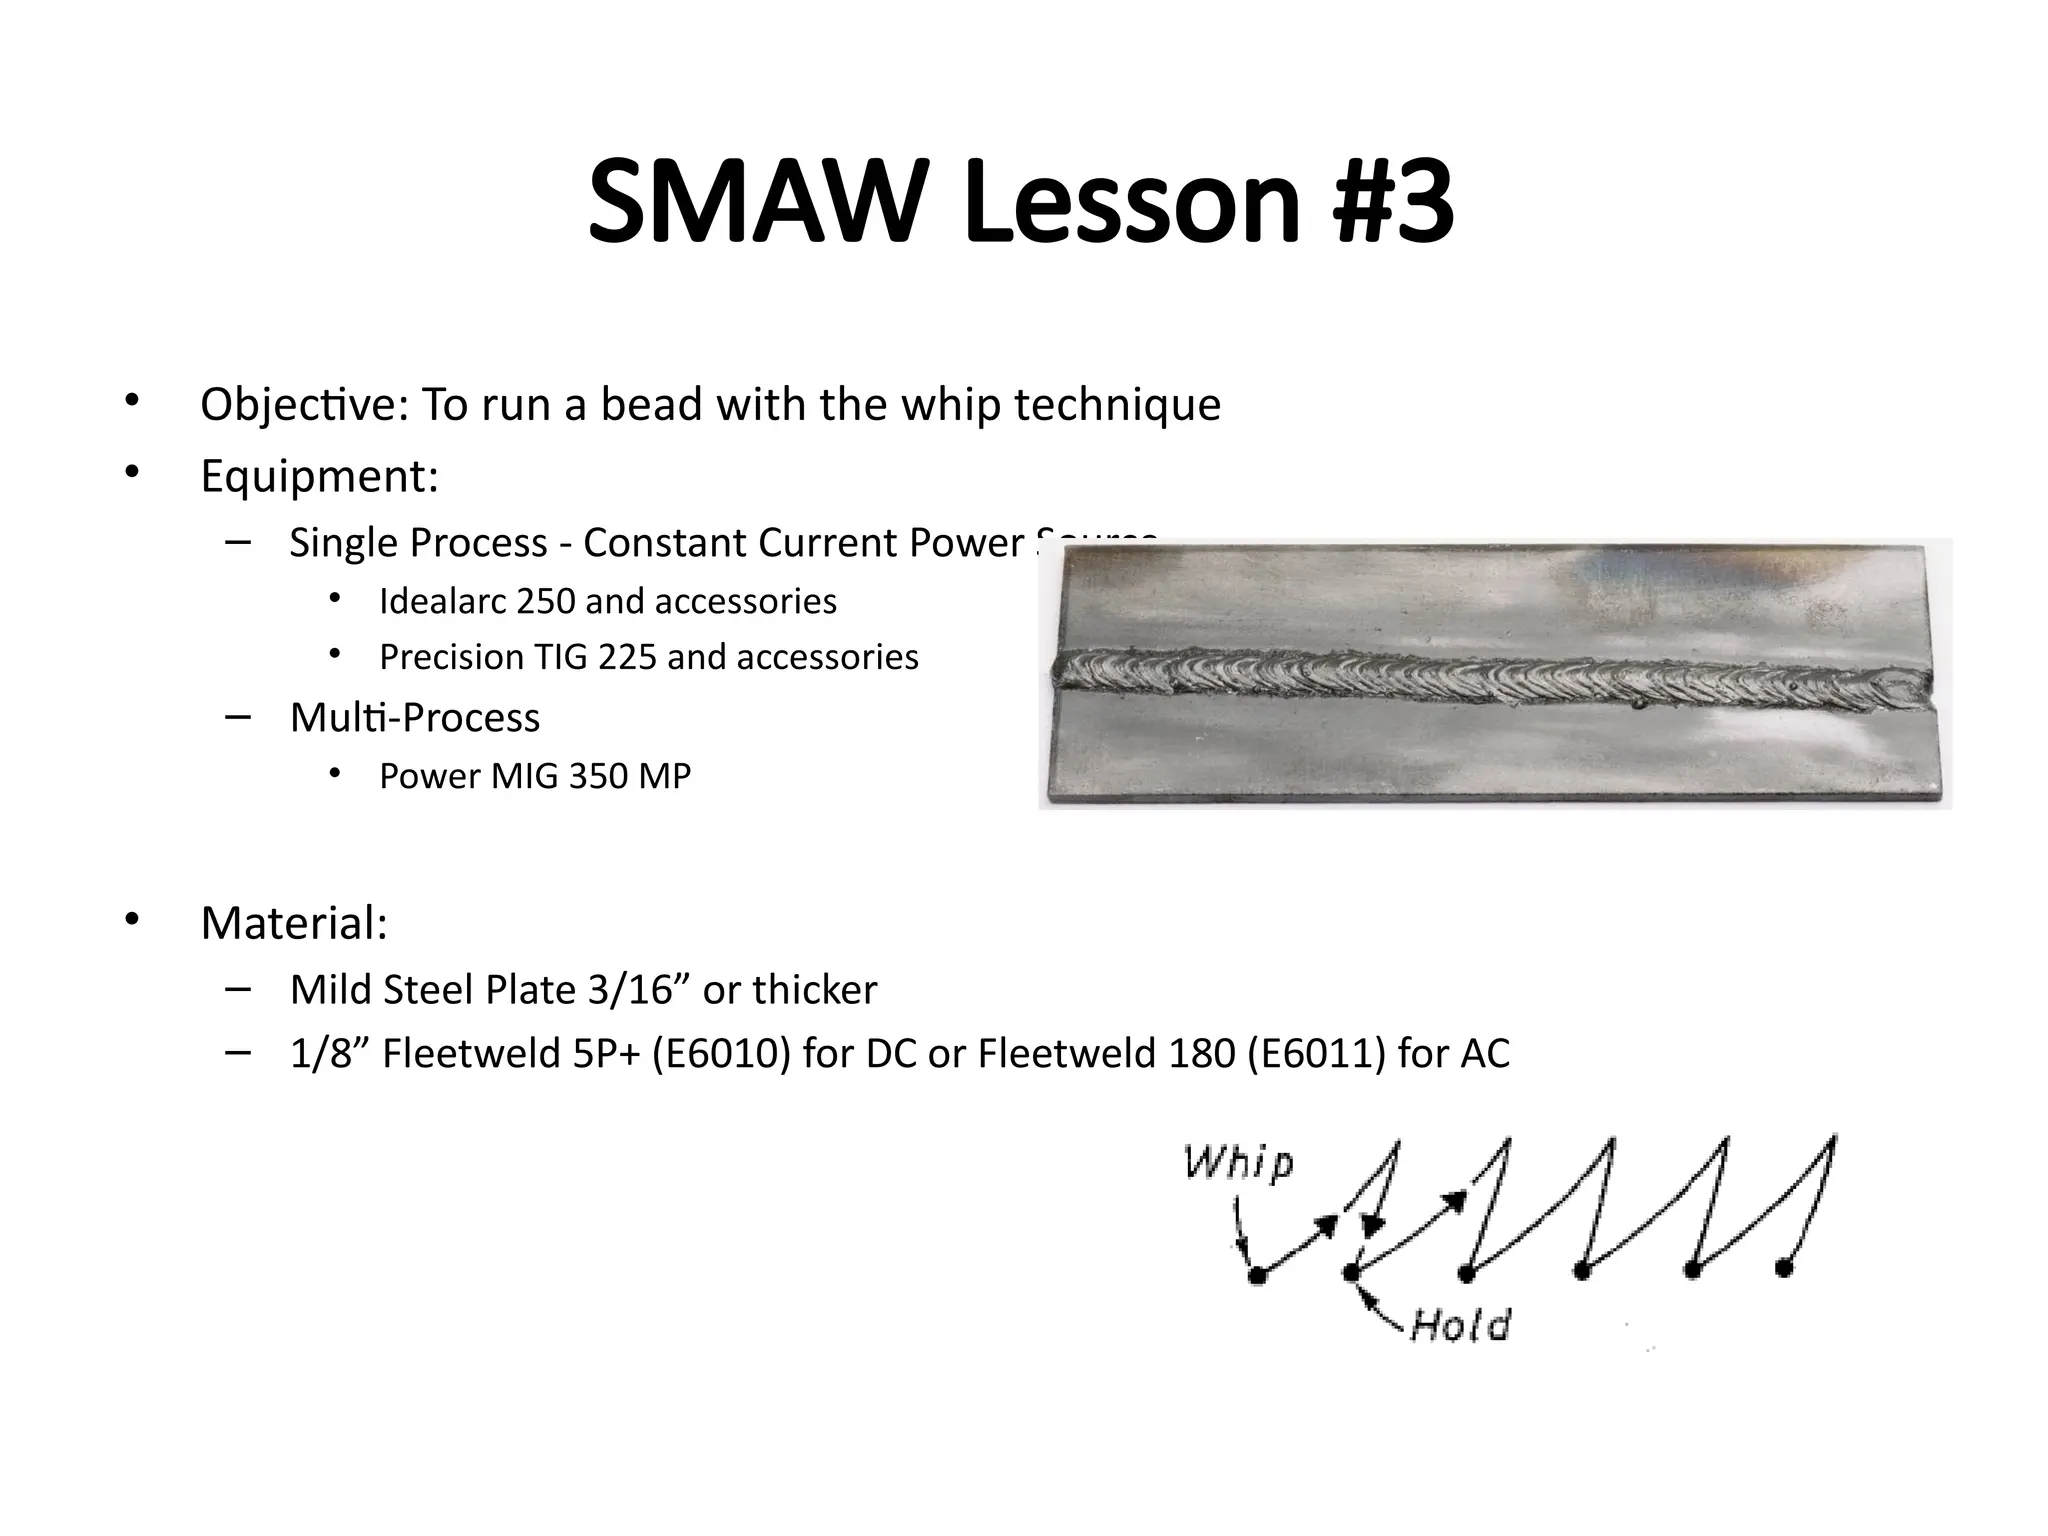
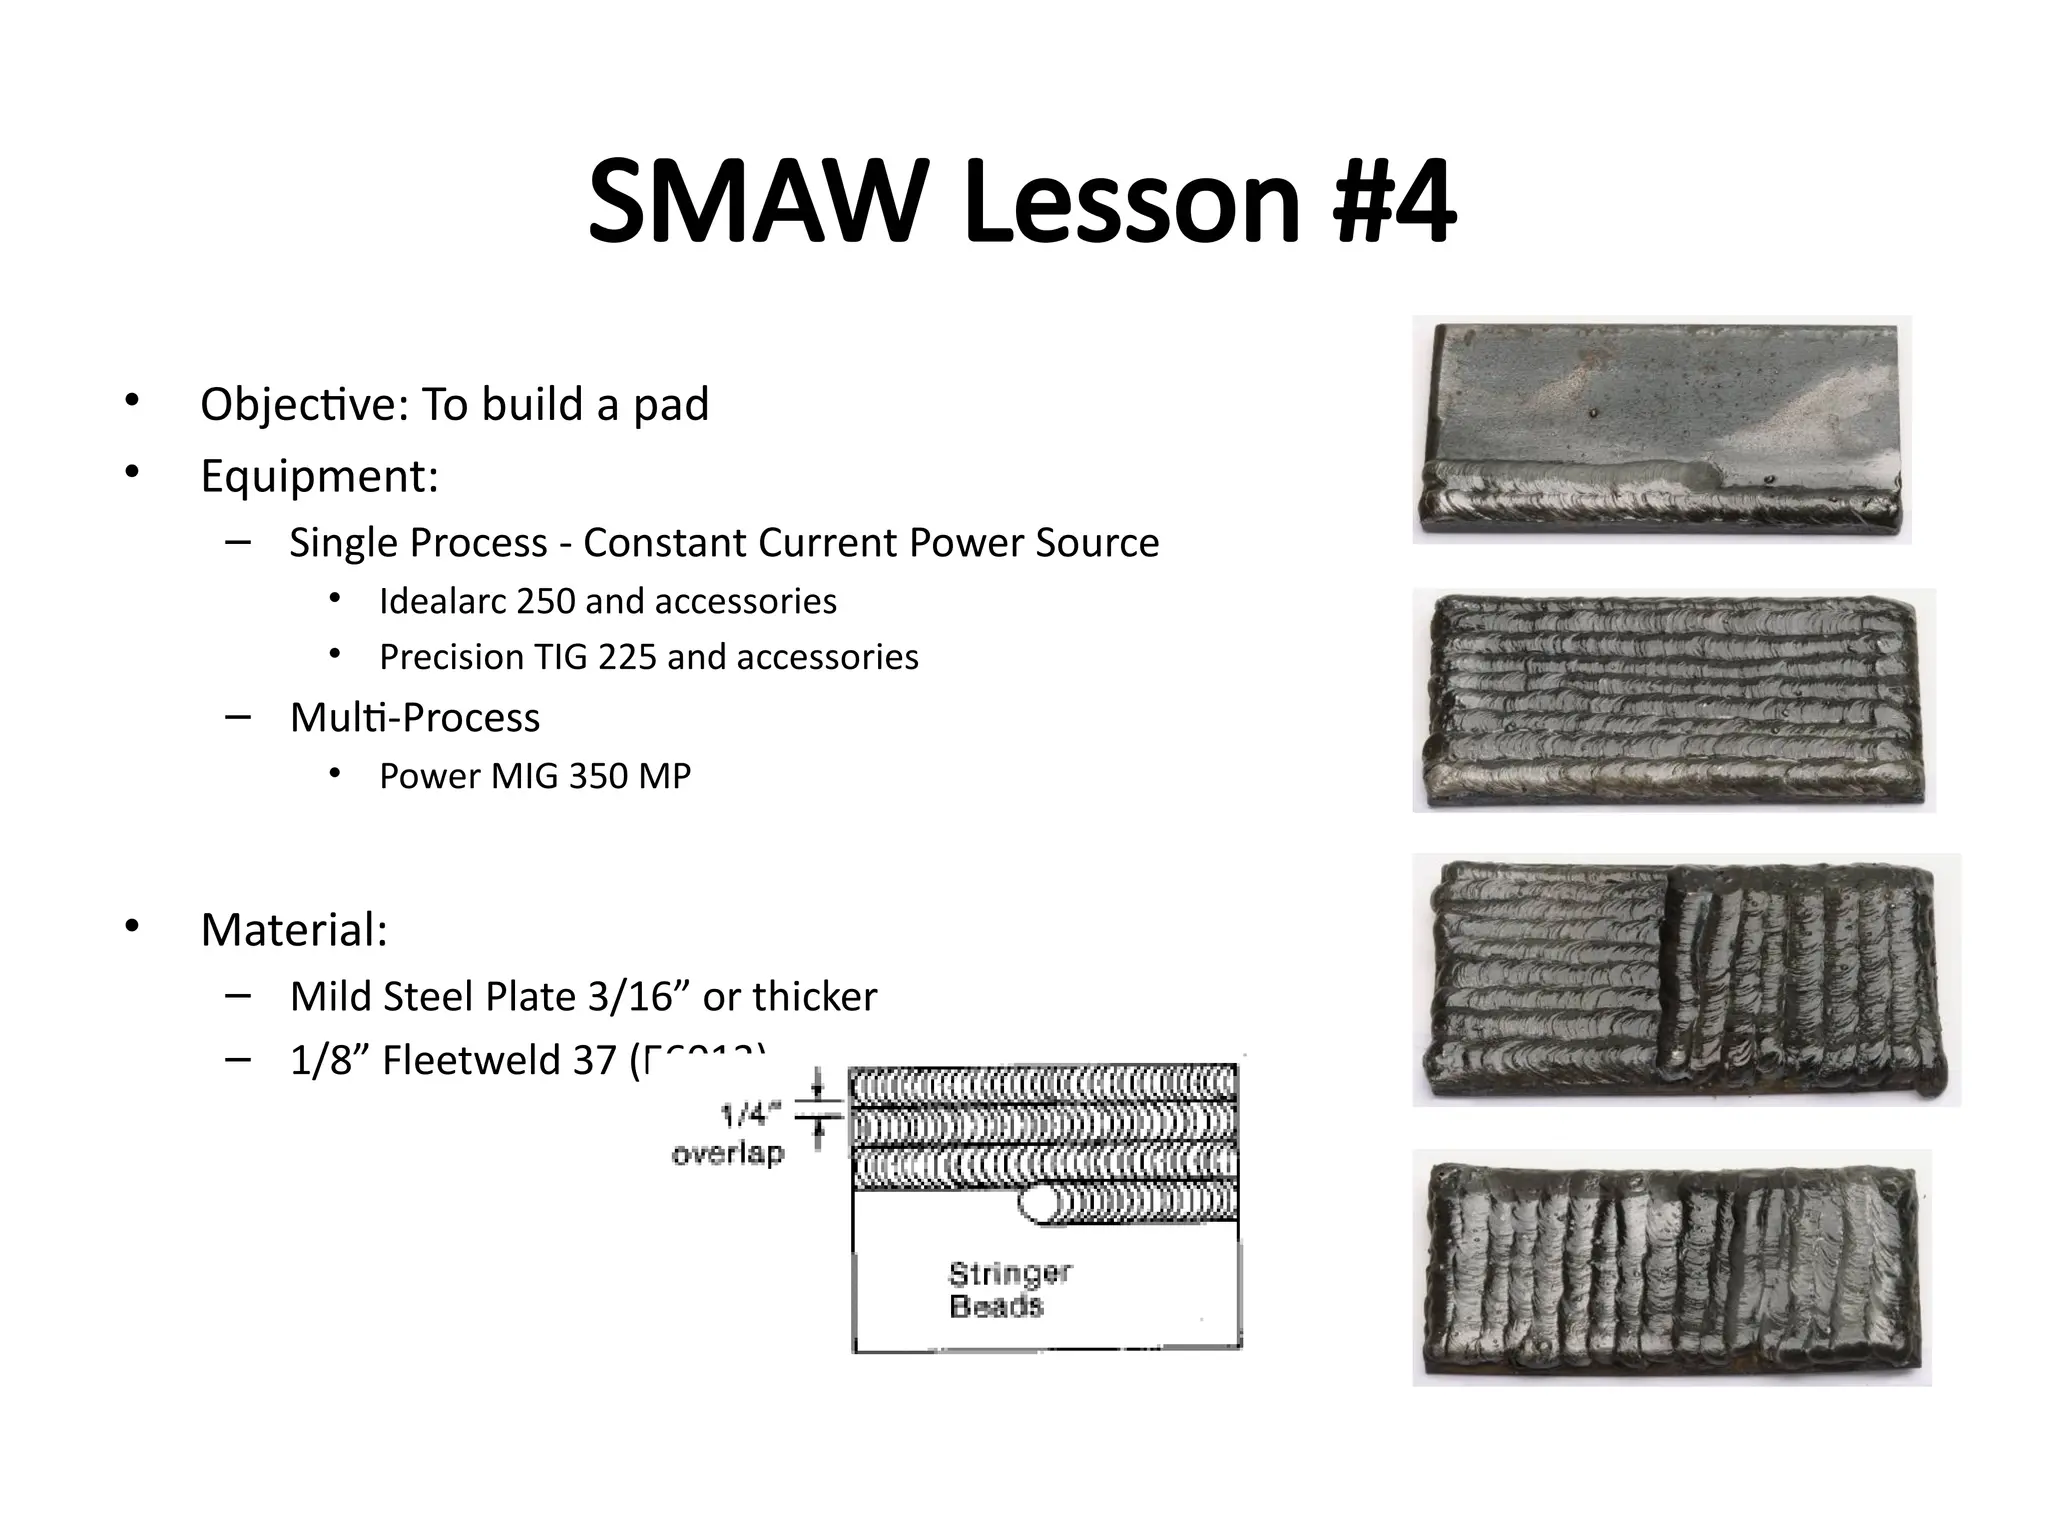
SHIELDED METAL ARC WELDING
(SMAW)
2
SMAW Unit Topics
• During this overview, we will
discuss the following topics:
• Safety
• SMAW Basics
• Equipment Set-Up
• Welding Variables
• Process Advantages and
Limitations
• AWS Connection
• National Academic Standards
Connection The SMAW process is great for
maintenance and repair work!
3
Unit Objectives
• Upon successful completion of the SMAW Unit of Study, you will have
learned to:
– Properly protect yourself and others while welding
– Set up and operate SMAW equipment
– Strike and maintain an arc
– Make welds in four positions using different electrodes
– Understand a weld inspection process
– Apply the AWS electrode classification system
– Take the next step to becoming a certified welder
Most structural steel welders are
required to be certified
4
SMAW Equipment Set Up
1. Turn power supply on
2. Connect work clamp
3. Select electrode
a. Type
b. Diameter
4. Adjust output
a. Polarity
b. Amperage
6. Insert electrode into electrode holder
5
SMAW Process Variables
• Settings on the
machine
– Polarity : AC, DC+, DC-
– Amperage Output
• Operator Controlled
Variables
– Work Angle
– Travel Angle
– Arc Length
– Travel Speed
A straight AC machine will
not have a polarity switch
like this AC/DC machine
6
Striking an Arc
and Making a Weld
7
Striking an Arc
• To begin the SMAW Process, you must first
strike an arc. This can be done using one of
the following techniques:
– Scratch start – scratch the electrode on the base
metal like a match
– Tap Start – tap the rod against the base metal
8
Work Angle
• The work angle is the
angle between the
electrode and the work
as depicted on the left
• Work angles can vary
depending on the
position the weld is
being made in
90°
9
Travel Angle
• Also commonly called
Lead Angle
• The travel (lead) angle
is the angle between
the electrode and the
plane perpendicular to
the weld axis
20-30°
10
Arc Length
• After striking the arc, maintain a 1/8” distance
between the electrode and the workpiece
– If the arc length becomes too short, the electrode will get
stuck to the workpiece or ‘short out’
– If the arc length becomes too long; spatter, undercut, and
porosity can occur
Arc Length = 1/8”
11
Travel Speed
• The travel speed is the
speed at which the
electrode moves along the
base material while
welding
– Too fast of a travel speed
results in a ropey or convex
weld
– Too slow of a travel speed
results in a wide weld with
an excessive metal deposit
The travel speed impacts the
shape of the bead.
End of Weld
12
Filling the Crater
• At the end of the weld, the operator breaks the arc
which creates a ‘crater’
• Use a short pause or slight back step at the end of
the weld to fill the crater
• Large craters can cause weld cracking
Back stepping is a short
move in the opposite
direction of weld travel
13
Restarting a Bead
• Here is the proper technique for restarting a
weld:
1. Strike Arc Here
2. Move Electrode to
Crown of Crater
3. Resume Forward
Travel
14
Troubleshooting Welds
15
Troubleshooting Welds
A B C D E F G
These welds were cut and etched
with nitric acid to show penetration
16
SMAW Advantages
and Limitations
17
Advantages of SMAW
• Low initial cost
• Portable
• Easy to use outdoors
• All position
capabilities
• Easy to change
between many base
materials What safety precautions should
be taken by these welders?
18
Limitations of SMAW
• Lower consumable
efficiency
• Difficult to weld very thin
materials
• Frequent restarts
• Lower operating factor
• Higher operator skill
required for SMAW than
some other processes
Building a barge in a large shipyard
19
AWS Classification of
SMAW Electrodes
20
E70XX
Electrode
Tensile in Ksi
Welding Position:
1 = All Position, 2 = Flat & Horizontal
Type of Current and Coating
AWS Classification
of SMAW Electrodes
21
Lesson Plans
22
SMAW Lesson #1
• Objective: Strike and establish an arc
• Equipment:
– Single Process – Constant Current
Power Source
• Idealarc 250 and accessories
• Precision TIG 225 and accessories
– Multi-Process
• Power MIG 350 MP
• Material:
– Mild Steel Plate 1/8” or thicker
– 1/8” Fleetweld 5P+ (E6010) for DC
or Fleetweld 180 (E6011) for AC
23
SMAW Lesson #2
• Objective: To run a straight bead on flat plate and to fill the crater
• Equipment:
– Single Process - Constant Current
Power Source
• Idealarc 250 and accessories
• Precision TIG 225 and accessories
– Multi-Process
• Power MIG 350 MP
• Material:
– Mild Steel Plate 3/16” or thicker
– 1/8” Fleetweld 37 (E6013)
Good Poor
24
SMAW Lesson #3
• Objective: To run a bead with the whip technique
• Equipment:
– Single Process - Constant Current Power Source
• Idealarc 250 and accessories
• Precision TIG 225 and accessories
– Multi-Process
• Power MIG 350 MP
• Material:
– Mild Steel Plate 3/16” or thicker
– 1/8” Fleetweld 5P+ (E6010) for DC or Fleetweld 180 (E6011) for AC
25
SMAW Lesson #4
• Objective: To build a pad
• Equipment:
– Single Process - Constant Current Power Source
• Idealarc 250 and accessories
• Precision TIG 225 and accessories
– Multi-Process
• Power MIG 350 MP
• Material:
– Mild Steel Plate 3/16” or thicker
– 1/8” Fleetweld 37 (E6013)
26
SMAW Lesson #5
• Objective: To make a fillet weld on a lap joint in the horizontal position (AWS Position 2F)
• Equipment:
– Single Process - Constant Current Power Source
• Idealarc 250 and accessories
• Precision TIG 225 and accessories
– Multi-Process
• Power MIG 350 MP
• Material:
– Mild Steel Plate - 10 gauge
– 1/8” Fleetweld 5P+ (E6010) for DC or Fleetweld 180 (E6011) for AC
2F
Top View Side View
27
SMAW Lesson #6
• Objective: To make a fillet weld on a tee joint in the horizontal position
(AWS Position 2F)
• Equipment:
– Single Process - Constant Current Power Source
• Idealarc 250 and accessories
• Precision TIG 225 and accessories
– Multi-Process
• Power MIG 350 MP
• Material:
– Mild Steel Plate - 10 gauge
– 1/8” Fleetweld 5P+ (E6010) for DC or Fleetweld 180 (E6011) for AC
2F
28
SMAW Lesson #7
• Objective: To make a fillet weld on a tee joint in the horizontal position (AWS Position 2F)
• Equipment:
– Single Process - Constant Current Power Source
• Idealarc 250 and accessories
• Precision TIG 225 and accessories
– Multi-Process
• Power MIG 350 MP
• Material:
– Mild Steel Plate - 10 gauge
– 1/8” Excalibur 7018 (E7018) for DC
or Lincoln 7018AC (E7018) for AC
2F
29
SMAW Lesson #8
• Objective: To make a three pass fillet weld on a tee joint in the horizontal position (AWS
Position 2F)
• Equipment:
– Single Process - Constant Current Power Source
• Idealarc 250 and accessories
• Precision TIG 225 and accessories
– Multi-Process
• Power MIG 350 MP
• Material:
– Mild Steel Plate – ¼”
– 1/8” Excalibur 7018 (E7018) for DC or
Lincoln 7018AC (E7018) for AC
2F
30
SMAW Lesson #9
• Objective: To make a fillet weld on a lap joint in the vertical position welding down
(AWS Position 3FD)
• Equipment:
– Single Process - Constant Current Power Source
• Idealarc 250 and accessories
• Precision TIG 225 and accessories
– Multi-Process
• Power MIG 350 MP
• Material:
– Mild Steel Plate - 10 gauge
– 1/8” Fleetweld 37 (E6013)
3FD
31
SMAW Lesson #10
• Objective: To make a fillet weld on a tee joint in the vertical position welding down (AWS
Position 3FD)
• Equipment:
– Single Process - Constant Current Power Source
• Idealarc 250 and accessories
• Precision TIG 225 and accessories
– Multi-Process
• Power MIG 350 MP
• Material:
– Mild Steel Plate - 10 gauge
– 1/8” Fleetweld 5P+ (E6010) for DC or Fleetweld 180 (E6011) for AC
3FD
32
SMAW Lesson #11
• Objective: To make a fillet weld on a lap joint in the overhead position (AWS Position 4F)
• Equipment:
– Single Process - Constant Current Power Source
• Idealarc 250 and accessories
• Precision TIG 225 and accessories
– Multi-Process
• Power MIG 350 MP
• Material:
– Mild Steel Plate - 10 gauge
– 1/8” Fleetweld 5P+ (E6010) for DC or Fleetweld 180 (E6011) for AC
4F
33
SMAW Lesson #12
• Objective: To make a fillet weld on a tee joint in the overhead position (AWS Position 4F)
• Equipment:
– Single Process - Constant Current Power Source
• Idealarc 250 and accessories
• Precision TIG 225 and accessories
– Multi-Process
• Power MIG 350 MP
• Material:
– Mild Steel Plate - 10 gauge
– 1/8” Fleetweld 5P+ (E6010) for DC or Fleetweld 180 (E6011) for AC
4F
34
SMAW Lesson #13
• Objective: To make a single pass fillet weld on a tee joint in the vertical position welding up
(AWS Position 3F)
• Equipment:
– Single Process - Constant Current Power Source
• Idealarc 250 and accessories
• Precision TIG 225 and accessories
– Multi-Process
• Power MIG 350 MP
• Material:
– Mild Steel Plate – 1/4”
– 1/8” Fleetweld 5P+ (E6010) for DC or Fleetweld 180 (E6011) for AC
3F
35
SMAW Lesson #14
3F
• Objective: To make a three pass fillet weld on a tee joint in the vertical position welding up
(AWS Position 3F)
• Equipment:
– Single Process - Constant Current Power Source
• Idealarc 250 and accessories
• Precision TIG 225 and accessories
– Multi-Process
• Power MIG 350 MP
• Material:
– Mild Steel Plate – 1/4”
– 1/8” Fleetweld 5P+ (E6010) for
DC or Fleetweld 180 (E6011) for AC
36
SMAW Lesson #15
• Objective: To make a single pass fillet weld on a tee joint in the vertical position welding up
(AWS Position 3F)
• Equipment:
– Single Process - Constant Current Power Source
• Idealarc 250 and accessories
• Precision TIG 225 and accessories
– Multi-Process
• Power MIG 350 MP
• Material:
– Mild Steel Plate – 1/4”
– 1/8” Excalibur 7018 (E7018) for DC or Lincoln 7018AC (E7018) for AC
3F
37
SMAW Lesson #16
• Objective: To make a three pass fillet weld on a
tee joint in the vertical position welding up
(AWS Position 3F)
• Equipment:
– Single Process - Constant Current Power
Source
• Idealarc 250 and accessories
• Precision TIG 225 and accessories
– Multi-Process
• Power MIG 350 MP
• Material:
– Mild Steel Plate – 1/4”
– 1/8” Excalibur 7018 (E7018) for DC or
Lincoln 7018AC (E7018) for AC
3F

SMAW NCII GRADE 12 TVL SENIOR HIGH SCHOOL.pptx

  • 1.
    SHIELDED METAL ARCWELDING (SMAW)
  • 2.
    2 SMAW Unit Topics •During this overview, we will discuss the following topics: • Safety • SMAW Basics • Equipment Set-Up • Welding Variables • Process Advantages and Limitations • AWS Connection • National Academic Standards Connection The SMAW process is great for maintenance and repair work!
  • 3.
    3 Unit Objectives • Uponsuccessful completion of the SMAW Unit of Study, you will have learned to: – Properly protect yourself and others while welding – Set up and operate SMAW equipment – Strike and maintain an arc – Make welds in four positions using different electrodes – Understand a weld inspection process – Apply the AWS electrode classification system – Take the next step to becoming a certified welder Most structural steel welders are required to be certified
  • 4.
    4 SMAW Equipment SetUp 1. Turn power supply on 2. Connect work clamp 3. Select electrode a. Type b. Diameter 4. Adjust output a. Polarity b. Amperage 6. Insert electrode into electrode holder
  • 5.
    5 SMAW Process Variables •Settings on the machine – Polarity : AC, DC+, DC- – Amperage Output • Operator Controlled Variables – Work Angle – Travel Angle – Arc Length – Travel Speed A straight AC machine will not have a polarity switch like this AC/DC machine
  • 6.
    6 Striking an Arc andMaking a Weld
  • 7.
    7 Striking an Arc •To begin the SMAW Process, you must first strike an arc. This can be done using one of the following techniques: – Scratch start – scratch the electrode on the base metal like a match – Tap Start – tap the rod against the base metal
  • 8.
    8 Work Angle • Thework angle is the angle between the electrode and the work as depicted on the left • Work angles can vary depending on the position the weld is being made in 90°
  • 9.
    9 Travel Angle • Alsocommonly called Lead Angle • The travel (lead) angle is the angle between the electrode and the plane perpendicular to the weld axis 20-30°
  • 10.
    10 Arc Length • Afterstriking the arc, maintain a 1/8” distance between the electrode and the workpiece – If the arc length becomes too short, the electrode will get stuck to the workpiece or ‘short out’ – If the arc length becomes too long; spatter, undercut, and porosity can occur Arc Length = 1/8”
  • 11.
    11 Travel Speed • Thetravel speed is the speed at which the electrode moves along the base material while welding – Too fast of a travel speed results in a ropey or convex weld – Too slow of a travel speed results in a wide weld with an excessive metal deposit The travel speed impacts the shape of the bead. End of Weld
  • 12.
    12 Filling the Crater •At the end of the weld, the operator breaks the arc which creates a ‘crater’ • Use a short pause or slight back step at the end of the weld to fill the crater • Large craters can cause weld cracking Back stepping is a short move in the opposite direction of weld travel
  • 13.
    13 Restarting a Bead •Here is the proper technique for restarting a weld: 1. Strike Arc Here 2. Move Electrode to Crown of Crater 3. Resume Forward Travel
  • 14.
  • 15.
    15 Troubleshooting Welds A BC D E F G These welds were cut and etched with nitric acid to show penetration
  • 16.
  • 17.
    17 Advantages of SMAW •Low initial cost • Portable • Easy to use outdoors • All position capabilities • Easy to change between many base materials What safety precautions should be taken by these welders?
  • 18.
    18 Limitations of SMAW •Lower consumable efficiency • Difficult to weld very thin materials • Frequent restarts • Lower operating factor • Higher operator skill required for SMAW than some other processes Building a barge in a large shipyard
  • 19.
  • 20.
    20 E70XX Electrode Tensile in Ksi WeldingPosition: 1 = All Position, 2 = Flat & Horizontal Type of Current and Coating AWS Classification of SMAW Electrodes
  • 21.
  • 22.
    22 SMAW Lesson #1 •Objective: Strike and establish an arc • Equipment: – Single Process – Constant Current Power Source • Idealarc 250 and accessories • Precision TIG 225 and accessories – Multi-Process • Power MIG 350 MP • Material: – Mild Steel Plate 1/8” or thicker – 1/8” Fleetweld 5P+ (E6010) for DC or Fleetweld 180 (E6011) for AC
  • 23.
    23 SMAW Lesson #2 •Objective: To run a straight bead on flat plate and to fill the crater • Equipment: – Single Process - Constant Current Power Source • Idealarc 250 and accessories • Precision TIG 225 and accessories – Multi-Process • Power MIG 350 MP • Material: – Mild Steel Plate 3/16” or thicker – 1/8” Fleetweld 37 (E6013) Good Poor
  • 24.
    24 SMAW Lesson #3 •Objective: To run a bead with the whip technique • Equipment: – Single Process - Constant Current Power Source • Idealarc 250 and accessories • Precision TIG 225 and accessories – Multi-Process • Power MIG 350 MP • Material: – Mild Steel Plate 3/16” or thicker – 1/8” Fleetweld 5P+ (E6010) for DC or Fleetweld 180 (E6011) for AC
  • 25.
    25 SMAW Lesson #4 •Objective: To build a pad • Equipment: – Single Process - Constant Current Power Source • Idealarc 250 and accessories • Precision TIG 225 and accessories – Multi-Process • Power MIG 350 MP • Material: – Mild Steel Plate 3/16” or thicker – 1/8” Fleetweld 37 (E6013)
  • 26.
    26 SMAW Lesson #5 •Objective: To make a fillet weld on a lap joint in the horizontal position (AWS Position 2F) • Equipment: – Single Process - Constant Current Power Source • Idealarc 250 and accessories • Precision TIG 225 and accessories – Multi-Process • Power MIG 350 MP • Material: – Mild Steel Plate - 10 gauge – 1/8” Fleetweld 5P+ (E6010) for DC or Fleetweld 180 (E6011) for AC 2F Top View Side View
  • 27.
    27 SMAW Lesson #6 •Objective: To make a fillet weld on a tee joint in the horizontal position (AWS Position 2F) • Equipment: – Single Process - Constant Current Power Source • Idealarc 250 and accessories • Precision TIG 225 and accessories – Multi-Process • Power MIG 350 MP • Material: – Mild Steel Plate - 10 gauge – 1/8” Fleetweld 5P+ (E6010) for DC or Fleetweld 180 (E6011) for AC 2F
  • 28.
    28 SMAW Lesson #7 •Objective: To make a fillet weld on a tee joint in the horizontal position (AWS Position 2F) • Equipment: – Single Process - Constant Current Power Source • Idealarc 250 and accessories • Precision TIG 225 and accessories – Multi-Process • Power MIG 350 MP • Material: – Mild Steel Plate - 10 gauge – 1/8” Excalibur 7018 (E7018) for DC or Lincoln 7018AC (E7018) for AC 2F
  • 29.
    29 SMAW Lesson #8 •Objective: To make a three pass fillet weld on a tee joint in the horizontal position (AWS Position 2F) • Equipment: – Single Process - Constant Current Power Source • Idealarc 250 and accessories • Precision TIG 225 and accessories – Multi-Process • Power MIG 350 MP • Material: – Mild Steel Plate – ¼” – 1/8” Excalibur 7018 (E7018) for DC or Lincoln 7018AC (E7018) for AC 2F
  • 30.
    30 SMAW Lesson #9 •Objective: To make a fillet weld on a lap joint in the vertical position welding down (AWS Position 3FD) • Equipment: – Single Process - Constant Current Power Source • Idealarc 250 and accessories • Precision TIG 225 and accessories – Multi-Process • Power MIG 350 MP • Material: – Mild Steel Plate - 10 gauge – 1/8” Fleetweld 37 (E6013) 3FD
  • 31.
    31 SMAW Lesson #10 •Objective: To make a fillet weld on a tee joint in the vertical position welding down (AWS Position 3FD) • Equipment: – Single Process - Constant Current Power Source • Idealarc 250 and accessories • Precision TIG 225 and accessories – Multi-Process • Power MIG 350 MP • Material: – Mild Steel Plate - 10 gauge – 1/8” Fleetweld 5P+ (E6010) for DC or Fleetweld 180 (E6011) for AC 3FD
  • 32.
    32 SMAW Lesson #11 •Objective: To make a fillet weld on a lap joint in the overhead position (AWS Position 4F) • Equipment: – Single Process - Constant Current Power Source • Idealarc 250 and accessories • Precision TIG 225 and accessories – Multi-Process • Power MIG 350 MP • Material: – Mild Steel Plate - 10 gauge – 1/8” Fleetweld 5P+ (E6010) for DC or Fleetweld 180 (E6011) for AC 4F
  • 33.
    33 SMAW Lesson #12 •Objective: To make a fillet weld on a tee joint in the overhead position (AWS Position 4F) • Equipment: – Single Process - Constant Current Power Source • Idealarc 250 and accessories • Precision TIG 225 and accessories – Multi-Process • Power MIG 350 MP • Material: – Mild Steel Plate - 10 gauge – 1/8” Fleetweld 5P+ (E6010) for DC or Fleetweld 180 (E6011) for AC 4F
  • 34.
    34 SMAW Lesson #13 •Objective: To make a single pass fillet weld on a tee joint in the vertical position welding up (AWS Position 3F) • Equipment: – Single Process - Constant Current Power Source • Idealarc 250 and accessories • Precision TIG 225 and accessories – Multi-Process • Power MIG 350 MP • Material: – Mild Steel Plate – 1/4” – 1/8” Fleetweld 5P+ (E6010) for DC or Fleetweld 180 (E6011) for AC 3F
  • 35.
    35 SMAW Lesson #14 3F •Objective: To make a three pass fillet weld on a tee joint in the vertical position welding up (AWS Position 3F) • Equipment: – Single Process - Constant Current Power Source • Idealarc 250 and accessories • Precision TIG 225 and accessories – Multi-Process • Power MIG 350 MP • Material: – Mild Steel Plate – 1/4” – 1/8” Fleetweld 5P+ (E6010) for DC or Fleetweld 180 (E6011) for AC
  • 36.
    36 SMAW Lesson #15 •Objective: To make a single pass fillet weld on a tee joint in the vertical position welding up (AWS Position 3F) • Equipment: – Single Process - Constant Current Power Source • Idealarc 250 and accessories • Precision TIG 225 and accessories – Multi-Process • Power MIG 350 MP • Material: – Mild Steel Plate – 1/4” – 1/8” Excalibur 7018 (E7018) for DC or Lincoln 7018AC (E7018) for AC 3F
  • 37.
    37 SMAW Lesson #16 •Objective: To make a three pass fillet weld on a tee joint in the vertical position welding up (AWS Position 3F) • Equipment: – Single Process - Constant Current Power Source • Idealarc 250 and accessories • Precision TIG 225 and accessories – Multi-Process • Power MIG 350 MP • Material: – Mild Steel Plate – 1/4” – 1/8” Excalibur 7018 (E7018) for DC or Lincoln 7018AC (E7018) for AC 3F

Editor's Notes

  • #1 SECTION OVERVIEW: Section Overviews are provided on the introductory slides at the front of each topical area to explain the intended use for the slides included in the section. Slide numbers are included on the Section Overview slides for easy reference when preparing for delivery of the slide content. TEACHER NOTES: Teacher Notes are included on the Section Overview slides as a reference tool when making class preparations. Suggested Activities are included as ideas for teachers to use to help students gain practical experience with the welding content. However, these are designed to be supplemented by each teacher based on local program needs. Slides have been developed to incorporate content information regarding performance standards from the American Welding Society (AWS) and the National Academic Standards for English, Science, and Math. INDIVIDUAL WELDING LESSON NOTES ARE AVAILABLE IN LESSON PLAN FACILITATOR’S GUIDE
  • #2 SECTION OVERVIEW: This slide is meant to start generating conversation and thoughts about content to be covered in this lesson. TEACHER NOTES: Bulleted information on topical areas is provided to lead class discussion on areas which are to be covered in the training.
  • #3 SECTION OVERVIEW: This slide is included to explain the objectives of this unit of study. TEACHER NOTES: Teachers could use this opportunity to give a high-level overview of the importance and application of SMAW welding in today’s society.
  • #6 SECTION OVERVIEW: These slides discuss striking an arc and making a weld TEACHER NOTES: Slides 22-29: When using these slides, teachers may prefer to discuss the importance of the following topics: Striking an arc Work angle Travel angle Arc length Travel speed Filling a crater Restarting the bead
  • #14 SECTION OVERVIEW: The next slide discusses several troubleshooting topics. TEACHER NOTES: Slide 30-31: Weld troubleshooting. The beads on the pad depict changes in welding variables and their results. Discuss the following: A – Good Weld: Proper Current, Travel Speed and Arc Length B – Current too low: Ropey, convex bead appearance C – Current too High: Excess spatter and possible burn-through of base materials D – Arc Length too short: Poor wet-in at toes, electrode can ‘short’ to base material E – Arc Length too Long: Excess spatter, undercut and porosity F – Travel Speed too slow: Wide weld with excess metal deposit G – Travel Speed too high: Ropey and convex bead
  • #16 SECTION OVERVIEW: This section is meant to lead into a discussion regarding the advantages and limitations of using the SMAW process. TEACHER NOTES: Slides 32-34: The advantages and limitations of SMAW Advantages: Low start up costs – SMAW equipment is less expensive than GMAW equipment Portable – electrode leads are easy to move from job to job Easy to use outdoors - The process does not require a shielding gas so it is resistant to winds All position capabilities SMAW can be used on variety of materials – just change the electrode and you’re ready for the next project Limitations: Electrodes are 60-65% efficient - 1.5 to 2” of the electrode (stub) is thrown away. The slag and spatter also contribute to SMAW consumable losses. Difficult to weld very thin material – Frequent restarts – Most electrodes are 9-18” in length. As the electrodes are consumed they continually need to be replaced Operating factor of 5-25% - Operators using the SMAW process spend only 5-25% of their time welding. Time is spent chipping slag, cleaning spatter, changing electrodes, repositioning the part, etc. It takes practice to become a good welder using the SMAW process. The GMAW process is generally easier to learn.
  • #19 SECTION OVERVIEW: This section is meant to lead into a discussion regarding the AWS Classification of SMAW Electrodes TEACHER NOTES: Slides 35-36: For more information on the AWS classification of SMAW electrodes see Lincoln Electric’s free ‘Stick Electrode Product Catalog’ - http://content.lincolnelectric.com/pdfs/products/literature/c210.pdf
  • #21 SECTION OVERVIEW: These slides are used for practicing lesson content in the lab setting. TEACHER NOTES: Slides 37-53: When using these slides, teachers might want to reference information included in the Facilitator’s Guide. Recommended equipment – Only one of the single process or multi-process machines is required to complete the lesson.