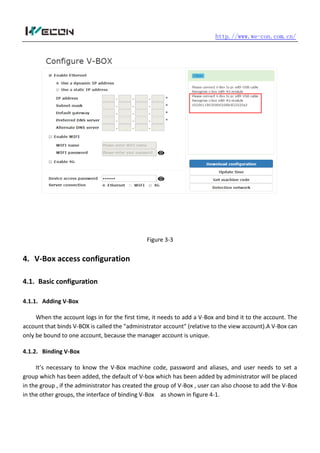
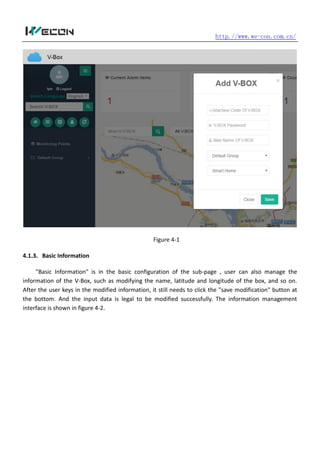
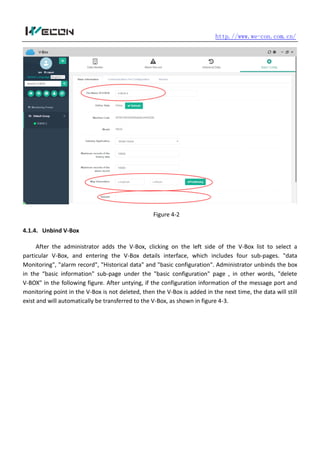
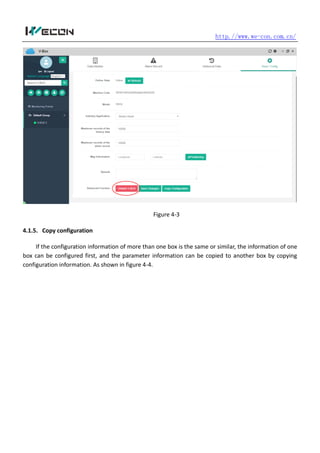
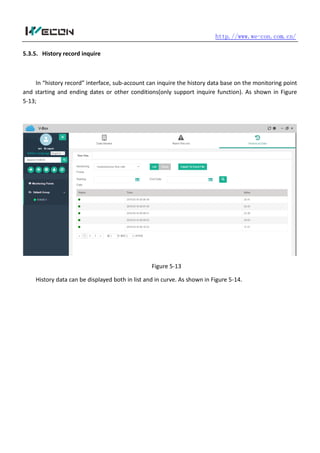
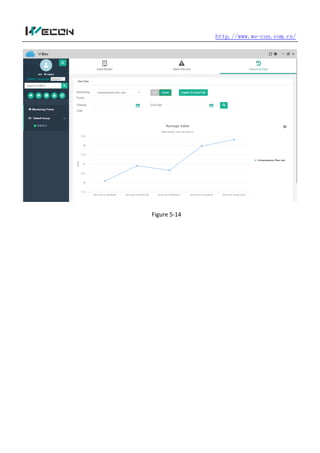
The document provides instructions for using the V-BOX Web application. It describes the basic functions and configuration of the application. The basic functions include user registration, password retrieval, and login. It also explains how to configure V-BOX parameters such as access password, connection settings, and update time. Additionally, it outlines how to add and manage V-BOX devices, communication ports, monitoring points, user accounts and alarm settings within the V-BOX Web interface.
1. http.//www.we-con.com.cn/
《V-BOX Web End User manual》
1. V-Box visit website
V-BOX Web visit website:http://v-box.net.
2. Basic Function
2.1. User registration
Users can register by mobile number and mailbox. The registration of the mobile phone number
needs to receive a verification code, only when the mobile phone number is legal and the verification
code is matching, the registration can succeed. As shown in figure 2-1; The registration of mailbox
requires an activated link. Only the user receives the activated link and clicks it, after that the
registration can succeed. As shown in figure 2-2.
2. http.//www.we-con.com.cn/
Figure 2-1 Figure 2-2
2.2. Retrieve the password
The password can be retrieved through the mobile phone number or the mailbox. The password
can only be be modified successfully if the password is the same as that received by the user on the
mobile phone or in the mailbox, and the password is legal, as shown in figure 2-3.
3. http.//www.we-con.com.cn/
Figure 2-3
2.3. User login
When the user logs in, the login account can be a mobile phone number or a mailbox, and only
when the mobile phone number or mailbox which is legal, and the password is matched, the login can
be successful. The same account can be logged in at the same time on Web and mobile, but not on
different PC devices. If user logs on to the same account successively on different PC devices, the
account on the first login device will be forced off line. The login interface is shown in figure 2-4.
4. http.//www.we-con.com.cn/
Figure 2-4
2.4. User information management
Users can click on the profile or user name to enter the management interface of the user
information, which shows the user's personal information, including user name, mailbox, mobile phone
number, user can also "bind / change mailbox", "bind / change cell phone", "change passwords", and so
on, as shown in figure 2-5.
Figure 2-5
5. http.//www.we-con.com.cn/
When binding / changing mailboxes, user needs to key in a mailbox to bind / replace, which will
succeed only if the mailbox is valid, as shown in figure 2-6.
Figure 2-6
When binding / changing the mobile phone number, user needs to key in the mobile phone number
to bind / change. After clicking the "click send" button, if the mobile phone number is legal, the user will
receive a verification code. Only when the verification code matches, the operation can be carried out
successfully, as shown in figure 2-7.
Figure 2-7
When changing a password, the user is required to key in an old password and a new password, and
only if the password is valid, the operation can be carried out successfully, as shown in figure 2-8.
7. http.//www.we-con.com.cn/
Figure 3-1
The configuration information of the V-Box includes the access password, the access mode, the
machine code acquisition, the update time, and so on, as shown in figure 3-2.
Figure 3-2
3.1. Configuration V-Box
Download: use the Android download cable to connect the V-Box to the PC. When the PC
recognizes the V-Box driver, it will be displayed in the list, as shown in figure 3-2. "recognize the V-Box of
the 4G Module."
3.2. Device access password
When configuring a client to access the box, user needs to key in an access password that can be
combined with numbers and letters. The default password is 888888.
8. http.//www.we-con.com.cn/
3.3. Device connection setting
The device connection setup is configured to configure the V-Box access mode, which refers to the
mode by the smart box to dock the data with the server.There are three modes of connection. Ethernet
mode / WiFi mode and 4G network mode.
1、Ethernet mode. There are two modes of dynamic IP address and static IP address. When using
static IP address mode, the complete IP information must be configured, and the IP information
must not conflict with other IP.
2、WIFI mode:First configure the WIFI account and password, V-Box will automatically match the
set of WIFI information, and connected to the network.
3、4G mode:Use mobile phone 4G card for networking. Please consult mobile phone client for the
cost of data flow. After configuring the mode, user can choose the settings in device connection and
write the information to the V-Box through the download configuration button.
3.4. Update time
Click the button of updating time to write the time of PC into the box.
3.5. Get the machine code
Each V-Box has a separate and unique machine code which can be bound and monitored only when
the machine code is acquired. As shown in figure 3-3.
9. http.//www.we-con.com.cn/
Figure 3-3
4. V-Box access configuration
4.1. Basic configuration
4.1.1. Adding V-Box
When the account logs in for the first time, it needs to add a V-Box and bind it to the account. The
account that binds V-BOX is called the "administrator account" (relative to the view account).A V-Box can
only be bound to one account, because the manager account is unique.
4.1.2. Binding V-Box
It’s necessary to know the V-Box machine code, password and aliases, and user needs to set a
group which has been added, the default of V-box which has been added by administrator will be placed
in the group , if the administrator has created the group of V-Box , user can also choose to add the V-Box
in the other groups, the interface of binding V-Box as shown in figure 4-1.
10. http.//www.we-con.com.cn/
Figure 4-1
4.1.3. Basic Information
"Basic Information" is in the basic configuration of the sub-page , user can also manage the
information of the V-Box, such as modifying the name, latitude and longitude of the box, and so on.
After the user keys in the modified information, it still needs to click the "save modification" button at
the bottom. And the input data is legal to be modified successfully. The information management
interface is shown in figure 4-2.
11. http.//www.we-con.com.cn/
Figure 4-2
4.1.4. Unbind V-Box
After the administrator adds the V-Box, clicking on the left side of the V-Box list to select a
particular V-Box, and entering the V-Box details interface, which includes four sub-pages. "data
Monitoring", "alarm record", "Historical data" and "basic configuration". Administrator unbinds the box
in the “basic information" sub-page under the "basic configuration" page , in other words, "delete
V-BOX" in the following figure. After untying, if the configuration information of the message port and
monitoring point in the V-Box is not deleted, then the V-Box is added in the next time, the data will still
exist and will automatically be transferred to the V-Box, as shown in figure 4-3.
12. http.//www.we-con.com.cn/
Figure 4-3
4.1.5. Copy configuration
If the configuration information of more than one box is the same or similar, the information of one
box can be configured first, and the parameter information can be copied to another box by copying
configuration information. As shown in figure 4-4.
14. http.//www.we-con.com.cn/
Note: user can copy the parameter configuration information only if the configuration information
of “Test machine 1” is empty. If additional parameters are configured in this “Test machine 1”, clicking
the Save button which will prompt for the copy failure information. As shown in Figure 4-6.
Figure 4-6
4.1.6. Communication port configuration
In the "basic configuration" "port configuration" interface can be used to add, modify and delete
port configuration operations, only administrator account has permissions to operate this function. As
shown in the following figure, adding the communication port configuration. select or input the
communication protocol, device type, driver name, V-Box station number, PLC station number, and so on.
After the communication port is configured successfully, the system will synchronize the configuration
information and the file of driver to the V-Box within 30s. As shown in figure 4-7.
15. http.//www.we-con.com.cn/
Figure 4-7
4.1.7. Updating the communication port
Modifying the configuration of communication port . The administrator can modify the data other
than the device ID, and if the file of driver changes, the monitoring points and data under this port will
be deleted, as shown in figure 4-8.
16. http.//www.we-con.com.cn/
Figure 4-8
4.1.8. Communication port deletion
When the configuration of communication port is deleted, the monitoring point data which is
associated with the communication port configuration of the V-Box will also be deleted; The prompt
dialog box pops up when the port configuration is deleted to confirm the continuation of the operation ,
as shown in figure 4-9.
+
17. http.//www.we-con.com.cn/
Figure 4-9
4.1.9. Version information
View the version information of the V-Box. Because of updating the product all the time, judging
the function of the V-Box according to the version information. As shown in figure 4-10.
Figure 4-10
18. http.//www.we-con.com.cn/
4.2. V-Box group management
Administrators can manage V-Box groups, including adding groups, modifying groups, and deleting
groups, as shown in figure 4-11.
Figure 4-11
Adding groups:When adding a group, user need to enter the group name, as shown in figure 4-12.
Figure 4-12
Update group:To modify the group, user needs to key in the new name of the group, as shown in
19. http.//www.we-con.com.cn/
figure 4-13.
Figure 4-13
Delete groups. In order to ensure the reliability of the operation and the security of the data, a
prompt box will be popped to confirm the continuation of the operation, as shown in figure 4-14.
20. http.//www.we-con.com.cn/
Figure 4-14
4.3. Data monitoring
4.3.1. Real-time monitoring point configuration
In the “Data monitoring” interface, User can modify the real-time monitor location. Adding
real-time monitoring point need to be selected or input real time monitoring point name, connecting
device (communication port), address type, register type. As shown in Figure 4-15.
21. http.//www.we-con.com.cn/
Figure 4-15
Add in batches: To facilitate adding multiple real-time monitoring point with the same configuration,
the system provides batch adding functions as shown in Figure 4-16.
22. http.//www.we-con.com.cn/
Figure 4-16
4.3.2. Monitoring point group management
In the V-Box , User can grouping manage the real-time monitoring point, monitoring point can be
move to different group, in the “group setting” sub-page, Adding groups, modify groups, delete groups
and other operations can be done,
Adding groups: Groups name need to be added when adding groups. As shown in Figure 4-17.
25. http.//www.we-con.com.cn/
Figure 4-19
4.3.3. Current data modify
In the “Data monitoring” interface, user can modify monitoring point’s current data. Enter the
monitoring point’s modify status by clicking the text box in the "Value" column in the list. Clicking “√”
icon to change the value; Clicking “X”icon to cancel the change. As shown in figure 4.20.
26. http.//www.we-con.com.cn/
Figure 4-20
4.4. History data modification
Adding the monitoring addresses in the【History data】, collecting data according to conditions and
form a data list for searching and monitoring.
4.4.1. Data Registration
In the “Data registration” sub-page under “History data” interface, User can modify history data,
the required data include name, connection device(communication ports), address type and register
type, as shown in figure 4-21.
27. http.//www.we-con.com.cn/
Figure 4-21
4.4.2. Data query
In the “Original data” sub-page, user can query and delete history data. When querying data user
need input the monitoring point, starting and ending date and other conditions. History data can be
displayed through list and curves.
28. http.//www.we-con.com.cn/
Figure 4-22
Collected data sheet can be saved as Excel file and saved in PC through【Export Excel】button.
4.5. Modifying alarm data
User can modify the alarm conditions in【Alarm record】and query current alarm data and history
alarm record information. Alarm record can be divided to current alarm and history alarm according to
administrator to confirm the status.
4.5.1. Alarm Registration
In the “Alarm registration” sub-page under “Alarm data” interface, alarm data can be added. When
adding alarm records, you need to select or enter the name, group, connection device (communication
port) and address type, as shown in Figure 4-23.
29. http.//www.we-con.com.cn/
Figure 4-23
4.5.2. Current alarm
The data in “current alarm” sub-screen is the operating record that not be confirmed, administrator
can change the status of alarm record by “confirm” them. The “confirmed” alarm record will become
history alarm record and will be transferred to “history alarm” sub-screen, in “history alarm”
sub-screen, User can search the alarm data base on series number, name, starting and ending date and
some other conditions. As shown in figure 4-24.
30. http.//www.we-con.com.cn/
Figure 4-24
5. V-BOX account management
When the account is logged in, you can bind the V-Box to the account by adding the V-Box
information. The account bound to the V-BOX is called "administrator account" (relative sub-account). A
V- Box can only bind an account, that is, the administrator account is unique.
5.1. Account management
One administrator account can be configured with multiple sub-accounts, and the sub-account can
be assigned to monitor the V- Box, as well as read and write authority on V-Box data. As shown in Figure
5-1:
31. http.//www.we-con.com.cn/
Figure 5-1
One administrator account tie to four V-BOX(A,B,C,D), each V-BOX have the operational data
(A1,A2,A3….) , set three sub-accounts in one administrator account, and assign permissions for each
sub-account. For example, as figure shown above, sub-account 1 can monitor and operate one of the
data(A1,B1,C1,D1) in four V-BOXS(A,B,C,D). Sub-account 3 can monitor and operate the data
(A3,A4,C3,C4,D3) in three V-BOXS (A,B,C).
5.2. Sub-account management
Enter the sub-account management interface by clicking “sub-account management” button in the
left side button group. User can do the operating like adding , forbidding, and authority management
and so on. Authority management include the management for current monitoring points, history
monitoring points, alarm monitoring points. As shown in Figure 5-2.
32. http.//www.we-con.com.cn/
Figure 5-2
(1) “Sub-account” have two status : “enable” and “disable”. When adding a sub-account, you need
to fill in the account number and password of the sub-account, or you can select whether to enable the
sub-account immediately, as shown in Figure 5-3.
33. http.//www.we-con.com.cn/
Figure 5-3
(2) Disable one sub-account by modify it directly, as shown in Figure 5-4.
Figure 5-4
(3) Enter “Monitoring point authority list” interface, User can manage the monitoring points
authority of selected sub-screen in the interface. As shown in Figure 5-5, for example to modify the
authority as “Read Only” or “Read-write”; You can remove the monitoring points from the monitoring
account, After the association is removed, some permissions (i.e. real-time, history and alarm) of the
monitoring account to the monitoring point will be deleted.
34. http.//www.we-con.com.cn/
Figure 5-5
User can also assign the monitoring point to the currently selected monitoring accounts. The
assigned monitoring point can be from different V-boxes. After being assigned, the sub account has
some permissions to the monitoring point, as shown in Figure 5-6.
35. http.//www.we-con.com.cn/
Figure 5-6
5.3. Distribution monitoring point
5.3.1. Groups Management
Loading http://v-box.net by Sub-account. Sub-account can manage monitoring point. Such as
creating group, modifying group and deleting group. The group name need to be filled in the group
when creating the group. As shown in figure 5-7.
36. http.//www.we-con.com.cn/
Figure 5-7
The new group name need to be filled when modify the group.
Figure 5-8
When deleting a group, clicking “OK” button in the dialog box to confirm the deletion. If the
deletion is confirmed, the monitoring point under the group will also be removed with the group, as
shown in Figure 5-9.
38. http.//www.we-con.com.cn/
Figure 5-10
5.3.2. Data monitoring
Sub-account have not the concept of “box”, data input have three types: current data, alarm data
and history data. After administrator allocate the monitoring point of sub-account, in “data monitoring”
interface, sub-account allocate the monitoring point to different grouping, as shown in Figure 5.10.
Same monitoring point can be exited in different grouping. After allocated, User can search the
real-time data in current group, If the sub-account has reading and writing permissions, you can modify
the real-time data of the monitoring point, otherwise it can only query.
5.3.3. Confirm the current alarm
After the administrator allocates the alarm monitoring point to the sub-account, the sub-account
can monitor the alarm data of the monitoring point assigned by the administrator on the "alarm record"
interface. The interface includes two sub-pages, "current alarm" and "historical alarm ". Alarm data have
“confirmed” and “unconfirmed” two status. “unconfirmed” status’s alarm data is displayed in “Current
alarm” sub-screen. “confirmed” status’s alarm data is displayed in “historical alarm” sub-screen. If the
sub-account has read-write permission, you can confirm the unconfirmed alarm data by clicking "√" in
the "Operation" column, otherwise only the query function will be performed. After confirmation, the
corresponding current alarm data will be displayed in the " History Alarm "sub-page, as shown in Figure
5-11:
39. http.//www.we-con.com.cn/
Figure 5-11
5.3.4. Alarm data inquire
In the “history alarm” interface, User can inquire the alarm data base on series number, name,
starting and ending date and other conditions. As shown in figure 5-12.
Figure 5-12
40. http.//www.we-con.com.cn/
5.3.5. History record inquire
In “history record” interface, sub-account can inquire the history data base on the monitoring point
and starting and ending dates or other conditions(only support inquire function). As shown in Figure
5-13;
Figure 5-13
History data can be displayed both in list and in curve. As shown in Figure 5-14.