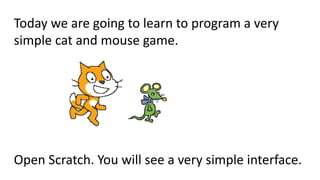
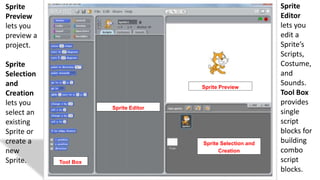
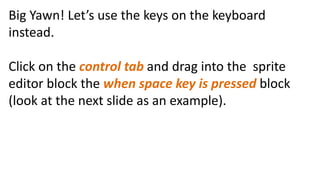
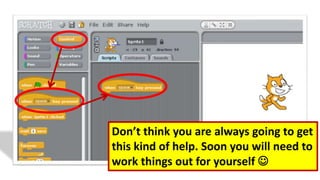
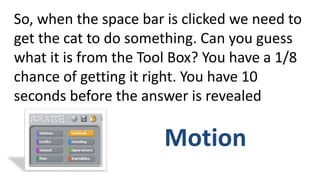
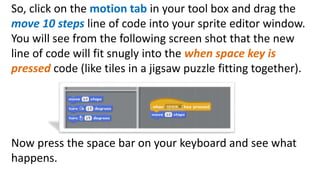
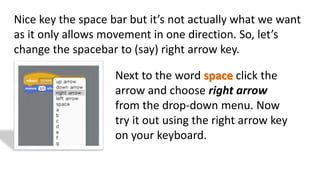
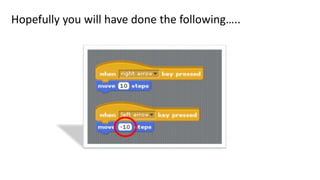
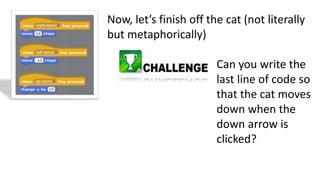
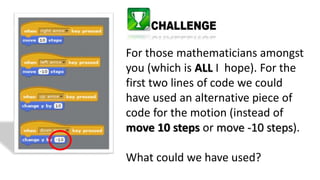
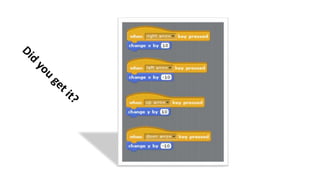
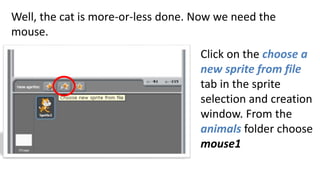
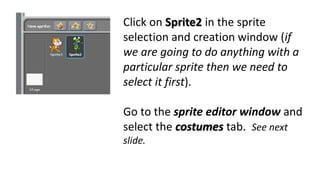
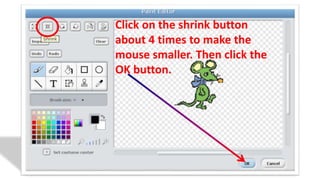
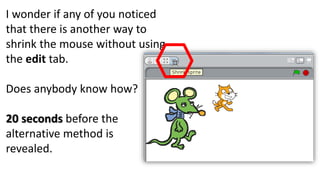
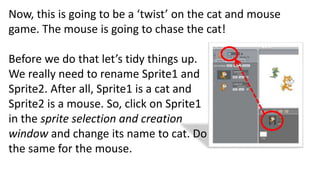
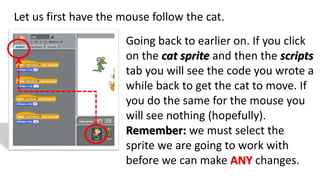
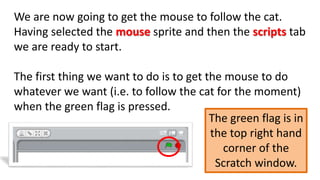
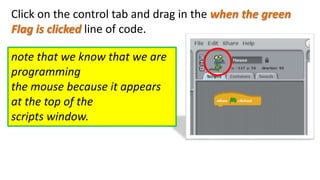
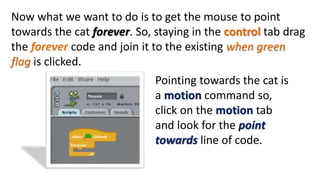
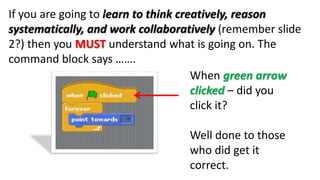
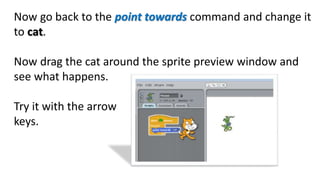
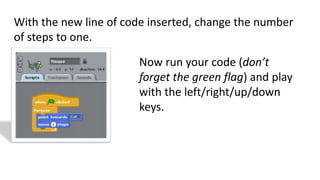
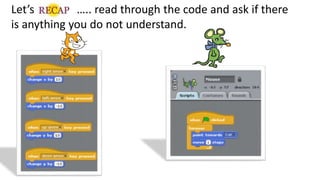
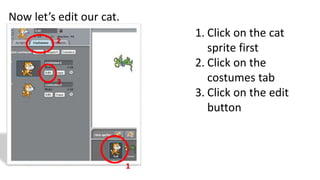
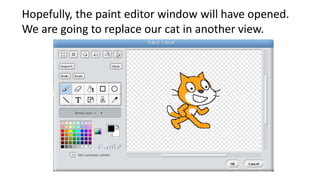
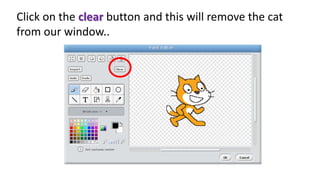
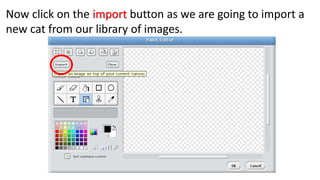
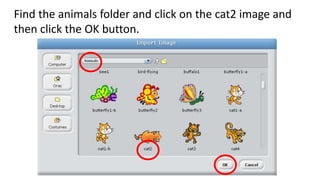
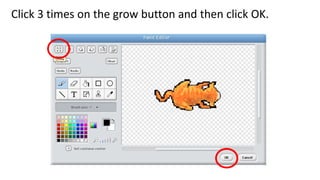
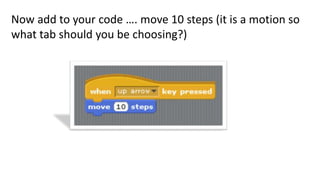
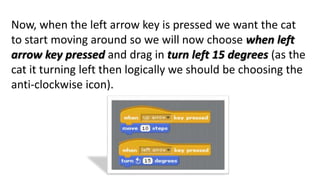
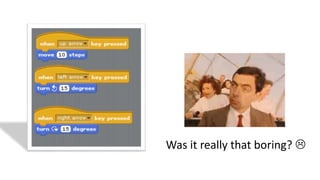
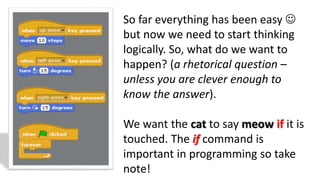
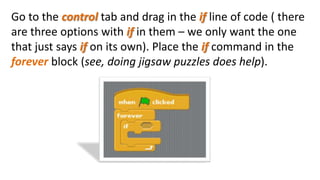
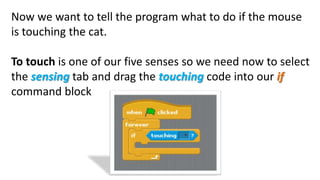
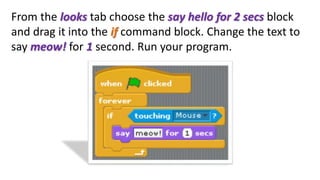
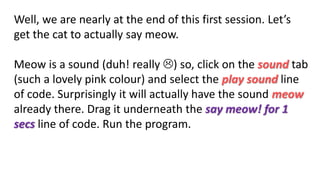
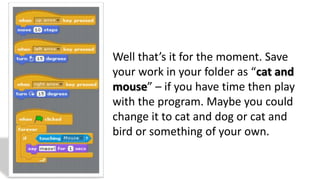
This document provides instructions for programming a basic cat and mouse game using the Scratch programming environment. It guides the reader through selecting and editing sprites, writing code to control sprite movement and interactions, and testing the program. The cat sprite is programmed to move around the screen using arrow keys, while the mouse sprite is programmed to follow and move towards the cat. Additional code makes the cat say "meow" when touched by the mouse. The instructions are broken into clear steps and include screenshots to illustrate the Scratch interface and blocks of code to use.
The Great State of Design with CSS Grid Layout and FriendsStacy Kvernmo
For far too long we've been forced to reuse layout patterns that have worked in the past, creating a web full of sites that all look the same. Narrow timelines, browser support restrictions and lack of a true grid system have led us to create work that is "good enough".
I've spent years exploring how we can make the web a more unique space. With some of the newer CSS techniques available, we can start to make more creative designs. CSS Grid Layout is on the horizon and will play a major role in the design of our sites. Finally having a true, 2 dimensional grid will give our layouts much more flexibility and it is on us to explore the possibilities.
This talk was presented at CSS Day 2016.
The presentation is about Scratch . In This presentation you will get various things to learn about Scratch. How to use it . How to start. It has various images and clarifying features which will enhance your Preseentation.
This tutorial will guide you through the steps to design a fidget spinner in Solidworks. We'll start by modeling a basic spinner, then we'll design our own counterweights to be machined. We'll make a dimensioned print for the counterweight, too! We'll end by creating an assembly for the spinner and I'll give you some next steps to take your design further.
8 killer adobe photoshop tips for designersRemon Mia
Believe it or not, if you’re using Photoshop to design website, you’re on the right path to become a successful web designer. This is simply because Photoshop is one of the most advanced tool in the design industry that can make your creative imagination comes true with its plethora of professional tools which boost your productivity at the same time.
https://goo.gl/pwqYM7
Biological screening of herbal drugs: Introduction and Need for
Phyto-Pharmacological Screening, New Strategies for evaluating
Natural Products, In vitro evaluation techniques for Antioxidants, Antimicrobial and Anticancer drugs. In vivo evaluation techniques
for Anti-inflammatory, Antiulcer, Anticancer, Wound healing, Antidiabetic, Hepatoprotective, Cardio protective, Diuretics and
Antifertility, Toxicity studies as per OECD guidelines
Francesca Gottschalk - How can education support child empowerment.pptxEduSkills OECD
Francesca Gottschalk from the OECD’s Centre for Educational Research and Innovation presents at the Ask an Expert Webinar: How can education support child empowerment?
Welcome to TechSoup New Member Orientation and Q&A (May 2024).pdfTechSoup
In this webinar you will learn how your organization can access TechSoup's wide variety of product discount and donation programs. From hardware to software, we'll give you a tour of the tools available to help your nonprofit with productivity, collaboration, financial management, donor tracking, security, and more.
Synthetic Fiber Construction in lab .pptxPavel ( NSTU)
Synthetic fiber production is a fascinating and complex field that blends chemistry, engineering, and environmental science. By understanding these aspects, students can gain a comprehensive view of synthetic fiber production, its impact on society and the environment, and the potential for future innovations. Synthetic fibers play a crucial role in modern society, impacting various aspects of daily life, industry, and the environment. ynthetic fibers are integral to modern life, offering a range of benefits from cost-effectiveness and versatility to innovative applications and performance characteristics. While they pose environmental challenges, ongoing research and development aim to create more sustainable and eco-friendly alternatives. Understanding the importance of synthetic fibers helps in appreciating their role in the economy, industry, and daily life, while also emphasizing the need for sustainable practices and innovation.
Embracing GenAI - A Strategic ImperativePeter Windle
Artificial Intelligence (AI) technologies such as Generative AI, Image Generators and Large Language Models have had a dramatic impact on teaching, learning and assessment over the past 18 months. The most immediate threat AI posed was to Academic Integrity with Higher Education Institutes (HEIs) focusing their efforts on combating the use of GenAI in assessment. Guidelines were developed for staff and students, policies put in place too. Innovative educators have forged paths in the use of Generative AI for teaching, learning and assessments leading to pockets of transformation springing up across HEIs, often with little or no top-down guidance, support or direction.
This Gasta posits a strategic approach to integrating AI into HEIs to prepare staff, students and the curriculum for an evolving world and workplace. We will highlight the advantages of working with these technologies beyond the realm of teaching, learning and assessment by considering prompt engineering skills, industry impact, curriculum changes, and the need for staff upskilling. In contrast, not engaging strategically with Generative AI poses risks, including falling behind peers, missed opportunities and failing to ensure our graduates remain employable. The rapid evolution of AI technologies necessitates a proactive and strategic approach if we are to remain relevant.
The Roman Empire A Historical Colossus.pdfkaushalkr1407
The Roman Empire, a vast and enduring power, stands as one of history's most remarkable civilizations, leaving an indelible imprint on the world. It emerged from the Roman Republic, transitioning into an imperial powerhouse under the leadership of Augustus Caesar in 27 BCE. This transformation marked the beginning of an era defined by unprecedented territorial expansion, architectural marvels, and profound cultural influence.
The empire's roots lie in the city of Rome, founded, according to legend, by Romulus in 753 BCE. Over centuries, Rome evolved from a small settlement to a formidable republic, characterized by a complex political system with elected officials and checks on power. However, internal strife, class conflicts, and military ambitions paved the way for the end of the Republic. Julius Caesar’s dictatorship and subsequent assassination in 44 BCE created a power vacuum, leading to a civil war. Octavian, later Augustus, emerged victorious, heralding the Roman Empire’s birth.
Under Augustus, the empire experienced the Pax Romana, a 200-year period of relative peace and stability. Augustus reformed the military, established efficient administrative systems, and initiated grand construction projects. The empire's borders expanded, encompassing territories from Britain to Egypt and from Spain to the Euphrates. Roman legions, renowned for their discipline and engineering prowess, secured and maintained these vast territories, building roads, fortifications, and cities that facilitated control and integration.
The Roman Empire’s society was hierarchical, with a rigid class system. At the top were the patricians, wealthy elites who held significant political power. Below them were the plebeians, free citizens with limited political influence, and the vast numbers of slaves who formed the backbone of the economy. The family unit was central, governed by the paterfamilias, the male head who held absolute authority.
Culturally, the Romans were eclectic, absorbing and adapting elements from the civilizations they encountered, particularly the Greeks. Roman art, literature, and philosophy reflected this synthesis, creating a rich cultural tapestry. Latin, the Roman language, became the lingua franca of the Western world, influencing numerous modern languages.
Roman architecture and engineering achievements were monumental. They perfected the arch, vault, and dome, constructing enduring structures like the Colosseum, Pantheon, and aqueducts. These engineering marvels not only showcased Roman ingenuity but also served practical purposes, from public entertainment to water supply.
Honest Reviews of Tim Han LMA Course Program.pptxtimhan337
Personal development courses are widely available today, with each one promising life-changing outcomes. Tim Han’s Life Mastery Achievers (LMA) Course has drawn a lot of interest. In addition to offering my frank assessment of Success Insider’s LMA Course, this piece examines the course’s effects via a variety of Tim Han LMA course reviews and Success Insider comments.
2. With Scratch, you can program your own interactive stories,
games, and animations — and share your creations with
others in the online community.
Scratch helps young people learn to think creatively, reason
systematically, and work collaboratively — essential skills
for life in the 21st century.
3. Learn to Code, Code to Learn
The ability to code computer programs is
an important part of literacy in today’s
society. When people learn to code in
Scratch, they learn important strategies
for solving problems, designing projects,
and communicating ideas.
4. You can download a copy of Scratch at ….
http://scratch.mit.edu/scratch_1.4/
Yes, it is FREE!
5. Today we are going to learn to program a very
simple cat and mouse game.
Open Scratch. You will see a very simple interface.
6. Sprite Preview
Sprite Editor
Sprite Selection and
Creation
Tool Box
Sprite
Preview
lets you
preview a
project.
Sprite
Selection
and
Creation
lets you
select an
existing
Sprite or
create a
new
Sprite.
Sprite
Editor
lets you
edit a
Sprite’s
Scripts,
Costume,
and
Sounds.
Tool Box
provides
single
script
blocks for
building
combo
script
blocks.
7. Let’s get started.
The first thing we are going to do is concentrate
on the cat. We want it to move forward,
backward, up and down using the arrow keys.
Just like any game you may play on your
computer.
From our toolbox we are going to use the
motion and control tools.
8. You can move the cat around the screen just by
clicking on it in the preview window and dragging
it around. Drag it outside of the preview window
and letting go will make it appear back in the
preview window.
Try moving the cat around!
9. Big Yawn! Let’s use the keys on the keyboard
instead.
Click on the control tab and drag into the sprite
editor block the when space key is pressed block
(look at the next slide as an example).
10. Don’t think you are always going to get
this kind of help. Soon you will need to
work things out for yourself
11. So, when the space bar is clicked we need to
get the cat to do something. Can you guess
what it is from the Tool Box? You have a 1/8
chance of getting it right. You have 10
seconds before the answer is revealed
Motion
12. So, click on the motion tab in your tool box and drag the
move 10 steps line of code into your sprite editor window.
You will see from the following screen shot that the new
line of code will fit snugly into the when space key is
pressed code (like tiles in a jigsaw puzzle fitting together).
Now press the space bar on your keyboard and see what
happens.
13. Nice key the space bar but it’s not actually what we want
as it only allows movement in one direction. So, let’s
change the spacebar to (say) right arrow key.
Next to the word space click the
arrow and choose right arrow
from the drop-down menu. Now
try it out using the right arrow key
on your keyboard.
14. Arduous task (big snigger).
Now, duplicate the code you have just written to make the
cat move backward when the left arrow key is clicked.
Think of negative numbers – you’ll never get
away from maths in computing
16. Now we need to get the cat to move up and down. Here’s
where your maths comes in again
The control aspect of the code is easy but what about
moving up and down?
Click on the motion tab and decide
on which of the lines of code will
move the cat up.
Maths: co-ordinates
17. Hopefully you will have remembered your x and y co-
ordinates!
To move the cat up we need to use
the y coordinate. So you will need
to write a new line of code so that
when the up arrow is pressed the
cat will change y by 10.
Try it out and see if you are
correct.
18. Now, let’s finish off the cat (not literally
but metaphorically)
Can you write the
last line of code so
that the cat moves
down when the
down arrow is
clicked?
19. For those mathematicians amongst
you (which is ALL I hope). For the
first two lines of code we could
have used an alternative piece of
code for the motion (instead of
move 10 steps or move -10 steps).
What could we have used?
20.
21. Well, the cat is more-or-less done. Now we need the
mouse.
Click on the choose a
new sprite from file
tab in the sprite
selection and creation
window. From the
animals folder choose
mouse1
22. Now we have our cat and mouse together on the screen.
As you can see the mouse is
rather large compared to the
cat so we will need to reduce it
in size.
23. Click on Sprite2 in the sprite
selection and creation window (if
we are going to do anything with a
particular sprite then we need to
select it first).
Go to the sprite editor window and
select the costumes tab. See next
slide.
24. We are now going to make the
mouse smaller so we need to
click the edit tab.
25. Click on the shrink button
about 4 times to make the
mouse smaller. Then click the
OK button.
26. I wonder if any of you noticed
that there is another way to
shrink the mouse without using
the edit tab.
Does anybody know how?
20 seconds before the
alternative method is
revealed.
27. Now, this is going to be a ‘twist’ on the cat and mouse
game. The mouse is going to chase the cat!
Before we do that let’s tidy things up.
We really need to rename Sprite1 and
Sprite2. After all, Sprite1 is a cat and
Sprite2 is a mouse. So, click on Sprite1
in the sprite selection and creation
window and change its name to cat. Do
the same for the mouse.
28. Let us first have the mouse follow the cat.
Going back to earlier on. If you click
on the cat sprite and then the scripts
tab you will see the code you wrote a
while back to get the cat to move. If
you do the same for the mouse you
will see nothing (hopefully).
Remember: we must select the
sprite we are going to work with
before we can make ANY changes.
29. We are now going to get the mouse to follow the cat.
Having selected the mouse sprite and then the scripts tab
we are ready to start.
The first thing we want to do is to get the mouse to do
whatever we want (i.e. to follow the cat for the moment)
when the green flag is pressed.
The green flag is in
the top right hand
corner of the
Scratch window.
30. Click on the control tab and drag in the when the green
Flag is clicked line of code.
note that we know that we are
programming
the mouse because it appears
at the top of the
scripts window.
31. Now what we want to do is to get the mouse to point
towards the cat forever. So, staying in the control tab drag
the forever code and join it to the existing when green
flag is clicked.
Pointing towards the cat is
a motion command so,
click on the motion tab
and look for the point
towards line of code.
32. Drag this point towards line of code into the forever
block – it fits together just like a jigsaw!
To the right of the point towards
line of code is an arrow. If you click
on the arrow you have 2 choices.
Choose mouse-pointer and see
what happens.
Note: If nothing happens then you
are not following the code. See
next slide
33. If you are going to learn to think creatively, reason
systematically, and work collaboratively (remember slide
2?) then you MUST understand what is going on. The
command block says …….
When green arrow
clicked – did you
click it?
Well done to those
who did get it
correct.
34. Now go back to the point towards command and change it
to cat.
Now drag the cat around the sprite preview window and
see what happens.
Try it with the arrow
keys.
35. I wonder how may people forgot to click the green flag
Now we want to get the mouse to move towards the cat.
The move command, of course, is a motion command so,
with the motion tab open drag the move 10 steps line of
code and place it beneath the point towards cat code.
You may see something weird happening i.e. the mouse
moving at a fast rate. If this is the case then just stop the
program by clicking the red circle next to the green flag.
36. With the new line of code inserted, change the number
of steps to one.
Now run your code (don’t
forget the green flag) and play
with the left/right/up/down
keys.
37. Let’s ….. read through the code and ask if there
is anything you do not understand.
38. Now let’s edit our cat.
1. Click on the cat
sprite first
2. Click on the
costumes tab
3. Click on the edit
button
1
2
3
39. Hopefully, the paint editor window will have opened.
We are going to replace our cat in another view.
40. Click on the clear button and this will remove the cat
from our window..
41. Now click on the import button as we are going to import a
new cat from our library of images.
42. Find the animals folder and click on the cat2 image and
then click the OK button.
44. OK. We know what you are thinking (or may have already
said): “Cats DON’T move backwards like that”. So let’s
change that.
Click on the cat sprite (bottom right-hand side of the
Scratch window) and make sure the scripts tab is
selected.
Delete ALL your lines of code by dragging them to the
left (into the tool box area). You should have no scripts.
45. Now click on the control tab and drag in when up arrow
key pressed.
I bet someone says that there is no such code – well there
is but it says (at first) when space key pressed but you have
been following the instructions earlier on without taking
any notice of the what they actually mean.
46. Now add to your code …. move 10 steps (it is a motion so
what tab should you be choosing?)
47. Now, when the left arrow key is pressed we want the cat
to start moving around so we will now choose when left
arrow key pressed and drag in turn left 15 degrees (as the
cat it turning left then logically we should be choosing the
anti-clockwise icon).
48. Well, it’s not really some cataclysmic,
mind-boggling challenge but we can’t
have everything, can we!
Write the code for the when the right-hand key is pressed.
50. Hopefully you have been trying out your code as you
go along. If not then you have 30 seconds now before
the next slide.
51. OK. So what? Well we want something to happen when
the mouse catches the cat. There are two things we can
do. The first one is simply for the cat to say meow.
So….. what we want to do is to write some code so that
when the mouse touches the cat it says meow (the cat
that is, not the mouse). So here goes.
52. The first thing we need to do is to drag in a when green flag
clicked command line. This will ensure that our code will
always run when the green flag is chosen.
The second thing we need to do is make sure that the cat
sprite is selected. In the scripts area we need to drag in a
forever command (think about it, we want the cat to say
meow every time that it is touched by the mouse).
Join the two together.
53. So far everything has been easy
but now we need to start thinking
logically. So, what do we want to
happen? (a rhetorical question –
unless you are clever enough to
know the answer).
We want the cat to say meow if it is
touched. The if command is
important in programming so take
note!
54. Go to the control tab and drag in the if line of code ( there
are three options with if in them – we only want the one
that just says if on its own). Place the if command in the
forever block (see, doing jigsaw puzzles does help).
55. Now we want to tell the program what to do if the mouse
is touching the cat.
To touch is one of our five senses so we need now to select
the sensing tab and drag the touching code into our if
command block
56. To the right of the touching word is an arrow, click on it
and choose mouse.
Now, the next part is logically illogical! Perhaps you might
not agree.
Anyway, we want the cat to say meow when it is touched
by the mouse so we go to the looks tab (duh! why the
looks tab – don’t ask me as I said, it’s logically illogical!
But it is a lovely purple colour )
57. From the looks tab choose the say hello for 2 secs block
and drag it into the if command block. Change the text to
say meow! for 1 second. Run your program.
58. Well, we are nearly at the end of this first session. Let’s
get the cat to actually say meow.
Meow is a sound (duh! really ) so, click on the sound tab
(such a lovely pink colour) and select the play sound line
of code. Surprisingly it will actually have the sound meow
already there. Drag it underneath the say meow! for 1
secs line of code. Run the program.
59. Well that’s it for the moment. Save
your work in your folder as “cat and
mouse” – if you have time then play
with the program. Maybe you could
change it to cat and dog or cat and
bird or something of your own.