More Related Content

PDF
Infrastructure as Code (IaC) 談義 2022 
PDF

PDF

PDF
【BS4】時は来たれり。今こそ .NET 6 へ移行する時。 
PPTX

PPTX
Azure Api Management 俺的マニュアル 2020年3月版 
PDF

PDF
What's hot

PDF
AWS Black Belt Online Seminar 2018 Amazon DynamoDB Advanced Design Pattern 
PDF

PDF

PDF

PDF
ソフトウェア設計における 意思決定とそのレビューの秘訣 
PPTX
「関心の分離」と「疎結合」 ソフトウェアアーキテクチャのひとかけら 
PDF

PDF
Dockerfile を書くためのベストプラクティス解説編 
PDF

PPTX
![[Aurora事例祭り]Amazon Aurora を使いこなすためのベストプラクティス](https://cdn.slidesharecdn.com/ss_thumbnails/amazonauroratips-170307140000-thumbnail.jpg?width=640&height=640&fit=bounds)
PDF
[Aurora事例祭り]Amazon Aurora を使いこなすためのベストプラクティス 
PDF

PPTX
モノリスからマイクロサービスへの移行 ~ストラングラーパターンの検証~(Spring Fest 2020講演資料) 
KEY

PDF

PPTX
RLSを用いたマルチテナント実装 for Django 
PPTX

PDF
【de:code 2020】 Azure Red hat OpenShift (ARO) によるシステムアーキテクチャ構築の実践 
PPTX

PDF
Similar to Vue入門

PDF

PDF

PPTX

PDF

PDF
Vue.jsの関連ツール・ライブラリ(Vuex, Vue-Router, Nuxt) 
PPTX

PDF
Progressive Framework Vue.js 2.0 
PDF

PPTX
アバター着せ替えアプリ開発におけるフロントエンド技術(Vue.js活用事例) #denatechcon 
PDF

PDF
はじめようVue3!ハンズオンでとらのあなラボのフロントエンドを学ぶ_20210611_TechDay#1 
PPTX

PDF
プロダクトに 1 から Vue.js を導入した話 
PDF
React.js + Flux入門 #scripty02 
PDF

PDF

PDF

PDF
QML を用いた YouTube クライアントの作成 - 関東 Qt 勉強会 
PDF
WordPress REST API と Vue.js を使ったフロントエンド開発 
PDF
Laravel vue-project-upload More from Takeo Noda

PDF

PDF
Prometeusについてはじめてみよう / Let's start Prometeus 
PDF

PDF

PPTX

PDF

PDF

PDF

PDF

PDF

PDF

PDF
Vue入門
- 1.
Copyright © XchangeSolutions All right reserved.
Vue入門
株式会社エクスチェンジ ソリューションズ
野田 健夫
2019.10.29
Fukuoka.php Vol.31
- 2.
2
Copyright © XchangeSolutions All right reserved.
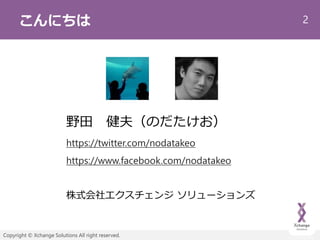
こんにちは
野田 健夫(のだたけお)
https://twitter.com/nodatakeo
https://www.facebook.com/nodatakeo
株式会社エクスチェンジ ソリューションズ
- 3.
3
Copyright © XchangeSolutions All right reserved.
内容について
Vueの未経験者、初心者を対象。導入から
開発の基本をカバー。
Vueの特性について理解して、より深く利
用することを目標としています。
- 4.
4
Copyright © XchangeSolutions All right reserved.
Vueとは
テンプレート(フロントUI)に特化したオープンソースのJavaScriptフ
レームワーク。
データ駆動(データドリブン)、リアクティブプログラミング。
データが変わることで表示が変わる。
コンポーネント志向(HTML/CSS/JSを部品単位で扱う)。
MVVMパターン(Model-View-ViewModelパターン、Controllerレス)。
https://qiita.com/asip2k25/items/bd4bdccd5201d542953c
DOM API(JSON)
Vue
- 5.
5
Copyright © XchangeSolutions All right reserved.
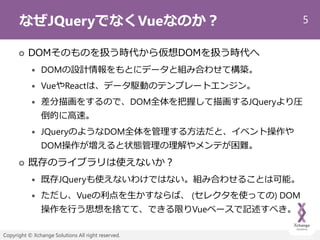
なぜJQueryでなくVueなのか?
DOMそのものを扱う時代から仮想DOMを扱う時代へ
DOMの設計情報をもとにデータと組み合わせて構築。
VueやReactは、データ駆動のテンプレートエンジン。
差分描画をするので、DOM全体を把握して描画するJQueryより圧
倒的に高速。
JQueryのようなDOM全体を管理する方法だと、イベント操作や
DOM操作が増えると状態管理の理解やメンテが困難。
既存のライブラリは使えないか?
既存JQueryも使えないわけではない。組み合わせることは可能。
ただし、Vueの利点を生かすならば、 (セレクタを使っての) DOM
操作を行う思想を捨てて、できる限りVueベースで記述すべき。
- 6.
6
Copyright © XchangeSolutions All right reserved.
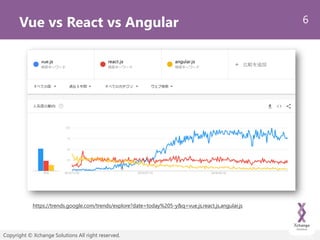
Vue vs React vs Angular
https://trends.google.com/trends/explore?date=today%205-y&q=vue.js,react.js,angular.js
- 7.
7
Copyright © XchangeSolutions All right reserved.
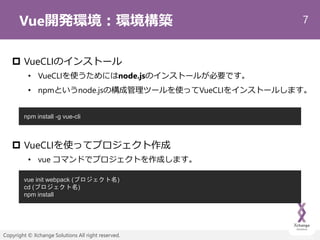
Vue開発環境:環境構築
VueCLIのインストール
• VueCLIを使うためにはnode.jsのインストールが必要です。
• npmというnode.jsの構成管理ツールを使ってVueCLIをインストールします。
VueCLIを使ってプロジェクト作成
• vue コマンドでプロジェクトを作成します。
npm install -g vue-cli
vue init webpack (プロジェクト名)
cd (プロジェクト名)
npm install
- 8.
8
Copyright © XchangeSolutions All right reserved.
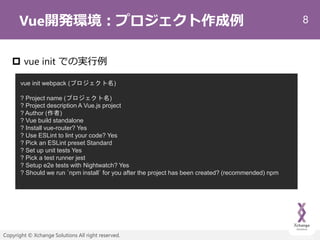
Vue開発環境:プロジェクト作成例
vue init での実行例
vue init webpack (プロジェクト名)
? Project name (プロジェクト名)
? Project description A Vue.js project
? Author (作者)
? Vue build standalone
? Install vue-router? Yes
? Use ESLint to lint your code? Yes
? Pick an ESLint preset Standard
? Set up unit tests Yes
? Pick a test runner jest
? Setup e2e tests with Nightwatch? Yes
? Should we run `npm install` for you after the project has been created? (recommended) npm
- 9.
9
Copyright © XchangeSolutions All right reserved.
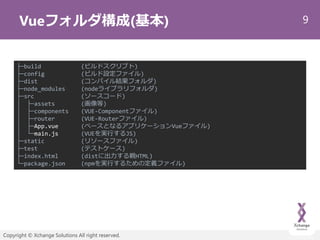
Vueフォルダ構成(基本)
├─build (ビルドスクリプト)
├─config (ビルド設定ファイル)
├─dist (コンパイル結果フォルダ)
├─node_modules (nodeライブラリフォルダ)
├─src (ソースコード)
│ ├─assets (画像等)
│ ├─components (VUE-Componentファイル)
│ ├─router (VUE-Routerファイル)
│ ├─App.vue (ベースとなるアプリケーションVueファイル)
│ └─main.js (VUEを実行するJS)
├─static (リソースファイル)
├─test (テストケース)
├─index.html (distに出力する親HTML)
└─package.json (npmを実行するための定義ファイル)
- 10.
10
Copyright © XchangeSolutions All right reserved.
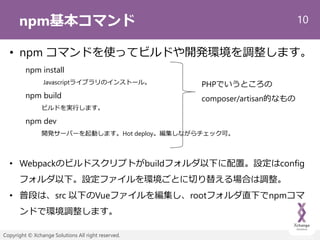
npm基本コマンド
• npm コマンドを使ってビルドや開発環境を調整します。
npm install
Javascriptライブラリのインストール。
npm build
ビルドを実行します。
npm dev
開発サーバーを起動します。Hot deploy。編集しながらチェック可。
• Webpackのビルドスクリプトがbuildフォルダ以下に配置。設定はconfig
フォルダ以下。設定ファイルを環境ごとに切り替える場合は調整。
• 普段は、src 以下のVueファイルを編集し、rootフォルダ直下でnpmコマ
ンドで環境調整します。
PHPでいうところの
composer/artisan的なもの
- 11.
11
Copyright © XchangeSolutions All right reserved.
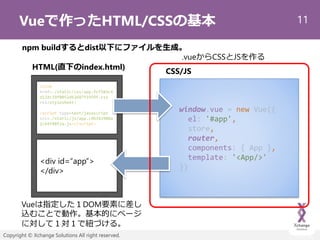
Vueで作ったHTML/CSSの基本
<div id=“app”>
</div>
window.vue = new Vue({
el: '#app',
store,
router,
components: { App },
template: '<App/>'
})
HTML(直下のindex.html)
<link
href=./static/css/app.fcf583c4
d12dc29f0052d63687f1959f.css
rel=stylesheet>
<script type=text/javascript
src=./static/js/app.c9b343980a
2cb4f88f2a.js></script>
CSS/JS
Vueは指定した1DOM要素に差し
込むことで動作。基本的にページ
に対して1対1で紐づける。
.vueからCSSとJSを作る
npm buildするとdist以下にファイルを生成。
- 12.
12
Copyright © XchangeSolutions All right reserved.
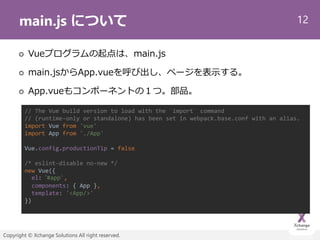
main.js について
Vueプログラムの起点は、main.js
main.jsからApp.vueを呼び出し、ページを表示する。
App.vueもコンポーネントの1つ。部品。
// The Vue build version to load with the `import` command
// (runtime-only or standalone) has been set in webpack.base.conf with an alias.
import Vue from 'vue'
import App from './App'
Vue.config.productionTip = false
/* eslint-disable no-new */
new Vue({
el: ‘#app',
components: { App },
template: '<App/>'
})
- 13.
13
Copyright © XchangeSolutions All right reserved.
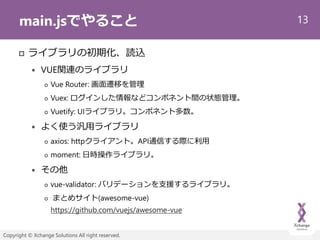
main.jsでやること
ライブラリの初期化、読込
VUE関連のライブラリ
Vue Router: 画面遷移を管理
Vuex: ログインした情報などコンポネント間の状態管理。
Vuetify: UIライブラリ。コンポネント多数。
よく使う汎用ライブラリ
axios: httpクライアント。API通信する際に利用
moment: 日時操作ライブラリ。
その他
vue-validator: バリデーションを支援するライブラリ。
まとめサイト(awesome-vue)
https://github.com/vuejs/awesome-vue
- 14.
14
Copyright © XchangeSolutions All right reserved.
App.vueについて
すべてのコンポーネントの親玉。
Vueは、App.vueを起点として、この基本
形のコンポーネントが階層化され、組み合
わさった形で動作。
それぞれの部品レイヤーごとにテンプレー
ト、スクリプト、スタイルの3要素を含む。
- 15.
15
Copyright © XchangeSolutions All right reserved.
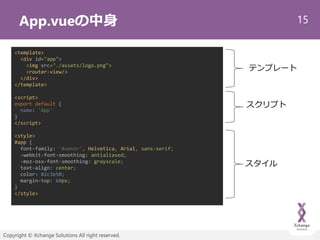
App.vueの中身
<template>
<div id="app">
<img src="./assets/logo.png">
<router-view/>
</div>
</template>
<script>
export default {
name: 'App'
}
</script>
<style>
#app {
font-family: 'Avenir', Helvetica, Arial, sans-serif;
-webkit-font-smoothing: antialiased;
-moz-osx-font-smoothing: grayscale;
text-align: center;
color: #2c3e50;
margin-top: 60px;
}
</style>
テンプレート
スクリプト
スタイル
- 16.
16
Copyright © XchangeSolutions All right reserved.
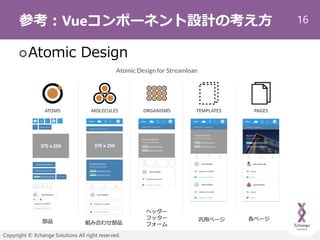
参考:Vueコンポーネント設計の考え方
Atomic Design
部品 組み合わせ部品
汎用ページ
ヘッダー
フッター
フォーム
各ページ
- 17.
17
Copyright © XchangeSolutions All right reserved.
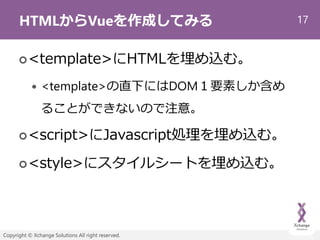
HTMLからVueを作成してみる
<template>にHTMLを埋め込む。
<template>の直下にはDOM1要素しか含め
ることができないので注意。
<script>にJavascript処理を埋め込む。
<style>にスタイルシートを埋め込む。
- 18.
18
Copyright © XchangeSolutions All right reserved.
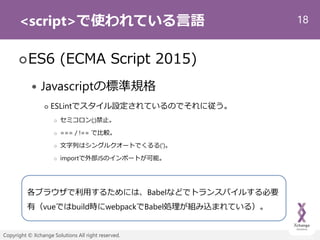
<script>で使われている言語
ES6 (ECMA Script 2015)
Javascriptの標準規格
ESLintでスタイル設定されているのでそれに従う。
セミコロン(;)禁止。
=== / !== で比較。
文字列はシングルクオートでくるる(‘)。
importで外部JSのインポートが可能。
各ブラウザで利用するためには、Babelなどでトランスパイルする必要
有(vueではbuild時にwebpackでBabel処理が組み込まれている)。
- 19.
19
Copyright © XchangeSolutions All right reserved.
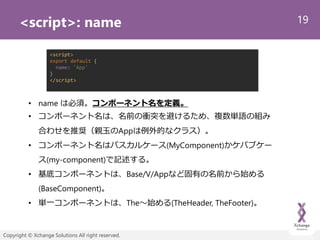
<script>: name
<script>
export default {
name: 'App'
}
</script>
• name は必須。コンポーネント名を定義。
• コンポーネント名は、名前の衝突を避けるため、複数単語の組み
合わせを推奨(親玉のAppは例外的なクラス)。
• コンポーネント名はパスカルケース(MyComponent)かケバブケー
ス(my-component)で記述する。
• 基底コンポーネントは、Base/V/Appなど固有の名前から始める
(BaseComponent)。
• 単一コンポーネントは、The~始める(TheHeader, TheFooter)。
- 20.
20
Copyright © XchangeSolutions All right reserved.
<script>: components
<script>
import PageHeader from '@/component/PageHeader'
import PageFooter from '@/component/PageFooter'
import SubMenu from '@/component/SubMenu'
export default {
name: 'App’
components: {
PageHeader,
PageFooter
SubMenu
}
:
}
</script>
• template内で利用するコンポーネントを定義。
• template内では、ケバブ記法もしくはパスカル記法のタグで呼び出す。
<page-header />
<sub-menu :menu="menu" />
<page-footer />
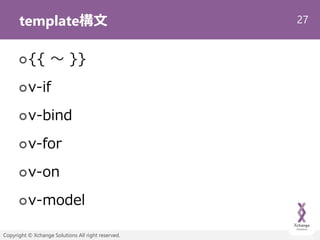
template構文
- 21.
21
Copyright © XchangeSolutions All right reserved.
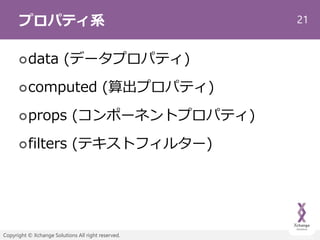
プロパティ系
data (データプロパティ)
computed (算出プロパティ)
props (コンポーネントプロパティ)
filters (テキストフィルター)
- 22.
22
Copyright © XchangeSolutions All right reserved.
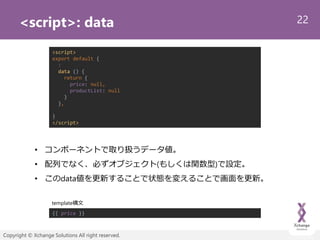
<script>: data
• コンポーネントで取り扱うデータ値。
• 配列でなく、必ずオブジェクト(もしくは関数型)で設定。
• このdata値を更新することで状態を変えることで画面を更新。
<script>
export default {
:
data () {
return {
price: null,
productList: null
}
},
}
</script>
{{ price }}
template構文
- 23.
23
Copyright © XchangeSolutions All right reserved.
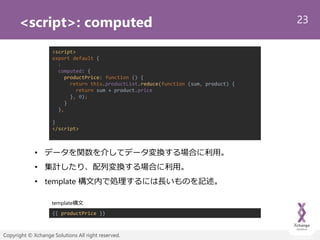
<script>: computed
<script>
export default {
:
computed: {
productPrice: function () {
return this.productList.reduce(function (sum, product) {
return sum + product.price
}, 0);
}
},
}
</script>
• データを関数を介してデータ変換する場合に利用。
• 集計したり、配列変換する場合に利用。
• template 構文内で処理するには長いものを記述。
{{ productPrice }}
template構文
- 24.
24
Copyright © XchangeSolutions All right reserved.
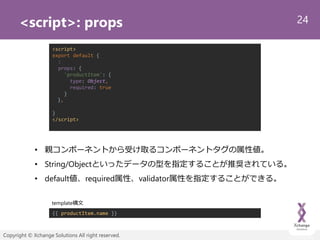
<script>: props
<script>
export default {
:
props: {
'productItem': {
type: Object,
required: true
}
},
}
</script>
• 親コンポーネントから受け取るコンポーネントタグの属性値。
• String/Objectといったデータの型を指定することが推奨されている。
• default値、required属性、validator属性を指定することができる。
{{ productItem.name }}
template構文
- 25.
25
Copyright © XchangeSolutions All right reserved.
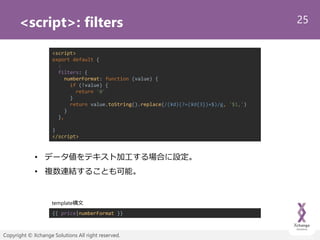
<script>: filters
<script>
export default {
:
filters: {
numberFormat: function (value) {
if (!value) {
return '0'
}
return value.toString().replace(/(¥d)(?=(¥d{3})+$)/g, '$1,')
}
},
}
</script>
• データ値をテキスト加工する場合に設定。
• 複数連結することも可能。
{{ price|numberFormat }}
template構文
- 26.
26
Copyright © XchangeSolutions All right reserved.
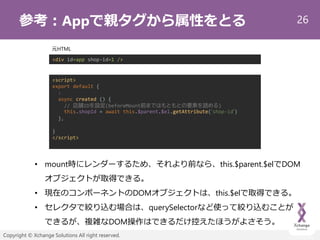
参考:Appで親タグから属性をとる
<script>
export default {
:
async created () {
// 店舗IDを設定(beforeMount前まではもともとの要素を読める)
this.shopId = await this.$parent.$el.getAttribute(‘shop-id‘)
},
}
</script>
• mount時にレンダーするため、それより前なら、this.$parent.$elでDOM
オブジェクトが取得できる。
• 現在のコンポーネントのDOMオブジェクトは、this.$elで取得できる。
• セレクタで絞り込む場合は、querySelectorなど使って絞り込むことが
できるが、複雑なDOM操作はできるだけ控えたほうがよさそう。
<div id=app shop-id=1 />
元HTML
- 27.
- 28.
28
Copyright © XchangeSolutions All right reserved.
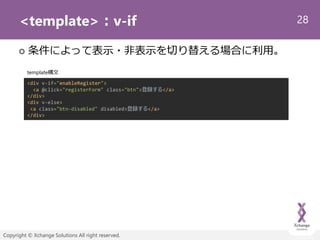
<template>:v-if
条件によって表示・非表示を切り替える場合に利用。
<div v-if="enableRegister">
<a @click="registerForm" class="btn">登録する</a>
</div>
<div v-else>
<a class="btn-disabled" disabled>登録する</a>
</div>
template構文
- 29.
29
Copyright © XchangeSolutions All right reserved.
<template>:v-bind
DOM属性を変化させるときに利用。
主にクラス名やスタイルの調整時に利用。
省略記法は :[属性名]。
<a @click="registerForm" v-bind:class="[buttonClickable ? 'btn' : 'btn-disabled’]”>
登録する
</a>
template構文
<a @click="registerForm" :class="[buttonClickable ? 'btn' : 'btn-disabled’]”>
登録する
</a>
template構文(省略記法)
重要!
- 30.
30
Copyright © XchangeSolutions All right reserved.
<template>:v-for
配列や連想配列を表示する際に利用します。
:keyを必ず指定。
プリミティブな一意性を保つ値を設定。
この値の変化でレンダリングが行われる。
<div v-for="(product, idx) in productList" :key="`product-${idx}`">
<product-list-view :product-item="product" />
</div>
<div v-for="key in Object.keys(productList).reverse()" :key="`product-${idx}`">
<product-list-view :product-item="productList[key]" />
</div>
template構文
- 31.
31
Copyright © XchangeSolutions All right reserved.
<template>:v-on
イベントを検知するための属性。
v-on:イベント名で記述。
v-on:click (省略記法だと@click)
v-on:change (省略記法だと@change)
<a v-on:click="registerForm" v-bind:class="[buttonClickable ? 'btn' : 'btn-disabled’]”>
登録する
</a>
<a @click="registerForm" :class="[buttonClickable ? 'btn' : 'btn-disabled’]”>
登録する
</a>
template構文
重要!
template構文(省略記法)
- 32.
32
Copyright © XchangeSolutions All right reserved.
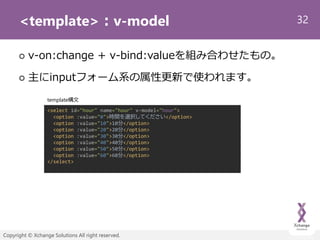
<template>:v-model
v-on:change + v-bind:valueを組み合わせたもの。
主にinputフォーム系の属性更新で使われます。
<select id="hour" name="hour" v-model="hour">
<option :value="0">時間を選択してください</option>
<option :value="10">10分</option>
<option :value="20">20分</option>
<option :value="30">30分</option>
<option :value="40">40分</option>
<option :value="50">50分</option>
<option :value="60">60分</option>
</select>
template構文
- 33.
33
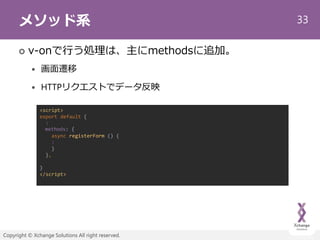
Copyright © XchangeSolutions All right reserved.
メソッド系
v-onで行う処理は、主にmethodsに追加。
画面遷移
HTTPリクエストでデータ反映
<script>
export default {
:
methods: {
async registerForm () {
:
}
},
}
</script>
- 34.
34
Copyright © XchangeSolutions All right reserved.
<script>:watch
プロパティ系の値の変化を検知する。
$routeや配列でネストした値についてもリスナーを
差し込むことができる。
<script>
export default {
:
watch: {
// データの値の変化を監視
price (newVal, oldVal) {
console.log(`更新前のデータ:${oldVal}`)
console.log(`更新後のデータ:${newVal}`)
},
// ルーティング情報の変化を監視
'$route': function (to, from) {
console.log(`画面遷移前のpath:${from}`)
console.log(`画面遷移後のpath:${to}`)
}
},
}
https://qiita.com/33haji/items/7f91afa5d2aef47d74aa
- 35.
35
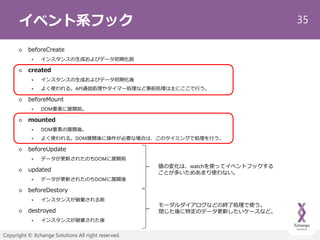
Copyright © XchangeSolutions All right reserved.
イベント系フック
beforeCreate
インスタンスの生成およびデータ初期化前
created
インスタンスの生成およびデータ初期化後
よく使われる。API通信処理やタイマー処理など事前処理は主にここで行う。
beforeMount
DOM要素に展開前。
mounted
DOM要素の展開後。
よく使われる。DOM展開後に操作が必要な場合は、このタイミングで処理を行う。
beforeUpdate
データが更新されたのちDOMに展開前
updated
データが更新されたのちDOMに展開後
beforeDestory
インスタンスが破棄される前
destroyed
インスタンスが破棄された後
値の変化は、watchを使ってイベントフックする
ことが多いためあまり使わない。
モーダルダイアログなどの終了処理で使う。
閉じた後に特定のデータ更新したいケースなど。
- 36.
36
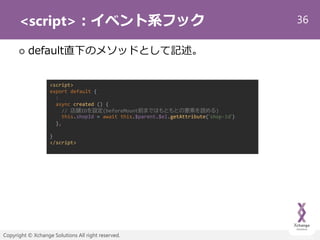
Copyright © XchangeSolutions All right reserved.
<script>:イベント系フック
default直下のメソッドとして記述。
<script>
export default {
:
async created () {
// 店舗IDを設定(beforeMount前まではもともとの要素を読める)
this.shopId = await this.$parent.$el.getAttribute(‘shop-id‘)
},
}
</script>
- 37.
- 38.
38
Copyright © XchangeSolutions All right reserved.
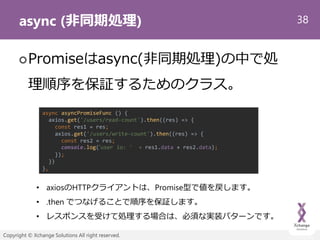
async (非同期処理)
Promiseはasync(非同期処理)の中で処
理順序を保証するためのクラス。
async asyncPromiseFunc () {
axios.get('/users/read-count').then((res) => {
const res1 = res;
axios.get('/users/write-count').then((res) => {
const res2 = res;
console.log(‘user io: ' + res1.data + res2.data);
});
})
},
• axiosのHTTPクライアントは、Promise型で値を戻します。
• .then でつなげることで順序を保証します。
• レスポンスを受けて処理する場合は、必須な実装パターンです。
- 39.
39
Copyright © XchangeSolutions All right reserved.
await (then)
awaitはPromise.then~のネストが深
くなるのを解消するための記法です。
async asyncAwaitFunc () {
const res1 = await axios.get('/users/read-count');
const res2 = await axios.get('/users/write-count');
console.log('user io: ' + res1.data + res2.data)
},
• 前のページと同じ実装をawaitで記述と上記のようになります。
• await を付けた順で同期処理(手続き処理)されます。
• awaitがついていない場合は、非同期処理されます。
- 40.
40
Copyright © XchangeSolutions All right reserved.
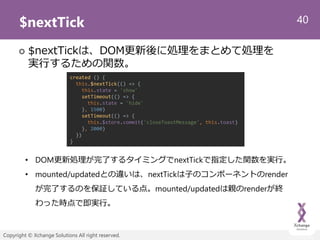
$nextTick
$nextTickは、DOM更新後に処理をまとめて処理を
実行するための関数。
created () {
this.$nextTick(() => {
this.state = 'show'
setTimeout(() => {
this.state = 'hide'
}, 1500)
setTimeout(() => {
this.$store.commit('closeToastMessage', this.toast)
}, 2000)
})
}
• DOM更新処理が完了するタイミングでnextTickで指定した関数を実行。
• mounted/updatedとの違いは、nextTickは子のコンポーネントのrender
が完了するのを保証している点。mounted/updatedは親のrenderが終
わった時点で即実行。
- 41.
41
Copyright © XchangeSolutions All right reserved.
Mixin
コンポーネントのscript部分について土台を
作ってそれを混ぜ込むことが可能。
PHPでいうところのTrait的なもの
export default {
props: {
'cartItem': {
type: Object,
required: true
}
}
:
}
<script>
import BaseCart from ‘./BaseCart'
export default {
name: 'cart-confirm',
mixins: [BaseCart]
:
}
</script>
BaseCart.vue CartConfirm.vue
MIXIN
- 42.
42
Copyright © XchangeSolutions All right reserved.
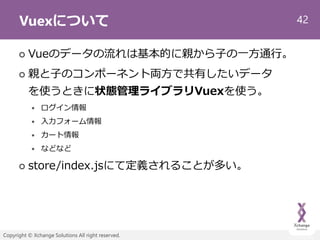
Vuexについて
Vueのデータの流れは基本的に親から子の一方通行。
親と子のコンポーネント両方で共有したいデータ
を使うときに状態管理ライブラリVuexを使う。
ログイン情報
入力フォーム情報
カート情報
などなど
store/index.jsにて定義されることが多い。
- 43.
43
Copyright © XchangeSolutions All right reserved.
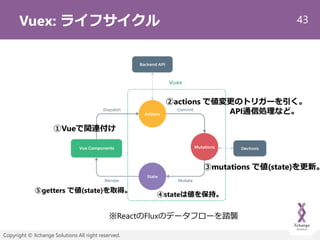
Vuex: ライフサイクル
※ReactのFluxのデータフローを踏襲
②actions で値変更のトリガーを引く。
API通信処理など。
①Vueで関連付け
③mutations で値(state)を更新。
⑤getters で値(state)を取得。
④stateは値を保持。
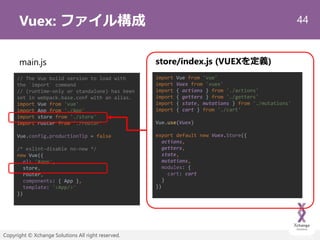
- 44.
44
Copyright © XchangeSolutions All right reserved.
Vuex: ファイル構成
// The Vue build version to load with
the `import` command
// (runtime-only or standalone) has been
set in webpack.base.conf with an alias.
import Vue from 'vue'
import App from './App'
import store from './store'
import router from './router'
Vue.config.productionTip = false
/* eslint-disable no-new */
new Vue({
el: '#app',
store,
router,
components: { App },
template: '<App/>'
})
main.js store/index.js (VUEXを定義)
import Vue from 'vue'
import Vuex from 'vuex'
import { actions } from './actions'
import { getters } from './getters'
import { state, mutations } from './mutations'
import { cart } from './cart'
Vue.use(Vuex)
export default new Vuex.Store({
actions,
getters,
state,
mutations,
modules: {
cart: cart
}
})
- 45.
45
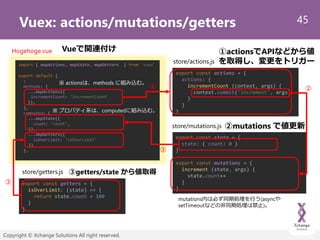
Copyright © XchangeSolutions All right reserved.
Vuex: actions/mutations/getters
export const actions = {
actions: {
incrementCount (context, args) {
context.commit('increment', args)
}
}
}
export const state = {
state: { count: 0 }
}
export const mutations = {
increment (state, args) {
state.count++
}
}
export const getters = {
isOverLimit: (state) => {
return state.count > 100
}
}
store/actions.js
store/mutations.js
store/getters.js
import { mapActions, mapState, mapGetters } from 'vuex’
export default {
:
methods: {
...mapActions({
incrementCount: 'incrementCount‘
}),
},
computed: {
...mapState({
count: 'count',
}),
...mapGetters({
isOverLimit: 'isOverLimit'
})
},
※ actionsは、methods に組み込む。
Hogehoge.vue
③getters/state から値取得
①actionsでAPIなどから値
を取得し、変更をトリガー
②mutations で値更新
mutations内は必ず同期処理を行う(asyncや
setTimeoutなどの非同期処理は禁止)。
Vueで関連付け
① ②
③
③
※ プロパティ系は、computedに組み込む。
- 46.
46
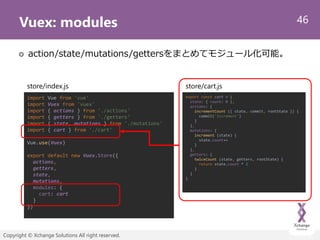
Copyright © XchangeSolutions All right reserved.
Vuex: modules
action/state/mutations/gettersをまとめてモジュール化可能。
export const cart = {
state: { count: 0 },
actions: {
incrementCount ({ state, commit, rootState }) {
commit('increment')
}
},
mutations: {
increment (state) {
state.count++
}
},
getters: {
twiceCount (state, getters, rootState) {
return state.count * 2
}
}
}
store/index.js
import Vue from 'vue'
import Vuex from 'vuex'
import { actions } from './actions'
import { getters } from './getters'
import { state, mutations } from './mutations'
import { cart } from './cart'
Vue.use(Vuex)
export default new Vuex.Store({
actions,
getters,
state,
mutations,
modules: {
cart: cart
}
})
store/cart.js
- 47.
47
Copyright © XchangeSolutions All right reserved.
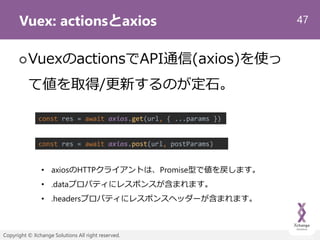
Vuex: actionsとaxios
VuexのactionsでAPI通信(axios)を使っ
て値を取得/更新するのが定石。
const res = await axios.get(url, { ...params })
const res = await axios.post(url, postParams)
• axiosのHTTPクライアントは、Promise型で値を戻します。
• .dataプロパティにレスポンスが含まれます。
• .headersプロパティにレスポンスヘッダーが含まれます。
- 48.
48
Copyright © XchangeSolutions All right reserved.
Vue-Router
画面遷移情報を定義する。
router/index.jsにて設定。
import Vue from 'vue'
import Router from 'vue-router'
import HelloWorld from '@/components/HelloWorld'
Vue.use(Router)
export default new Router({
routes: [
{
path: '/',
name: 'HelloWorld',
component: HelloWorld
}
]
})
// The Vue build version to load with
the `import` command
// (runtime-only or standalone) has been
set in webpack.base.conf with an alias.
import Vue from 'vue'
import App from './App'
import store from './store'
import router from './router'
Vue.config.productionTip = false
/* eslint-disable no-new */
new Vue({
el: '#app',
store,
router,
components: { App },
template: '<App/>'
})
main.js route/index.js
path, name, 対応する component を
指定します。
- 49.
49
Copyright © XchangeSolutions All right reserved.
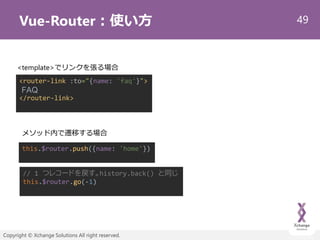
Vue-Router:使い方
<router-link :to="{name: 'faq'}">
FAQ
</router-link>
<template>でリンクを張る場合
メソッド内で遷移する場合
// 1 つレコードを戻す。history.back() と同じ
this.$router.go(-1)
this.$router.push({name: 'home'})
- 50.
50
Copyright © XchangeSolutions All right reserved.
Vue-Route: スクロール処理
export default new Router({
routes: [
:
],
scrollBehavior (to, from, savedPosition) {
if (to.name === 'home') {
return { x: 0, y: 0 }
}
// ハッシュタグが指定されているときは、セレクターを指定して移動
if (to.hash) {
return {
selector: to.hash
// , offset: { x: 0, y: 10 }
}
}
// 望みのポジションを返す
if (savedPosition) {
return savedPosition
} else {
return { x: 0, y: 0 }
}
}
})
route/index.js
- 51.
51
Copyright © XchangeSolutions All right reserved.
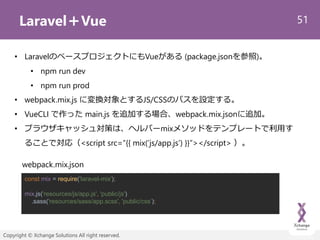
Laravel+Vue
const mix = require('laravel-mix');
mix.js('resources/js/app.js', 'public/js')
.sass('resources/sass/app.scss', 'public/css’);
• LaravelのベースプロジェクトにもVueがある (package.jsonを参照)。
• npm run dev
• npm run prod
• webpack.mix.js に変換対象とするJS/CSSのパスを設定する。
• VueCLI で作った main.js を追加する場合、webpack.mix.jsonに追加。
• ブラウザキャッシュ対策は、ヘルパーmixメソッドをテンプレートで利用す
ることで対応(<script src=“{{ mix(‘js/app.js’) }}”></script> )。
webpack.mix.json
- 52.
52
Copyright © XchangeSolutions All right reserved.
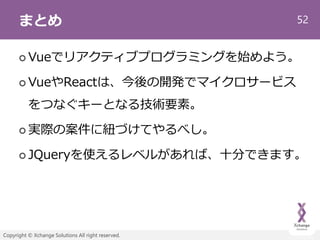
まとめ
Vueでリアクティブプログラミングを始めよう。
VueやReactは、今後の開発でマイクロサービス
をつなぐキーとなる技術要素。
実際の案件に紐づけてやるべし。
JQueryを使えるレベルがあれば、十分できます。
- 53.
- 54.


![29
Copyright © Xchange Solutions All right reserved.
<template>:v-bind
DOM属性を変化させるときに利用。
主にクラス名やスタイルの調整時に利用。
省略記法は :[属性名]。
<a @click="registerForm" v-bind:class="[buttonClickable ? 'btn' : 'btn-disabled’]”>
登録する
</a>
template構文
<a @click="registerForm" :class="[buttonClickable ? 'btn' : 'btn-disabled’]”>
登録する
</a>
template構文(省略記法)
重要!](https://image.slidesharecdn.com/vuefukuokaphpvol31-191029105933/85/Vue-29-320.jpg)
![30
Copyright © Xchange Solutions All right reserved.
<template>:v-for
配列や連想配列を表示する際に利用します。
:keyを必ず指定。
プリミティブな一意性を保つ値を設定。
この値の変化でレンダリングが行われる。
<div v-for="(product, idx) in productList" :key="`product-${idx}`">
<product-list-view :product-item="product" />
</div>
<div v-for="key in Object.keys(productList).reverse()" :key="`product-${idx}`">
<product-list-view :product-item="productList[key]" />
</div>
template構文](https://image.slidesharecdn.com/vuefukuokaphpvol31-191029105933/85/Vue-30-320.jpg)
![31
Copyright © Xchange Solutions All right reserved.
<template>:v-on
イベントを検知するための属性。
v-on:イベント名で記述。
v-on:click (省略記法だと@click)
v-on:change (省略記法だと@change)
<a v-on:click="registerForm" v-bind:class="[buttonClickable ? 'btn' : 'btn-disabled’]”>
登録する
</a>
<a @click="registerForm" :class="[buttonClickable ? 'btn' : 'btn-disabled’]”>
登録する
</a>
template構文
重要!
template構文(省略記法)](https://image.slidesharecdn.com/vuefukuokaphpvol31-191029105933/85/Vue-31-320.jpg)


![41
Copyright © Xchange Solutions All right reserved.
Mixin
コンポーネントのscript部分について土台を
作ってそれを混ぜ込むことが可能。
PHPでいうところのTrait的なもの
export default {
props: {
'cartItem': {
type: Object,
required: true
}
}
:
}
<script>
import BaseCart from ‘./BaseCart'
export default {
name: 'cart-confirm',
mixins: [BaseCart]
:
}
</script>
BaseCart.vue CartConfirm.vue
MIXIN](https://image.slidesharecdn.com/vuefukuokaphpvol31-191029105933/85/Vue-41-320.jpg)
![48
Copyright © Xchange Solutions All right reserved.
Vue-Router
画面遷移情報を定義する。
router/index.jsにて設定。
import Vue from 'vue'
import Router from 'vue-router'
import HelloWorld from '@/components/HelloWorld'
Vue.use(Router)
export default new Router({
routes: [
{
path: '/',
name: 'HelloWorld',
component: HelloWorld
}
]
})
// The Vue build version to load with
the `import` command
// (runtime-only or standalone) has been
set in webpack.base.conf with an alias.
import Vue from 'vue'
import App from './App'
import store from './store'
import router from './router'
Vue.config.productionTip = false
/* eslint-disable no-new */
new Vue({
el: '#app',
store,
router,
components: { App },
template: '<App/>'
})
main.js route/index.js
path, name, 対応する component を
指定します。](https://image.slidesharecdn.com/vuefukuokaphpvol31-191029105933/85/Vue-48-320.jpg)
![50
Copyright © Xchange Solutions All right reserved.
Vue-Route: スクロール処理
export default new Router({
routes: [
:
],
scrollBehavior (to, from, savedPosition) {
if (to.name === 'home') {
return { x: 0, y: 0 }
}
// ハッシュタグが指定されているときは、セレクターを指定して移動
if (to.hash) {
return {
selector: to.hash
// , offset: { x: 0, y: 10 }
}
}
// 望みのポジションを返す
if (savedPosition) {
return savedPosition
} else {
return { x: 0, y: 0 }
}
}
})
route/index.js](https://image.slidesharecdn.com/vuefukuokaphpvol31-191029105933/85/Vue-50-320.jpg)